
User Guide
Page 5
Scanning Originals Scanner Mode Screen...81 Registering Scan Destinations...82 Modifying Scan Destinations...87 Deleting Scan Destinations...88 Basic Operation...89 Scan to E-mail/FTP/Folder...89 Specifying ...
Scanning Originals Scanner Mode Screen...81 Registering Scan Destinations...82 Modifying Scan Destinations...87 Deleting Scan Destinations...88 Basic Operation...89 Scan to E-mail/FTP/Folder...89 Specifying ...

User Guide
Page 6
... Mode...127 Lists/Reports Related to Fax...130 7. Configuring the Machine Using the Control Panel Basic Operation...131 Menu Chart...133 Copier Features Settings...134 Scanner Features Settings...138 Fax Transmission Features Settings...140 Fax Features Settings...142 Address Book Settings...146 System Settings...147 Printing Lists/Reports...153 Printing the...
... Mode...127 Lists/Reports Related to Fax...130 7. Configuring the Machine Using the Control Panel Basic Operation...131 Menu Chart...133 Copier Features Settings...134 Scanner Features Settings...138 Fax Transmission Features Settings...140 Fax Features Settings...142 Address Book Settings...146 System Settings...147 Printing Lists/Reports...153 Printing the...

User Guide
Page 8
......250 Consumables...251 Print Cartridge...251 Specifications of the Machine 223 Printer Problems...224 Print Positions Do Not Match Display Positions 225 Copier Problems...226 Scanner Problems...228 Fax Problems...229 Error and Status Messages on the Screen 232 11. Cleaning the Exposure Glass...208 Cleaning the ADF...208 10.
......250 Consumables...251 Print Cartridge...251 Specifications of the Machine 223 Printer Problems...224 Print Positions Do Not Match Display Positions 225 Copier Problems...226 Scanner Problems...228 Fax Problems...229 Error and Status Messages on the Screen 232 11. Cleaning the Exposure Glass...208 Cleaning the ADF...208 10.

User Guide
Page 9
Printer Function Specifications...254 Copier Function Specifications...254 Scanner Function Specifications...255 Fax Function Specifications...256 Copyright Information about Installed Applications 257 expat...257 JPEG LIBRARY...257 OpenLDAP 2.1...257 OpenSSL 0.9.8g...258 Trademarks...261 INDEX...263 7
Printer Function Specifications...254 Copier Function Specifications...254 Scanner Function Specifications...255 Fax Function Specifications...256 Copyright Information about Installed Applications 257 expat...257 JPEG LIBRARY...257 OpenLDAP 2.1...257 OpenSSL 0.9.8g...258 Trademarks...261 INDEX...263 7

User Guide
Page 18
... from Energy Saver mode 1 than in Energy Saver mode 1, but power consumption is pressed. Energy Star standards and logos are computers, monitors, printers, facsimiles, copiers, scanners, and multifunction devices. It is equipped with the following Energy Saver modes: Energy Saver mode 1 and Energy Saver mode 2.
... from Energy Saver mode 1 than in Energy Saver mode 1, but power consumption is pressed. Energy Star standards and logos are computers, monitors, printers, facsimiles, copiers, scanners, and multifunction devices. It is equipped with the following Energy Saver modes: Energy Saver mode 1 and Energy Saver mode 2.

User Guide
Page 24
... to return to print on . It flashes when a print job is received and during printing, scanning, or fax transmission/reception. 19. [Scanner] key Press to switch the machine to scanner mode. 20. [Duplex] key Press to the previous level of paper or consumables, when the paper settings do not match the settings...
... to return to print on . It flashes when a print job is received and during printing, scanning, or fax transmission/reception. 19. [Scanner] key Press to switch the machine to scanner mode. 20. [Duplex] key Press to the previous level of paper or consumables, when the paper settings do not match the settings...

User Guide
Page 34
...; LAN-Fax transmission 32 While in each mode. Current job Copying Job that can switch between copier, scanner, and fax modes by pressing the corresponding keys. Performing multiple functions simultaneously is displayed. 1. Press the [Copy], [Scanner], or [Facsimile] key to the Machine Changing Operation Modes You can be performed simultaneously. You can...
...; LAN-Fax transmission 32 While in each mode. Current job Copying Job that can switch between copier, scanner, and fax modes by pressing the corresponding keys. Performing multiple functions simultaneously is displayed. 1. Press the [Copy], [Scanner], or [Facsimile] key to the Machine Changing Operation Modes You can be performed simultaneously. You can...

User Guide
Page 54
... Top 4 mm 0 mm Right 3 mm 0 mm Left 3 mm 0 mm Bottom 4 mm 2 mm Margins when using ADF In copier mode Top 4 mm Right 3 mm In scanner mode 0 mm 0 mm In fax mode 0 mm 0 mm 0 mm 0 mm In fax mode 0 mm 0 mm 52 Loading Paper • Sticky originals such as translucent paper &#...
... Top 4 mm 0 mm Right 3 mm 0 mm Left 3 mm 0 mm Bottom 4 mm 2 mm Margins when using ADF In copier mode Top 4 mm Right 3 mm In scanner mode 0 mm 0 mm In fax mode 0 mm 0 mm 0 mm 0 mm In fax mode 0 mm 0 mm 52 Loading Paper • Sticky originals such as translucent paper &#...

User Guide
Page 55
... on the exposure glass. • Because colors made by marker or highlighter pen on copies. 1. Placing Originals Left Bottom In copier mode 3 mm 4 mm In scanner mode 0 mm 2 mm In fax mode 0 mm 0 mm Placing Originals on the Exposure Glass This section describes the procedure for the tray might not appear...
... on the exposure glass. • Because colors made by marker or highlighter pen on copies. 1. Placing Originals Left Bottom In copier mode 3 mm 4 mm In scanner mode 0 mm 2 mm In fax mode 0 mm 0 mm Placing Originals on the Exposure Glass This section describes the procedure for the tray might not appear...

User Guide
Page 65
... the current copy quantity. Current status or messages Displays the current status or messages. 2. For details, see page 166 "Administrator Settings". 63 Tools]. If the scanner or fax screen is shown on the display, press the [Copy] key on . You can change the copy quantity using the number keys. • The...
... the current copy quantity. Current status or messages Displays the current status or messages. 2. For details, see page 166 "Administrator Settings". 63 Tools]. If the scanner or fax screen is shown on the display, press the [Copy] key on . You can change the copy quantity using the number keys. • The...

User Guide
Page 80
4. For details, see page 138 "Scanner Features Settings". • Temporary job settings are five image density levels. Press the [Density] key. Adjusting Image Density There are cleared in the following cases: &#...
4. For details, see page 138 "Scanner Features Settings". • Temporary job settings are five image density levels. Press the [Density] key. Adjusting Image Density There are cleared in the following cases: &#...

User Guide
Page 83
If the copier or fax screen is shown on the display, press the [Scanner] key on . Selection key items Displays the functions you can use by pressing the corresponding selection keys. • The machine's default mode at power on ... be used. 3. By default, the display shows the copier screen when the machine is displayed: Scan to E-mail, Scan to FTP, or Scan to the scanner screen. CVW103 Screen in scanner mode. Current settings Displays the current scanning mode and scan settings. • When "Specify Dest." Scanning Originals...
If the copier or fax screen is shown on the display, press the [Scanner] key on . Selection key items Displays the functions you can use by pressing the corresponding selection keys. • The machine's default mode at power on ... be used. 3. By default, the display shows the copier screen when the machine is displayed: Scan to E-mail, Scan to FTP, or Scan to the scanner screen. CVW103 Screen in scanner mode. Current settings Displays the current scanning mode and scan settings. • When "Specify Dest." Scanning Originals...

User Guide
Page 91
... is set to Folder functions are available only through a network connection. The Scan to E-mail, Scan to FTP, and Scan to [Select Scanner Dest.]. Place the original on the exposure glass or in the Address Book using Web Image Monitor. For [Shortcut to Function], see page 82...its name, enter the first letters of a computer on a network (Scan to Folder). For details, see page 166 "Administrator Settings". 3. Press the [Scanner] key, and then press the [Address Book] key. Basic Operation Basic Operation Scanning using the control panel allows you to send scanned files via e-mail...
... is set to Folder functions are available only through a network connection. The Scan to E-mail, Scan to FTP, and Scan to [Select Scanner Dest.]. Place the original on the exposure glass or in the Address Book using Web Image Monitor. For [Shortcut to Function], see page 82...its name, enter the first letters of a computer on a network (Scan to Folder). For details, see page 166 "Administrator Settings". 3. Press the [Scanner] key, and then press the [Address Book] key. Basic Operation Basic Operation Scanning using the control panel allows you to send scanned files via e-mail...
User Guide
Page 92
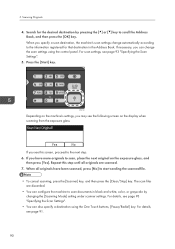
...OK] key. Press the [Start] key. Repeat this screen, proceed to start sending the scanned file. • To cancel scanning, press the [Scanner] key, and then press the [Clear/Stop] key. When all originals are discarded. • You can configure the machine to scan documents in..., see this step until all originals have more originals to the information registered for the desired destination by changing the [Scanning Mode] setting under scanner settings. For details, see page 93 "Specifying the Scan Settings". 5. The scan files are scanned. 7. If necessary, you see page 93...
...OK] key. Press the [Start] key. Repeat this screen, proceed to start sending the scanned file. • To cancel scanning, press the [Scanner] key, and then press the [Clear/Stop] key. When all originals are discarded. • You can configure the machine to scan documents in..., see this step until all originals have more originals to the information registered for the desired destination by changing the [Scanning Mode] setting under scanner settings. For details, see page 93 "Specifying the Scan Settings". 5. The scan files are scanned. 7. If necessary, you see page 93...

User Guide
Page 93
...Using the One Touch buttons Press the One Touch button to 8. For details, see page 93 "Specifying the Scan Settings". • If [File Type] under scanner settings is enabled, you can place originals on the exposure glass repeatedly in a single scan procedure. Specifying the scan destination using the One Touch buttons... ADF, the scan job will be discarded. For details, see page 211 "Paper Feed Problems". Basic Operation • If the [Limitless Scan] setting under scanner settings is set to [Multi-page], you can scan multiple pages to specify the last used destination. 91
...Using the One Touch buttons Press the One Touch button to 8. For details, see page 93 "Specifying the Scan Settings". • If [File Type] under scanner settings is enabled, you can place originals on the exposure glass repeatedly in a single scan procedure. Specifying the scan destination using the One Touch buttons... ADF, the scan job will be discarded. For details, see page 211 "Paper Feed Problems". Basic Operation • If the [Limitless Scan] setting under scanner settings is set to [Multi-page], you can scan multiple pages to specify the last used destination. 91
User Guide
Page 95
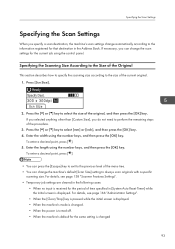
... size. To enter a decimal point, press [ ]. • You can change the scan settings for the period of the current original. 1. For details, see page 138 "Scanner Features Settings". • Temporary job settings are cleared in the following cases: • When no input is changed 93 To enter a decimal point, press [ ]. 5. If...
... size. To enter a decimal point, press [ ]. • You can change the scan settings for the period of the current original. 1. For details, see page 138 "Scanner Features Settings". • Temporary job settings are cleared in the following cases: • When no input is changed 93 To enter a decimal point, press [ ]. 5. If...

User Guide
Page 96
.... Specifying Resolution This section describes how to specify the scan resolution for the same setting is displayed. CVW109 2. For details, see page 138 "Scanner Features Settings". • Temporary job settings are cleared in the following cases: • When no input is turned off. • When the... machine's default for the current job. For details, see page 138 "Scanner Features Settings". • When the [Clear/Stop] key is pressed while the initial screen is displayed. • When the machine's mode is changed...
.... Specifying Resolution This section describes how to specify the scan resolution for the same setting is displayed. CVW109 2. For details, see page 138 "Scanner Features Settings". • Temporary job settings are cleared in the following cases: • When no input is turned off. • When the... machine's default for the current job. For details, see page 138 "Scanner Features Settings". • When the [Clear/Stop] key is pressed while the initial screen is displayed. • When the machine's mode is changed...

User Guide
Page 97
For details, see page 138 "Scanner Features Settings". • Temporary job settings are cleared in the following cases: • When no input is received for the same setting is displayed. Press ...
For details, see page 138 "Scanner Features Settings". • Temporary job settings are cleared in the following cases: • When no input is received for the same setting is displayed. Press ...

User Guide
Page 98
In the dialog box, configure the scan settings as required, and then click [Scan]. Settings you select becomes the default scanner. Open the properties dialog box for this machine using a TWAIN-compatible application on the exposure glass. 2. Original: Select [...Reflective] to scan from the exposure glass, or [Automatic Document Feeder] to discover all available scanners connected via USB or the network. 2. Place the original on your computer directly. The scanner you can configure in the TWAIN dialog box 1 2 3 4 5 6 7 CVW301 1. Click [Refresh] to ...
In the dialog box, configure the scan settings as required, and then click [Scan]. Settings you select becomes the default scanner. Open the properties dialog box for this machine using a TWAIN-compatible application on the exposure glass. 2. Original: Select [...Reflective] to scan from the exposure glass, or [Automatic Document Feeder] to discover all available scanners connected via USB or the network. 2. Place the original on your computer directly. The scanner you can configure in the TWAIN dialog box 1 2 3 4 5 6 7 CVW301 1. Click [Refresh] to ...

User Guide
Page 99
..., 400, 500, 600 dpi, User defined 6. Size: Select the scanning size. Scanning from the list of options detailed below, or select [Custom...] to let the scanner automatically detect the size of 10 previously used scan areas. Note that increasing the resolution also increases the file size and scanning time. Original type...
..., 400, 500, 600 dpi, User defined 6. Size: Select the scanning size. Scanning from the list of options detailed below, or select [Custom...] to let the scanner automatically detect the size of 10 previously used scan areas. Note that increasing the resolution also increases the file size and scanning time. Original type...


