User Guide
Page 5
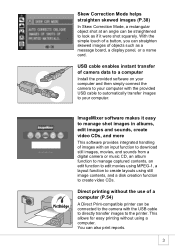
... (P.38) In Skew Correction Mode, a rectangular object shot at an angle can be connected to the camera with an input function to download still images, movies, and sounds from a digital camera or music CD, an album function to manage captured contents, an edit function to edit movies using MPEG... creation function to create video CDs. This allows for easy printing without the use of camera data to a computer Install the provided software on your computer and then simply connect the camera to your computer with the provided USB cable to automatically transfer images to manage shot images...
... (P.38) In Skew Correction Mode, a rectangular object shot at an angle can be connected to the camera with an input function to download still images, movies, and sounds from a digital camera or music CD, an album function to manage captured contents, an edit function to edit movies using MPEG... creation function to create video CDs. This allows for easy printing without the use of camera data to a computer Install the provided software on your computer and then simply connect the camera to your computer with the provided USB cable to automatically transfer images to manage shot images...
User Guide
Page 37
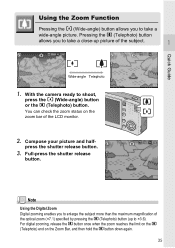
...the z (Telephoto) button (up picture of the LCD monitor. 2. press the shutter release button. 3. Note Using the Digital Zoom Digital zooming enables you to take a wide-angle picture. For digital zooming, release the z button once when the zoom reaches the limit on the z (Telephoto) end on the zoom bar ...of the subject. Quick Guide Using the Zoom Function Pressing the Z (Wide-angle) button allows you to take a close-up to ×3.6). With the camera ready to...
...the z (Telephoto) button (up picture of the LCD monitor. 2. press the shutter release button. 3. Note Using the Digital Zoom Digital zooming enables you to take a wide-angle picture. For digital zooming, release the z button once when the zoom reaches the limit on the z (Telephoto) end on the zoom bar ...of the subject. Quick Guide Using the Zoom Function Pressing the Z (Wide-angle) button allows you to take a close-up to ×3.6). With the camera ready to...
User Guide
Page 38
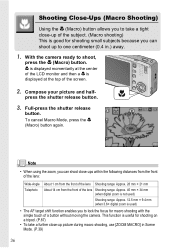
... Approx. 28 mm × 21 mm About 14 cm from the front of the lens Shooting range: Approx. 45 mm × 34 mm (when digital zoom is not used ) • The AF target shift function enables you to lock the focus for macro shooting with the simple touch of the... Macro Mode, press the N (Macro) button again. Full-press the shutter release button. N is displayed momentarily at the top of a button without moving the camera. With the camera ready to shoot, press the N (Macro) button. press the shutter release button. 3. Shooting Close-Ups (Macro Shooting) Using the N (Macro) button allows you...
... Approx. 28 mm × 21 mm About 14 cm from the front of the lens Shooting range: Approx. 45 mm × 34 mm (when digital zoom is not used ) • The AF target shift function enables you to lock the focus for macro shooting with the simple touch of the... Macro Mode, press the N (Macro) button again. Full-press the shutter release button. N is displayed momentarily at the top of a button without moving the camera. With the camera ready to shoot, press the N (Macro) button. press the shutter release button. 3. Shooting Close-Ups (Macro Shooting) Using the N (Macro) button allows you...
User Guide
Page 56
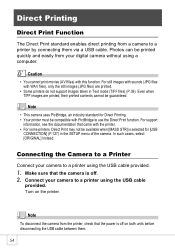
... PictBridge to a printer by connecting them . 54 For still images with sounds (JPG files with this function. Connecting the Camera to a Printer Connect your camera to a printer using the USB cable provided. Connect your digital camera without using the USB cable provided. 1. Caution • You cannot print movies (AVI files) with WAV files), only...
... PictBridge to a printer by connecting them . 54 For still images with sounds (JPG files with this function. Connecting the Camera to a Printer Connect your camera to a printer using the USB cable provided. Connect your digital camera without using the USB cable provided. 1. Caution • You cannot print movies (AVI files) with WAV files), only...
User Guide
Page 96
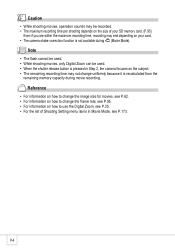
...to change the image size for movies, see P.62. • For information on how to use the Digital Zoom, see P.35. • For the list of your card. • The camera shake correction function is recalculated from the remaining memory capacity during 3 (Movie Mode). Caution • While ..., operation sounds may be used . • While shooting movies, only Digital Zoom can be recorded. • The maximum recording time per shooting depends on the size of Shooting Setting menu items in Step 2, the camera focuses on the subject. • The remaining recording time may end depending...
...to change the image size for movies, see P.62. • For information on how to use the Digital Zoom, see P.35. • For the list of your card. • The camera shake correction function is recalculated from the remaining memory capacity during 3 (Movie Mode). Caution • While ..., operation sounds may be used . • While shooting movies, only Digital Zoom can be recorded. • The maximum recording time per shooting depends on the size of Shooting Setting menu items in Step 2, the camera focuses on the subject. • The remaining recording time may end depending...
User Guide
Page 106
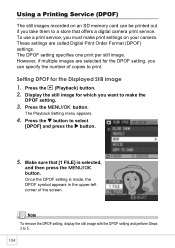
However, if multiple images are called Digital Print Order Format (DPOF) settings. Setting DPOF for which you must make the DPOF setting. 3. Press the C/D button. Using a Printing Service (DPOF) The still images recorded on your camera. To use a print service, you want to make print settings on an SD ... of copies to print. The DPOF setting specifies one print per still image. The Playback Setting menu appears. 4. Make sure that offers a digital camera print service. Press the 6 (Playback) button. 2. Display the still image for the Displayed Still Image 1.
However, if multiple images are called Digital Print Order Format (DPOF) settings. Setting DPOF for which you must make the DPOF setting. 3. Press the C/D button. Using a Printing Service (DPOF) The still images recorded on your camera. To use a print service, you want to make print settings on an SD ... of copies to print. The DPOF setting specifies one print per still image. The Playback Setting menu appears. 4. Make sure that offers a digital camera print service. Press the 6 (Playback) button. 2. Display the still image for the Displayed Still Image 1.
User Guide
Page 122
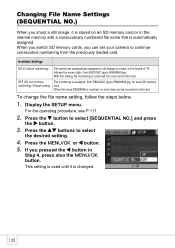
When you switch SD memory cards, you take, in the format of "R" followed by seven digits, from one card to the next. Press the !" buttons to select [SEQUENTIAL NO.] and press the $ button. 3. To change the file name setting, follow the ... to select the desired setting. 4. Changing File Name Settings (SEQUENTIAL NO.) When you shoot a still image, it is reached, no more data can set your camera to continue consecutive numbering from RIMG0001.jpg to RIMG9999.jpg, for each SD memory card. Press the C/D or # button. 5. With this setting, file numbering is...
When you switch SD memory cards, you take, in the format of "R" followed by seven digits, from one card to the next. Press the !" buttons to select [SEQUENTIAL NO.] and press the $ button. 3. To change the file name setting, follow the ... to select the desired setting. 4. Changing File Name Settings (SEQUENTIAL NO.) When you shoot a still image, it is reached, no more data can set your camera to continue consecutive numbering from RIMG0001.jpg to RIMG9999.jpg, for each SD memory card. Press the C/D or # button. 5. With this setting, file numbering is...
User Guide
Page 134
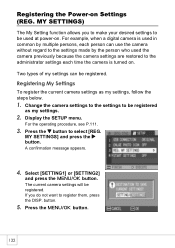
... to register them, press the DISP. Two types of my settings can use the camera without regard to the settings made by the person who used the camera previously because the camera settings are restored to the administrator settings each person can be registered as my settings,...MY SETTINGS] and press the $ button. A confirmation message appears. 4. Display the SETUP menu. For example, when a digital camera is used at power-on. button. 5. Change the camera settings to the settings to be registered. MY SETTINGS) The My Setting function allows you do not want to select [REG...
... to register them, press the DISP. Two types of my settings can use the camera without regard to the settings made by the person who used the camera previously because the camera settings are restored to the administrator settings each person can be registered as my settings,...MY SETTINGS] and press the $ button. A confirmation message appears. 4. Display the SETUP menu. For example, when a digital camera is used at power-on. button. 5. Change the camera settings to the settings to be registered. MY SETTINGS) The My Setting function allows you do not want to select [REG...
User Guide
Page 146
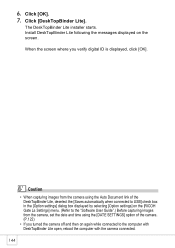
Install DeskTopBinder Lite following the messages displayed on the [RICOH Gate La Settings] menu. (Refer to the "Software User Guide".) Before capturing images from the camera using the Auto Document link of the DeskTopBinder Lite, deselect the [Saves automatically when connected to...by selecting [Option settings] on the screen. Caution • When capturing images from the camera, set the date and time using the [DATE SETTINGS] option of the camera. (P.122) • If you verify digital ID is displayed, click [OK]. The DeskTopBinder Lite installer starts. Click [DeskTopBinder Lite]. ...
Install DeskTopBinder Lite following the messages displayed on the [RICOH Gate La Settings] menu. (Refer to the "Software User Guide".) Before capturing images from the camera using the Auto Document link of the DeskTopBinder Lite, deselect the [Saves automatically when connected to...by selecting [Option settings] on the screen. Caution • When capturing images from the camera, set the date and time using the [DATE SETTINGS] option of the camera. (P.122) • If you verify digital ID is displayed, click [OK]. The DeskTopBinder Lite installer starts. Click [DeskTopBinder Lite]. ...
User Guide
Page 160
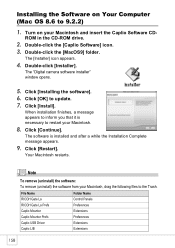
...(Mac OS 8.6 to restart your Macintosh. 8. Double-click the [Caplio Software] icon. 3. The [Installer] icon appears. 4. The "Digital camera software installer" window opens. 5. Click [Installing the software]. 6. Click [Continue]. Note To remove (uninstall) the software: To remove (...uninstall) the software from your Macintosh, drag the following files to update. 7. File Name RICOH Gate La Folder Name Control Panels RICOH Gate La Prefs Caplio Mounter Caplio Mounter Prefs Preferences Extensions Preferences Caplio USB Driver Caplio LIB Extensions Extensions ...
...(Mac OS 8.6 to restart your Macintosh. 8. Double-click the [Caplio Software] icon. 3. The [Installer] icon appears. 4. The "Digital camera software installer" window opens. 5. Click [Installing the software]. 6. Click [Continue]. Note To remove (uninstall) the software: To remove (...uninstall) the software from your Macintosh, drag the following files to update. 7. File Name RICOH Gate La Folder Name Control Panels RICOH Gate La Prefs Caplio Mounter Caplio Mounter Prefs Preferences Extensions Preferences Caplio USB Driver Caplio LIB Extensions Extensions ...
User Guide
Page 169
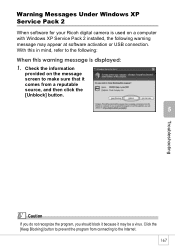
..., you should block it because it comes from connecting to the Internet. 167 Troubleshooting Warning Messages Under Windows XP Service Pack 2 When software for your Ricoh digital camera is displayed: 1. Click the [Keep Blocking] button to prevent the program from a reputable source, and then click the [Unblock] button.
..., you should block it because it comes from connecting to the Internet. 167 Troubleshooting Warning Messages Under Windows XP Service Pack 2 When software for your Ricoh digital camera is displayed: 1. Click the [Keep Blocking] button to prevent the program from a reputable source, and then click the [Unblock] button.

User Guide
Page 171
...215; 1 External (AC adapter): 3.8 V External Dimensions 95.0 mm (W) × 53.0 mm (H) × 26.0 mm (D) (excluding projecting parts) Weight Camera: Approximately 135 g (excluding battery, strap) Accessories: Approximately 30 g (battery, strap) Tripod Hole Shape 1/4-20UNC Operating Temperature Range 0 qC to 40 qC Operating ...85% or less Storage Temperature Range -20 qC to 60 qC Camera Parts Image Pickup Element Lens • Lens • Focal Length • Shooting Distance • Macro Shooting Distance • Digital Zoom Monitor Display Parts • Screen Size • Type ...
...215; 1 External (AC adapter): 3.8 V External Dimensions 95.0 mm (W) × 53.0 mm (H) × 26.0 mm (D) (excluding projecting parts) Weight Camera: Approximately 135 g (excluding battery, strap) Accessories: Approximately 30 g (battery, strap) Tripod Hole Shape 1/4-20UNC Operating Temperature Range 0 qC to 40 qC Operating ...85% or less Storage Temperature Range -20 qC to 60 qC Camera Parts Image Pickup Element Lens • Lens • Focal Length • Shooting Distance • Macro Shooting Distance • Digital Zoom Monitor Display Parts • Screen Size • Type ...
User Guide
Page 183
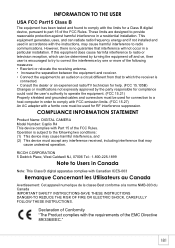
...interference that may cause harmful interference to radio communications. Declaration of Conformity "The Product complies with the requirements of the FCC Rules. RICOH CORPORATION 5 Dedrick Place, West Caldwell NJ, 07006 Tel.: 1-800-225-1899 Note to Users in a particular installation. If this... DANGER-TO REDUCE THE RISK OF FIRE OR ELECTRIC SHOCK, CAREFULLY FOLLOW THESE INSTRUCTIONS. COMPLIANCE INFORMATION STATEMENT Product Name: DIGITAL CAMERA Model Number: Caplio R4 This device complies with Part 15 of the following two conditions: (1) This device may cause harmful interference, and (2)...
...interference that may cause harmful interference to radio communications. Declaration of Conformity "The Product complies with the requirements of the FCC Rules. RICOH CORPORATION 5 Dedrick Place, West Caldwell NJ, 07006 Tel.: 1-800-225-1899 Note to Users in a particular installation. If this... DANGER-TO REDUCE THE RISK OF FIRE OR ELECTRIC SHOCK, CAREFULLY FOLLOW THESE INSTRUCTIONS. COMPLIANCE INFORMATION STATEMENT Product Name: DIGITAL CAMERA Model Number: Caplio R4 This device complies with Part 15 of the following two conditions: (1) This device may cause harmful interference, and (2)...

User Guide
Page 184
... B Backlighting 80 Battery 16 Battery Charger 10, 19 Battery Level Indication 17 Battery/Card Cover 13, 20 BEEP SOUND 117 C Camera shake 28 Camera Shake Correction Button .......... 12, 29 Caplio Mounter 155 Caplio Software CD-ROM 11, 137, 155 Card Reader 150 Charging 19 COLOR... DEPTH 71 CONT 89 COPY TO CARD 108 D DATE IMPRINT 79 DATE SETTINGS 24, 122 Delete 50 Delete/Self-timer Button 13, 50, 88 DENSITY 86 DeskTopBinder Lite 138 Digital...
... B Backlighting 80 Battery 16 Battery Charger 10, 19 Battery Level Indication 17 Battery/Card Cover 13, 20 BEEP SOUND 117 C Camera shake 28 Camera Shake Correction Button .......... 12, 29 Caplio Mounter 155 Caplio Software CD-ROM 11, 137, 155 Card Reader 150 Charging 19 COLOR... DEPTH 71 CONT 89 COPY TO CARD 108 D DATE IMPRINT 79 DATE SETTINGS 24, 122 Delete 50 Delete/Self-timer Button 13, 50, 88 DENSITY 86 DeskTopBinder Lite 138 Digital...
User Guide
Page 188
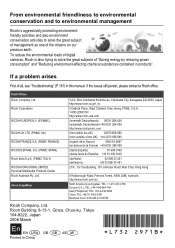
...USA GB GB AE AE Printed in this manual. From environmental friendliness to environmental conservation and to environmental management Ricoh is also trying to solve the great subjects of "Saving energy by reducing power consumption" and "Reducing ...161) in China Ricoh Corporation RICOH EUROPE B.V. (EPMMC) RICOH UK LTD. (PMMC UK) RICOH FRANCE S.A. (PMMC FRANCE) RICOH ESPANA, S.A. (PMMC SPAIN) Ricoh Italia S.p.A. (PMMC ITALY) RICOH HONG KONG LIMITED Personal Multimedia Products Center Ricoh Australia Pty. If a problem arises First of digital cameras, Ricoh is aggressively promoting ...
...USA GB GB AE AE Printed in this manual. From environmental friendliness to environmental conservation and to environmental management Ricoh is also trying to solve the great subjects of "Saving energy by reducing power consumption" and "Reducing ...161) in China Ricoh Corporation RICOH EUROPE B.V. (EPMMC) RICOH UK LTD. (PMMC UK) RICOH FRANCE S.A. (PMMC FRANCE) RICOH ESPANA, S.A. (PMMC SPAIN) Ricoh Italia S.p.A. (PMMC ITALY) RICOH HONG KONG LIMITED Personal Multimedia Products Center Ricoh Australia Pty. If a problem arises First of digital cameras, Ricoh is aggressively promoting ...

