User Guide
Page 4
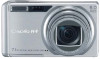
...adjustments with minimum steps for easy focus locking even on a trip or at 30 frames per second and with a long-lasting, highcapacity rechargeable battery for longer periods of a button, without moving the camera itself. It allows you can also assign a function as the exposure compensation and ...high-quality movies with sound (P.93) Record high-quality movies with 320 × 240 pixels at work. Equipped with a powerful longlasting rechargeable battery (P.16) This camera comes with full sound. Scene Mode enables easy shooting (P.38) In Scene Mode, you to lock the focus with the...
...adjustments with minimum steps for easy focus locking even on a trip or at 30 frames per second and with a long-lasting, highcapacity rechargeable battery for longer periods of a button, without moving the camera itself. It allows you can also assign a function as the exposure compensation and ...high-quality movies with sound (P.93) Record high-quality movies with 320 × 240 pixels at work. Equipped with a powerful longlasting rechargeable battery (P.16) This camera comes with full sound. Scene Mode enables easy shooting (P.38) In Scene Mode, you to lock the focus with the...
User Guide
Page 6
... ...10 Names of Parts...12 LCD Monitor Display ...14 Getting Ready to Shoot 16 About the Battery...16 Battery Level Indication 17 SD Memory Card (available in stores 18 Charging the Rechargeable Battery 19 Loading the Rechargeable Battery and SD Memory Card 20 Turning the Power On/Off 22 Setting the Language 23 Setting...
... ...10 Names of Parts...12 LCD Monitor Display ...14 Getting Ready to Shoot 16 About the Battery...16 Battery Level Indication 17 SD Memory Card (available in stores 18 Charging the Rechargeable Battery 19 Loading the Rechargeable Battery and SD Memory Card 20 Turning the Power On/Off 22 Setting the Language 23 Setting...

User Guide
Page 12
Before Shooting Packing List Open the package and make sure all the items are included. • Caplio R4 • Rechargeable Battery • Battery Charger • AV Cable Used when viewing your images on a TV. • USB Cable Used to connect the camera to the camera Thread the small end of the strap through the strap eyelet on the camera and loop the ends as shown. • Handstrap The serial number of the camera is provided on the bottom face of the camera. 10 Note Attaching the hand strap to a computer or Direct Print-compatible printer.
Before Shooting Packing List Open the package and make sure all the items are included. • Caplio R4 • Rechargeable Battery • Battery Charger • AV Cable Used when viewing your images on a TV. • USB Cable Used to connect the camera to the camera Thread the small end of the strap through the strap eyelet on the camera and loop the ends as shown. • Handstrap The serial number of the camera is provided on the bottom face of the camera. 10 Note Attaching the hand strap to a computer or Direct Print-compatible printer.
User Guide
Page 13
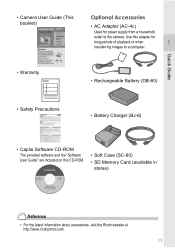
... the camera. Use this adapter for power supply from a household outlet to a computer. • Warranty • Rechargeable Battery (DB-60) • Safety Precautions • Battery Charger (BJ-6) • Caplio Software CD-ROM The provided software and the "Software User Guide" are included on this ...CD-ROM. • Soft Case (SC-60) • SD Memory Card (available in stores) Reference • For the latest information about accessories, visit the Ricoh ...
... the camera. Use this adapter for power supply from a household outlet to a computer. • Warranty • Rechargeable Battery (DB-60) • Safety Precautions • Battery Charger (BJ-6) • Caplio Software CD-ROM The provided software and the "Software User Guide" are included on this ...CD-ROM. • Soft Case (SC-60) • SD Memory Card (available in stores) Reference • For the latest information about accessories, visit the Ricoh ...
User Guide
Page 15
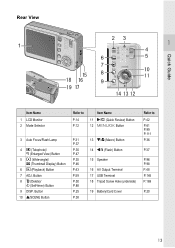
... #/F (Flash) Button P.47 P.35 15 Speaker P.46 P.43 16 AV Output Terminal P.59 17 USB Terminal P.50 18 Tripod Screw Hole (underside) P.88 P.25 19 Battery/Card Cover P.38 Refer to P.42 P.61 P.99 P.111 P.36 P.37 P.96 P.98 P.48 P.145 P.169 P.20 13 Rear View Quick Guide Item Name 1 LCD...
... #/F (Flash) Button P.47 P.35 15 Speaker P.46 P.43 16 AV Output Terminal P.59 17 USB Terminal P.50 18 Tripod Screw Hole (underside) P.88 P.25 19 Battery/Card Cover P.38 Refer to P.42 P.61 P.99 P.111 P.36 P.37 P.96 P.98 P.48 P.145 P.169 P.20 13 Rear View Quick Guide Item Name 1 LCD...
User Guide
Page 16
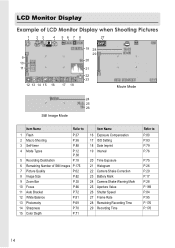
... Depth P.71 Item Name 16 Exposure Compensation 17 ISO Setting 18 Date Imprint 19 Interval 20 Time Exposure 21 Histogram 22 Camera Shake Correction 23 Battery Mark 24 Camera Shake Warning Mark 25 Aperture Value 26 Shutter Speed 27 Frame Rate 28 Remaining Recording Time 29 Recording Time Refer to P.80...
... Depth P.71 Item Name 16 Exposure Compensation 17 ISO Setting 18 Date Imprint 19 Interval 20 Time Exposure 21 Histogram 22 Camera Shake Correction 23 Battery Mark 24 Camera Shake Warning Mark 25 Aperture Value 26 Shutter Speed 27 Frame Rate 28 Remaining Recording Time 29 Recording Time Refer to P.80...
User Guide
Page 17
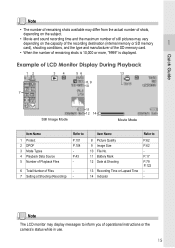
... Playback Files 6 Total Number of remaining shots is 10,000 or more, "9999" is displayed. Item Name 8 Picture Quality 9 Image Size 10 File No. 11 Battery Mark 12 Date at Shooting (Recording) Refer to P.62 P.62 P.17 P.79 P.122 - Note The LCD monitor may vary depending on the subject. • Movie...
... Playback Files 6 Total Number of remaining shots is 10,000 or more, "9999" is displayed. Item Name 8 Picture Quality 9 Image Size 10 File No. 11 Battery Mark 12 Date at Shooting (Recording) Refer to P.62 P.62 P.17 P.79 P.122 - Note The LCD monitor may vary depending on the subject. • Movie...
User Guide
Page 18
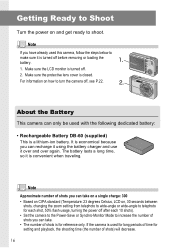
... zoom setting from telephoto to wide-angle or wide-angle to telephoto for reference only. It is economical because you can recharge it using the battery charger and use it is convenient when traveling. If the camera is used this camera, follow the steps below to turn the camera off before... removing or loading the battery. 1. The battery lasts a long time, so it over and over again. Getting Ready to Shoot Turn the power on and get ready to increase the number...
... zoom setting from telephoto to wide-angle or wide-angle to telephoto for reference only. It is economical because you can recharge it using the battery charger and use it is convenient when traveling. If the camera is used this camera, follow the steps below to turn the camera off before... removing or loading the battery. 1. The battery lasts a long time, so it over and over again. Getting Ready to Shoot Turn the power on and get ready to increase the number...
User Guide
Page 19
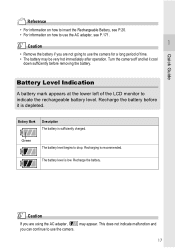
... P.20. • For information on how to drop. Recharge the battery before it cool down sufficiently before removing the battery. Caution • Remove the battery if you can continue to indicate the rechargeable battery level. The battery level is sufficiently charged. Recharge the battery. Recharging is depleted. Turn the camera off and let it is recommended...
... P.20. • For information on how to drop. Recharge the battery before it cool down sufficiently before removing the battery. Caution • Remove the battery if you can continue to indicate the rechargeable battery level. The battery level is sufficiently charged. Recharge the battery. Recharging is depleted. Turn the camera off and let it is recommended...

User Guide
Page 21
... Off Flashing Description Charging started Charging complete Battery charger or battery may be charged before use. 1. Plug the battery charger into an outlet. The battery label should face up. Depending on the battery charger. Quick Guide Charging the Rechargeable Battery The rechargeable battery needs to reverse the and sides. 2. Insert the battery, making sure that the and markings...
... Off Flashing Description Charging started Charging complete Battery charger or battery may be charged before use. 1. Plug the battery charger into an outlet. The battery label should face up. Depending on the battery charger. Quick Guide Charging the Rechargeable Battery The rechargeable battery needs to reverse the and sides. 2. Insert the battery, making sure that the and markings...
User Guide
Page 22
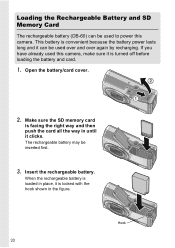
..., it is facing the right way and then push the card all the way in the figure. Hook 20 Loading the Rechargeable Battery and SD Memory Card The rechargeable battery (DB-60) can be used over and over again by recharging. Make sure the SD memory card is locked with the hook... shown in until it can be inserted first. 3. Open the battery/card cover. 2. This battery is turned off before loading the battery and card. 1. If you have already used to power this camera, make sure it is convenient because the...
..., it is facing the right way and then push the card all the way in the figure. Hook 20 Loading the Rechargeable Battery and SD Memory Card The rechargeable battery (DB-60) can be used over and over again by recharging. Make sure the SD memory card is locked with the hook... shown in until it can be inserted first. 3. Open the battery/card cover. 2. This battery is turned off before loading the battery and card. 1. If you have already used to power this camera, make sure it is convenient because the...

User Guide
Page 23
... used with another camera, be ejected. Push in a dry cool place. • Use the battery charger (BJ-6) to format an SD memory card, see P.112. 21 Caution • Remove the rechargeable battery if you are not going to use the camera for a long period of time. • ... cover. Pull the card out of the camera. Close the battery/card cover and slide it from the camera. Quick Guide Removing the Rechargeable Battery Open the battery/card cover. Release the hook that locks the rechargeable battery. Pull the battery out of the camera. Reference For information on the card before ...
... used with another camera, be ejected. Push in a dry cool place. • Use the battery charger (BJ-6) to format an SD memory card, see P.112. 21 Caution • Remove the rechargeable battery if you are not going to use the camera for a long period of time. • ... cover. Pull the card out of the camera. Close the battery/card cover and slide it from the camera. Quick Guide Removing the Rechargeable Battery Open the battery/card cover. Release the hook that locks the rechargeable battery. Pull the battery out of the camera. Reference For information on the card before ...

User Guide
Page 26
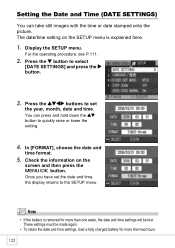
..., month, date and time. Setting the Date and Time When the power is turned on how to set . Setting at shipping Note • If the battery is set the date and time, see P.122. • For information on for more than two hours. The date is removed for more than one... week, the date and time settings will be made again. • To retain the date and time settings, load a fully charged battery for the first time, the date/ time setting screen appears. 1. Press the !"#$ buttons to cancel the setting. These settings must be lost. and move the...
..., month, date and time. Setting the Date and Time When the power is turned on how to set . Setting at shipping Note • If the battery is set the date and time, see P.122. • For information on for more than two hours. The date is removed for more than one... week, the date and time settings will be made again. • To retain the date and time settings, load a fully charged battery for the first time, the date/ time setting screen appears. 1. Press the !"#$ buttons to cancel the setting. These settings must be lost. and move the...
User Guide
Page 79
However, the Interval Shooting setting is set to quickly raise or lower the minute setting. • If the battery is recommended. • If you can press and hold either the !" After shooting, once the time specified in Interval Shooting elapses, the next shot is ...
However, the Interval Shooting setting is set to quickly raise or lower the minute setting. • If the battery is recommended. • If you can press and hold either the !" After shooting, once the time specified in Interval Shooting elapses, the next shot is ...

User Guide
Page 118
... made here are not valid and Auto Power Off does not work when the camera is used until it will shut off automatically to conserve battery power (Auto Power Off). You can change the Auto Power Off setting, follow the steps below. 1. For the operating procedure, see P.111. 2. By default, Auto...
... made here are not valid and Auto Power Off does not work when the camera is used until it will shut off automatically to conserve battery power (Auto Power Off). You can change the Auto Power Off setting, follow the steps below. 1. For the operating procedure, see P.111. 2. By default, Auto...
User Guide
Page 124
... menu. Once you have set the year, month, date and time. Press the !"#$ buttons to quickly raise or lower the setting. 4. Note • If the battery is explained here. 1. Display the SETUP menu. For the operating procedure, see P.111. 2. button to set the date and time, the display returns to select... for more than one week, the date and time settings will be made again. • To retain the date and time settings, load a fully charged battery for more than two hours. 122
... menu. Once you have set the year, month, date and time. Press the !"#$ buttons to quickly raise or lower the setting. 4. Note • If the battery is explained here. 1. Display the SETUP menu. For the operating procedure, see P.111. 2. button to set the date and time, the display returns to select... for more than one week, the date and time settings will be made again. • To retain the date and time settings, load a fully charged battery for more than two hours. 122
User Guide
Page 163
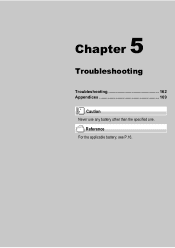
Reference For the applicable battery, see P.16. 5 Chapter Troubleshooting Troubleshooting 162 Appendices 169 Caution Never use any battery other than the specified one.
Reference For the applicable battery, see P.16. 5 Chapter Troubleshooting Troubleshooting 162 Appendices 169 Caution Never use any battery other than the specified one.
User Guide
Page 164
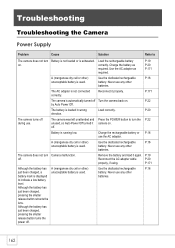
... and Press the POWER button to turn the P.22 unused, so Auto Power Off turned it again. battery. Battery is not loaded or is automatically turned off Turn the camera back on. Use the AC adapter as required. The...Use the dedicated rechargeable P.16 unacceptable battery is displayed batteries. The camera turns off . 162 Remove the battery and load it camera on . P.171 Although the battery has A (manganese dry cell or other battery mark is used . Charge the battery as required. battery. Although the battery has just been charged, pressing ...
... and Press the POWER button to turn the P.22 unused, so Auto Power Off turned it again. battery. Battery is not loaded or is automatically turned off Turn the camera back on. Use the AC adapter as required. The...Use the dedicated rechargeable P.16 unacceptable battery is displayed batteries. The camera turns off . 162 Remove the battery and load it camera on . P.171 Although the battery has A (manganese dry cell or other battery mark is used . Charge the battery as required. battery. Although the battery has just been charged, pressing ...
User Guide
Page 165
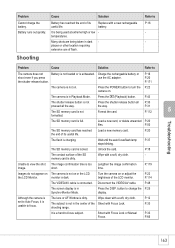
.... Press the 6 (Playback) button. Format the card. P.50 The SD memory card has reached Load a new memory card. Shoot with a new rechargeable battery. The camera is not on or adjust the brightness of the SD Wipe with a soft, dry cloth. - P.31 The SD memory card is charging. The...the VIDEO/AV cable. P.43 The shutter release button is dirty. Press the DISP. Wipe clean with Focus Lock. Problem Cannot charge the battery. Charge the rechargeable battery or shoot even if you press use of the Shoot with a soft, dry cloth. P.20 the end of its useful life. short....
.... Press the 6 (Playback) button. Format the card. P.50 The SD memory card has reached Load a new memory card. Shoot with a new rechargeable battery. The camera is not on or adjust the brightness of the SD Wipe with a soft, dry cloth. - P.31 The SD memory card is charging. The...the VIDEO/AV cable. P.43 The shutter release button is dirty. Press the DISP. Wipe clean with Focus Lock. Problem Cannot charge the battery. Charge the rechargeable battery or shoot even if you press use of the Shoot with a soft, dry cloth. P.20 the end of its useful life. short....
User Guide
Page 166
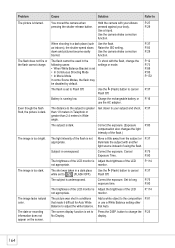
... The flash cannot be used in the following cases: • When White Balance Bracket is running low. P.12 P.73 P.89 P.93 P.172 P.37 Battery is set to your subject and shoot. The distance to the subject is not appropriate. The shot was shot in a dark place while set •... of using the flash. P.37 than 1.8 meters in Telephoto or greater than 2.4 meters in a dark place (such Use the flash. Charge the rechargeable battery or P.16 use a White Balance setting other Balance to change the settings or mode. P.83 down and pictures become easily Use the camera shake correction...
... The flash cannot be used in the following cases: • When White Balance Bracket is running low. P.12 P.73 P.89 P.93 P.172 P.37 Battery is set to your subject and shoot. The distance to the subject is not appropriate. The shot was shot in a dark place while set •... of using the flash. P.37 than 1.8 meters in Telephoto or greater than 2.4 meters in a dark place (such Use the flash. Charge the rechargeable battery or P.16 use a White Balance setting other Balance to change the settings or mode. P.83 down and pictures become easily Use the camera shake correction...