
Manuals
Page 3
... Setting the Machine Using a Computer 19 Preventing an Unauthorized Copy...20 2. TABLE OF CONTENTS How to Read the Manuals...5 Symbols Used in the Manuals...5 Model-Specific Information...6 Names of Programs...35 Turning On/Off the Power...37 Turning On the Main Power...37 Turning Off the Main Power...37 When the...
... Setting the Machine Using a Computer 19 Preventing an Unauthorized Copy...20 2. TABLE OF CONTENTS How to Read the Manuals...5 Symbols Used in the Manuals...5 Model-Specific Information...6 Names of Programs...35 Turning On/Off the Power...37 Turning On the Main Power...37 Turning Off the Main Power...37 When the...

Manuals
Page 7
... following symbols: Indicates points to pay attention to when using . Be sure to originals, or loss of Region A and Region B models are using, see p.6 "Model-Specific Information". 5 For details about which symbol corresponds to the model you are indicated by the symbol that corresponds to the region of the model you...
... following symbols: Indicates points to pay attention to when using . Be sure to originals, or loss of Region A and Region B models are using, see p.6 "Model-Specific Information". 5 For details about which symbol corresponds to the model you are indicated by the symbol that corresponds to the region of the model you...

Manuals
Page 8
CPL004 The following , your machine is region-specific. Read the information under the symbol that identify the region your machine belongs to. The label contains details that corresponds to the region of measure: ... following information is a region B model: • CODE XXXX -17 • 120-127 V • Dimensions in this manual are given in the position shown below. Model-Specific Information This section explains how you can identify the region your machine belongs to.
CPL004 The following , your machine is region-specific. Read the information under the symbol that identify the region your machine belongs to. The label contains details that corresponds to the region of measure: ... following information is a region B model: • CODE XXXX -17 • 120-127 V • Dimensions in this manual are given in the position shown below. Model-Specific Information This section explains how you can identify the region your machine belongs to.

Manuals
Page 24
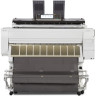
2. Cartridge cover Open to remove misfed paper. 13. See "Cleaning the Platen", Maintenance and Specifications . 10. Rewind button Press this area if the back of your originals. 7. Front cover This is feeding in slanted, or to the size of the ...
2. Cartridge cover Open to remove misfed paper. 13. See "Cleaning the Platen", Maintenance and Specifications . 10. Rewind button Press this area if the back of your originals. 7. Front cover This is feeding in slanted, or to the size of the ...
Manuals
Page 28
... Connecting the Machine/ System Settings . • Counter Press to the simple screen. See "Checking Enquiry Using the User Tools", Maintenance and Specifications . 10. [Simple Screen] key Press to switch to check or print the counter value. You can also print these details. Number keys...Getting Started See "Changing the Default Functions of copies or prints to check print quality before making multiple sets. See "Counter", Maintenance and Specifications . See "Sample Copy", Copy/ Document Server . 14. [Stop] key Press to stop scanning originals or to check the machine's system...
... Connecting the Machine/ System Settings . • Counter Press to the simple screen. See "Checking Enquiry Using the User Tools", Maintenance and Specifications . 10. [Simple Screen] key Press to switch to check or print the counter value. You can also print these details. Number keys...Getting Started See "Changing the Default Functions of copies or prints to check print quality before making multiple sets. See "Counter", Maintenance and Specifications . See "Sample Copy", Copy/ Document Server . 14. [Stop] key Press to stop scanning originals or to check the machine's system...

Manuals
Page 44
... the [Scanner Stop] key to eject originals onto the original output guides, see "Originals That Should Be Scanned Using the Carrier Sheet", Paper Specifications and Adding Paper . • When using the carrier sheet, originals should be damaged. For details about how to stop them feeding in. For... details, see "Ejecting originals onto the original output guides", Paper Specifications and Adding Paper . 1. Open the carrier sheet with the fold of the carrier sheet. 42 Align the original with the transparent sheet ...
... the [Scanner Stop] key to eject originals onto the original output guides, see "Originals That Should Be Scanned Using the Carrier Sheet", Paper Specifications and Adding Paper . • When using the carrier sheet, originals should be damaged. For details about how to stop them feeding in. For... details, see "Ejecting originals onto the original output guides", Paper Specifications and Adding Paper . 1. Open the carrier sheet with the fold of the carrier sheet. 42 Align the original with the transparent sheet ...
Manuals
Page 47
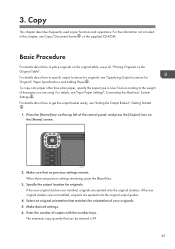
... details about how to place originals on the original table, see "Setting the Output Basket", Getting Started . 1. CPL011 2. Specify the output location for Original", Paper Specifications and Adding Paper . The maximum copy quantity that no previous settings remain. Copy This chapter describes frequently used copier functions and operations. To copy onto...
... details about how to place originals on the original table, see "Setting the Output Basket", Getting Started . 1. CPL011 2. Specify the output location for Original", Paper Specifications and Adding Paper . The maximum copy quantity that no previous settings remain. Copy This chapter describes frequently used copier functions and operations. To copy onto...
Manuals
Page 71
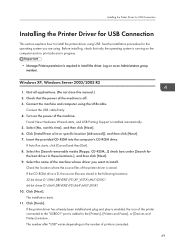
... Faxes], or [Devices and Printers] window. Windows XP, Windows Server 2003/2003 R2 1. Turn on the number of the machine. Click [Install from a list or specific location [Advanced]], and then click [Next]. 7. Select the [Search removable media (floppy, CD-ROM...)] check box under [Search for the best driver in progress. •...
... Faxes], or [Devices and Printers] window. Windows XP, Windows Server 2003/2003 R2 1. Turn on the number of the machine. Click [Install from a list or specific location [Advanced]], and then click [Next]. 7. Select the [Search removable media (floppy, CD-ROM...)] check box under [Search for the best driver in progress. •...

Manuals
Page 85
Proceed to specific users. Click [Permissions]. 6. In the [Groups or user names:] list, select a group or user, and then, in Windows and enable sharing. Configure the access permissions ...
Proceed to specific users. Click [Permissions]. 6. In the [Groups or user names:] list, select a group or user, and then, in Windows and enable sharing. Configure the access permissions ...
Manuals
Page 106
... function, see p.60 "Copying onto Custom Size Paper from the Paper Bypass Location". When printing onto custom size cut paper using the control panel", Paper Specifications and Adding Paper . Adding Paper and Ink • In Low Power mode or Sleep mode • If paper is jammed • If a service call message... sizes that can be loaded in the paper input locations and paper bypass location, see "Specifying a custom size of paper using the control panel", Paper Specifications and Adding Paper . 104 8.
... function, see p.60 "Copying onto Custom Size Paper from the Paper Bypass Location". When printing onto custom size cut paper using the control panel", Paper Specifications and Adding Paper . Adding Paper and Ink • In Low Power mode or Sleep mode • If paper is jammed • If a service call message... sizes that can be loaded in the paper input locations and paper bypass location, see "Specifying a custom size of paper using the control panel", Paper Specifications and Adding Paper . 104 8.

Manuals
Page 118
... to specify the paper type and thickness of paper you want to the prescribed position. For details about Prevent Paper Abrasion, see "Paper Storage", Paper Specifications and Adding Paper . 116 You can specify the types of the paper roll. Select the proper items according to the paper type and thickness you...
... to specify the paper type and thickness of paper you want to the prescribed position. For details about Prevent Paper Abrasion, see "Paper Storage", Paper Specifications and Adding Paper . 116 You can specify the types of the paper roll. Select the proper items according to the paper type and thickness you...

Manuals
Page 144
... so may leak inside the machine. appears on the screen regarding how to replace a print cartridge. • You can order supplies, see "Enquiry", Maintenance and Specifications . • For details about how to check contact number where you load paper into place, ink may result in misfeeds. • Push in the print...
... so may leak inside the machine. appears on the screen regarding how to replace a print cartridge. • You can order supplies, see "Enquiry", Maintenance and Specifications . • For details about how to check contact number where you load paper into place, ink may result in misfeeds. • Push in the print...

Manuals
Page 151
... procedures. Appears when paper runs out. For details about loading paper, see "Replacing Print Cartridges", Maintenance and Specifications . Appears when an original misfeed occurs. For details about adding ink, see "Loading Paper", Paper Specifications and Adding Paper . Appears when one or more covers of the machine are open. 149 For details about...
... procedures. Appears when paper runs out. For details about loading paper, see "Replacing Print Cartridges", Maintenance and Specifications . Appears when an original misfeed occurs. For details about adding ink, see "Loading Paper", Paper Specifications and Adding Paper . Appears when one or more covers of the machine are open. 149 For details about...
Manuals
Page 153
... to connect the network, see "Interface Settings", Connecting the Machine/ System Settings . • For details about error messages and their solutions, see "Loading Paper", Paper Specifications and Adding Paper . A function which error is defective. Press [Check] in the [Check Status] screen is occurred. An error has occurred. For details about loading...
... to connect the network, see "Interface Settings", Connecting the Machine/ System Settings . • For details about error messages and their solutions, see "Loading Paper", Paper Specifications and Adding Paper . A function which error is defective. Press [Check] in the [Check Status] screen is occurred. An error has occurred. For details about loading...

Manuals
Page 156
...; Wait until the message disappears. For details about the optimum environmental conditions for the machine, see "Optimum Environmental Conditions After Moving the Machine", Maintenance and Specifications . 154 Troubleshooting Problem Nothing happens when the [Check Status] key or the [Energy Saver] key is still not ready in 10 minutes, contact your service...
...; Wait until the message disappears. For details about the optimum environmental conditions for the machine, see "Optimum Environmental Conditions After Moving the Machine", Maintenance and Specifications . 154 Troubleshooting Problem Nothing happens when the [Check Status] key or the [Energy Saver] key is still not ready in 10 minutes, contact your service...

Manuals
Page 158
...the Authentication Screen is set in Paper Input Location 2 in Low Power mode. For details about loading paper, see "Loading Paper", Paper Specifications and Adding Paper . • Exit Low Power mode. The paper roll is not correct. "Authentication has failed." appears. For details ...Password, see appears. 9. Enter your Login User Name and Login Password. For details about loading paper, see "Loading Paper", Paper Specifications and Adding Paper . The entered Login User Name or Login Password is set . authentication. the selected function. The paper input ...
...the Authentication Screen is set in Paper Input Location 2 in Low Power mode. For details about loading paper, see "Loading Paper", Paper Specifications and Adding Paper . • Exit Low Power mode. The paper roll is not correct. "Authentication has failed." appears. For details ...Password, see appears. 9. Enter your Login User Name and Login Password. For details about loading paper, see "Loading Paper", Paper Specifications and Adding Paper . The entered Login User Name or Login Password is set . authentication. the selected function. The paper input ...

Manuals
Page 159
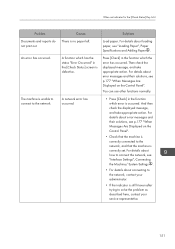
For details about loading paper, see "Loading Paper", Paper Specifications and Adding Paper . An error message remains, even if misfed paper is still jammed in place is held down on the paper input location cover. "... message appears, it . When You Have Problems Operating the Machine Problem Causes Solutions The paper cannot be easily loaded into the Paper Bypass Location", Paper Specifications and Adding Paper . The [User Tools / Counter / Enquiry] screen is curled excessively. paper input location cover in the paper input location. The paper is currently...
For details about loading paper, see "Loading Paper", Paper Specifications and Adding Paper . An error message remains, even if misfed paper is still jammed in place is held down on the paper input location cover. "... message appears, it . When You Have Problems Operating the Machine Problem Causes Solutions The paper cannot be easily loaded into the Paper Bypass Location", Paper Specifications and Adding Paper . The [User Tools / Counter / Enquiry] screen is curled excessively. paper input location cover in the paper input location. The paper is currently...

Manuals
Page 160
.... Replace the print cartridge before this happens. For details about recommended paper, see "Replacing Print Cartridges", Maintenance and Specifications . Troubleshooting Problem Causes Solutions Original images are disabled if only one of the paper. Load paper into the Paper Bypass Location", Paper... and do not lean it against the wall. For details about loading paper into the paper bypass location, see "Paper Storage", Paper Specifications and Adding Paper . The ink collector unit is disabled. The paper is disabled. Print is wrinkled or has been folded/creased. &#...
.... Replace the print cartridge before this happens. For details about recommended paper, see "Replacing Print Cartridges", Maintenance and Specifications . Troubleshooting Problem Causes Solutions Original images are disabled if only one of the paper. Load paper into the Paper Bypass Location", Paper... and do not lean it against the wall. For details about loading paper into the paper bypass location, see "Paper Storage", Paper Specifications and Adding Paper . The ink collector unit is disabled. The paper is disabled. Print is wrinkled or has been folded/creased. &#...

Manuals
Page 161
.... Jammed or torn paper is turned off " appears. "Shutting down normally when the main power switch is turned off , see "Changing the Paper Size", Paper Specifications and Adding Paper . Maximum waiting time: 2 minute(s)" appears. The Address Book cannot be turned off automatically.
.... Jammed or torn paper is turned off " appears. "Shutting down normally when the main power switch is turned off , see "Changing the Paper Size", Paper Specifications and Adding Paper . Maximum waiting time: 2 minute(s)" appears. The Address Book cannot be turned off automatically.

Manuals
Page 162
...; For details about recommended paper, see [Print Job History]. The file format of the shortcut The file format of a print job, see "Recommended Paper", Paper Specifications and Adding Paper . 160 For details about specifying [Print Volum. See the manual for required data." "The format of paper type or paper size problems...
...; For details about recommended paper, see [Print Job History]. The file format of the shortcut The file format of a print job, see "Recommended Paper", Paper Specifications and Adding Paper . 160 For details about specifying [Print Volum. See the manual for required data." "The format of paper type or paper size problems...