User Guide
Page 6
... the File Type...143 Specifying Scan Settings...144 7. 6. Scan Basic Procedure When Using Scan to Folder 131 Creating a Shared Folder on a Computer Running Windows/Confirming a Computer's Information...131 Registering an SMB Folder...133 Deleting an SMB Registered Folder...136 Entering the Path to ...the Destination Manually 137 Basic Procedure for Sending Scan Files by E-mail 138 Registering an E-mail Destination...138 Deleting an...
... the File Type...143 Specifying Scan Settings...144 7. 6. Scan Basic Procedure When Using Scan to Folder 131 Creating a Shared Folder on a Computer Running Windows/Confirming a Computer's Information...131 Registering an SMB Folder...133 Deleting an SMB Registered Folder...136 Entering the Path to ...the Destination Manually 137 Basic Procedure for Sending Scan Files by E-mail 138 Registering an E-mail Destination...138 Deleting an...
User Guide
Page 14
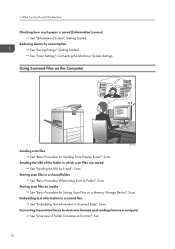
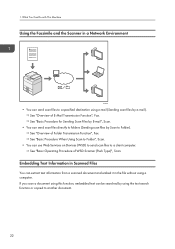
... "Saving Energy", Getting Started. 1. Storing scan files on media See "Basic Procedure for Saving Scan Files on the Computer BQX138S Sending scan files See "Basic Procedure for Sending Scan Files by E-mail", Scan. Storing scan files in a shared folder See "Basic Procedure When Using Scan to a computer See "Overview of the folder in Scanned Data", Scan. What You Can Do with...
... "Saving Energy", Getting Started. 1. Storing scan files on media See "Basic Procedure for Saving Scan Files on the Computer BQX138S Sending scan files See "Basic Procedure for Sending Scan Files by E-mail", Scan. Storing scan files in a shared folder See "Basic Procedure When Using Scan to a computer See "Overview of the folder in Scanned Data", Scan. What You Can Do with...
User Guide
Page 15
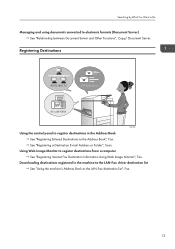
.../ Document Server. Searching by What You Want to Do Managing and using documents converted to the Address Book", Fax. See "Registering a Destination E-mail Address or Folder", Scan. Registering Destinations BRL060S Using the control panel to register destinations in the machine to register destinations from a computer See "Registering Internet Fax Destination Information Using...
.../ Document Server. Searching by What You Want to Do Managing and using documents converted to the Address Book", Fax. See "Registering a Destination E-mail Address or Folder", Scan. Registering Destinations BRL060S Using the control panel to register destinations in the machine to register destinations from a computer See "Registering Internet Fax Destination Information Using...
User Guide
Page 24
... Scanner in the file without using e-mail (Sending scan files by Scan to a client computer. See "Basic Procedure for Sending Scan Files by E-mail", Scan. • You can send scan files to another document. 22 See "Basic Procedure When Using Scan to Folder", Scan. • You can extract text information from a scanned document and embed it in a Network Environment...
... Scanner in the file without using e-mail (Sending scan files by Scan to a client computer. See "Basic Procedure for Sending Scan Files by E-mail", Scan. • You can send scan files to another document. 22 See "Basic Procedure When Using Scan to Folder", Scan. • You can extract text information from a scanned document and embed it in a Network Environment...
User Guide
Page 61
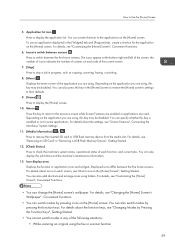
... screen's settings to their defaults. 9. [Home] Press to check the machine's system status, operational status of the following situations: • While scanning an original using . For details, see "Changing Modes by Pressing the Function Keys", Getting Started. • You cannot switch modes in progress, ...; You can switch modes by pressing the function keys. You can also switch modes by pressing icons on the application you are using folders. How to display the application list. Depending on the [Home] screen. You can also add shortcuts and arrange icons using , this...
... screen's settings to their defaults. 9. [Home] Press to check the machine's system status, operational status of the following situations: • While scanning an original using . For details, see "Changing Modes by Pressing the Function Keys", Getting Started. • You cannot switch modes in progress, ...; You can switch modes by pressing the function keys. You can also switch modes by pressing icons on the application you are using folders. How to display the application list. Depending on the [Home] screen. You can also add shortcuts and arrange icons using , this...
User Guide
Page 76
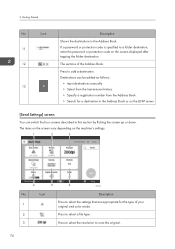
...the machine's settings. 1 2 3 4 5 6 DRY219 No. The items on the screen vary depending on the screen displayed after tapping the folder destination. 12 The sections of your original and color mode. 2 Press to select a file type. 3 Press to select the resolution to ...screens described in the Address Book. 11 If a password or protection code is specified to add a destination. Icon Description 1 Press to scan the original. 74 2. Destinations can be added as follows: • Input destinations manually 13 • Select from the transmission history •...
...the machine's settings. 1 2 3 4 5 6 DRY219 No. The items on the screen vary depending on the screen displayed after tapping the folder destination. 12 The sections of your original and color mode. 2 Press to select a file type. 3 Press to select the resolution to ...screens described in the Address Book. 11 If a password or protection code is specified to add a destination. Icon Description 1 Press to scan the original. 74 2. Destinations can be added as follows: • Input destinations manually 13 • Select from the transmission history •...
User Guide
Page 108
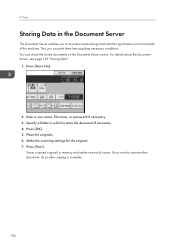
... about the Document Server, see page 145 "Storing Data". 1. Enter a user name, file name, or password if necessary. 3. Make the scanning settings for the original. 7. Press [Start]. Press [Store File]. 2. If you can check the stored documents on the hard disk of copies. Stores... scanned originals in which to store another document, do so after copying is complete. 106 Place the originals. 6. Specify a folder in memory and makes one set of this machine. Press [OK]. 5. You can...
... about the Document Server, see page 145 "Storing Data". 1. Enter a user name, file name, or password if necessary. 3. Make the scanning settings for the original. 7. Press [Start]. Press [Store File]. 2. If you can check the stored documents on the hard disk of copies. Stores... scanned originals in which to store another document, do so after copying is complete. 106 Place the originals. 6. Specify a folder in memory and makes one set of this machine. Press [OK]. 5. You can...
User Guide
Page 133
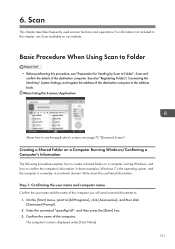
...book. When Using the Scanner Application About how to use the application's screen, see "Preparation for Sending by Scan to Folder • Before performing this chapter, see Scan available on a computer running Windows, and how to [All Programs], click [Accessories], and then click [Command... name and computer name Confirm the user name and the name of the destination computer. Scan This chapter describes frequently used scanner functions and operations. See also "Registering Folders", Connecting the Machine/ System Settings, and register the address of the computer. Enter the...
...book. When Using the Scanner Application About how to use the application's screen, see "Preparation for Sending by Scan to Folder • Before performing this chapter, see Scan available on a computer running Windows, and how to [All Programs], click [Accessories], and then click [Command... name and computer name Confirm the user name and the name of the destination computer. Scan This chapter describes frequently used scanner functions and operations. See also "Registering Folders", Connecting the Machine/ System Settings, and register the address of the computer. Enter the...

User Guide
Page 134
... Click [Add...]. 8. Be sure to specific users. Use the following procedure, a computer which is running Microsoft Windows Create a shared destination folder in as you give access rights only to put a space between "set user", and then press the [Enter] key. In the [Select...Advanced...]. 9. In the following procedure to , and then click [OK]. 11. Right-click the folder, and then click [Properties]. 3. On the [Sharing] tab, click [Advanced Sharing...]. 4. Click [Permissions]. 6. Scan You can also confirm the IPv4 address. Enter the command "set " and "user". 5. The...
... Click [Add...]. 8. Be sure to specific users. Use the following procedure, a computer which is running Microsoft Windows Create a shared destination folder in as you give access rights only to put a space between "set user", and then press the [Enter] key. In the [Select...Advanced...]. 9. In the following procedure to , and then click [OK]. 11. Right-click the folder, and then click [Properties]. 3. On the [Sharing] tab, click [Advanced Sharing...]. 4. Click [Permissions]. 6. Scan You can also confirm the IPv4 address. Enter the command "set " and "user". 5. The...
User Guide
Page 135
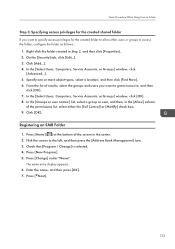
... In the [Select Users, Computers, Service Accounts, or Groups] window, click [OK]. 8. Enter the name, and then press [OK]. 7. Right-click the folder created in Step 2, and then click [Properties]. 2. From the list of the permissions list, select either the [Full Control] or [Modify] check box. 9.... On the [Security] tab, click [Edit...]. 3. Basic Procedure When Using Scan to Folder Step 3: Specifying access privileges for the created folder to allow other users or groups to access the folder, configure the folder as follows: 1.
... In the [Select Users, Computers, Service Accounts, or Groups] window, click [OK]. 8. Enter the name, and then press [OK]. 7. Right-click the folder created in Step 2, and then click [Properties]. 2. From the list of the permissions list, select either the [Full Control] or [Modify] check box. 9.... On the [Security] tab, click [Edit...]. 3. Basic Procedure When Using Scan to Folder Step 3: Specifying access privileges for the created folder to allow other users or groups to access the folder, configure the folder as follows: 1.
User Guide
Page 136
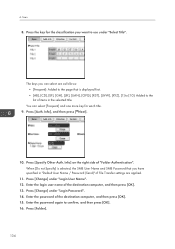
... then press [ Next]. 10. Enter the password again to the list of items in "Default User Name / Password (Send)" of "Folder Authentication". Press [Change] under "Login User Name". 12. Press [Folder]. 134 6. You can select are applied. 11. Press [Specify Other Auth. The keys you can select [Frequent] and one more key... follows: • [Frequent]: Added to the page that is selected, the SMB User Name and SMB Password that you want to use under "Select Title". Scan 8. Press [Auth.
... then press [ Next]. 10. Enter the password again to the list of items in "Default User Name / Password (Send)" of "Folder Authentication". Press [Change] under "Login User Name". 12. Press [Folder]. 134 6. You can select are applied. 11. Press [Specify Other Auth. The keys you can select [Frequent] and one more key... follows: • [Frequent]: Added to the page that is selected, the SMB User Name and SMB Password that you want to use under "Select Title". Scan 8. Press [Auth.
User Guide
Page 137
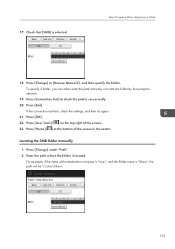
...Using Scan to check the path is "Share", the path will be \\User\Share. 135 Press [Exit]. Press [Change] under "Path". 2. For example: if the name of the screen in the center. Press [OK]. 22. Press [Home] ( ) at the bottom of the destination computer is "User", and the folder ... 20. Press [User Tools] ( ) on the top right of the screen. 23. Enter the path where the folder is selected. Locating the SMB folder manually 1. Press [Change] or [Browse Network], and then specify the folder. If the connection test fails, check the settings, and then try again. 21. To specify...
...Using Scan to check the path is "Share", the path will be \\User\Share. 135 Press [Exit]. Press [Change] under "Path". 2. For example: if the name of the screen in the center. Press [OK]. 22. Press [Home] ( ) at the bottom of the destination computer is "User", and the folder ... 20. Press [User Tools] ( ) on the top right of the screen. 23. Enter the path where the folder is selected. Locating the SMB folder manually 1. Press [Change] or [Browse Network], and then specify the folder. If the connection test fails, check the settings, and then try again. 21. To specify...
User Guide
Page 138
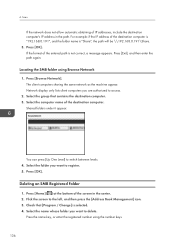
...the computer name of IP addresses, include the destination computer's IP address in the center. 2. Select the folder you are authorized to access. 2. Deleting an SMB Registered Folder 1. Scan If the network does not allow automatic obtaining of the destination computer. For example: if the IP address... If the format of the destination computer is "192.168.0.191", and the folder name is selected. 4. Select the name whose folder you want to delete. Press [Exit], and then enter the path again. Shared folders under it appear. Press [Home] ( ) at the bottom of the screen ...
...the computer name of IP addresses, include the destination computer's IP address in the center. 2. Select the folder you are authorized to access. 2. Deleting an SMB Registered Folder 1. Scan If the network does not allow automatic obtaining of the destination computer. For example: if the IP address... If the format of the destination computer is "192.168.0.191", and the folder name is selected. 4. Select the name whose folder you want to delete. Press [Exit], and then enter the path again. Shared folders under it appear. Press [Home] ( ) at the bottom of the screen ...

User Guide
Page 139
Press [OK]. 9. Press [Home] ( ) at the bottom of the screen. 10. Entering the Path to the Destination Manually When Using the Scanner Application About how to Folder You can search by the registered name, user code, fax number, folder name, e-mail address, or IPFax destination. 5. A confirmation message appears. 7. Basic Procedure When Using Scan to use the application's screen, see page 72 "[Scanner] Screen". 137 Press the protocol which is not currently selected. Press [Yes]. 8. Press [Folder]. 6. Press [User Tools] ( ) on the top right of the screen in the center.
Press [OK]. 9. Press [Home] ( ) at the bottom of the screen. 10. Entering the Path to the Destination Manually When Using the Scanner Application About how to Folder You can search by the registered name, user code, fax number, folder name, e-mail address, or IPFax destination. 5. A confirmation message appears. 7. Basic Procedure When Using Scan to use the application's screen, see page 72 "[Scanner] Screen". 137 Press the protocol which is not currently selected. Press [Yes]. 8. Press [Folder]. 6. Press [User Tools] ( ) on the top right of the screen in the center.
User Guide
Page 142
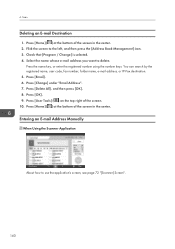
...] icon. 3. Select the name whose e-mail address you want to delete. You can search by the registered name, user code, fax number, folder name, e-mail address, or IP-Fax destination. 5. Scan Deleting an E-mail Destination 1. 6. Press [Email]. 6. Press [Delete All], and then press [OK]. 8. Press [User Tools] ( ) on the top right of...
...] icon. 3. Select the name whose e-mail address you want to delete. You can search by the registered name, user code, fax number, folder name, e-mail address, or IP-Fax destination. 5. Scan Deleting an E-mail Destination 1. 6. Press [Email]. 6. Press [Delete All], and then press [OK]. 8. Press [User Tools] ( ) on the top right of...
User Guide
Page 143
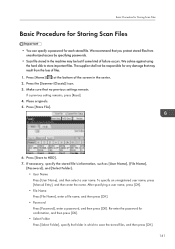
...[Manual Entry], and then enter the name. We recommend that you protect stored files from unauthorized access by specifying passwords. • Scan file stored in the machine may result from the loss of files. 1. The supplier shall not be lost if some kind of ...at the bottom of failure occurs. Press [Store File]. 6. Basic Procedure for Storing Scan Files Basic Procedure for Storing Scan Files • You can specify a password for confirmation, and then press [OK]. • Select Folder Press [Select Folder], specify the folder in which to save the stored files, and then press [OK]. 141
...[Manual Entry], and then enter the name. We recommend that you protect stored files from unauthorized access by specifying passwords. • Scan file stored in the machine may result from the loss of files. 1. The supplier shall not be lost if some kind of ...at the bottom of failure occurs. Press [Store File]. 6. Basic Procedure for Storing Scan Files Basic Procedure for Storing Scan Files • You can specify a password for confirmation, and then press [OK]. • Select Folder Press [Select Folder], specify the folder in which to save the stored files, and then press [OK]. 141

User Guide
Page 144
You can select more than one file. 4. If necessary, press [Scan Settings] to preview a file selected from the list of stored files, select the file you want to check is stored. 3. Checking a Stored File Selected from the List This section explains how to specify scanner settings such as resolution and scan size. 10. From the list of stored files. 1. Press [Select Stored File]. 2. Scan 8. Specify the folder in which the file you want to check. Press [Start]. Press [Preview]. 142 6. Press [OK]. 9.
You can select more than one file. 4. If necessary, press [Scan Settings] to preview a file selected from the list of stored files, select the file you want to check is stored. 3. Checking a Stored File Selected from the List This section explains how to specify scanner settings such as resolution and scan size. 10. From the list of stored files. 1. Press [Select Stored File]. 2. Scan 8. Specify the folder in which the file you want to check. Press [Start]. Press [Preview]. 142 6. Press [OK]. 9.
User Guide
Page 145
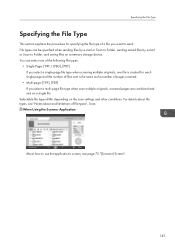
...types, see page 72 "[Scanner] Screen". 143 You can be specified when sending files by e-mail or Scan to Folder, sending stored files by e-mail or Scan to Folder, and saving files on the scan settings and other conditions. File types can select one of the following file types: • Single Page:... [TIFF / JPEG], [PDF] If you select a single-page file type when scanning multiple originals, one file is the same as...
...types, see page 72 "[Scanner] Screen". 143 You can be specified when sending files by e-mail or Scan to Folder, sending stored files by e-mail or Scan to Folder, and saving files on the scan settings and other conditions. File types can select one of the following file types: • Single Page:... [TIFF / JPEG], [PDF] If you select a single-page file type when scanning multiple originals, one file is the same as...
User Guide
Page 147
... accessed with a correct password remains selected even after operations are ended. Press [Home] ( ) at the bottom of [User Name]. Press [To Scanning Screen]. 4. For information not included in this chapter, see "Registering Addresses and Users", Connecting the Machine/ System Settings. File Name A file name ... [Access Privileges] may appear instead of the screen in the Document Server is not to identify the document creator and type. Specify a folder in the Address Book, or enter the name directly. You can register a user name to a stored document in the center. 2. ...
... accessed with a correct password remains selected even after operations are ended. Press [Home] ( ) at the bottom of [User Name]. Press [To Scanning Screen]. 4. For information not included in this chapter, see "Registering Addresses and Users", Connecting the Machine/ System Settings. File Name A file name ... [Access Privileges] may appear instead of the screen in the Document Server is not to identify the document creator and type. Specify a folder in the Address Book, or enter the name directly. You can register a user name to a stored document in the center. 2. ...

User Guide
Page 148
...For double-check, enter the password again, and then press [OK]. 13. If the list does not appear, press [Finish Scanning]. 146 Press [File Name]. 9. Specify the original scanning conditions. 15. Specify a user name, and then press [OK]. You can use four to eight digits for the password. 12... Press [Password]. 11. To specify a name not shown in the Address Book. Enter a file name, and then press [OK]. 10. After scanning, a list of folders will be displayed. 7. The user names shown are names that were registered in the screen, press [Manual Entry], and then enter a user name. ...
...For double-check, enter the password again, and then press [OK]. 13. If the list does not appear, press [Finish Scanning]. 146 Press [File Name]. 9. Specify the original scanning conditions. 15. Specify a user name, and then press [OK]. You can use four to eight digits for the password. 12... Press [Password]. 11. To specify a name not shown in the Address Book. Enter a file name, and then press [OK]. 10. After scanning, a list of folders will be displayed. 7. The user names shown are names that were registered in the screen, press [Manual Entry], and then enter a user name. ...


