
AirPrint Guide
Page 4
... of documents or data, or the use or non-use of keys on models or options. 2 This symbol indicates points that you are not obeyed. Also, you always copy or have backups of the machine. Displayed contents and illustrations on the screen vary depending on the machine's display or control panels. Be sure to when using functions. How to Read the Manuals Symbols Used in the Manuals This manual uses the following...
... of documents or data, or the use or non-use of keys on models or options. 2 This symbol indicates points that you are not obeyed. Also, you always copy or have backups of the machine. Displayed contents and illustrations on the screen vary depending on the machine's display or control panels. Be sure to when using functions. How to Read the Manuals Symbols Used in the Manuals This manual uses the following...
AirPrint Guide
Page 5
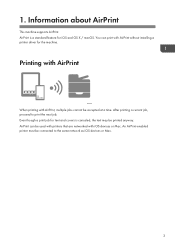
... network as iOS devices or Mac. 3 AirPrint can print with iOS devices or Mac. Printing with AirPrint DTN753 When printing with AirPrint, multiple jobs cannot be printed anyway. An AirPrint-enabled printer must be used with printers that are networked with AirPrint without installing a printer driver for iOS and OS X / macOS. AirPrint is canceled, the text may be accepted at a time. Even though a print job for text and covers is a standard feature for the machine...
... network as iOS devices or Mac. 3 AirPrint can print with iOS devices or Mac. Printing with AirPrint DTN753 When printing with AirPrint, multiple jobs cannot be printed anyway. An AirPrint-enabled printer must be used with printers that are networked with AirPrint without installing a printer driver for iOS and OS X / macOS. AirPrint is canceled, the text may be accepted at a time. Even though a print job for text and covers is a standard feature for the machine...
AirPrint Guide
Page 7
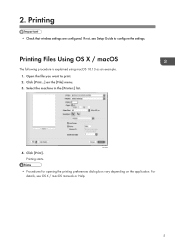
Select the machine in the [Printer:] list. Click [Print]. Printing starts. • Procedures for opening the printing preferences dialog box vary depending on the [File] menu. 3. If not, see OS X / macOS manuals or Help. 5 DYG652 4. 2. Click [Print...] on the application. Printing Files Using OS X / macOS The following procedure is explained using macOS 10.13 as an example. 1. Open the file you want to configure the settings. Printing • Check that wireless settings are configured. For details, see Setup Guide to print. 2.
Select the machine in the [Printer:] list. Click [Print]. Printing starts. • Procedures for opening the printing preferences dialog box vary depending on the [File] menu. 3. If not, see OS X / macOS manuals or Help. 5 DYG652 4. 2. Click [Print...] on the application. Printing Files Using OS X / macOS The following procedure is explained using macOS 10.13 as an example. 1. Open the file you want to configure the settings. Printing • Check that wireless settings are configured. For details, see Setup Guide to print. 2.

AirPrint Guide
Page 8
Printer select screen is displayed. 5. Printing starts. 6 Tap (Share). 3. Printing Printing Files Using iOS 1. Tap (Printer) or [Print]. 4. Tap the machine's name. 6. 2. Tap [Printer]. Tap [Print]. Open the file you want to print. 2.
Printer select screen is displayed. 5. Printing starts. 6 Tap (Share). 3. Printing Printing Files Using iOS 1. Tap (Printer) or [Print]. 4. Tap the machine's name. 6. 2. Tap [Printer]. Tap [Print]. Open the file you want to print. 2.

AirPrint Guide
Page 12
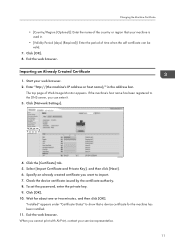
... web browser. 2. Click [Network Settings]. Configure the following settings displayed on the window: • [Common Name (Required)]: Enter the name of your machine. • [Organization (Optional)], [Organizational Unit (Optional)]: Enter the organization name that your machine belongs to. • [City/Locality (Optional)]: Enter the name of the municipality that your machine is used in . 10 Click the [Certificate] tab. 5. Select [Create New Self-Signed Certificate], and then click [Next]. 6. Installing a new machine...
... web browser. 2. Click [Network Settings]. Configure the following settings displayed on the window: • [Common Name (Required)]: Enter the name of your machine. • [Organization (Optional)], [Organizational Unit (Optional)]: Enter the organization name that your machine belongs to. • [City/Locality (Optional)]: Enter the name of the municipality that your machine is used in . 10 Click the [Certificate] tab. 5. Select [Create New Self-Signed Certificate], and then click [Next]. 6. Installing a new machine...
AirPrint Guide
Page 13
...) (Required)]: Enter the period of time when the self certificate can enter it. 3. Click [OK]. 8. Exit the web browser. Specify an already created certificate you cannot print with AirPrint, contact your web browser. 2. Wait for the machine has been installed. 11. Click the [Certificate] tab. 5. To set the password, enter the private key. 9. Click [OK]. 10. Changing the Machine Certificate • [Country/Region (Optional)]: Enter the...
...) (Required)]: Enter the period of time when the self certificate can enter it. 3. Click [OK]. 8. Exit the web browser. Specify an already created certificate you cannot print with AirPrint, contact your web browser. 2. Wait for the machine has been installed. 11. Click the [Certificate] tab. 5. To set the password, enter the private key. 9. Click [OK]. 10. Changing the Machine Certificate • [Country/Region (Optional)]: Enter the...

Google Cloud Print Guide
Page 3
TABLE OF CONTENTS How to Google Cloud Print...5 Register with Web Image Monitor...5 Register with Windows...5 Printing with Google Cloud Print...8 Printing a Web Page...8 Printing the files stored in the Manuals...2 Disclaimer...2 1. Information about Google Cloud Print About the Google Cloud Print...3 2. Printing with Google Cloud Print Register the Machine to Read the Manuals...2 Symbols Used in your computer...9 3. Appendix Troubleshooting...13 Connection Problems...13 Confirm the Settings of Google Cloud Print for the Machine 14 Trademark...16 1
TABLE OF CONTENTS How to Google Cloud Print...5 Register with Web Image Monitor...5 Register with Windows...5 Printing with Google Cloud Print...8 Printing a Web Page...8 Printing the files stored in the Manuals...2 Disclaimer...2 1. Information about Google Cloud Print About the Google Cloud Print...3 2. Printing with Google Cloud Print Register the Machine to Read the Manuals...2 Symbols Used in your computer...9 3. Appendix Troubleshooting...13 Connection Problems...13 Confirm the Settings of Google Cloud Print for the Machine 14 Trademark...16 1
Google Cloud Print Guide
Page 4
... or malfunctions of this machine or function. Displayed contents and illustrations on the screen vary depending on the machine's display or control panels. Also, you always have memoranda, copies (duplicates) or backups of keys on models or options. 2 Documents or data might be liable for taking protective measures against computer viruses, worms, and other harmful software. Make sure that , to Read the Manuals Symbols Used in no event...
... or malfunctions of this machine or function. Displayed contents and illustrations on the screen vary depending on the machine's display or control panels. Also, you always have memoranda, copies (duplicates) or backups of keys on models or options. 2 Documents or data might be liable for taking protective measures against computer viruses, worms, and other harmful software. Make sure that , to Read the Manuals Symbols Used in no event...
Google Cloud Print Guide
Page 5
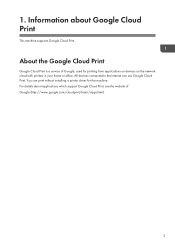
About the Google Cloud Print Google Cloud Print is a service of Google (http://www.google.com/cloudprint/learn/apps.html). 3 You can use Google Cloud Print. 1. All devices connected to the Internet can print without installing a printer driver for printing from applications on devices on the network cloud with printers in your home or office. Information about applications which support Google Cloud Print, see the website of Google, used for the machine. For details about Google Cloud Print This machine supports Google Cloud Print.
About the Google Cloud Print Google Cloud Print is a service of Google (http://www.google.com/cloudprint/learn/apps.html). 3 You can use Google Cloud Print. 1. All devices connected to the Internet can print without installing a printer driver for printing from applications on devices on the network cloud with printers in your home or office. Information about applications which support Google Cloud Print, see the website of Google, used for the machine. For details about Google Cloud Print This machine supports Google Cloud Print.

Google Cloud Print Guide
Page 7
... been registered to Google. 5 Register with an Android device, follow on your machine. 8. If you can print with Google Cloud Print You can enter it. 3. Start a web browser on the Google website (https://accounts.google.com/SignUp). Start Google Chrome on -screen instructions to register the machine's information. Register with Web Image Monitor When registering with Windows 1. 2. Go to the website for Google Cloud...
... been registered to Google. 5 Register with an Android device, follow on your machine. 8. If you can print with Google Cloud Print You can enter it. 3. Start a web browser on the Google website (https://accounts.google.com/SignUp). Start Google Chrome on -screen instructions to register the machine's information. Register with Web Image Monitor When registering with Windows 1. 2. Go to the website for Google Cloud...

Google Cloud Print Guide
Page 11
Printing is started. Printing the files stored in to Google. Start Google Chrome. 2. ECC513 9 Sign in your computer 1. Click [Change...] under "Google Cloud Print". 8. Click [Print]. Select the machine from the printer list displayed under [Destination] Printing with Google Cloud Print ECC511 7. 6.
Printing is started. Printing the files stored in to Google. Start Google Chrome. 2. ECC513 9 Sign in your computer 1. Click [Change...] under "Google Cloud Print". 8. Click [Print]. Select the machine from the printer list displayed under [Destination] Printing with Google Cloud Print ECC511 7. 6.

Google Cloud Print Guide
Page 13
Select the machine from my computer]. Printing is started. ECC521 11 Select the file you want to print. 8. 6. Specify the printing conditions and then click [Print]. Printing with Google Cloud Print ECC519 7. Click [Select a file from the printer list registered in Google Cloud Print. 9.
Select the machine from my computer]. Printing is started. ECC521 11 Select the file you want to print. 8. 6. Specify the printing conditions and then click [Print]. Printing with Google Cloud Print ECC519 7. Click [Select a file from the printer list registered in Google Cloud Print. 9.
Google Cloud Print Guide
Page 17
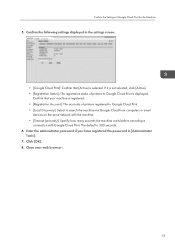
... status of Google Cloud Print for the Machine 5. If it is displayed. The default is selected. Confirm that [Active] is 300 seconds. 6. Enter the administrator password if you have registered the password in the settings screen. • [Google Cloud Print]: Confirm that your web browser. 15 Confirm the following settings displayed in [Administrator Tools]. 7. Confirm the Settings of printers to search the machine via Google Cloud from computers or smart devices on the same network...
... status of Google Cloud Print for the Machine 5. If it is displayed. The default is selected. Confirm that [Active] is 300 seconds. 6. Enter the administrator password if you have registered the password in the settings screen. • [Google Cloud Print]: Confirm that your web browser. 15 Confirm the following settings displayed in [Administrator Tools]. 7. Confirm the Settings of printers to search the machine via Google Cloud from computers or smart devices on the same network...
Wi-Fi Direct Guide
Page 3
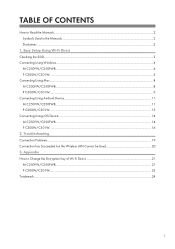
... CONTENTS How to Change the Encryption Key of Wi-Fi Direct 21 M C250FW/C250FWB...21 P C300W/C301W...23 Trademark...24 1 Troubleshooting Connection Problems...19 Connection has Succeeded but the Wireless LAN Cannot be Used 20 3. Easy Setup Using Wi-Fi Direct Checking the SSID...3 Connecting Using Windows...4 M C250FW/C250FWB...4 P C300W/C301W...5 Connecting Using Mac...8 M C250FW/C250FWB...8 P C300W/C301W...9 Connecting Using Android Device...11 M C250FW/C250FWB...11 P C300W/C301W...12 Connecting Using iOS Device...14 M C250FW/C250FWB...14 P C300W...
... CONTENTS How to Change the Encryption Key of Wi-Fi Direct 21 M C250FW/C250FWB...21 P C300W/C301W...23 Trademark...24 1 Troubleshooting Connection Problems...19 Connection has Succeeded but the Wireless LAN Cannot be Used 20 3. Easy Setup Using Wi-Fi Direct Checking the SSID...3 Connecting Using Windows...4 M C250FW/C250FWB...4 P C300W/C301W...5 Connecting Using Mac...8 M C250FW/C250FWB...8 P C300W/C301W...9 Connecting Using Android Device...11 M C250FW/C250FWB...11 P C300W/C301W...12 Connecting Using iOS Device...14 M C250FW/C250FWB...14 P C300W...
Wi-Fi Direct Guide
Page 5
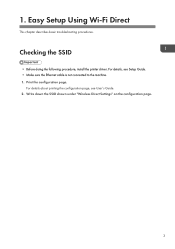
Easy Setup Using Wi-Fi Direct This chapter describes basic troubleshooting procedures. Checking the SSID • Before doing the following procedure, install the printer driver. Write down the SSID shown under "Wireless Direct Settings" on the configuration page. 3 Print the configuration page. For details, see User's Guide. 2. For details about printing the configuration page, see Setup Guide. • Make sure the Ethernet cable is not connected to the machine. 1. 1.
Easy Setup Using Wi-Fi Direct This chapter describes basic troubleshooting procedures. Checking the SSID • Before doing the following procedure, install the printer driver. Write down the SSID shown under "Wireless Direct Settings" on the configuration page. 3 Print the configuration page. For details, see User's Guide. 2. For details about printing the configuration page, see Setup Guide. • Make sure the Ethernet cable is not connected to the machine. 1. 1.
Wi-Fi Direct Guide
Page 6
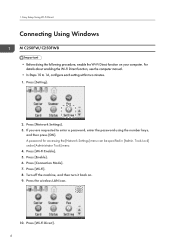
... [Administrator Tools] menu. 4. Press [Wi-Fi]. 8. Turn off the machine, and then turn it back on your computer. Press [Setting]. 2. 1. Press [Network Settings]. 3. Press [Connection Mode]. 7. A password for accessing the [Network Settings] menu can be specified in [Admin. Press [Wi-Fi Direct]. 4 For details about enabling the Wi-Fi Direct function, see the computer manual. • In Steps 10 to enter a password, enter the password using the number keys, and then press [OK]. Press the wireless LAN...
... [Administrator Tools] menu. 4. Press [Wi-Fi]. 8. Turn off the machine, and then turn it back on your computer. Press [Setting]. 2. 1. Press [Network Settings]. 3. Press [Connection Mode]. 7. A password for accessing the [Network Settings] menu can be specified in [Admin. Press [Wi-Fi Direct]. 4 For details about enabling the Wi-Fi Direct function, see the computer manual. • In Steps 10 to enter a password, enter the password using the number keys, and then press [OK]. Press the wireless LAN...
Wi-Fi Direct Guide
Page 10
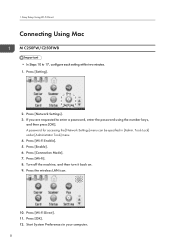
..., configure each setting within two minutes. 1. Press [Wi-Fi Enable]. 5. Press [Connection Mode]. 7. Press [OK]. 12. Press [Setting]. 2. A password for accessing the [Network Settings] menu can be specified in your computer. 8 Easy Setup Using Wi-Fi Direct Connecting Using Mac M C250FW/C250FWB • In Steps 10 to enter a password, enter the password using the number keys, and then press [OK]. Press [Wi-Fi]. 8. Start System Preferences in [Admin. Press [Network Settings]. 3. Tools Lock] under [Administrator Tools] menu. 4. Turn off the machine, and...
..., configure each setting within two minutes. 1. Press [Wi-Fi Enable]. 5. Press [Connection Mode]. 7. Press [OK]. 12. Press [Setting]. 2. A password for accessing the [Network Settings] menu can be specified in your computer. 8 Easy Setup Using Wi-Fi Direct Connecting Using Mac M C250FW/C250FWB • In Steps 10 to enter a password, enter the password using the number keys, and then press [OK]. Press [Wi-Fi]. 8. Start System Preferences in [Admin. Press [Network Settings]. 3. Tools Lock] under [Administrator Tools] menu. 4. Turn off the machine, and...
Wi-Fi Direct Guide
Page 16
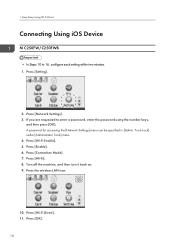
... to 16, configure each setting within two minutes. 1. Press [Wi-Fi Direct]. 11. Press [Enable]. 6. Press [Wi-Fi]. 8. Tools Lock] under [Administrator Tools] menu. 4. Press [Connection Mode]. 7. Turn off the machine, and then turn it back on. 9. Press [Setting]. 2. Easy Setup Using Wi-Fi Direct Connecting Using iOS Device M C250FW/C250FWB • In Steps 10 to enter a password, enter the password using the number keys, and then press [OK]. A password for accessing the [Network Settings] menu can be specified...
... to 16, configure each setting within two minutes. 1. Press [Wi-Fi Direct]. 11. Press [Enable]. 6. Press [Wi-Fi]. 8. Tools Lock] under [Administrator Tools] menu. 4. Press [Connection Mode]. 7. Turn off the machine, and then turn it back on. 9. Press [Setting]. 2. Easy Setup Using Wi-Fi Direct Connecting Using iOS Device M C250FW/C250FWB • In Steps 10 to enter a password, enter the password using the number keys, and then press [OK]. A password for accessing the [Network Settings] menu can be specified...

Wi-Fi Direct Guide
Page 23
... A password for the machine. Press [Setting]. 2. If you are requested to Change the Encryption Key of Wi-Fi Direct M C250FW/C250FWB You can be specified in [Admin. Press [Network Settings]. 3. 3. Tools Lock] under [Administrator Tools] menu. 4. Appendix This appendix describes trademarks for accessing the [Network Settings] menu can change the encryption key of Wi-Fi Direct by using the number keys, and then press [OK]. How to enter a password, enter the password using the control panel or Web Image...
... A password for the machine. Press [Setting]. 2. If you are requested to Change the Encryption Key of Wi-Fi Direct M C250FW/C250FWB You can be specified in [Admin. Press [Network Settings]. 3. 3. Tools Lock] under [Administrator Tools] menu. 4. Appendix This appendix describes trademarks for accessing the [Network Settings] menu can change the encryption key of Wi-Fi Direct by using the number keys, and then press [OK]. How to enter a password, enter the password using the control panel or Web Image...

Wi-Fi Direct Guide
Page 25
... [ ] key to select [Network Settings], and then press the [OK] key. 3. Turn off the machine, and then turn it . 3. ECC501 4. Click the [Wireless] tab. 5. Press the [ ] or [ ] key to select [Wi-Fi Dir. Press the scroll keys to select [Wireless(Wi-Fi)], and then press the [OK] key. 4. Enter the administrator password if you can change the encryption key of Wi-Fi Direct by using the control panel or Web Image Monitor. Configuring Settings Using Web Image...
... [ ] key to select [Network Settings], and then press the [OK] key. 3. Turn off the machine, and then turn it . 3. ECC501 4. Click the [Wireless] tab. 5. Press the [ ] or [ ] key to select [Wi-Fi Dir. Press the scroll keys to select [Wireless(Wi-Fi)], and then press the [OK] key. 4. Enter the administrator password if you can change the encryption key of Wi-Fi Direct by using the control panel or Web Image Monitor. Configuring Settings Using Web Image...


