Product Guide
Page 1
Product Concept: Flagship color laser printer expanding on the G130/G131 product after a ... Launch Date: 7/15/2005 S/N Configuration: Q37xxxxxxxxx/ Q38xxxxxxxxx Product Code: G130/G131 Savin CLP128/CLP135 Ricoh Aficio CL7200/C7300 Lanier LP332c/LP335c Gestetner C7528n/C7535hdn Training Information: All support technicians previously certified via the G080 ...be trained on the above method of the update package. Description Service Update Package Service Manual Parts Catalog EDP Code 002372MIU 002373MIU 002447MIU Technicians not certified on the G080 by first completing the existing...
Product Concept: Flagship color laser printer expanding on the G130/G131 product after a ... Launch Date: 7/15/2005 S/N Configuration: Q37xxxxxxxxx/ Q38xxxxxxxxx Product Code: G130/G131 Savin CLP128/CLP135 Ricoh Aficio CL7200/C7300 Lanier LP332c/LP335c Gestetner C7528n/C7535hdn Training Information: All support technicians previously certified via the G080 ...be trained on the above method of the update package. Description Service Update Package Service Manual Parts Catalog EDP Code 002372MIU 002373MIU 002447MIU Technicians not certified on the G080 by first completing the existing...

Product Guide
Page 10
...; Load only one or two envelopes to the paper feed direction. • Before loading envelopes, flatten their leading edges (the edge going into the printer) by running a pencil or ruler across them. • Some kinds of envelope might also occur when using envelopes 1 and 2 depending on envelopes... may be uneven if parts of the flaps. G130/G131 Product Support Guide Appendix. Print one size and type of envelope at a time. • When loading envelopes, be...
...; Load only one or two envelopes to the paper feed direction. • Before loading envelopes, flatten their leading edges (the edge going into the printer) by running a pencil or ruler across them. • Some kinds of envelope might also occur when using envelopes 1 and 2 depending on envelopes... may be uneven if parts of the flaps. G130/G131 Product Support Guide Appendix. Print one size and type of envelope at a time. • When loading envelopes, be...
Product Guide
Page 12
... - 1.0 G130/G131 Product Support Guide Service Maintance Table Unique/Common U: Unique for this model C: Common with listed model Part Number B1803810 B2423830 AF031049 AF030049 AF032049 AF031046 AF030049 AF032046 Description Transfer Unit (Note 1) Transfer Cleaning Unit (Note 1) Feed Roller ...Yield (Prints) 150k 150k 150k Unique or Common C (B135/B138 series) C (B135/B138 series) C (B135/B138 series) Large Capacity Tray: G569 Part Number Description AF031049 AF030049 AF032049 Feed Roller (Note 2) Pick-up Roller (Note 2) Separation Roller (Note 2) Q'ty /Unit 1 1 1 Expecte d Yield ...
... - 1.0 G130/G131 Product Support Guide Service Maintance Table Unique/Common U: Unique for this model C: Common with listed model Part Number B1803810 B2423830 AF031049 AF030049 AF032049 AF031046 AF030049 AF032046 Description Transfer Unit (Note 1) Transfer Cleaning Unit (Note 1) Feed Roller ...Yield (Prints) 150k 150k 150k Unique or Common C (B135/B138 series) C (B135/B138 series) C (B135/B138 series) Large Capacity Tray: G569 Part Number Description AF031049 AF030049 AF032049 Feed Roller (Note 2) Pick-up Roller (Note 2) Separation Roller (Note 2) Q'ty /Unit 1 1 1 Expecte d Yield ...

Product Guide
Page 14
...20.0 0.0 PM Inerval (P/J) 1 2 3 P/ J PCU(Bk) PCU(FC) Dev(Bk) Dev(FC) Fusing Note: Machine works for assessing yield is common in the printer field.) The expected yield of all users, this may cause a reduction in process control self-check and lines position adjustment (MUSIC) or performs idling when...) of maintenance kits counts up without making outputs. Therefore, it is recommended to consider the expected P/J and print volume for all PM parts is always the same for each user when making a service contract. If making a meter charge contract with customers and if the meter ...
...20.0 0.0 PM Inerval (P/J) 1 2 3 P/ J PCU(Bk) PCU(FC) Dev(Bk) Dev(FC) Fusing Note: Machine works for assessing yield is common in the printer field.) The expected yield of all users, this may cause a reduction in process control self-check and lines position adjustment (MUSIC) or performs idling when...) of maintenance kits counts up without making outputs. Therefore, it is recommended to consider the expected P/J and print volume for all PM parts is always the same for each user when making a service contract. If making a meter charge contract with customers and if the meter ...

Product Guide
Page 17
...Torque Limiter - Manual Feed AF030049 Pick-up Roller AF032046 Separation Roller - G130/G131 Product Support Guide Initial Recommended Service Parts Part Description G1312211 PCU - CMY G2600152 Development Section:Service:JP -4:M G2600153 Development Section:Service:JP -4:Y G2600151 Development Section:Service:...AX060286 Ploygon Mirror Motor B1803301 Air Pump:Toner Supply:Ass'y G0803301 Air Pump:Toner Supply Items in Red = PM Part Description AE040042 Oil Supply Roller:Pressure:DIA16 AE044066 Stripper Pawls:pFa AE044050 Stripper Pawl B1804101 Fusing Belt:MM60:Ass'y B1804300 ...
...Torque Limiter - Manual Feed AF030049 Pick-up Roller AF032046 Separation Roller - G130/G131 Product Support Guide Initial Recommended Service Parts Part Description G1312211 PCU - CMY G2600152 Development Section:Service:JP -4:M G2600153 Development Section:Service:JP -4:Y G2600151 Development Section:Service:...AX060286 Ploygon Mirror Motor B1803301 Air Pump:Toner Supply:Ass'y G0803301 Air Pump:Toner Supply Items in Red = PM Part Description AE040042 Oil Supply Roller:Pressure:DIA16 AE044066 Stripper Pawls:pFa AE044050 Stripper Pawl B1804101 Fusing Belt:MM60:Ass'y B1804300 ...

Product Guide
Page 22
... new model in the field: Unique or Common: U: Unique C: Common Item 1 2 3 4 5 6 7 Part Number Description A0069104 Scanner Positioning Pin (4pcs/set) G4129310 Ricoh Gray Scale G4049004 RS-13 chart B6455010 SD Card B6456700 PCMCIA Card Adapter B6456800 USB Reader/Writer - G130/G131 Product... Support Guide Compression Method MH, MR, MMR, JPEG Interface: For scanner: For printer: 10 / 100 BASE-TX (Standard...
... new model in the field: Unique or Common: U: Unique C: Common Item 1 2 3 4 5 6 7 Part Number Description A0069104 Scanner Positioning Pin (4pcs/set) G4129310 Ricoh Gray Scale G4049004 RS-13 chart B6455010 SD Card B6456700 PCMCIA Card Adapter B6456800 USB Reader/Writer - G130/G131 Product... Support Guide Compression Method MH, MR, MMR, JPEG Interface: For scanner: For printer: 10 / 100 BASE-TX (Standard...

Maintenance Manual
Page 17
monochrome and color copiers, ink-jet printers, etc.) • Special paper, such as they are especially likely when using the following paper as thermal paper, aluminum foil, carbon paper and conductive paper • Paper whose weight is heavier or lighter than a laser printer (e.g. Print one size ...and type of envelope at a time. • When loading envelopes, be sure to unfold the flaps and position them . • Some kinds of envelope might cause misfeeds, wrinkles or print poorly. • Print quality on envelopes may be uneven if parts...
monochrome and color copiers, ink-jet printers, etc.) • Special paper, such as they are especially likely when using the following paper as thermal paper, aluminum foil, carbon paper and conductive paper • Paper whose weight is heavier or lighter than a laser printer (e.g. Print one size ...and type of envelope at a time. • When loading envelopes, be sure to unfold the flaps and position them . • Some kinds of envelope might cause misfeeds, wrinkles or print poorly. • Print quality on envelopes may be uneven if parts...

Maintenance Manual
Page 58
...If the external tray is attached to avoid burns. Replace Fusing Unit (Type C) A Turn off the printer and wait about an hour to the printer, raise it in a burn. • Touch only the handles, no other parts. After that, install the new fusing unit. The fusing unit gets very hot and will burn... your hands if you touch it from the printer. B If the 2 tray finisher or the booklet finisher is installed, open the duplex reversal...
...If the external tray is attached to avoid burns. Replace Fusing Unit (Type C) A Turn off the printer and wait about an hour to the printer, raise it in a burn. • Touch only the handles, no other parts. After that, install the new fusing unit. The fusing unit gets very hot and will burn... your hands if you touch it from the printer. B If the 2 tray finisher or the booklet finisher is installed, open the duplex reversal...

Maintenance Manual
Page 59
H Take the new fusing unit out of the bag and put it down on a level sur- G Holding the fusing unit handle as shown, slowly pull the fusing unit up, and then put it down on a surface. ❒ Do not touch any area other than the green felt parts. ❒ Do not touch the inside of the fusing unit. Replacing Consumables and Maintenance Kit E Slowly pull out the left cover. F Open the upper left cover. face. 59
H Take the new fusing unit out of the bag and put it down on a level sur- G Holding the fusing unit handle as shown, slowly pull the fusing unit up, and then put it down on a surface. ❒ Do not touch any area other than the green felt parts. ❒ Do not touch the inside of the fusing unit. Replacing Consumables and Maintenance Kit E Slowly pull out the left cover. F Open the upper left cover. face. 59

Maintenance Manual
Page 60
K Close the upper left cover ( ), and then push the part labeled "PUSH" next to align it with the marks on the machine stand. ❒ Install the fusing unit so the blue dial is on the front cover side. J Slowly turn the fusing unit handle in the direction of the arrow, until it clicks ( ). 60 Replacing Consumables and Maintenance Kit I Holding the fusing unit handle, slowly lower the unit to the handle at the bottom rear, until it clicks.
K Close the upper left cover ( ), and then push the part labeled "PUSH" next to align it with the marks on the machine stand. ❒ Install the fusing unit so the blue dial is on the front cover side. J Slowly turn the fusing unit handle in the direction of the arrow, until it clicks ( ). 60 Replacing Consumables and Maintenance Kit I Holding the fusing unit handle, slowly lower the unit to the handle at the bottom rear, until it clicks.

Maintenance Manual
Page 72
Some parts of the machine are at a high voltage and could be checked, adjusted, or repaired, contact your service representative. • Do not take apart or attempt ... the machine needs to be very hot. If you an electric shock. If the machine has laser systems, there is not enough, wipe using a soft cloth. If dry wiping is a risk of sight. Clean the printer periodically to maintain print clarity. Dry wipe the exterior using a soft, wet cloth that is dust...
Some parts of the machine are at a high voltage and could be checked, adjusted, or repaired, contact your service representative. • Do not take apart or attempt ... the machine needs to be very hot. If you an electric shock. If the machine has laser systems, there is not enough, wipe using a soft cloth. If dry wiping is a risk of sight. Clean the printer periodically to maintain print clarity. Dry wipe the exterior using a soft, wet cloth that is dust...

Maintenance Manual
Page 73
C Wipe around the registration roller by turning it could cause a burn. A Turn off the power, and then unplug the power cable. The registration roller is set as shown. Cleaning Cleaning the Registration Roller • The inside of the printer becomes very hot. B Open the right cover as shown. Clean the roller when replacing the black development unit. To avoid burns, do not touch parts labelled "hot surface", otherwise it and applying a soft damp cloth. 73
C Wipe around the registration roller by turning it could cause a burn. A Turn off the power, and then unplug the power cable. The registration roller is set as shown. Cleaning Cleaning the Registration Roller • The inside of the printer becomes very hot. B Open the right cover as shown. Clean the roller when replacing the black development unit. To avoid burns, do not touch parts labelled "hot surface", otherwise it and applying a soft damp cloth. 73

Maintenance Manual
Page 82
...then press the {# Enter} key. I When automatic color adjustment is loaded in the sample: Color at center: 0 Color shifted to left: -1 Color shifted to right: +1 Select Action: 0: Exit Select Action: -1: Re-adjust Select Action: +1: Re-adjust When you select " 0 ", the printer returns to appear, and then click the {# Enter... is printed. Otherwise, select one of the following values according to the position of the printed pattern. Adjusting the Printer H Press the {# Enter} key. K Compare the color adjustment sheet sample with the framed white part of the color in the bypass tray.
...then press the {# Enter} key. I When automatic color adjustment is loaded in the sample: Color at center: 0 Color shifted to left: -1 Color shifted to right: +1 Select Action: 0: Exit Select Action: -1: Re-adjust Select Action: +1: Re-adjust When you select " 0 ", the printer returns to appear, and then click the {# Enter... is printed. Otherwise, select one of the following values according to the position of the printed pattern. Adjusting the Printer H Press the {# Enter} key. K Compare the color adjustment sheet sample with the framed white part of the color in the bypass tray.

Maintenance Manual
Page 84
Adjusting the Printer Correcting the Color Gradation Color gradation during color printing various slightly depending on a number of gradation corrections. rection several times, as needed. ❒ Corrections to obtain suitable print results, color gradation can correct the gradation in the following order. Set the... printing a run of factors. If you can be applied to color gradation are set using "Calibr.1" and "Calibr.2" respectively. 84 The correction value for the highlighted and the middle parts are performed in two areas: the bright part (highlighted) and the medium...
Adjusting the Printer Correcting the Color Gradation Color gradation during color printing various slightly depending on a number of gradation corrections. rection several times, as needed. ❒ Corrections to obtain suitable print results, color gradation can correct the gradation in the following order. Set the... printing a run of factors. If you can be applied to color gradation are set using "Calibr.1" and "Calibr.2" respectively. 84 The correction value for the highlighted and the middle parts are performed in two areas: the bright part (highlighted) and the medium...

Maintenance Manual
Page 86
...that the cursor is changed to 2. 86 Adjusting the Printer A confirmation message appears when complete. dation correction sheet 1. For setting K (black) gradation, hold the correction value (0-6) for "K" of the closest color using either the {U} or {T} key. I Set...value for gradation correction 1 of the Color Calibration Sample Sheet, and set between 0 and 6. low) using correc- Calibrate 1: K:2 M:3 C/Y:3/3 K Set the gradation correction values for the K (black). Calibrate 1: K:2 M:2 C/Y:2/2 The example shows the display of the highlighted part using the same procedure as for M...
...that the cursor is changed to 2. 86 Adjusting the Printer A confirmation message appears when complete. dation correction sheet 1. For setting K (black) gradation, hold the correction value (0-6) for "K" of the closest color using either the {U} or {T} key. I Set...value for gradation correction 1 of the Color Calibration Sample Sheet, and set between 0 and 6. low) using correc- Calibrate 1: K:2 M:3 C/Y:3/3 K Set the gradation correction values for the K (black). Calibrate 1: K:2 M:2 C/Y:2/2 The example shows the display of the highlighted part using the same procedure as for M...

Maintenance Manual
Page 87
...correction values, check "Save and exit"is displayed and press the {# Enter} key. Next, proceed to subsequent print jobs. Color Calibrate: Start Calibr. 2 P Check "Yes" is displayed, and then press the {# Enter} key to print the correc...- R After completing all settings, press the {Online} key. Adjusting the Printer M Check "Yes" is displayed, and press the {# Enter} key to print gra- To save This concludes the setting for ...as in step I and set the gradation correction value of the middle part using calibration 2. tion result.
...correction values, check "Save and exit"is displayed and press the {# Enter} key. Next, proceed to subsequent print jobs. Color Calibrate: Start Calibr. 2 P Check "Yes" is displayed, and then press the {# Enter} key to print the correc...- R After completing all settings, press the {Online} key. Adjusting the Printer M Check "Yes" is displayed, and press the {# Enter} key to print gra- To save This concludes the setting for ...as in step I and set the gradation correction value of the middle part using calibration 2. tion result.

Maintenance Manual
Page 88
Adjusting the Printer Viewing the Color Calibration Sample Sheet and Gradation Correction Sheet The color gradation correction value setting sheet contains two color sample columns: the "Sample 1" column for setting the highlight part and the "Sample 2" column for setting the middle part. Similarly, there are made for M (magenta) is used for calibration 2. ❖ Color sample and correction values...
Adjusting the Printer Viewing the Color Calibration Sample Sheet and Gradation Correction Sheet The color gradation correction value setting sheet contains two color sample columns: the "Sample 1" column for setting the highlight part and the "Sample 2" column for setting the middle part. Similarly, there are made for M (magenta) is used for calibration 2. ❖ Color sample and correction values...
Maintenance Manual
Page 115
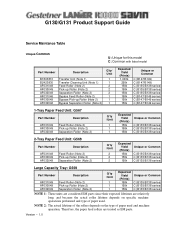
... the printer fied color. Troubleshooting Problem Possible causes and solutions Printing is level. To adjust the print density, press {Menu} on , and then try printing again. 115 If "Add Toner XXX" (where "XXX" is not done in the printer driver option setup. Make sure the machine is partly patchy. See p.75 "Cleaning the DustProof...
... the printer fied color. Troubleshooting Problem Possible causes and solutions Printing is level. To adjust the print density, press {Menu} on , and then try printing again. 115 If "Add Toner XXX" (where "XXX" is not done in the printer driver option setup. Make sure the machine is partly patchy. See p.75 "Cleaning the DustProof...

Maintenance Manual
Page 118
... and feed direction. See p.28 "Loading Paper in the printer driver's [Change User Settings] dialog box. Some parts of the print image are • shiny or glossy when printed as a mixture of paper in Tray 1/2 and the optional paper feed unit". Color gradation during color printing changes slightly, depending on the display might not...
... and feed direction. See p.28 "Loading Paper in the printer driver's [Change User Settings] dialog box. Some parts of the print image are • shiny or glossy when printed as a mixture of paper in Tray 1/2 and the optional paper feed unit". Color gradation during color printing changes slightly, depending on the display might not...
Maintenance Manual
Page 139
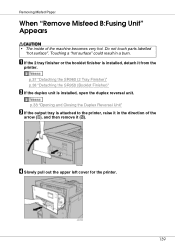
Do not touch parts labelled "hot surface". D Slowly pull out the upper left cover for the printer. 139 Touching a "hot surface" could result in the direction of the machine becomes very hot. p.37 "Detaching the SR960 (2 Tray Finisher)" p.38 "Detaching the SR950 ...(Booklet Finisher)" B If the duplex unit is installed, detach it from the printer. A If the 2 tray finisher or the booklet finisher is installed, open the duplex reversal unit. p.38 "Opening and Closing the Duplex Reversal Unit" C If the...
Do not touch parts labelled "hot surface". D Slowly pull out the upper left cover for the printer. 139 Touching a "hot surface" could result in the direction of the machine becomes very hot. p.37 "Detaching the SR960 (2 Tray Finisher)" p.38 "Detaching the SR950 ...(Booklet Finisher)" B If the duplex unit is installed, detach it from the printer. A If the 2 tray finisher or the booklet finisher is installed, open the duplex reversal unit. p.38 "Opening and Closing the Duplex Reversal Unit" C If the...


