Product Guide
Page 8
... Lanier ID Description Compatibility 40KP Printer Maintenance Kit Type 7200/7300A 402305 481-0896 Color PCU's (CMY) G130/G131 only 80KP Printer Maintenance Kit Type 7200/7300B 402306 481-0897 Color Development Units (CMY) G130/G131 only * 80KP Printer Maintenance Kit Type 7200/7300C 402307 481-0898 Fusing Unit G130/G131 only 80KP Printer Maintenance Kit Type 7200/7300...
... Lanier ID Description Compatibility 40KP Printer Maintenance Kit Type 7200/7300A 402305 481-0896 Color PCU's (CMY) G130/G131 only 80KP Printer Maintenance Kit Type 7200/7300B 402306 481-0897 Color Development Units (CMY) G130/G131 only * 80KP Printer Maintenance Kit Type 7200/7300C 402307 481-0898 Fusing Unit G130/G131 only 80KP Printer Maintenance Kit Type 7200/7300...

Product Guide
Page 13
... PCU Expected Yield (prints) 3P/J 40K Yield Target Number of Rotations Number of Prints 280k 40K Color PCU 40K 280k 40K Black Development 80K Color Development Unit 80k Fusing Unit 80k 860k 80K 870K 80k 8190k 80k The number of Prints (%) 1P/J 2P/J 19.8 (49.5%) 31.7 (79.2%) 19.8 (49.5%) 31.8 (79.6%) 58.3 (72.9%) 73.3 (91...
... PCU Expected Yield (prints) 3P/J 40K Yield Target Number of Rotations Number of Prints 280k 40K Color PCU 40K 280k 40K Black Development 80K Color Development Unit 80k Fusing Unit 80k 860k 80K 870K 80k 8190k 80k The number of Prints (%) 1P/J 2P/J 19.8 (49.5%) 31.7 (79.2%) 19.8 (49.5%) 31.8 (79.6%) 58.3 (72.9%) 73.3 (91...

Product Guide
Page 15
... Prints or Developments 30K 40K 80K 150K Remarks Black PCU Prints R Included in maintenance kit F Color (Y/M/C) PCU Prints R Included in maintenance kit A Black Development Unit Prints R Included in maintenance kit D Color (C/M/Y) Development Unit Prints R Included in maintenance kit B Fusing Unit Prints R Included in maintenance kit C Waste Toner Bottle Dust Filter Prints R R Included in maintenance kit E Included...
... Prints or Developments 30K 40K 80K 150K Remarks Black PCU Prints R Included in maintenance kit F Color (Y/M/C) PCU Prints R Included in maintenance kit A Black Development Unit Prints R Included in maintenance kit D Color (C/M/Y) Development Unit Prints R Included in maintenance kit B Fusing Unit Prints R Included in maintenance kit C Waste Toner Bottle Dust Filter Prints R R Included in maintenance kit E Included...
Maintenance Manual
Page 2
...Unit 52 Replacing the Fusing Unit 58 Replacing the Dustproof Filter 62 Replacing the Waste Toner Bottle 65 Replacing the Paper Feed Roller 68 Cleaning Cautions to Take When Cleaning 72 Cleaning the Registration Roller 73 Cleaning the DustProof Glass 75 Checking the Earth Leakage Breaker 77 Adjusting the Printer Adjusting the Color... Registration 79 Auto Adjust...79 Adjusting the Fuser for Thick Paper 80 Test Sheet Samples 83 Correcting the Color Gradation 84 Set the Gradation Correction Value 84 Viewing the Color Calibration Sample Sheet...
...Unit 52 Replacing the Fusing Unit 58 Replacing the Dustproof Filter 62 Replacing the Waste Toner Bottle 65 Replacing the Paper Feed Roller 68 Cleaning Cautions to Take When Cleaning 72 Cleaning the Registration Roller 73 Cleaning the DustProof Glass 75 Checking the Earth Leakage Breaker 77 Adjusting the Printer Adjusting the Color... Registration 79 Auto Adjust...79 Adjusting the Fuser for Thick Paper 80 Test Sheet Samples 83 Correcting the Color Gradation 84 Set the Gradation Correction Value 84 Viewing the Color Calibration Sample Sheet...

Maintenance Manual
Page 3
When "Remove Misfeed B:Fusing Unit" Appears 139 When "Remove Misfeed R:Finisher" Appears 142 When "Remove Misfeed R1" Appears 146 When "Remove Misfeed R2-4" Appears 148 When "Remove Misfeed Y:Paper Tray" Appears 150 When "Remove Misfeed Z1:Duplex Unit" Appears 151 When "Remove Misfeed Z2:Dup.Feed Unit" Appears 153 Appendix When the Front Cover Does Not Close 157 Moving and Transporting the Printer 159 Moving the Printer 159 Consumables ...161 Toner Cartridge ...161 Staple Cartridge ...161 Other consumables 162 Specifications...163 Mainframe ...163 Options ...166 3
When "Remove Misfeed B:Fusing Unit" Appears 139 When "Remove Misfeed R:Finisher" Appears 142 When "Remove Misfeed R1" Appears 146 When "Remove Misfeed R2-4" Appears 148 When "Remove Misfeed Y:Paper Tray" Appears 150 When "Remove Misfeed Z1:Duplex Unit" Appears 151 When "Remove Misfeed Z2:Dup.Feed Unit" Appears 153 Appendix When the Front Cover Does Not Close 157 Moving and Transporting the Printer 159 Moving the Printer 159 Consumables ...161 Toner Cartridge ...161 Staple Cartridge ...161 Other consumables 162 Specifications...163 Mainframe ...163 Options ...166 3
Maintenance Manual
Page 13
...this precaution may stick to the fusing unit and cause a paper misfeed. ❒ When printing on OHP transparencies that has already been printed onto by other than the ones recommended is used. Storing Paper • Paper should always be guaranteed if paper other printers. Types of Paper and Other... 13 Paper and Other Media Paper Recommendations Loading Paper ❒ Do not use paper that have a print side, load them to stick to the fusing unit and cause misfeeds. ❒ Set the paper as follows: • Avoid storing paper in humid areas. • Avoid exposing paper to direct...
...this precaution may stick to the fusing unit and cause a paper misfeed. ❒ When printing on OHP transparencies that has already been printed onto by other than the ones recommended is used. Storing Paper • Paper should always be guaranteed if paper other printers. Types of Paper and Other... 13 Paper and Other Media Paper Recommendations Loading Paper ❒ Do not use paper that have a print side, load them to stick to the fusing unit and cause misfeeds. ❒ Set the paper as follows: • Avoid storing paper in humid areas. • Avoid exposing paper to direct...

Maintenance Manual
Page 58
... tray is attached to cool could result in the direction of the arrow ( ), and then remove it from the printer. Replacing Consumables and Maintenance Kit Replacing the Fusing Unit • The fusing unit becomes very hot. The fusing unit gets very hot and will burn your hands if you touch it in a burn. • Touch only the...
... tray is attached to cool could result in the direction of the arrow ( ), and then remove it from the printer. Replacing Consumables and Maintenance Kit Replacing the Fusing Unit • The fusing unit becomes very hot. The fusing unit gets very hot and will burn your hands if you touch it in a burn. • Touch only the...

Maintenance Manual
Page 59
G Holding the fusing unit handle as shown, slowly pull the fusing unit up, and then put it down on a surface. ❒ Do not touch any area other than the green felt parts. ❒ Do not touch the inside of the bag and put it down on a level sur- F Open the upper left cover. H Take the new fusing unit out of the fusing unit. face. 59 Replacing Consumables and Maintenance Kit E Slowly pull out the left cover.
G Holding the fusing unit handle as shown, slowly pull the fusing unit up, and then put it down on a surface. ❒ Do not touch any area other than the green felt parts. ❒ Do not touch the inside of the bag and put it down on a level sur- F Open the upper left cover. H Take the new fusing unit out of the fusing unit. face. 59 Replacing Consumables and Maintenance Kit E Slowly pull out the left cover.

Maintenance Manual
Page 60
K Close the upper left cover ( ), and then push the part labeled "PUSH" next to align it with the marks on the machine stand. ❒ Install the fusing unit so the blue dial is on the front cover side. Replacing Consumables and Maintenance Kit I Holding the fusing unit handle, slowly lower the unit to the handle at the bottom rear, until it clicks. J Slowly turn the fusing unit handle in the direction of the arrow, until it clicks ( ). 60
K Close the upper left cover ( ), and then push the part labeled "PUSH" next to align it with the marks on the machine stand. ❒ Install the fusing unit so the blue dial is on the front cover side. Replacing Consumables and Maintenance Kit I Holding the fusing unit handle, slowly lower the unit to the handle at the bottom rear, until it clicks. J Slowly turn the fusing unit handle in the direction of the arrow, until it clicks ( ). 60
Maintenance Manual
Page 98
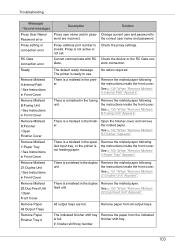
... the IP ad- Or, press the {Form Feed} key, and then select the tray using the control panel. is Close the cover for the printer. Close the upper cover for the paper feed table/Large Capacity Tray feed table/Large Capacity Tray. is open . er for the toner cartridge) is...open . DHCP assigned Cannot change An attempt to change after setting DHCP dress, subnet mask or gateway to [Off]. The paper entrance cover for the fusing unit) is not set to cancel the print job. Check Toner Crtg XXX/XXX The indicated toner cartridge is open . See p.40 "Replacing the Toner ...
... the IP ad- Or, press the {Form Feed} key, and then select the tray using the control panel. is Close the cover for the printer. Close the upper cover for the paper feed table/Large Capacity Tray feed table/Large Capacity Tray. is open . er for the toner cartridge) is...open . DHCP assigned Cannot change An attempt to change after setting DHCP dress, subnet mask or gateway to [Off]. The paper entrance cover for the fusing unit) is not set to cancel the print job. Check Toner Crtg XXX/XXX The indicated toner cartridge is open . See p.40 "Replacing the Toner ...
Maintenance Manual
Page 103
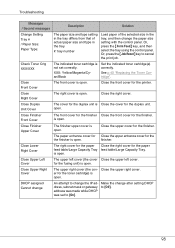
... in Front Cover There is a misfeed in the speci- Remove the misfed paper following fied input tray, or the printer is a misfeed in the printer. See p.142 "When "Remove Misfeed R:Finisher" Appears". Remove Misfeed Y:Paper Tray / See Instructions in Front Cover ... the misfed paper following the instructions inside the front cover. See p.139 "When "Remove Misfeed B:Fusing Unit" Appears". not feeding paper. feed unit. Remove Misfeed Z2:Dup.Feed Unit / Open Front Cover There is a misfeed in the duplex Remove the misfed paper. Troubleshooting Messages ...
... in Front Cover There is a misfeed in the speci- Remove the misfed paper following fied input tray, or the printer is a misfeed in the printer. See p.142 "When "Remove Misfeed R:Finisher" Appears". Remove Misfeed Y:Paper Tray / See Instructions in Front Cover ... the misfed paper following the instructions inside the front cover. See p.139 "When "Remove Misfeed B:Fusing Unit" Appears". not feeding paper. feed unit. Remove Misfeed Z2:Dup.Feed Unit / Open Front Cover There is a misfeed in the duplex Remove the misfed paper. Troubleshooting Messages ...

Maintenance Manual
Page 105
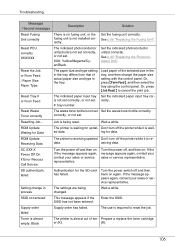
...". XXX: Yellow/Magenta/Cyan/Black Set the indicated development unit(s) correctly. Troubleshooting Messages / Second messages Description Solution Replace Color PCU soon (A) The time to replace the color PCU is soon. Replace Feed Roller (Type H) It is /are not set correctly, or not set . Replace the fusing unit. on your service contract, contact your sales or...
...". XXX: Yellow/Magenta/Cyan/Black Set the indicated development unit(s) correctly. Troubleshooting Messages / Second messages Description Solution Replace Color PCU soon (A) The time to replace the color PCU is soon. Replace Feed Roller (Type H) It is /are not set correctly, or not set . Replace the fusing unit. on your service contract, contact your sales or...
Maintenance Manual
Page 106
... Form Feed The indicated paper input tray is almost out of ton- ed data. ROM Update Receiving Data The printer is required to cancel the print job. If the message appears again, contact your sales or service representative. failed...SD authenticatn. Enter the SSID. Troubleshooting Messages / Second messages Description Solution Reset Fusing Unit correctly There is no fusing unit, or the fusing unit is /are being reset. See p.45 "Replacing the Photoconductor Unit". Set the fusing unit correctly. Prepare a replace the toner cartridge er (K). (K). 106 See p.58...
... Form Feed The indicated paper input tray is almost out of ton- ed data. ROM Update Receiving Data The printer is required to cancel the print job. If the message appears again, contact your sales or service representative. failed...SD authenticatn. Enter the SSID. Troubleshooting Messages / Second messages Description Solution Reset Fusing Unit correctly There is no fusing unit, or the fusing unit is /are being reset. See p.45 "Replacing the Photoconductor Unit". Set the fusing unit correctly. Prepare a replace the toner cartridge er (K). (K). 106 See p.58...
Maintenance Manual
Page 139
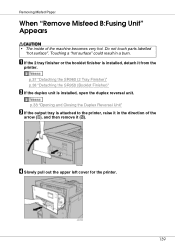
... is installed, open the duplex reversal unit. p.37 "Detaching the SR960 (2 Tray Finisher)" p.38 "Detaching the SR950 (Booklet Finisher)" B If the duplex unit is attached to the printer, raise it in a burn. Removing Misfed Paper When "Remove Misfeed B:Fusing Unit" Appears • The inside of ...the arrow ( ), and then remove it from the printer. Touching a "hot surface" could result in the...
... is installed, open the duplex reversal unit. p.37 "Detaching the SR960 (2 Tray Finisher)" p.38 "Detaching the SR950 (Booklet Finisher)" B If the duplex unit is attached to the printer, raise it in a burn. Removing Misfed Paper When "Remove Misfeed B:Fusing Unit" Appears • The inside of ...the arrow ( ), and then remove it from the printer. Touching a "hot surface" could result in the...

Maintenance Manual
Page 162
... more frequently than indicated. Name Printer Maintenance Kit Type 7200/7300A Printer Maintenance Kit Type 7200/7300B Printer Maintenance Kit Type 7200/7300C Printer Maintenance Kit Type 7200/7300D Printer Maintenance Kit Type 3800E Printer Maintenance Kit Type 7200/7300F Printer Maintenance Kit Type 3800H Consumables Color photoconductor unit × 3 Color development unit × 3 Fusing unit × 1 Black development unit × 1 Waste toner bottle...
... more frequently than indicated. Name Printer Maintenance Kit Type 7200/7300A Printer Maintenance Kit Type 7200/7300B Printer Maintenance Kit Type 7200/7300C Printer Maintenance Kit Type 7200/7300D Printer Maintenance Kit Type 3800E Printer Maintenance Kit Type 7200/7300F Printer Maintenance Kit Type 3800H Consumables Color photoconductor unit × 3 Color development unit × 3 Fusing unit × 1 Black development unit × 1 Waste toner bottle...

Setup Guide
Page 7
...use aluminum foil, carbon-containing paper or other parts. If it topples over, it could result in an environment that , install the new fusing unit. Operating the machine in a burn. • Touch only the handles, no other conductive paper. Accumulated dust can cause an electrical fire ...for a long time, unplug the power code. • When you pull out the plug from humidity and dust. When installing a new fusing unit, turn off the printer and wait about an hour. A fire or an electric shock might cause an electrical shock. • Keep the machine in a confined...
...use aluminum foil, carbon-containing paper or other parts. If it topples over, it could result in an environment that , install the new fusing unit. Operating the machine in a burn. • Touch only the handles, no other conductive paper. Accumulated dust can cause an electrical fire ...for a long time, unplug the power code. • When you pull out the plug from humidity and dust. When installing a new fusing unit, turn off the printer and wait about an hour. A fire or an electric shock might cause an electrical shock. • Keep the machine in a confined...

Setup Guide
Page 9
Read This First Positions of RWARNING and RCAUTION labels This machine has labels for RWARNING and RCAUTION at the positions shown below. Turn off the main power and be careful when replacing fusing unit/removing misfed paper. High temperature parts. 9 High temperature parts. For safety, please follow the instructions and handle the machine as indicated.
Read This First Positions of RWARNING and RCAUTION labels This machine has labels for RWARNING and RCAUTION at the positions shown below. Turn off the main power and be careful when replacing fusing unit/removing misfed paper. High temperature parts. 9 High temperature parts. For safety, please follow the instructions and handle the machine as indicated.

Setup Guide
Page 16
... may occur due to the Printer Exterior: Rear View ❖ Basic Model Printer 1. Earth leakage breaker Prevents electric shock. 9. Connector board Connect the main power cable, cables from options, etc. Upper left cover Open this port and the other end to remove misfed paper or when replacing the fusing unit. 7. Do not block or...
... may occur due to the Printer Exterior: Rear View ❖ Basic Model Printer 1. Earth leakage breaker Prevents electric shock. 9. Connector board Connect the main power cable, cables from options, etc. Upper left cover Open this port and the other end to remove misfed paper or when replacing the fusing unit. 7. Do not block or...

Setup Guide
Page 17
...the other end to the wall outlet. 6. Remove the paper guide before pulling up and hold the bar of the printer, when removing misfed paper or when replacing the fusing unit. 7. Power port Connect the power cable to this port. ❒ The cable is already connected if your machine... filter. 2. Connector board Connect the main power cable, cables from overheating. to the appropriate port on this handle to the Printer ❖ Duplex Unit Standard Model Printer 1. Guide to lift the printer. Duplex reversal unit Open this, and then the upper left cover of this board. 3.
...the other end to the wall outlet. 6. Remove the paper guide before pulling up and hold the bar of the printer, when removing misfed paper or when replacing the fusing unit. 7. Power port Connect the power cable to this port. ❒ The cable is already connected if your machine... filter. 2. Connector board Connect the main power cable, cables from overheating. to the appropriate port on this handle to the Printer ❖ Duplex Unit Standard Model Printer 1. Guide to lift the printer. Duplex reversal unit Open this, and then the upper left cover of this board. 3.

Setup Guide
Page 19
... Conductor Unit The printer comes with one black and three color (yellow, cyan, and magenta) photoconductor units. When "Replace Black PCU (Type F)" or "Replace Color PCU (Type A)" appears on the display, replace the development unit. 19 Unit (Type D)" or "Replace Color Dev. (Type B)" appears on the display, replace the photo conductor unit. 6. When "Replace Black Dev. Fusing Unit When "Replace Fusing Unit (C)" appears...
... Conductor Unit The printer comes with one black and three color (yellow, cyan, and magenta) photoconductor units. When "Replace Black PCU (Type F)" or "Replace Color PCU (Type A)" appears on the display, replace the development unit. 19 Unit (Type D)" or "Replace Color Dev. (Type B)" appears on the display, replace the photo conductor unit. 6. When "Replace Black Dev. Fusing Unit When "Replace Fusing Unit (C)" appears...


