Hardware Guide
Page 7
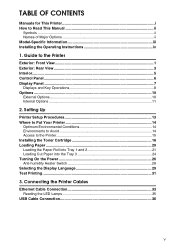
... Connection 33 Reading the LED Lamps 35 USB Cable Connection 36 v TABLE OF CONTENTS Manuals for This Printer i How to the Printer 15 Installing the Toner Cartridge 16 Loading Paper ...20 Loading the Paper Roll into Tray 1 and 2 21 Loading Cut Paper into the Tray 3 24 Turning On the Power 26...
... Connection 33 Reading the LED Lamps 35 USB Cable Connection 36 v TABLE OF CONTENTS Manuals for This Printer i How to the Printer 15 Installing the Toner Cartridge 16 Loading Paper ...20 Loading the Paper Roll into Tray 1 and 2 21 Loading Cut Paper into the Tray 3 24 Turning On the Power 26...

Hardware Guide
Page 8
Replacing Consumables Replacing the Toner Cartridge 95 7. Cleaning and Adjusting the Printer Maintaining Your Printer 101 Cleaning the Main Unit 102 Adjusting Paper Thickness 103 Adjusting the Fine Ratio 105 ...
Replacing Consumables Replacing the Toner Cartridge 95 7. Cleaning and Adjusting the Printer Maintaining Your Printer 101 Cleaning the Main Unit 102 Adjusting Paper Thickness 103 Adjusting the Fine Ratio 105 ...

Hardware Guide
Page 9
... (B 129 Paper Misfeed Message (C 129 Paper Misfeed Message (N 130 Paper Misfeed Message (V 131 10.Appendix Moving and Transporting the Printer 133 Disposal ...134 Consumables ...135 Toner Cartridge ...135 Specifications for the Main Unit 136 Specifications for Options 139 Paper Cassette Type 240 139 IEEE 802.11b Interface Unit Type H 139 Gigabit...
... (B 129 Paper Misfeed Message (C 129 Paper Misfeed Message (N 130 Paper Misfeed Message (V 131 10.Appendix Moving and Transporting the Printer 133 Disposal ...134 Consumables ...135 Toner Cartridge ...135 Specifications for the Main Unit 136 Specifications for Options 139 Paper Cassette Type 240 139 IEEE 802.11b Interface Unit Type H 139 Gigabit...
Hardware Guide
Page 11
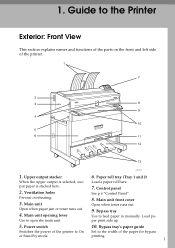
Upper output stacker 6. Main unit front cover Open when toner runs out. 9. Main unit opening lever Use to the width of the paper for bypass or Stand by mode. printing. 1 Load paper print side up. 5. ... parts on the front and left side of the printer to On Set to open the main unit. Main unit Open when paper jam or toner runs out. 4. Load a paper roll here. 7. Power switch 10. 1.
Upper output stacker 6. Main unit front cover Open when toner runs out. 9. Main unit opening lever Use to the width of the paper for bypass or Stand by mode. printing. 1 Load paper print side up. 5. ... parts on the front and left side of the printer to On Set to open the main unit. Main unit Open when paper jam or toner runs out. 4. Load a paper roll here. 7. Power switch 10. 1.
Hardware Guide
Page 15
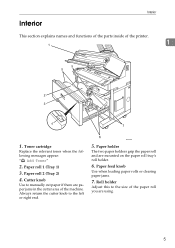
.... Always return the cutter knob to manually cut paper if there are paper jams in the cutter area of the printer. 1 1. BAL004S 5. Paper roll 2 (Tray 2) 4. Toner cartridge Replace the relevant toner when the following messages appear: "D Add Toner" 2. Interior Interior This section explains names and functions of the parts inside of the machine.
.... Always return the cutter knob to manually cut paper if there are paper jams in the cutter area of the printer. 1 1. BAL004S 5. Paper roll 2 (Tray 2) 4. Toner cartridge Replace the relevant toner when the following messages appear: "D Add Toner" 2. Interior Interior This section explains names and functions of the parts inside of the machine.

Hardware Guide
Page 23
... heater are provided. Setting Up Printer Setup Procedures Follow the steps explained below to a computer. Installing the toner cartridge T Loading Paper T Turning the Power On T Selecting the Display Language T Connecting the Printer Cables T Insert the toner cartridge included with the printer. English is working properly. See p.33 "Ethernet Cable Connection". See p.26... Printing". See p.49 "IEEE 802.11b (Wireless LAN) Configuration". Print a test page to confirm the printer is set up the printer. See p.16 "Installing the Toner Cartridge". 2.
... heater are provided. Setting Up Printer Setup Procedures Follow the steps explained below to a computer. Installing the toner cartridge T Loading Paper T Turning the Power On T Selecting the Display Language T Connecting the Printer Cables T Insert the toner cartridge included with the printer. English is working properly. See p.33 "Ethernet Cable Connection". See p.26... Printing". See p.49 "IEEE 802.11b (Wireless LAN) Configuration". Print a test page to confirm the printer is set up the printer. See p.16 "Installing the Toner Cartridge". 2.

Hardware Guide
Page 26
... flame. Consult a doctor if necessary. Setting Up Installing the Toner Cartridge This section explains adding and storing toner. nite when exposed to an open toner containers forcefully. R CAUTION: • If toner or used toner is swallowed, dilute by drinking a large amount of the toner cartridge. 16 Toner can spill, dirtying your eyes, flush immediately with cold water...
... flame. Consult a doctor if necessary. Setting Up Installing the Toner Cartridge This section explains adding and storing toner. nite when exposed to an open toner containers forcefully. R CAUTION: • If toner or used toner is swallowed, dilute by drinking a large amount of the toner cartridge. 16 Toner can spill, dirtying your eyes, flush immediately with cold water...

Hardware Guide
Page 27
Installing the Toner Cartridge A Lift both main unit opening levers, and then open the main unit upward. 2 BAL040S B Open the main unit front cover. Tap the other end of the cartridge ( ) four or five times. BAL041S C Remove the toner cartridge from its package. Gently tap the capped and end of the cartridge ( ) four or five times. BAL074S 17
Installing the Toner Cartridge A Lift both main unit opening levers, and then open the main unit upward. 2 BAL040S B Open the main unit front cover. Tap the other end of the cartridge ( ) four or five times. BAL041S C Remove the toner cartridge from its package. Gently tap the capped and end of the cartridge ( ) four or five times. BAL074S 17

Hardware Guide
Page 28
... the tape (next step). Rotate the joint ( ) to side four or five times so that it again. 2 BAL075S E Insert the end of the toner cartridge into the right in the direction of the cartridge. If the joint does not turn easily, tap the end of the cartridge and shake... it rotates easily. In- er moves freely inside of the arrow ( ). sert the toner cartridge into the toner holder on the left ( ). Setting Up D Shake the toner cartridge from the toner cartridge. 18 BAL046S BAL045S F Slowly remove the tape from side to confirm that the ton-
... the tape (next step). Rotate the joint ( ) to side four or five times so that it again. 2 BAL075S E Insert the end of the toner cartridge into the right in the direction of the cartridge. If the joint does not turn easily, tap the end of the cartridge and shake... it rotates easily. In- er moves freely inside of the arrow ( ). sert the toner cartridge into the toner holder on the left ( ). Setting Up D Shake the toner cartridge from the toner cartridge. 18 BAL046S BAL045S F Slowly remove the tape from side to confirm that the ton-

Hardware Guide
Page 29
... the actual number of the arrow unit it was purchased. 19 Note ❒ The waste toner bottle makes a noise when toner is not covered by warranty. Installing the Toner Cartridge G Rotate the toner cartridge in the direction of pages will vary depending on paper type, size, contents, and print... settings. ❒ Toner is added. However, if there is a problem, contact the store where it stops. 2 BAL047S H Close the main unit front cover and the main unit. This noise does not indicate a malfunction. ❒ The toner cartridge supplied with the printer allow you...
... the actual number of the arrow unit it was purchased. 19 Note ❒ The waste toner bottle makes a noise when toner is not covered by warranty. Installing the Toner Cartridge G Rotate the toner cartridge in the direction of pages will vary depending on paper type, size, contents, and print... settings. ❒ Toner is added. However, if there is a problem, contact the store where it stops. 2 BAL047S H Close the main unit front cover and the main unit. This noise does not indicate a malfunction. ❒ The toner cartridge supplied with the printer allow you...

Hardware Guide
Page 105
... amount of children. R CAUTION: • If toner or used toner containers in accidental ingestion. 95 R CAUTION: • If toner or used or unused) and toner containers out of reach of water. R CAUTION: • Keep toner (used toner is inhaled, gargle with cold water. If your skin comes into contact with toner, wash the affected area thoroughly with...
... amount of children. R CAUTION: • If toner or used toner containers in accidental ingestion. 95 R CAUTION: • If toner or used or unused) and toner containers out of reach of water. R CAUTION: • Keep toner (used toner is inhaled, gargle with cold water. If your skin comes into contact with toner, wash the affected area thoroughly with...

Hardware Guide
Page 106
... opening levers, and then lift open the main unit. Replacing Consumables Replace the toner if any of non-recommended toner can result in malfunction. ❒ When adding toner, do so. ❒ Do not shake the removed toner cartridge, remaining toner might scatter. ❒ Store toner containers in a cool, dry place away from direct sunlight. ❒ Store...
... opening levers, and then lift open the main unit. Replacing Consumables Replace the toner if any of non-recommended toner can result in malfunction. ❒ When adding toner, do so. ❒ Do not shake the removed toner cartridge, remaining toner might scatter. ❒ Store toner containers in a cool, dry place away from direct sunlight. ❒ Store...

Hardware Guide
Page 107
B Open the main unit front cover. Replacing the Toner Cartridge BAL041S C Hold the toner cartridge at the edge of the right end, and then roll it in the direction of the arrow. 6 BAL042S D Hold the toner cartridge at the edge of the left end, and then remove it from the printer. BAL043S 97
B Open the main unit front cover. Replacing the Toner Cartridge BAL041S C Hold the toner cartridge at the edge of the right end, and then roll it in the direction of the arrow. 6 BAL042S D Hold the toner cartridge at the edge of the left end, and then remove it from the printer. BAL043S 97

Hardware Guide
Page 108
If the joint does not turn easily, tap the end of the cartridge and shake it rotates easily. Then insert the toner cartridge into the toner holder on the left ( ). Gently tap the capped and end of the cartridge. Rotate the joint ( ) to side four or five times so that it ...again. 6 BAL075S G Insert the end of the toner cartridge into the right in the direction of the arrow ( ). er moves freely inside of the cartridge ( ) four or five times. BAL045S Do not rotate...
If the joint does not turn easily, tap the end of the cartridge and shake it rotates easily. Then insert the toner cartridge into the toner holder on the left ( ). Gently tap the capped and end of the cartridge. Rotate the joint ( ) to side four or five times so that it ...again. 6 BAL075S G Insert the end of the toner cartridge into the right in the direction of the arrow ( ). er moves freely inside of the cartridge ( ) four or five times. BAL045S Do not rotate...

Hardware Guide
Page 109
... to meet the highest standards of the arrow until it was purchased. 99 This noise does not indicate a malfunction. ❒ The toner cartridge supplied with the printer allows you can print will vary depending on paper type, size, contents, and print settings. ❒... front cover and the main unit. These numbers were obtained from the toner cartridge. When purchasing expendable supplies, we recommend using only those provided by an authorized dealer. ❒ Toner is added. BAL046S I Rotate the toner cartridge in the direction of quality and functionality. Note ❒ The ...
... to meet the highest standards of the arrow until it was purchased. 99 This noise does not indicate a malfunction. ❒ The toner cartridge supplied with the printer allows you can print will vary depending on paper type, size, contents, and print settings. ❒... front cover and the main unit. These numbers were obtained from the toner cartridge. When purchasing expendable supplies, we recommend using only those provided by an authorized dealer. ❒ Toner is added. BAL046S I Rotate the toner cartridge in the direction of quality and functionality. Note ❒ The ...

Hardware Guide
Page 112
A Lift the main unit opening levers on the imaging area. Cleaning and Adjusting the Printer Cleaning the Main Unit Clean off toner that may deteriorate. BAL010S B Wipe it with a soft, dry cloth. 7 BAL011S C Close the main unit cover gently. 102 Important ❒ Do not leave the main unit more than 10 minutes, otherwise print quality may have collected on either side and open the main unit.
A Lift the main unit opening levers on the imaging area. Cleaning and Adjusting the Printer Cleaning the Main Unit Clean off toner that may deteriorate. BAL010S B Wipe it with a soft, dry cloth. 7 BAL011S C Close the main unit cover gently. 102 Important ❒ Do not leave the main unit more than 10 minutes, otherwise print quality may have collected on either side and open the main unit.

Hardware Guide
Page 121
...Job... Wait a while. This message might appear on the control panel mean and what to [On]. Wait until "Ready" ap- Replace the toner cartridge. Offline Please wait... Wait a while. pears on . Make the change ... Setting change after printing, and then turn back on the ...described below. ❖ Status Messages Message Ready Waiting... All jobs in hexadecimal format. The printer is preparing, performing initial adjustments, or adding toner. 8. An attempt to change the IP address, subnet mask or gateway address was made while [DHCP] was set to do when a particular...
...Job... Wait a while. This message might appear on the control panel mean and what to [On]. Wait until "Ready" ap- Replace the toner cartridge. Offline Please wait... Wait a while. pears on . Make the change ... Setting change after printing, and then turn back on the ...described below. ❖ Status Messages Message Ready Waiting... All jobs in hexadecimal format. The printer is preparing, performing initial adjustments, or adding toner. 8. An attempt to change the IP address, subnet mask or gateway address was made while [DHCP] was set to do when a particular...

Hardware Guide
Page 122
...interface unit is installed correctly. If the message appears again, contact your sales or service representative. SD Card authenti- D Toner is almost The printer is al- Check that the machine cannot use has been installed. If the problem persists, contact ...interface unit installed. Install the correct board properly. If the message appears again, contact your sales or service representative. E Waste Toner al- Note ❒ Confirm error details by printing the Error Log. Troubleshooting Messages Cause Solution Connect failed:WirelessCard Turn power ...
...interface unit is installed correctly. If the message appears again, contact your sales or service representative. SD Card authenti- D Toner is almost The printer is al- Check that the machine cannot use has been installed. If the problem persists, contact ...interface unit installed. Install the correct board properly. If the message appears again, contact your sales or service representative. E Waste Toner al- Note ❒ Confirm error details by printing the Error Log. Troubleshooting Messages Cause Solution Connect failed:WirelessCard Turn power ...

Hardware Guide
Page 123
Job completed. A Printer/Document Server Features job has finished. times. ers of a paper jam or toner request, if the printer's covers are pressed. Single short beep. Meaning Printer ready. Panel/screen input accepted. Important ❒ Users cannot mute ... long beeps. Panel Tones Panel Tones The following table explains the meaning of the energysaving mode or was pressed. Paper may have jammed or toner may need replenishing. Printer requires user attention. Tone pattern Two long beeps. Single long beep. Cause After cooling or being switched on, the...
Job completed. A Printer/Document Server Features job has finished. times. ers of a paper jam or toner request, if the printer's covers are pressed. Single short beep. Meaning Printer ready. Panel/screen input accepted. Important ❒ Users cannot mute ... long beeps. Panel Tones Panel Tones The following table explains the meaning of the energysaving mode or was pressed. Paper may have jammed or toner may need replenishing. Printer requires user attention. Tone pattern Two long beeps. Single long beep. Cause After cooling or being switched on, the...

Hardware Guide
Page 127
...the im- size, and character settings. out might result in the printing process. language might have not been selected. 117 Cause Solution Toner is beginning to print without using the graphics comgraphics command, mand. The paper is beginning to print. puter display. See the printer ...driver Help. Use paper that has been stored in the recommended temperature and humidity condition. Toner is damp. When printing graphics, the output and the screen are not printed. Garbled characters are printed. run out. reduction, image ...
...the im- size, and character settings. out might result in the printing process. language might have not been selected. 117 Cause Solution Toner is beginning to print without using the graphics comgraphics command, mand. The paper is beginning to print. puter display. See the printer ...driver Help. Use paper that has been stored in the recommended temperature and humidity condition. Toner is damp. When printing graphics, the output and the screen are not printed. Garbled characters are printed. run out. reduction, image ...


