User Guide
Page 23
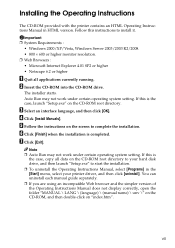
... CD-ROM root directory. Auto Run may not work under certain operating system setting. D Click [Install Manuals]. You can uninstall each manual guide separately. ❒ If you are using an incompatible Web browser and the simpler version of the Operating Instructions Manual does not display correctly, open the folder "MANUAL \ LANG \ (language) \ (manual name) \ unv \" on the CD-ROM, and then double-click on the screen to...
... CD-ROM root directory. Auto Run may not work under certain operating system setting. D Click [Install Manuals]. You can uninstall each manual guide separately. ❒ If you are using an incompatible Web browser and the simpler version of the Operating Instructions Manual does not display correctly, open the folder "MANUAL \ LANG \ (language) \ (manual name) \ unv \" on the CD-ROM, and then double-click on the screen to...
User Guide
Page 43
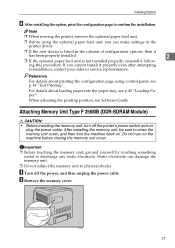
... not turn off the power, and then unplug the power cable. Note ❒ When moving the printer, remove the optional paper feed unit. ❒ Before using control panel, see Software Guide. For details about printing the configuration page using the optional paper feed unit, you cannot install it follow- After installing the memory unit, be sure to physical shocks. A Turn off the printer's power switch and un- B Remove the memory cover. If you can damage the memory unit. ❒ Do not subject the memory unit to close the memory unit cover...
... not turn off the power, and then unplug the power cable. Note ❒ When moving the printer, remove the optional paper feed unit. ❒ Before using control panel, see Software Guide. For details about printing the configuration page using the optional paper feed unit, you cannot install it follow- After installing the memory unit, be sure to physical shocks. A Turn off the printer's power switch and un- B Remove the memory cover. If you can damage the memory unit. ❒ Do not subject the memory unit to close the memory unit cover...

User Guide
Page 136
... correct paper or change the paper type / size using dial or via the special paper size setting menu on again. Remove the misfed paper. Remove Misfeed Tray 1 There is a paper jam in Tray 2. Remove Misfeed Tray 2 There is a paper jam in the optional memory on , and then download the controller FW again. Replace the toner to insufficient memory. ed paper tray. Load Paper: # or Stop/Start The printer detected that the actual paper type and size are not the same as the paper tray # (1, 2, bypass) size setting and the paper type settings. Memory full This error...
... correct paper or change the paper type / size using dial or via the special paper size setting menu on again. Remove the misfed paper. Remove Misfeed Tray 1 There is a paper jam in Tray 2. Remove Misfeed Tray 2 There is a paper jam in the optional memory on , and then download the controller FW again. Replace the toner to insufficient memory. ed paper tray. Load Paper: # or Stop/Start The printer detected that the actual paper type and size are not the same as the paper tray # (1, 2, bypass) size setting and the paper type settings. Memory full This error...
User Guide
Page 170
P Panel indicator, 112 Paper and other media, 35 Paper feed roller, 102 Paper Feed Unit TK1010, 15, 142 Paper not supported, 42 Paper recommendations, 37 Paper type, 38 Power socket, 2 Power switch, 1 Print area, 43 Print cartridge, 3, 69, 137 Printer does not print, 113 Printing configuration page, 14 Printing test page, 14 R Ready indicator, 4 Rear cover, 2 Rear view, 2 Registration roller, 105 Remove misfed internal path, 127 Remove misfeed duplex unit, 130 Remove misfeed paper exit, 133 Remove misfeed bypass tray, 132 Remove misfeed tray 1, 129 Remove misfeed tray 2, 130 Removing misfed ...
P Panel indicator, 112 Paper and other media, 35 Paper feed roller, 102 Paper Feed Unit TK1010, 15, 142 Paper not supported, 42 Paper recommendations, 37 Paper type, 38 Power socket, 2 Power switch, 1 Print area, 43 Print cartridge, 3, 69, 137 Printer does not print, 113 Printing configuration page, 14 Printing test page, 14 R Ready indicator, 4 Rear cover, 2 Rear view, 2 Registration roller, 105 Remove misfed internal path, 127 Remove misfeed duplex unit, 130 Remove misfeed paper exit, 133 Remove misfeed bypass tray, 132 Remove misfeed tray 1, 129 Remove misfeed tray 2, 130 Removing misfed ...

User Guide
Page 180
... Server 2003/2003 R2 10 Installing the PostScript 3 Printer Driver (Windows Vista and Windows Server 2008 12 Troubleshooting USB 13 If a Message Appears during Installation 14 Making Option Settings for the Printer 15 Conditions for the Specified Model ii How to Read This Manual iii Symbols ...iii 1. Making Printer Settings 21 PostScript 3 - Other Print Operations Form Feed...29 Performing Form Feed 29 Changing the Paper Input Setting 30 Canceling a Print Job 30 Canceling a Print Job 31 Canceling a Print Job Using the Control Panel 31 Windows - Setting Up the Printer Driver PCL...
... Server 2003/2003 R2 10 Installing the PostScript 3 Printer Driver (Windows Vista and Windows Server 2008 12 Troubleshooting USB 13 If a Message Appears during Installation 14 Making Option Settings for the Printer 15 Conditions for the Specified Model ii How to Read This Manual iii Symbols ...iii 1. Making Printer Settings 21 PostScript 3 - Other Print Operations Form Feed...29 Performing Form Feed 29 Changing the Paper Input Setting 30 Canceling a Print Job 30 Canceling a Print Job 31 Canceling a Print Job Using the Control Panel 31 Windows - Setting Up the Printer Driver PCL...

User Guide
Page 189
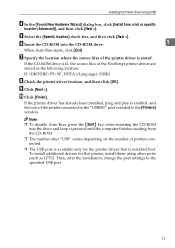
Log on the configuration page. C Select an interface language, and then click [OK]. E Click [Next >]. J Enter the printer's IP address in the [Port name] box. You can select [Autodetect], [TCP/IP Device], or [Web Services Device]. The default interface language is se- H In the drop-down menu, select [Standard TCP/IP Port], and then click [Next >]. The [Add Standard TCP/IP Printer Port Wizard] dialog box appears. The IP address you enter here...
Log on the configuration page. C Select an interface language, and then click [OK]. E Click [Next >]. J Enter the printer's IP address in the [Port name] box. You can select [Autodetect], [TCP/IP Device], or [Web Services Device]. The default interface language is se- H In the drop-down menu, select [Standard TCP/IP Port], and then click [Next >]. The [Add Standard TCP/IP Printer Port Wizard] dialog box appears. The IP address you enter here...

User Guide
Page 193
...; To install this printer, install them using the USB cable. C Turn the printer's power switch back to on security settings, the [User Account Control] dialog box might appear after you must have an account that is not installed, follow the plug-and-play starts. Then the [New Hardware Found], [Device Driver Wizard], or [Add New Hardware Wizard] dialog box appears, depending on the operating system. ❒ To disable Auto Run, press...
...; To install this printer, install them using the USB cable. C Turn the printer's power switch back to on security settings, the [User Account Control] dialog box might appear after you must have an account that is not installed, follow the plug-and-play starts. Then the [New Hardware Found], [Device Driver Wizard], or [Add New Hardware Wizard] dialog box appears, depending on the operating system. ❒ To disable Auto Run, press...

User Guide
Page 194
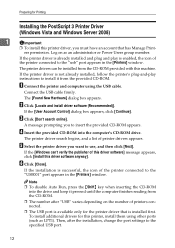
... printer, install them using the USB cable. If the printer driver has already been installed, plug and play is enabled, and the icon of the printer connected to the "USB001" port is turned to the [Printers] window. ers permission. G Specify the location where the source files of the printer driver is stored. 1 If the CD-ROM drive is added to off. Preparing for Printing F Insert the CD-ROM into the drive and keep...
... printer, install them using the USB cable. If the printer driver has already been installed, plug and play is enabled, and the icon of the printer connected to the "USB001" port is turned to the [Printers] window. ers permission. G Specify the location where the source files of the printer driver is stored. 1 If the CD-ROM drive is added to off. Preparing for Printing F Insert the CD-ROM into the drive and keep...
User Guide
Page 195
... reading from a list or specific location (Advanced)], and then click [Next >]. I Click [Next >]. J Click [Finish]. If the CD-ROM drive is D, the source files of the printer driver is available only for this printer, install them using other ports (such as LPT1). G Specify the location where the source files of the PostScript printer driver are stored in the following location: D:\DRIVERS\PS\XP_VISTA\(Language)\DISK1 H Check the printer driver location, and then...
... reading from a list or specific location (Advanced)], and then click [Next >]. I Click [Next >]. J Click [Finish]. If the CD-ROM drive is D, the source files of the printer driver is available only for this printer, install them using other ports (such as LPT1). G Specify the location where the source files of the PostScript printer driver are stored in the following location: D:\DRIVERS\PS\XP_VISTA\(Language)\DISK1 H Check the printer driver location, and then...
User Guide
Page 196
... printer, install them using the USB cable. Preparing for Printing Installing the PostScript 3 Printer Driver (Windows Vista and Windows Server 2008) 1 Important ❒ To install this printer driver, you must have an account that is installed first. A Connect the printer and computer using other ports (such as an administrator or Power Users group member. C Click [Don't search online]. The printer driver search begins, and a list of the printer connected to the "usb" port appears in the [Printers] window. If the [Windows can be installed...
... printer, install them using the USB cable. Preparing for Printing Installing the PostScript 3 Printer Driver (Windows Vista and Windows Server 2008) 1 Important ❒ To install this printer driver, you must have an account that is installed first. A Connect the printer and computer using other ports (such as an administrator or Power Users group member. C Click [Don't search online]. The printer driver search begins, and a list of the printer connected to the "usb" port appears in the [Printers] window. If the [Windows can be installed...
User Guide
Page 198
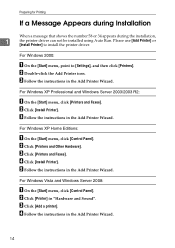
... instructions in "Hardware and Sound". C Follow the instructions in the Add Printer Wizard. For Windows XP Home Editions: A On the [Start] menu, click [Control Panel]. For Windows Vista and Windows Server 2008: A On the [Start] menu, click [Control Panel]. C Click [Add a printer]. B Click [Printers and Other Hardware]. D Click [Install Printer]. Preparing for Printing If a Message Appears during Installation When a message that shows the number 58 or 34 appears during the installation, 1 the printer driver can not be installed using Auto...
... instructions in "Hardware and Sound". C Follow the instructions in the Add Printer Wizard. For Windows XP Home Editions: A On the [Start] menu, click [Control Panel]. For Windows Vista and Windows Server 2008: A On the [Start] menu, click [Control Panel]. C Click [Add a printer]. B Click [Printers and Other Hardware]. D Click [Install Printer]. Preparing for Printing If a Message Appears during Installation When a message that shows the number 58 or 34 appears during the installation, 1 the printer driver can not be installed using Auto...

User Guide
Page 239
... printer driver, cover sheets are inserted even if you select [Off], the printer uses any size paper in ten seconds if a system error occurs. System Menu System Menu Parameters This section explains about parameters that use A4 or Letter size paper. Default: Off • Off • Short Edge Bind • Long Edge Bind Important ❒ This function is effective only for the SP C312DN model printer. ❖ Blank Pages You can be canceled...
... printer driver, cover sheets are inserted even if you select [Off], the printer uses any size paper in ten seconds if a system error occurs. System Menu System Menu Parameters This section explains about parameters that use A4 or Letter size paper. Default: Off • Off • Short Edge Bind • Long Edge Bind Important ❒ This function is effective only for the SP C312DN model printer. ❖ Blank Pages You can be canceled...
User Guide
Page 246
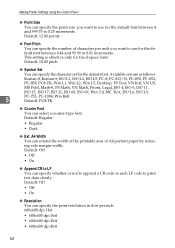
..., ISO L6, ISO L9, 5 PC-755, PC-1004, Win Balt Default: PC8-TK ❖ Courier Font You can specify the print resolution in dots per inch you want to use for the default font. Making Printer Settings Using the Control Panel ❖ Point Size You can specify the point size you want to print text data clearly. A4 Width You can extend the width of the printable...
..., ISO L6, ISO L9, 5 PC-755, PC-1004, Win Balt Default: PC8-TK ❖ Courier Font You can specify the print resolution in dots per inch you want to use for the default font. Making Printer Settings Using the Control Panel ❖ Point Size You can specify the point size you want to print text data clearly. A4 Width You can extend the width of the printable...
User Guide
Page 249
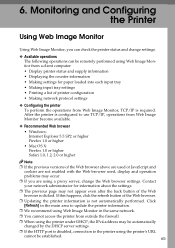
...; Updating the printer information is configured to update the printer information. ❒ We recommend using the printer's URL cannot be automatically changed by the DHCP server settings. ❒ If the HTTP port is clicked. Contact your network administrator for paper loaded into each input tray • Making input tray settings • Printing a list of printer configuration • Making network protocol settings ❖ Configuring the printer To perform the operations from Web Image Monitor become available. ❖ Recommended Web browser • Windows: Internet...
...; Updating the printer information is configured to update the printer information. ❒ We recommend using the printer's URL cannot be automatically changed by the DHCP server settings. ❒ If the HTTP port is clicked. Contact your network administrator for paper loaded into each input tray • Making input tray settings • Printing a list of printer configuration • Making network protocol settings ❖ Configuring the printer To perform the operations from Web Image Monitor become available. ❖ Recommended Web browser • Windows: Internet...
User Guide
Page 253
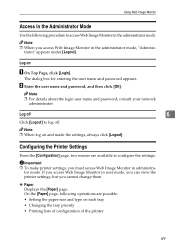
... about the login user name and password, consult your network administrator. Note ❒ When you access Web Image Monitor in the administrator mode. Log on and made the settings, always click [Logout]. On the [Paper] page, following procedure to log off. Configuring the Printer Settings From the [Configuration] page, two menus are possible: • Setting the paper size and type on each tray • Changing the tray priority • Printing lists of configuration of the printer 69
... about the login user name and password, consult your network administrator. Note ❒ When you access Web Image Monitor in the administrator mode. Log on and made the settings, always click [Logout]. On the [Paper] page, following procedure to log off. Configuring the Printer Settings From the [Configuration] page, two menus are possible: • Setting the paper size and type on each tray • Changing the tray priority • Printing lists of configuration of the printer 69
User Guide
Page 255
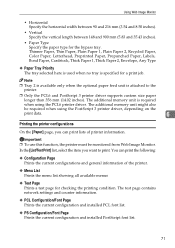
...). • Paper Type Specify the paper type for a print job. You can print lists of the printer. ❖ Menu List Prints the menu list showing all available menus ❖ Test Page Prints a test page for checking the printing condition. The additional memory unit might also be monitored from Web Image Monitor. The test page contains network settings and counter information. ❖ PCL Configuration/Font Page Prints the current configuration and installed PCL font list. ❖ PS Configuration/Font Page Prints the current configuration and installed PostScript font list. 71...
...). • Paper Type Specify the paper type for a print job. You can print lists of the printer. ❖ Menu List Prints the menu list showing all available menus ❖ Test Page Prints a test page for checking the printing condition. The additional memory unit might also be monitored from Web Image Monitor. The test page contains network settings and counter information. ❖ PCL Configuration/Font Page Prints the current configuration and installed PCL font list. ❖ PS Configuration/Font Page Prints the current configuration and installed PostScript font list. 71...
User Guide
Page 258
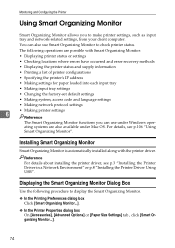
...installed along with Smart Organizing Monitor: • Displaying printer status or settings • Checking locations where errors have occurred and error recovery methods • Displaying the printer status and supply information • Printing a list of printer configurations • Specifying the printer's IP address • Making settings for paper loaded into each input tray • Making input tray settings • Changing the factory-set default settings • Making system, access code and language settings • Making network protocol settings • Making...
...installed along with Smart Organizing Monitor: • Displaying printer status or settings • Checking locations where errors have occurred and error recovery methods • Displaying the printer status and supply information • Printing a list of printer configurations • Specifying the printer's IP address • Making settings for paper loaded into each input tray • Making input tray settings • Changing the factory-set default settings • Making system, access code and language settings • Making network protocol settings • Making...

User Guide
Page 259
... a network printer. 7. [User Tools] tab Prints the test page or configuration page. Displaying the Printer Status In the Smart Organizing Monitor dialog box, you can check the status of the items such as toner levels and paper level. Note ❒ [Continue] and [Cancel] button are always disabled for resolving problems. 3. [Continue] button Click to display the [Form Feed] dialog box which you can use to change input tray settings. 4. [Cancel] button Click to cancel a print job. 5. [User Guide] button Click to display error related Help. 6. [Search Network Printer] button...
... a network printer. 7. [User Tools] tab Prints the test page or configuration page. Displaying the Printer Status In the Smart Organizing Monitor dialog box, you can check the status of the items such as toner levels and paper level. Note ❒ [Continue] and [Cancel] button are always disabled for resolving problems. 3. [Continue] button Click to display the [Form Feed] dialog box which you can use to change input tray settings. 4. [Cancel] button Click to cancel a print job. 5. [User Guide] button Click to display error related Help. 6. [Search Network Printer] button...

User Guide
Page 275
... setup. 91 For details about setting the IPv4 address of the printer is set up the network environment. When using DHCP, see Hardware Guide. TCP/IP of the printer using a host name to specify a printer, proceed to set up the printer's net- 8. C To print, install "Printing service for UNIX" as default. Setup Use the following procedure to make network environment settings. Special Operations under Windows Printing Files Directly from Windows You can print files directly using the control panel, and then set as the network...
... setup. 91 For details about setting the IPv4 address of the printer is set up the network environment. When using DHCP, see Hardware Guide. TCP/IP of the printer using a host name to specify a printer, proceed to set up the printer's net- 8. C To print, install "Printing service for UNIX" as default. Setup Use the following procedure to make network environment settings. Special Operations under Windows Printing Files Directly from Windows You can print files directly using the control panel, and then set as the network...

User Guide
Page 301
... bitmap images or using the server in a WAN environment over dial-up lines such as ISDN, printing may not be possible or errors may occur, depending on data transfer rates. • When using it for your network environment before using it for your work . • The settings for optional equipment will not be deleted, we recommend making settings in a server farm. These limitations are not properly copied, install them...
... bitmap images or using the server in a WAN environment over dial-up lines such as ISDN, printing may not be possible or errors may occur, depending on data transfer rates. • When using it for your network environment before using it for your work . • The settings for optional equipment will not be deleted, we recommend making settings in a server farm. These limitations are not properly copied, install them...


