
User Guide
Page 47
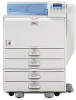
... unit can be inserted in the slot of Option Installation When installing multiple options, the following order is recommended: 1. To attach this option, contact your sales or service representative. 8. Install the interface board Install in the same slot, contact your sales... unit must have been attached. Attach the bridge unit To attach this option, contact your sales or service representative. 7. Attach the 1000-sheet finisher or 2 tray finisher Either the 1000-sheet finisher or 2 tray finisher can be attached, but not both . 2. If you can be attached, but not both ....
... unit can be inserted in the slot of Option Installation When installing multiple options, the following order is recommended: 1. To attach this option, contact your sales or service representative. 8. Install the interface board Install in the same slot, contact your sales... unit must have been attached. Attach the bridge unit To attach this option, contact your sales or service representative. 7. Attach the 1000-sheet finisher or 2 tray finisher Either the 1000-sheet finisher or 2 tray finisher can be attached, but not both . 2. If you can be attached, but not both ....

User Guide
Page 48
..., contact your sales or service representative. 9. Where to the underside of the printer. See "Attaching the Paper Fed Unit". 2. 2000-sheet paper feed unit Attach to Install Options Install options in the locations shown in the 2 tray finisher To attach this option, contact your sales or service representative. 2 10. Install the punch unit in...
..., contact your sales or service representative. 9. Where to the underside of the printer. See "Attaching the Paper Fed Unit". 2. 2000-sheet paper feed unit Attach to Install Options Install options in the locations shown in the 2 tray finisher To attach this option, contact your sales or service representative. 2 10. Install the punch unit in...

User Guide
Page 49
... sales or service representative. 5. 1000-sheet finisher Attach to the left side of the printer. • *1: Finisher upper tray • *2: Finisher shift tray To attach this option, contact your sales or service representative. 6. 2 Tray finisher Attach to the left side of the printer. • *3: Finisher upper tray • *4: Finisher shift tray To attach this option, contact your sales or service...
... sales or service representative. 5. 1000-sheet finisher Attach to the left side of the printer. • *1: Finisher upper tray • *2: Finisher shift tray To attach this option, contact your sales or service representative. 6. 2 Tray finisher Attach to the left side of the printer. • *3: Finisher upper tray • *4: Finisher shift tray To attach this option, contact your sales or service...

User Guide
Page 161
... original position. 11. Lower the upper unit carefully. Adding Staples BEK092S 8. The ribbon rolls around the staple case. Pull the ribbon out of the finisher. • If you attached. BEK200S 10. Holding the lever on the cartridge, push the cartridge down gently into the staple unit until it out completely. 6 BEK093S 9. Return...
... original position. 11. Lower the upper unit carefully. Adding Staples BEK092S 8. The ribbon rolls around the staple case. Pull the ribbon out of the finisher. • If you attached. BEK200S 10. Holding the lever on the cartridge, push the cartridge down gently into the staple unit until it out completely. 6 BEK093S 9. Return...

User Guide
Page 286
... 3 Printer Driver 1. Click [Next >]. 6. Click [Local printer] or [Local printer attached to complete the installation. Click [Next >] in [Port]. 17. Restart the computer to this name... if necessary. When the device selection appears, select "RICOH NetworkPrinter Driver C Model". 14. The installer starts. 3. The default interface language is selected...Vista, you do not need to restart the computer either now or later, and then click [Finish]. The [Port Name] text box automatically obtains a port name. 1. Preparing for Windows Vista...
... 3 Printer Driver 1. Click [Next >]. 6. Click [Local printer] or [Local printer attached to complete the installation. Click [Next >] in [Port]. 17. Restart the computer to this name... if necessary. When the device selection appears, select "RICOH NetworkPrinter Driver C Model". 14. The installer starts. 3. The default interface language is selected...Vista, you do not need to restart the computer either now or later, and then click [Finish]. The [Port Name] text box automatically obtains a port name. 1. Preparing for Windows Vista...
User Guide
Page 289
... Click [Continue]. Installing the PostScript 3 Printer Driver 1. The default interface language is added. 14. Click [Local printer] or [Local Printer attached to complete the installation. Click [LPR Port], and then click [Next >]. Check that the port of the selected printer is selected, and ...Next >] 7. Check that the name of the machine whose driver you want to restart the computer either now or later, and then click [Finish]. The installer starts. 3. Add Printer Wizard starts. The port is English. Restart the computer to this computer], and then click [Next ...
... Click [Continue]. Installing the PostScript 3 Printer Driver 1. The default interface language is added. 14. Click [Local printer] or [Local Printer attached to complete the installation. Click [LPR Port], and then click [Next >]. Check that the port of the selected printer is selected, and ...Next >] 7. Check that the name of the machine whose driver you want to restart the computer either now or later, and then click [Finish]. The installer starts. 3. Add Printer Wizard starts. The port is English. Restart the computer to this computer], and then click [Next ...

User Guide
Page 295
...". • p.51 "Messages Displayed When Installing the Printer Driver" 41 Click [Next >]. 1 6. The printer driver installation starts. 11. Click [Finish]. Using as default. 12. Add Printer Wizard starts. Step 5 does not apply for a printer], and then click [Next >]. If you are...stop installation of the printer driver already installed. Click [PostScript 3 Printer Driver]. Click [Network printer] or [A network printer, or a printer attached to complete installation. • A user code can be set after the printer driver installation. Select the [Yes] check box to use as ...
...". • p.51 "Messages Displayed When Installing the Printer Driver" 41 Click [Next >]. 1 6. The printer driver installation starts. 11. Click [Finish]. Using as default. 12. Add Printer Wizard starts. Step 5 does not apply for a printer], and then click [Next >]. If you are...stop installation of the printer driver already installed. Click [PostScript 3 Printer Driver]. Click [Network printer] or [A network printer, or a printer attached to complete installation. • A user code can be set after the printer driver installation. Select the [Yes] check box to use as ...

User Guide
Page 303
... [Next >]. Specify whether or not to complete installation. Restart the computer to print a test page, and then click [Finish]. Click [Local printer attached to complete installation. Printing with the selected language will be installed. The printer driver installation starts. 13. Installing the PostScript ... not apply for selecting the printer manufacturer and model name appears. 2. Other than Windows Vista, click [Next]. 49 Click [Finish]. Quit all applications currently running. 2. The following language is completed, select one of the machine whose driver you are using ...
... [Next >]. Specify whether or not to complete installation. Restart the computer to print a test page, and then click [Finish]. Click [Local printer attached to complete installation. Printing with the selected language will be installed. The printer driver installation starts. 13. Installing the PostScript ... not apply for selecting the printer manufacturer and model name appears. 2. Other than Windows Vista, click [Next]. 49 Click [Finish]. Quit all applications currently running. 2. The following language is completed, select one of the machine whose driver you are using ...

User Guide
Page 373
Punching Precautions Follow these precautions when using with the Finisher Type Paper Size 18" , 81/2" × 11" (Letter) , 81/4" × 13" (Folio) , 8" × 13" (F/GL) , 71/4" × 101/2" (Executive) , 51/2" × 81/2" (Half Letter) 3 holes ... position and the punch position, when using the punch function. • To use this function, an optional punch unit must be installed to the optional Finisher attached to the printer. • Punch printing will vary slightly from page to page as holes are punched into each sheet individually. • For printing methods...
Punching Precautions Follow these precautions when using with the Finisher Type Paper Size 18" , 81/2" × 11" (Letter) , 81/4" × 13" (Folio) , 8" × 13" (F/GL) , 71/4" × 101/2" (Executive) , 51/2" × 81/2" (Half Letter) 3 holes ... position and the punch position, when using the punch function. • To use this function, an optional punch unit must be installed to the optional Finisher attached to the printer. • Punch printing will vary slightly from page to page as holes are punched into each sheet individually. • For printing methods...

User Guide
Page 411
... is used when the output tray is not specified in the print data. • Standard Tray • Finisher Upper Tray • Finisher Shift Tray • Default: Standard Tray • Finisher trays appear only when an optional finisher is not specified in the print data. 5 Edge to Edge Print Select to whether or not to...; Off • Long Edge Bind • Short Edge Bind • Default: Off Output Tray Specify output tray to be used when the paper size is attached. 157
... is used when the output tray is not specified in the print data. • Standard Tray • Finisher Upper Tray • Finisher Shift Tray • Default: Standard Tray • Finisher trays appear only when an optional finisher is not specified in the print data. 5 Edge to Edge Print Select to whether or not to...; Off • Long Edge Bind • Short Edge Bind • Default: Off Output Tray Specify output tray to be used when the paper size is attached. 157

Hardware Guide
Page 23
Components inside the machine become very hot, and can be attached, but not both . 2. Order of the controller board. Attach the 1000-sheet finisher or 2 tray finisher Either the 1000-sheet finisher or 2 tray finisher can improve printer performance and expand the available features. 2 • Before installing ... the SD card slot of SD cards. Insert SD card options Insert in the slot inside the controller board. 5. To attach this option, contact your sales or service representative. 3. Installing Options Available Options By installing options, you want to use two...
Components inside the machine become very hot, and can be attached, but not both . 2. Order of the controller board. Attach the 1000-sheet finisher or 2 tray finisher Either the 1000-sheet finisher or 2 tray finisher can improve printer performance and expand the available features. 2 • Before installing ... the SD card slot of SD cards. Insert SD card options Insert in the slot inside the controller board. 5. To attach this option, contact your sales or service representative. 3. Installing Options Available Options By installing options, you want to use two...

Hardware Guide
Page 24
... unit or 2000-sheet paper feed unit must have been attached. Install the punch unit in the following illustrations. See "Attaching the Paper Fed Unit". 2. 2000-sheet paper feed unit Attach to Install Options Install options in the locations shown in the 2 tray finisher To attach this option, contact your sales or service representative. 2 10...
... unit or 2000-sheet paper feed unit must have been attached. Install the punch unit in the following illustrations. See "Attaching the Paper Fed Unit". 2. 2000-sheet paper feed unit Attach to Install Options Install options in the locations shown in the 2 tray finisher To attach this option, contact your sales or service representative. 2 10...

Hardware Guide
Page 25
... sales or service representative. 5. 1000-sheet finisher Attach to the left side of the printer. • *1: Finisher upper tray • *2: Finisher shift tray To attach this option, contact your sales or service representative. 6. 2 Tray finisher Attach to the left side of the printer. • *3: Finisher upper tray • *4: Finisher shift tray To attach this option, contact your sales or service...
... sales or service representative. 5. 1000-sheet finisher Attach to the left side of the printer. • *1: Finisher upper tray • *2: Finisher shift tray To attach this option, contact your sales or service representative. 6. 2 Tray finisher Attach to the left side of the printer. • *3: Finisher upper tray • *4: Finisher shift tray To attach this option, contact your sales or service...

Hardware Guide
Page 137
... on the cartridge, push the cartridge down gently into the staple unit until it out completely. 6 BEK093S 9. Pull the ribbon out of the finisher. • If you attached. Close the front cover of the staple case that you cannot pull out the upper unit, there are staples remaining inside the cartridge. 7. Lower...
... on the cartridge, push the cartridge down gently into the staple unit until it out completely. 6 BEK093S 9. Pull the ribbon out of the finisher. • If you attached. Close the front cover of the staple case that you cannot pull out the upper unit, there are staples remaining inside the cartridge. 7. Lower...

