User Guide
Page 7
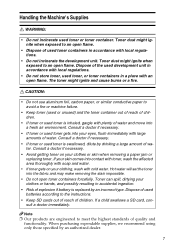
... to an open flame. Handling the Machine's Supplies R WARNING: • Do not incinerate used toner containers in accordance with an open flame. Hot water will set the toner into your clothes or skin when removing a paper jam or replacing toner. Dispose of quality and functionality. Toner dust might ignite and cause...
... to an open flame. Handling the Machine's Supplies R WARNING: • Do not incinerate used toner containers in accordance with an open flame. Hot water will set the toner into your clothes or skin when removing a paper jam or replacing toner. Dispose of quality and functionality. Toner dust might ignite and cause...

User Guide
Page 13
For more information about how to configure Energy Saver mode, see "Making Printer Settings Using the Control Panel" Software Guide as a HTML file on the control panel. It is an open program in which manufacturers participate voluntarily. Targeted products ...
For more information about how to configure Energy Saver mode, see "Making Printer Settings Using the Control Panel" Software Guide as a HTML file on the control panel. It is an open program in which manufacturers participate voluntarily. Targeted products ...
User Guide
Page 20
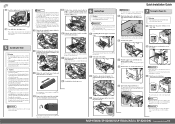
... of the printer. Turning the Power On Warning • Plug and unplug the power cable with the green locking lever. BEK254S MLP150DN/SP 8200DN/LP150dn/Aficio SP 8200DN 1/2 Quick Installation Guide Leave the front cover open flame. BEK004S Pushing the green locking lever down, pull out the toner holder carefully by...such as toner can be printed at a time, paper type and paper size used toner gets into a fresh air environment. Hot water will set to print 36,000 pages. • Toner is a consumable and is not covered by turning it clicks into the fabric and may make...
... of the printer. Turning the Power On Warning • Plug and unplug the power cable with the green locking lever. BEK254S MLP150DN/SP 8200DN/LP150dn/Aficio SP 8200DN 1/2 Quick Installation Guide Leave the front cover open flame. BEK004S Pushing the green locking lever down, pull out the toner holder carefully by...such as toner can be printed at a time, paper type and paper size used toner gets into a fresh air environment. Hot water will set to print 36,000 pages. • Toner is a consumable and is not covered by turning it clicks into the fabric and may make...
User Guide
Page 21
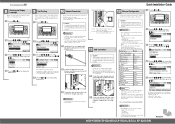
...(and/or peripheral) in order to the network environment. • The Ethernet cable must be used for information about network environment settings, see Software Guide. ❖ Reading the LED Lamps BEK153S 1. Test printing checks printer performance only; it does not test the... 2003/2003 R2, Mac OS 9.x, and Mac OS X. Green: turns on the display. MLP150DN/SP 8200DN/LP150dn/Aficio SP 8200DN Next Sheet BEK096S Connect the Ethernet cable to configure IP addressrelated settings. ❖ Receiving an IP Address Automatically (DHCP) The printer will be an Unshielded Twisted Pair ...
...(and/or peripheral) in order to the network environment. • The Ethernet cable must be used for information about network environment settings, see Software Guide. ❖ Reading the LED Lamps BEK153S 1. Test printing checks printer performance only; it does not test the... 2003/2003 R2, Mac OS 9.x, and Mac OS X. Green: turns on the display. MLP150DN/SP 8200DN/LP150dn/Aficio SP 8200DN Next Sheet BEK096S Connect the Ethernet cable to configure IP addressrelated settings. ❖ Receiving an IP Address Automatically (DHCP) The printer will be an Unshielded Twisted Pair ...
User Guide
Page 22
...After reading through all of the address. Click [Exit] in the CD-ROM root directory. Copyright © 2007 EN USA G179-7536 MLP150DN/SP 8200DN/LP150dn/Aficio SP 8200DN 2/2 Quick Installation Guide If your network uses IPv4, assign the IPv4 address to select [Specify], and then press the {OK} key. ...next field. The TCP/IP protocol is English. Log on the CD-ROM labeled "Manuals". Press the {Menu} key to return to confirm the settings. • For details about printing the configuration page, see "Test Printing". Press the {▼} or {▲} key to complete installation. If ...
...After reading through all of the address. Click [Exit] in the CD-ROM root directory. Copyright © 2007 EN USA G179-7536 MLP150DN/SP 8200DN/LP150dn/Aficio SP 8200DN 2/2 Quick Installation Guide If your network uses IPv4, assign the IPv4 address to select [Specify], and then press the {OK} key. ...next field. The TCP/IP protocol is English. Log on the CD-ROM labeled "Manuals". Press the {Menu} key to return to confirm the settings. • For details about printing the configuration page, see "Test Printing". Press the {▼} or {▲} key to complete installation. If ...

User Guide
Page 28
...an IP Address Automatically (DHCP 58 Configuring Network Settings When Using NetWare 60 Setting the Ethernet Speed...61 Wireless LAN Configuration...64 Setting the SSID...66 Setting Security Method of Wireless LAN...68 Setting a WEP Key...68 Setting WPA...69 Configuring WPA/WPA2...73 Installing a Site... Certificate...73 Installing Device Certificate...74 Setting Items of Paper and Other Media......
...an IP Address Automatically (DHCP 58 Configuring Network Settings When Using NetWare 60 Setting the Ethernet Speed...61 Wireless LAN Configuration...64 Setting the SSID...66 Setting Security Method of Wireless LAN...68 Setting a WEP Key...68 Setting WPA...69 Configuring WPA/WPA2...73 Installing a Site... Certificate...73 Installing Device Certificate...74 Setting Items of Paper and Other Media......
User Guide
Page 33
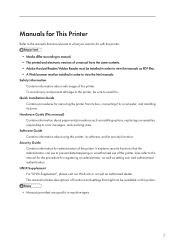
..., replacing consumables, responding to error messages, and resolving jams. Software Guide Contains information about safe usage of functions and settings that the administrators can use of the printer. This manual includes descriptions of this manual for the procedure for removing the...printer. • Media differ according to this printer. Hardware Guide (This manual) Contains information about paper and procedures such as setting user and administrator authentication. UNIX Supplement For "UNIX Supplement", please visit our Web site or consult an authorized dealer. Also refer ...
..., replacing consumables, responding to error messages, and resolving jams. Software Guide Contains information about safe usage of functions and settings that the administrators can use of the printer. This manual includes descriptions of this manual for the procedure for removing the...printer. • Media differ according to this printer. Hardware Guide (This manual) Contains information about paper and procedures such as setting user and administrator authentication. UNIX Supplement For "UNIX Supplement", please visit our Web site or consult an authorized dealer. Also refer ...

User Guide
Page 37
Select an interface language, and click [OK]. 4. The installer starts. Auto Run may not work under certain operating system settings. Click [Exit]. • If you cannot install a manual, copy the "MANUAL_HTML" folder to your computer's hard drive, and then run "Setup.exe". • To delete ...
Select an interface language, and click [OK]. 4. The installer starts. Auto Run may not work under certain operating system settings. Click [Exit]. • If you cannot install a manual, copy the "MANUAL_HTML" folder to your computer's hard drive, and then run "Setup.exe". • To delete ...

User Guide
Page 43
..., see Software Guide. 2. Control Panel This section explains names and usage of the parts of the display. 3. [Escape] Key Press this key to confirm settings or setting values, or move the cursor in each direction. Alert Indicator Lights up if there is receiving data from a computer. When the keys appear in this...
..., see Software Guide. 2. Control Panel This section explains names and usage of the parts of the display. 3. [Escape] Key Press this key to confirm settings or setting values, or move the cursor in each direction. Alert Indicator Lights up if there is receiving data from a computer. When the keys appear in this...

User Guide
Page 44
To resume the job, press this key again. 1 10. [Job Reset] Key Press this key to cancel an ongoing print job. 11. [Menu] Key Press this key to the initial screen. 18 The key lights up while the job is suspended. 1. While configuring settings, press this key to suspend a print job. Guide to the Printer 9. [Suspend/Resume] Key Press this key to return to configure and check the current printer settings.
To resume the job, press this key again. 1 10. [Job Reset] Key Press this key to cancel an ongoing print job. 11. [Menu] Key Press this key to the initial screen. 18 The key lights up while the job is suspended. 1. While configuring settings, press this key to suspend a print job. Guide to the Printer 9. [Suspend/Resume] Key Press this key to return to configure and check the current printer settings.

User Guide
Page 45
.... • [Prt.Jobs] is displayed only when the hard disk is dark. To adjust the display contrast, select [Maintenance] [General Settings] [Display Contrast]. You can change this setting by selecting [Maintenance] [General Settings] [Display Supply Info] [Off]. • Adjust the brightness if the screen is installed in the printer. • By default, the...
.... • [Prt.Jobs] is displayed only when the hard disk is dark. To adjust the display contrast, select [Maintenance] [General Settings] [Display Contrast]. You can change this setting by selecting [Maintenance] [General Settings] [Display Supply Info] [Off]. • Adjust the brightness if the screen is installed in the printer. • By default, the...

User Guide
Page 46
Selection keys Correspond to the function items shown on the bottom line of the same direction. 3. [OK] key Confirms settings or setting values, or moves to the next menu level. 4. When the keys appear in each direction. Scroll keys 1 Move the cursor in this manual instructs you to the previous display. 2. When this manual, press the scroll key of the display. Guide to the Printer 1. [Escape] key Cancels an operation or returns to "press [Option]", press the left selection key. 20 1.
Selection keys Correspond to the function items shown on the bottom line of the same direction. 3. [OK] key Confirms settings or setting values, or moves to the next menu level. 4. When the keys appear in each direction. Scroll keys 1 Move the cursor in this manual instructs you to the previous display. 2. When this manual, press the scroll key of the display. Guide to the Printer 1. [Escape] key Cancels an operation or returns to "press [Option]", press the left selection key. 20 1.
User Guide
Page 52
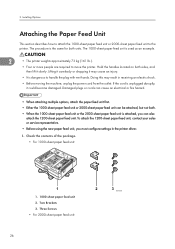
... carelessly or dropping it may result in the printer driver. 1. Two Brackets 3. Doing this may cause an injury. • It is attached, you must configure settings in receiving an electric shock. • Before moving the machine, unplug the power cord from the outlet. To attach the 1200-sheet paper feed unit...
... carelessly or dropping it may result in the printer driver. 1. Two Brackets 3. Doing this may cause an injury. • It is attached, you must configure settings in receiving an electric shock. • Before moving the machine, unplug the power cord from the outlet. To attach the 1200-sheet paper feed unit...
User Guide
Page 56
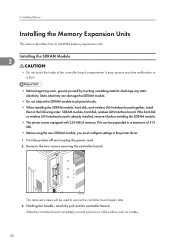
Installing the SDRAM Module 2 • Do not touch the inside of 512 MB. • Before using the new SDRAM module, you must configure settings in the following order: SDRAM module, hard disk, wireless LAN interface board. Static electricity can be used to a maximum of the controller board compartment. Turn ...
Installing the SDRAM Module 2 • Do not touch the inside of 512 MB. • Before using the new SDRAM module, you must configure settings in the following order: SDRAM module, hard disk, wireless LAN interface board. Static electricity can be used to a maximum of the controller board compartment. Turn ...
User Guide
Page 59
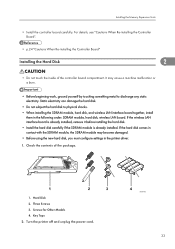
... the hard disk carefully if the SDRAM module is already installed. It may become damaged. • Before using the new hard disk, you must configure settings in the following order: SDRAM module, hard disk, wireless LAN board. Hard Disk 2. Static electricity can damage the hard disk. • Do not subject the...
... the hard disk carefully if the SDRAM module is already installed. It may become damaged. • Before using the new hard disk, you must configure settings in the following order: SDRAM module, hard disk, wireless LAN board. Hard Disk 2. Static electricity can damage the hard disk. • Do not subject the...

User Guide
Page 65
... the hard disk. 39 Installing the Interface Units 2 BEK249S 7. For details, see "Test Printing", Quick Installation Guide. • Before using the board, you must configure settings from step 2. Plug in the following order: SDRAM module, hard disk, wireless LAN interface board. If it is already installed, remove it cannot be installed...
... the hard disk. 39 Installing the Interface Units 2 BEK249S 7. For details, see "Test Printing", Quick Installation Guide. • Before using the board, you must configure settings from step 2. Plug in the following order: SDRAM module, hard disk, wireless LAN interface board. If it is already installed, remove it cannot be installed...

User Guide
Page 69
... package. BEK224S 1. Turn the printer off and unplug the power cord. 43 Installing the Interface Units 2 BEK173S • Before using the board, you must configure settings from the printer control panel. Static electricity can damage the board. • Do not subject the board to physical shocks. • For connection to discharge...
... package. BEK224S 1. Turn the printer off and unplug the power cord. 43 Installing the Interface Units 2 BEK173S • Before using the board, you must configure settings from the printer control panel. Static electricity can damage the board. • Do not subject the board to physical shocks. • For connection to discharge...

User Guide
Page 73
... 2 BEK149S Insert the SD card in the power cord, and then turn on the top level menu. • IPDS unit: [IPDS Menu] appears in [Print Settings]. • HDD encryption unit: [Machine Data Encryption] appears in use. See the control panel menu to confirm that the SD card was installed correctly. •...
... 2 BEK149S Insert the SD card in the power cord, and then turn on the top level menu. • IPDS unit: [IPDS Menu] appears in [Print Settings]. • HDD encryption unit: [Machine Data Encryption] appears in use. See the control panel menu to confirm that the SD card was installed correctly. •...

User Guide
Page 81
...: On 4 Machine IPv4 Address • IPv4 Address: 11.22.33.44 • Subnet Mask: 0.0.0.0 • Gateway Address: 0.0.0.0 IPv6 Stateless Setting Active IPsec Inactive NW Frame Type Auto Select Effective Protocol • IPv4: Active • IPv6: Inactive • NetWare: Active • SMB: ...SmartDeviceMonitor for Admin or a Web browser to the network environment using the control panel. • The following network settings according to configure IP address-related settings. 55 These items appear in use on your network, the IP address, subnet mask, and gateway address are...
...: On 4 Machine IPv4 Address • IPv4 Address: 11.22.33.44 • Subnet Mask: 0.0.0.0 • Gateway Address: 0.0.0.0 IPv6 Stateless Setting Active IPsec Inactive NW Frame Type Auto Select Effective Protocol • IPv4: Active • IPv6: Inactive • NetWare: Active • SMB: ...SmartDeviceMonitor for Admin or a Web browser to the network environment using the control panel. • The following network settings according to configure IP address-related settings. 55 These items appear in use on your network, the IP address, subnet mask, and gateway address are...

User Guide
Page 83
...entry of the address. Press the [Escape] key until the screen returns to enter the left field, press the [ ] key, and then you need to set in the same way. • Select [Inactive] for the printer, contact your network administrator. 9. To specify the IP address, press [IP Add]. Press ...the [ ] or [ ] key to the [Network] menu. 8. Press the [ ] or [ ] key to select [Active] or [Inactive], and then press the [OK] key. 4 Set other protocols you can enter the next field. If you use the pure IPv4 environment of NetWare5/5.1, Netware 6/6.5. 7. If you use IPv4, assign the IPv4...
...entry of the address. Press the [Escape] key until the screen returns to enter the left field, press the [ ] key, and then you need to set in the same way. • Select [Inactive] for the printer, contact your network administrator. 9. To specify the IP address, press [IP Add]. Press ...the [ ] or [ ] key to the [Network] menu. 8. Press the [ ] or [ ] key to select [Active] or [Inactive], and then press the [OK] key. 4 Set other protocols you can enter the next field. If you use the pure IPv4 environment of NetWare5/5.1, Netware 6/6.5. 7. If you use IPv4, assign the IPv4...


