Quick Guide
Page 1
Quick Guide Names and Locations Using the Copier Function Using the Scanner Function Using the Fax Function Troubleshooting Removing Paper Jams Print Cartridge For safe and correct use, be sure to read "Safety Information" before using the machine.
Quick Guide Names and Locations Using the Copier Function Using the Scanner Function Using the Fax Function Troubleshooting Removing Paper Jams Print Cartridge For safe and correct use, be sure to read "Safety Information" before using the machine.
Quick Guide
Page 2
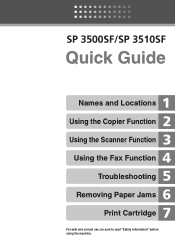
Table of Contents 1 Names and Locations • Exterior: SP 3510SF • Exterior: SP 3500SF 3 4 • Interior 5 • Control Panel 6 2 Using the Copier Function • Initial Screen and Basic Operation 8 • Advanced Photocopy Settings 11 3 Using the Scanner Function &#... 2 Jam 32 • Removing Bypass Tray Jam 34 • Removing Standard Tray/Duplex Unit Jam 36 • Removing from the ARDF or ADF 40 7 Print Cartridge • Before Replacing the Print Cartridge 44 • Replacing the Print...
Table of Contents 1 Names and Locations • Exterior: SP 3510SF • Exterior: SP 3500SF 3 4 • Interior 5 • Control Panel 6 2 Using the Copier Function • Initial Screen and Basic Operation 8 • Advanced Photocopy Settings 11 3 Using the Scanner Function &#... 2 Jam 32 • Removing Bypass Tray Jam 34 • Removing Standard Tray/Duplex Unit Jam 36 • Removing from the ARDF or ADF 40 7 Print Cartridge • Before Replacing the Print Cartridge 44 • Replacing the Print...
Quick Guide
Page 3
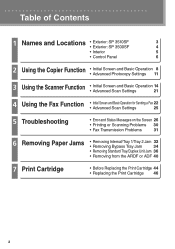
.... 3 Output Tray for the ARDF 7 Tray 1 8 Bypass Tray Pull open to load paper. Names and Locations Exterior: SP 3510SF 1 2 12 11 3 10 9 4 5 8 76 CMF352 1 ARDF (Auto Reverse 6 Tray 2 (option) Document Feeder) Cover Open this cover to replace the print cartridge or remove jammed paper. 12 Exposure Glass Place originals here sheet by sheet. 3
.... 3 Output Tray for the ARDF 7 Tray 1 8 Bypass Tray Pull open to load paper. Names and Locations Exterior: SP 3510SF 1 2 12 11 3 10 9 4 5 8 76 CMF352 1 ARDF (Auto Reverse 6 Tray 2 (option) Document Feeder) Cover Open this cover to replace the print cartridge or remove jammed paper. 12 Exposure Glass Place originals here sheet by sheet. 3

Quick Guide
Page 4
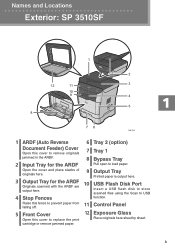
Names and Locations Exterior: SP 3500SF 1 23 11 12 10 9 8 7 6 4 5 CMF353 1 ADF (Auto Document 6 Tray 2 (option) Feeder) Cover Open this cover to remove originals 7 Tray 1 jammed in the ADF. 8 Bypass ... the ADF are output here. 10 USB Flash Disk Port Insert a USB flash disk to store 4 Stop Fences Raise this cover to replace the print cartridge or remove jammed paper. 12 Exposure Glass Place originals here sheet by sheet. 4 falling off. 11 Control Panel 5 Front Cover Open this fence to prevent...
Names and Locations Exterior: SP 3500SF 1 23 11 12 10 9 8 7 6 4 5 CMF353 1 ADF (Auto Document 6 Tray 2 (option) Feeder) Cover Open this cover to remove originals 7 Tray 1 jammed in the ADF. 8 Bypass ... the ADF are output here. 10 USB Flash Disk Port Insert a USB flash disk to store 4 Stop Fences Raise this cover to replace the print cartridge or remove jammed paper. 12 Exposure Glass Place originals here sheet by sheet. 4 falling off. 11 Control Panel 5 Front Cover Open this fence to prevent...
Quick Guide
Page 5
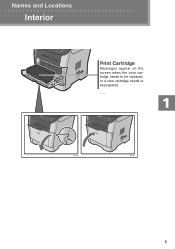
Names and Locations Interior Print Cartridge Messages appear on the screen when the print cartridge needs to be replaced, or a new cartridge needs to be prepared. CMF354 CMF068 CMF072 5
Names and Locations Interior Print Cartridge Messages appear on the screen when the print cartridge needs to be replaced, or a new cartridge needs to be prepared. CMF354 CMF068 CMF072 5

Quick Guide
Page 6
... values when red when a machine error occurs. Press to move the cursor in standby mode will 3 Number keys require maintenance soon (such as replacing a print cartridge), or lights up when received faxes that the image density or resolution. Press to cancel the last operation or Pressing the [ ][ ] keys while the exit...
... values when red when a machine error occurs. Press to move the cursor in standby mode will 3 Number keys require maintenance soon (such as replacing a print cartridge), or lights up when received faxes that the image density or resolution. Press to cancel the last operation or Pressing the [ ][ ] keys while the exit...
Quick Guide
Page 27
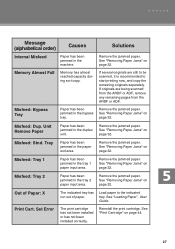
... paper exit area. See "Removing Paper Jams" on page 32. Tray Paper has been jammed in the bypass tray. The print cartridge has not been installed or has not been installed correctly. Remove the jammed paper. Memory has almost reached capacity during sort copy.... Out of paper. Reinstall the print cartridge. Remove the jammed paper. See "Removing Paper Jams" on page 32. See "Removing Paper Jams" on page 44. 27 If originals...
... paper exit area. See "Removing Paper Jams" on page 32. Tray Paper has been jammed in the bypass tray. The print cartridge has not been installed or has not been installed correctly. Remove the jammed paper. Memory has almost reached capacity during sort copy.... Out of paper. Reinstall the print cartridge. Remove the jammed paper. See "Removing Paper Jams" on page 32. See "Removing Paper Jams" on page 44. 27 If originals...
Quick Guide
Page 28
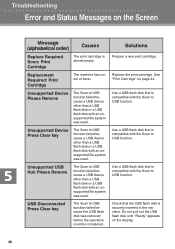
... the operation could be completed. Troubleshooting Error and Status Messages on the Screen Message (alphabetical order) Causes Replace Required Soon: Print Cartridge The print cartridge is securely inserted in the machine. Unsupported USB Hub Please Remove The Scan to USB function failed because a USB device other than... a USB flash disk or a USB flash disk with the Scan to USB function. See "Print Cartridge" on the display. 28 Check that is compatible with an unsupported file system was used . Do not pull out the USB flash disk ...
... the operation could be completed. Troubleshooting Error and Status Messages on the Screen Message (alphabetical order) Causes Replace Required Soon: Print Cartridge The print cartridge is securely inserted in the machine. Unsupported USB Hub Please Remove The Scan to USB function failed because a USB device other than... a USB flash disk or a USB flash disk with the Scan to USB function. See "Print Cartridge" on the display. 28 Check that is compatible with an unsupported file system was used . Do not pull out the USB flash disk ...

Quick Guide
Page 31
... not contain A4, Letter, or Legal size paper. v Cannot receive faxes even when sending them is possible • The print cartridge is correctly connected. Replace the print cartridge. For more details, see "Print Cartridge" on page 44. • A tray is empty. v A fax you cannot solve the problem, contact your local sales or service...
... not contain A4, Letter, or Legal size paper. v Cannot receive faxes even when sending them is possible • The print cartridge is correctly connected. Replace the print cartridge. For more details, see "Print Cartridge" on page 44. • A tray is empty. v A fax you cannot solve the problem, contact your local sales or service...
Quick Guide
Page 33
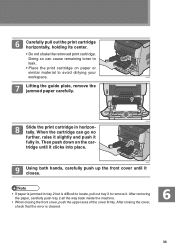
...plate, remove the jammed paper carefully. CMF071 Using both hands, carefully push up the front cover until it fully in. CMF070 Slide the print cartridge in tray 2 but is difficult to locate, pull out tray 2 to remove it closes. • If paper is cleared. 33 After ... is jammed in horizontally. Carefully pull out the print cartridge horizontally, holding its center. • Do not shake the removed print cartridge. Then push down on paper or similar material to leak. • Place the print cartridge on the cartridge until it . Doing so can go no further, ...
...plate, remove the jammed paper carefully. CMF071 Using both hands, carefully push up the front cover until it fully in. CMF070 Slide the print cartridge in tray 2 but is difficult to locate, pull out tray 2 to remove it closes. • If paper is cleared. 33 After ... is jammed in horizontally. Carefully pull out the print cartridge horizontally, holding its center. • Do not shake the removed print cartridge. Then push down on paper or similar material to leak. • Place the print cartridge on the cartridge until it . Doing so can go no further, ...
Quick Guide
Page 34
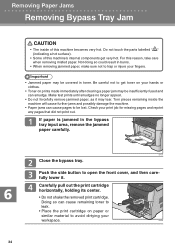
...the machine. • Paper jams can cause pages to be insufficiently fused and can cause remaining toner to leak. • Place the print cartridge on paper or similar material to avoid dirtying your print job for missing pages and reprint any pages that did not print out. Torn pieces... no longer appear. • Do not forcefully remove jammed paper, as it . Carefully pull out the print cartridge horizontally, holding its center. • Do not shake the removed print cartridge. Doing so can smudge. CMF073 Close the bypass tray. Push the side button to trap or injure your hands...
...the machine. • Paper jams can cause pages to be insufficiently fused and can cause remaining toner to leak. • Place the print cartridge on paper or similar material to avoid dirtying your print job for missing pages and reprint any pages that did not print out. Torn pieces... no longer appear. • Do not forcefully remove jammed paper, as it . Carefully pull out the print cartridge horizontally, holding its center. • Do not shake the removed print cartridge. Doing so can smudge. CMF073 Close the bypass tray. Push the side button to trap or injure your hands...
Quick Guide
Page 35
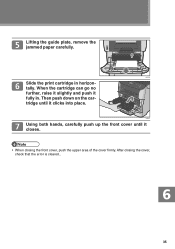
When the cartridge can go no further, raise it slightly and push it closes. • When closing the cover, check that the error is cleared.. 35 Lifting the guide plate, remove the jammed paper carefully. After closing the front cover, push the upper area of the cover firmly. CMF070 Slide the print cartridge in . CMF071 Using both hands, carefully push up the front cover until it clicks into place. Then push down on the cartridge until it fully in horizontally.
When the cartridge can go no further, raise it slightly and push it closes. • When closing the cover, check that the error is cleared.. 35 Lifting the guide plate, remove the jammed paper carefully. After closing the front cover, push the upper area of the cover firmly. CMF070 Slide the print cartridge in . CMF071 Using both hands, carefully push up the front cover until it clicks into place. Then push down on the cartridge until it fully in horizontally.
Quick Guide
Page 38
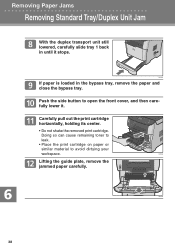
...the bypass tray, remove the paper and close the bypass tray. Doing so can cause remaining toner to leak. • Place the print cartridge on paper or similar material to open the front cover, and then carefully lower it stops. Push the side button to avoid dirtying your ...workspace. CMF070 38 Carefully pull out the print cartridge horizontally, holding its center. • Do not shake the removed print cartridge. CMF080 If paper is loaded in until it . CMF069 Lifting the guide plate, remove the jammed paper ...
...the bypass tray, remove the paper and close the bypass tray. Doing so can cause remaining toner to leak. • Place the print cartridge on paper or similar material to open the front cover, and then carefully lower it stops. Push the side button to avoid dirtying your ...workspace. CMF070 38 Carefully pull out the print cartridge horizontally, holding its center. • Do not shake the removed print cartridge. CMF080 If paper is loaded in until it . CMF069 Lifting the guide plate, remove the jammed paper ...
Quick Guide
Page 39
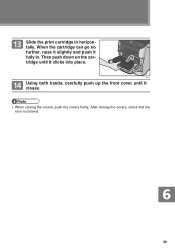
Then push down on the cartridge until it closes. • When closing the covers, check that the error is cleared. 39 Slide the print cartridge in . CMF071 Using both hands, carefully push up the front cover until it fully in horizontally. After closing the covers, push the covers firmly. When the cartridge can go no further, raise it slightly and push it clicks into place.
Then push down on the cartridge until it closes. • When closing the covers, check that the error is cleared. 39 Slide the print cartridge in . CMF071 Using both hands, carefully push up the front cover until it fully in horizontally. After closing the covers, push the covers firmly. When the cartridge can go no further, raise it slightly and push it clicks into place.
Quick Guide
Page 44
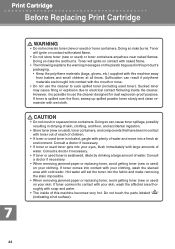
... this product's packaging. • Keep the polythene materials (bags, gloves, etc.) supplied with wet cloth. If toner comes into a fresh air environment. Print Cartridge Before Replacing Print Cartridge WARNING • Do not incinerate toner (new or used ) on your clothing. Consult a doctor if necessary. • If toner or used toner gets into...
... this product's packaging. • Keep the polythene materials (bags, gloves, etc.) supplied with wet cloth. If toner comes into a fresh air environment. Print Cartridge Before Replacing Print Cartridge WARNING • Do not incinerate toner (new or used ) on your clothing. Consult a doctor if necessary. • If toner or used toner gets into...
Quick Guide
Page 45
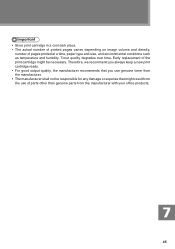
...responsible for any damage or expense that you use genuine toner from the manufacturer with your office products. 45 Early replacement of the print cartridge might result from the use of pages printed at a time, paper type and size, and environmental conditions such as temperature and humidity.... Toner quality degrades over time. • Store print cartridge in a cool dark place. • The actual number of printed pages varies depending on image volume and density, number of parts other than...
...responsible for any damage or expense that you use genuine toner from the manufacturer with your office products. 45 Early replacement of the print cartridge might result from the use of pages printed at a time, paper type and size, and environmental conditions such as temperature and humidity.... Toner quality degrades over time. • Store print cartridge in a cool dark place. • The actual number of printed pages varies depending on image volume and density, number of parts other than...
Quick Guide
Page 46
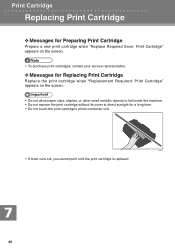
...conductor unit. CMC013 • If toner runs out, you cannot print until the print cartridge is replaced. 46 v Messages for Replacing Print Cartridge Replace the print cartridge when "Replacement Required: Print Cartridge" appears on the screen. • Do not allow paper clips, staples, or other... small metallic objects to fall inside the machine. • Do not expose the print cartridge without its cover to direct sunlight for Preparing Print Cartridge Prepare a new print cartridge when "Replace Required Soon: Print Cartridge" appears on the screen. • To purchase print...
...conductor unit. CMC013 • If toner runs out, you cannot print until the print cartridge is replaced. 46 v Messages for Replacing Print Cartridge Replace the print cartridge when "Replacement Required: Print Cartridge" appears on the screen. • Do not allow paper clips, staples, or other... small metallic objects to fall inside the machine. • Do not expose the print cartridge without its cover to direct sunlight for Preparing Print Cartridge Prepare a new print cartridge when "Replace Required Soon: Print Cartridge" appears on the screen. • To purchase print...

Quick Guide
Page 47
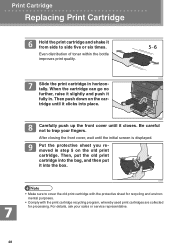
..., and then carefully lower it out of the box, and then take it . CMC081 Place the print cartridge on paper or similar material to leak. • Place the old print cartridge on a flat surface, and then remove the protection sheet. Doing so can cause remaining toner to avoid ...dirtying your workspace. CMC019 47 CMF069 Take the new print cartridge out of the plastic bag. Replacing Print Cartridge If paper is loaded in the bypass tray, remove the paper and close the bypass tray. Carefully pull out the...
..., and then carefully lower it out of the box, and then take it . CMC081 Place the print cartridge on paper or similar material to leak. • Place the old print cartridge on a flat surface, and then remove the protection sheet. Doing so can cause remaining toner to avoid ...dirtying your workspace. CMC019 47 CMF069 Take the new print cartridge out of the plastic bag. Replacing Print Cartridge If paper is loaded in the bypass tray, remove the paper and close the bypass tray. Carefully pull out the...
Quick Guide
Page 48
...48 CMF071 Carefully push up the front cover until the initial screen is displayed. For details, ask your fingers. Then, put the old print cartridge into the bag, and then put it from side to side five or six times. Be careful not to cover the old print... cartridge with the protective sheet for recycling and environmental purposes. • Comply with the print cartridge recycling program, whereby used print cartridges are collected for processing. After closing the front cover, wait until it closes. CMC020...
...48 CMF071 Carefully push up the front cover until the initial screen is displayed. For details, ask your fingers. Then, put the old print cartridge into the bag, and then put it from side to side five or six times. Be careful not to cover the old print... cartridge with the protective sheet for recycling and environmental purposes. • Comply with the print cartridge recycling program, whereby used print cartridges are collected for processing. After closing the front cover, wait until it closes. CMC020...
Quick Guide
Page 49
... unattended, it has been idle for 30 seconds. According to your sales or service representative for further information about topics covered in this manual. Print Cartridges Appendix Where to Inquire Contact your convenience, you can enable or disbale Energy Saver modes, as well as normal (even when Energy Saver mode 1 is...
... unattended, it has been idle for 30 seconds. According to your sales or service representative for further information about topics covered in this manual. Print Cartridges Appendix Where to Inquire Contact your convenience, you can enable or disbale Energy Saver modes, as well as normal (even when Energy Saver mode 1 is...

