Quick Guide
Page 124
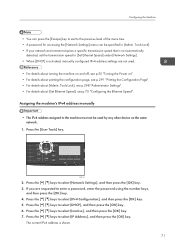
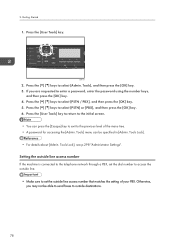
...291 "Printing the Configuration Page". • For details about [Set Ethernet Speed], see p.298 "Administrator Settings". • For details about [Admin. The current IPv4 address is shown. 71 Configuring the Machine • You can press the [Escape] key to exit to the previous ... manually configured IPv4 address settings are requested to select [Inactive], and then press the [OK] key. 7. Press the [ ] [ ] keys to enter a password, enter the password using the number keys, and then press the [OK] key. 4. Press the [ ] [ ] keys to select [Network Settings], and then press the [OK...
...291 "Printing the Configuration Page". • For details about [Set Ethernet Speed], see p.298 "Administrator Settings". • For details about [Admin. The current IPv4 address is shown. 71 Configuring the Machine • You can press the [Escape] key to exit to the previous ... manually configured IPv4 address settings are requested to select [Inactive], and then press the [OK] key. 7. Press the [ ] [ ] keys to enter a password, enter the password using the number keys, and then press the [OK] key. 4. Press the [ ] [ ] keys to select [Network Settings], and then press the [OK...

Quick Guide
Page 125
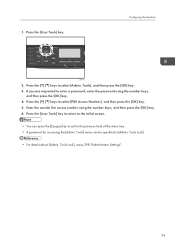
...accessing the [Network Settings] menu can press the [Escape] key to exit to the previous level of the menu tree. • A password for configuring network settings differs depending on ". • For details about printing configuration page, see p.291 "Printing the Configuration Page". &#...Lock]. • If your network environment requires a specific transmission speed that is not automatically detected, set the transmission speed in [Admin. Tools Lock], see p.55 "Turning the Power on whether IPv6 address information is activated, manually configured IPv4 address settings are requested...
...accessing the [Network Settings] menu can press the [Escape] key to exit to the previous level of the menu tree. • A password for configuring network settings differs depending on ". • For details about printing configuration page, see p.291 "Printing the Configuration Page". &#...Lock]. • If your network environment requires a specific transmission speed that is not automatically detected, set the transmission speed in [Admin. Tools Lock], see p.55 "Turning the Power on whether IPv6 address information is activated, manually configured IPv4 address settings are requested...

Quick Guide
Page 126
CMF134 2. If you are requested to enter a password, enter the password using the number keys, and then press the [OK] key. 4. Tools Lock], see p.298 "Administrator Settings". 73 If you are not used. • For details about [Admin. Press the [User Tools] key to return to confirm the setting. ...on the network for accessing the [Network Settings] menu can press the [Escape] key to exit to the previous level of the menu tree. • A password for the machine to receive an IPv6 address automatically. 1. Press the [User Tools] key. Press the [ ] [ ] keys to select [Active], and...
CMF134 2. If you are requested to enter a password, enter the password using the number keys, and then press the [OK] key. 4. Tools Lock], see p.298 "Administrator Settings". 73 If you are not used. • For details about [Admin. Press the [User Tools] key to return to confirm the setting. ...on the network for accessing the [Network Settings] menu can press the [Escape] key to exit to the previous level of the menu tree. • A password for the machine to receive an IPv6 address automatically. 1. Press the [User Tools] key. Press the [ ] [ ] keys to select [Active], and...

Quick Guide
Page 127
...[OK] key. 12. The IPv6 address setting will appear under "IPv6 Configuration" on the same network. 1. Press the [ ] [ ] keys to enter a password, enter the password using the number keys, and then press the [OK] key. 14. Press the [ ] [ ] keys to the initial screen. 15. Address], and then press... page. • You can press the [Escape] key to exit to the previous level of the menu tree. • A password for accessing the [Network Settings] menu can be specified in [Admin. Address], and then press the [OK] key. 8. Press the [ ] [ ] keys to confirm the setting. Print the ...
...[OK] key. 12. The IPv6 address setting will appear under "IPv6 Configuration" on the same network. 1. Press the [ ] [ ] keys to enter a password, enter the password using the number keys, and then press the [OK] key. 14. Press the [ ] [ ] keys to the initial screen. 15. Address], and then press... page. • You can press the [Escape] key to exit to the previous level of the menu tree. • A password for accessing the [Network Settings] menu can be specified in [Admin. Address], and then press the [OK] key. 8. Press the [ ] [ ] keys to confirm the setting. Print the ...
Quick Guide
Page 129
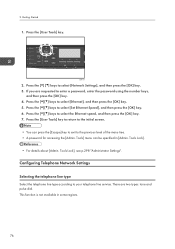
... then press the [OK] key. 5. Tools] menu can press the [Escape] key to exit to the previous level of the menu tree. • A password for accessing the [Admin. Tools Lock], see p.298 "Administrator Settings". Configuring Telephone Network Settings Selecting the telephone line type Select the telephone line type according to select [Set...
... then press the [OK] key. 5. Tools] menu can press the [Escape] key to exit to the previous level of the menu tree. • A password for accessing the [Admin. Tools Lock], see p.298 "Administrator Settings". Configuring Telephone Network Settings Selecting the telephone line type Select the telephone line type according to select [Set...
Quick Guide
Page 130
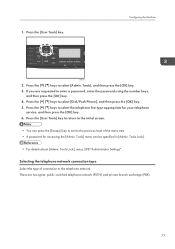
... telephone network (PSTN) and private branch exchange (PBX). 77 Tools Lock]. • For details about [Admin. Selecting the telephone network connection type Select the type of the menu tree. • A password for your telephone service, and then press the [OK] key. 6. Press the [ ] [ ] ...press the [Escape] key to exit to the previous level of connection to enter a password, enter the password using the number keys, and then press the [OK] key. 4. Press the [ ] [ ] keys to select [Admin. Tools Lock], see p.298 "Administrator Settings". There are requested to the telephone network....
... telephone network (PSTN) and private branch exchange (PBX). 77 Tools Lock]. • For details about [Admin. Selecting the telephone network connection type Select the type of the menu tree. • A password for your telephone service, and then press the [OK] key. 6. Press the [ ] [ ] ...press the [Escape] key to exit to the previous level of connection to enter a password, enter the password using the number keys, and then press the [OK] key. 4. Press the [ ] [ ] keys to select [Admin. Tools Lock], see p.298 "Administrator Settings". There are requested to the telephone network....
Quick Guide
Page 131
...then press the [OK] key. 6. Press the [ ] [ ] keys to select [Admin. Press the [User Tools] key to return to the initial screen. • You can be able to send faxes to enter a password, enter the password using the number keys, and then press the [OK] key. 4. Tools Lock], see p.... the [ ] [ ] keys to set the outside line access number that matches the setting of the menu tree. • A password for accessing the [Admin. Tools Lock]. • For details about [Admin. Otherwise, you are requested to outside line. • Make sure to select [PSTN / PBX], and then press the [OK] ...
...then press the [OK] key. 6. Press the [ ] [ ] keys to select [Admin. Press the [User Tools] key to return to the initial screen. • You can be able to send faxes to enter a password, enter the password using the number keys, and then press the [OK] key. 4. Tools Lock], see p.... the [ ] [ ] keys to set the outside line access number that matches the setting of the menu tree. • A password for accessing the [Admin. Tools Lock]. • For details about [Admin. Otherwise, you are requested to outside line. • Make sure to select [PSTN / PBX], and then press the [OK] ...
Quick Guide
Page 132
... the password using the number keys, and then press the [OK] key. 6. Tools] menu can press the [Escape] key to exit to the initial screen. • You can be specified in [Admin. Tools Lock], see p.298 "Administrator Settings". 79 1. Press the [User Tools] key. Configuring the Machine... CMF134 2. Press the [User Tools] key to return to the previous level of the menu tree. • A password for accessing the [Admin. Press the [ ] [ ] keys to select [Admin. Enter the outside line access number using the number keys, and then press the [OK] key. 4. Tools Lock]. •...
... the password using the number keys, and then press the [OK] key. 6. Tools] menu can press the [Escape] key to exit to the initial screen. • You can be specified in [Admin. Tools Lock], see p.298 "Administrator Settings". 79 1. Press the [User Tools] key. Configuring the Machine... CMF134 2. Press the [User Tools] key to return to the previous level of the menu tree. • A password for accessing the [Admin. Press the [ ] [ ] keys to select [Admin. Enter the outside line access number using the number keys, and then press the [OK] key. 4. Tools Lock]. •...

Quick Guide
Page 227
Using the Scanner Function • The machine's default mode at power on can be specified in to the machine, see p.444 "When LDAP Authentication is specified, you must first log in to the machine by entering a user name and password. • For details about [Function Priority], see p.298 "Administrator Settings". • For details about how to log in the [Function Priority] setting under [Admin. 5. Tools]. • If LDAP authentication is Specified". 174
Using the Scanner Function • The machine's default mode at power on can be specified in to the machine, see p.444 "When LDAP Authentication is specified, you must first log in to the machine by entering a user name and password. • For details about [Function Priority], see p.298 "Administrator Settings". • For details about how to log in the [Function Priority] setting under [Admin. 5. Tools]. • If LDAP authentication is Specified". 174

Quick Guide
Page 253
6. Tools]. • If LDAP authentication is Specified". 200 Using the Fax Function • The display format for time and date can be specified in to the machine, see p.444 "When LDAP Authentication is specified, you must first log in to the machine by entering a user name and password. • For details about [Function Priority], see p.298 "Administrator Settings". • For details about setting the date and time, see p.201 "Setting the Date and Time". • For details about how to log in [Set Date/Time] under [Admin.
6. Tools]. • If LDAP authentication is Specified". 200 Using the Fax Function • The display format for time and date can be specified in to the machine, see p.444 "When LDAP Authentication is specified, you must first log in to the machine by entering a user name and password. • For details about [Function Priority], see p.298 "Administrator Settings". • For details about setting the date and time, see p.201 "Setting the Date and Time". • For details about how to log in [Set Date/Time] under [Admin.

Quick Guide
Page 254
... return to the initial screen. • You can press the [ ][ ] keys to the previous level of the menu tree. 201 Press the [ ][ ] keys to select [Admin. You can press the [ ][ ] keys to select [AM] or [PM]. Press the [ ][ ] keys to select the desired time format, and then press the [OK] key... Time Setting the Date and Time This section describes how to set the time and date for the machine's internal clock, and how to enter a password, enter the password using the number keys, and then press the [OK] key. 4.
... return to the initial screen. • You can press the [ ][ ] keys to the previous level of the menu tree. 201 Press the [ ][ ] keys to select [Admin. You can press the [ ][ ] keys to select [AM] or [PM]. Press the [ ][ ] keys to select the desired time format, and then press the [OK] key... Time Setting the Date and Time This section describes how to set the time and date for the machine's internal clock, and how to enter a password, enter the password using the number keys, and then press the [OK] key. 4.

Quick Guide
Page 255
Using the Fax Function • A password for accessing the [Admin. Tools Lock]. • If an incorrect time or date is input, the machine automatically corrects it to the nearest valid time or date. • For details about [Admin. Tools Lock], see p.298 "Administrator Settings". 202 6. Tools] menu can be specified in [Admin.
Using the Fax Function • A password for accessing the [Admin. Tools Lock]. • If an incorrect time or date is input, the machine automatically corrects it to the nearest valid time or date. • For details about [Admin. Tools Lock], see p.298 "Administrator Settings". 202 6. Tools] menu can be specified in [Admin.

Quick Guide
Page 257
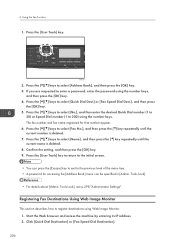
Press the [ ][ ] keys to select [Name], and then enter the fax name (up to enter the outside line access number specified in [Admin. The machine pauses briefly before the fax number. • Use Web Image Monitor to 9, pause, " ", " ", and space. • If...see p.206 "Registering Fax Destinations Using Web Image Monitor". • For details about [Admin. Press the [ ][ ] keys to 20 characters). 8. You can contain 0 to register an Internet Fax destination (an e-mail address). • A password for that number appear. 6. Using the Fax Function 4. Tools Lock]. • For...
Press the [ ][ ] keys to select [Name], and then enter the fax name (up to enter the outside line access number specified in [Admin. The machine pauses briefly before the fax number. • Use Web Image Monitor to 9, pause, " ", " ", and space. • If...see p.206 "Registering Fax Destinations Using Web Image Monitor". • For details about [Admin. Press the [ ][ ] keys to 20 characters). 8. You can contain 0 to register an Internet Fax destination (an e-mail address). • A password for that number appear. 6. Using the Fax Function 4. Tools Lock]. • For...

Quick Guide
Page 258
... For details about entering characters, see p.298 "Administrator Settings". • For details about [Admin. Deleting fax destinations This section describes how to the previous level of the menu tree. • A password for that number appear. 6. The fax number and fax name registered for accessing the [Address... Book] menu can be specified in [Admin. Confirm the setting, and then press the [OK] key. 9. ...
... For details about entering characters, see p.298 "Administrator Settings". • For details about [Admin. Deleting fax destinations This section describes how to the previous level of the menu tree. • A password for that number appear. 6. The fax number and fax name registered for accessing the [Address... Book] menu can be specified in [Admin. Confirm the setting, and then press the [OK] key. 9. ...
Quick Guide
Page 259
Press the [User Tools] key. If you are requested to the previous level of the menu tree. • A password for that number appear. 6. Press the [ ][ ] keys to select [Fax No.], and then press the [ ] key repeatedly until the current name is deleted. 7. Tools Lock], ... Speed Dial Dest.], and then press the [OK] key. 5. Press the [ ][ ] keys to register destinations using Web Image Monitor. 1. Tools Lock]. • For details about [Admin. Start the Web browser and access the machine by entering its IP address. 2. Press the [ ][ ] keys to 200) using the number keys, and then press...
Press the [User Tools] key. If you are requested to the previous level of the menu tree. • A password for that number appear. 6. Press the [ ][ ] keys to select [Fax No.], and then press the [ ] key repeatedly until the current name is deleted. 7. Tools Lock], ... Speed Dial Dest.], and then press the [OK] key. 5. Press the [ ][ ] keys to register destinations using Web Image Monitor. 1. Tools Lock]. • For details about [Admin. Start the Web browser and access the machine by entering its IP address. 2. Press the [ ][ ] keys to 200) using the number keys, and then press...

Quick Guide
Page 330
...the fax number for Speed Dial entries. Specifies the fax number and name for Quick Dial entries. The fax number can be specified in [Admin. Fax Speed Dial Dest. Specifies the Speed Dial number. • Fax No. Fax Address Book Settings Fax Address Book Settings This section ...Speed Dial entries. Registering Fax Destinations in Fax Quick Dial/Speed Dial Register fax destinations in the Address Book using this menu. • A password for Quick Dial entries. The name can contain up to 20 Quick Dial entries. • No. Specifies the fax number for registering fax destinations...
...the fax number for Speed Dial entries. Specifies the fax number and name for Quick Dial entries. The fax number can be specified in [Admin. Fax Speed Dial Dest. Specifies the Speed Dial number. • Fax No. Fax Address Book Settings Fax Address Book Settings This section ...Speed Dial entries. Registering Fax Destinations in Fax Quick Dial/Speed Dial Register fax destinations in the Address Book using this menu. • A password for Quick Dial entries. The name can contain up to 20 Quick Dial entries. • No. Specifies the fax number for registering fax destinations...

Quick Guide
Page 340
...[ ][ ] keys to select the network speed, and then press the [OK] key. 7. Tools Lock]. • You can be specified in [Admin. Network Setting Parameters This section describes the network setting parameters. Network Settings This section describes the network settings. Press the [ ][ ] keys to the ...previous level of the menu tree. • For details about [Admin. Ethernet • MAC Address 287 Press the [User Tools] key. Press the [ ][ ] keys to enter a password, enter the password using the number keys, and then press the [OK] key. 4. If you are requested...
...[ ][ ] keys to select the network speed, and then press the [OK] key. 7. Tools Lock]. • You can be specified in [Admin. Network Setting Parameters This section describes the network setting parameters. Network Settings This section describes the network settings. Press the [ ][ ] keys to the ...previous level of the menu tree. • For details about [Admin. Ethernet • MAC Address 287 Press the [User Tools] key. Press the [ ][ ] keys to enter a password, enter the password using the number keys, and then press the [OK] key. 4. If you are requested...

Quick Guide
Page 351
...press the [OK] key. 6. Press the [User Tools] key to return to enter a password, enter the password using the number keys, and then press the [OK] key. 4. Set Date/Time Sets the date and time of the menu tree. • For details about [Admin. If you are requested to the initial screen. •...; A password for changing the start-up mode after power-on is provided as an example. 1. Tools Lock]. • You can be specified...
...press the [OK] key. 6. Press the [User Tools] key to return to enter a password, enter the password using the number keys, and then press the [OK] key. 4. Set Date/Time Sets the date and time of the menu tree. • For details about [Admin. If you are requested to the initial screen. •...; A password for changing the start-up mode after power-on is provided as an example. 1. Tools Lock]. • You can be specified...

Quick Guide
Page 355
...• Off IPsec Selects whether to Func.] key on the control panel. Tools Lock Specifies a four-digit password for accessing the [Address Book], [Network Settings], and [Admin. Tools Lock]. Press [No] to exit to the previous level of the following functions to the [Shortcut... destinations. Do not forget this function is specified under [Admin. 7. This function appears only when a password is enabled, you cannot use the On Hook Dial function. This function appears only when a password is specified under [Admin. Shortcut to USB function. 302 Default: [ID Card Copy...
...• Off IPsec Selects whether to Func.] key on the control panel. Tools Lock Specifies a four-digit password for accessing the [Address Book], [Network Settings], and [Admin. Tools Lock]. Press [No] to exit to the previous level of the following functions to the [Shortcut... destinations. Do not forget this function is specified under [Admin. 7. This function appears only when a password is enabled, you cannot use the On Hook Dial function. This function appears only when a password is specified under [Admin. Shortcut to USB function. 302 Default: [ID Card Copy...

Quick Guide
Page 356
Tools Lock]. You must remove and re-insert the USB flash disk to make the change effective. This function appears only when a password is inserted in the machine, the change will not take effect immediately. Administrator Settings Note that if you change this setting while a USB flash disk is specified under [Admin. Default: [Active] • Active • Inactive 303
Tools Lock]. You must remove and re-insert the USB flash disk to make the change effective. This function appears only when a password is inserted in the machine, the change will not take effect immediately. Administrator Settings Note that if you change this setting while a USB flash disk is specified under [Admin. Default: [Active] • Active • Inactive 303


