Manuals
Page 4
......106 Printer Does Not Print...107 When the Printer is Directly Connected to Take When Cleaning...99 Cleaning the Friction Pad and the Paper Feed Roller 100 8. Cleaning the Printer Cautions to a Computer via USB Cable 108 Other Printing Problems...111 2
......106 Printer Does Not Print...107 When the Printer is Directly Connected to Take When Cleaning...99 Cleaning the Friction Pad and the Paper Feed Roller 100 8. Cleaning the Printer Cautions to a Computer via USB Cable 108 Other Printing Problems...111 2
Manuals
Page 28
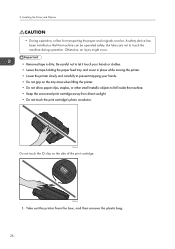
... carefully to prevent trapping your hands. • Do not grip on the side of the print cartridge. Installing the Printer and Options • During operation, rollers for transporting the paper and originals revolve.
... carefully to prevent trapping your hands. • Do not grip on the side of the print cartridge. Installing the Printer and Options • During operation, rollers for transporting the paper and originals revolve.
Manuals
Page 102
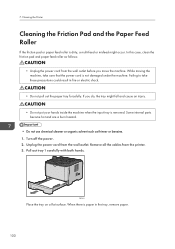
...8226; Unplug the power cord from the printer. 3. 7. CMC092 Place the tray on a flat surface. In this case, clean the friction pad and paper feed roller as thinner or benzine. 1. Turn off the power. 2. When there is not damaged under the machine. If you move the machine. Pull out tray 1 ...carefully with both hands. Cleaning the Printer Cleaning the Friction Pad and the Paper Feed Roller If the friction pad or paper feed roller is removed. Remove all the cables from the wall outlet before you do, the tray might fall and cause an injury....
...8226; Unplug the power cord from the printer. 3. 7. CMC092 Place the tray on a flat surface. In this case, clean the friction pad and paper feed roller as thinner or benzine. 1. Turn off the power. 2. When there is not damaged under the machine. If you move the machine. Pull out tray 1 ...carefully with both hands. Cleaning the Printer Cleaning the Friction Pad and the Paper Feed Roller If the friction pad or paper feed roller is removed. Remove all the cables from the wall outlet before you do, the tray might fall and cause an injury....
Manuals
Page 103
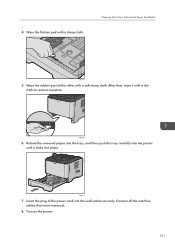
Wipe the rubber part of the power cord into the wall socket securely. Reload the removed paper into the tray, and then push the tray carefully into place. Connect all the interface cables that , wipe it clicks into the printer until it with a dry cloth to remove moisture. After that were removed.. 8. Wipe the friction pad with a soft damp cloth. Cleaning the Friction Pad and the Paper Feed Roller CMC084 5. CMC085 6. CMC109 7. 4. Turn on the power. 101 Insert the plug of the roller with a damp cloth.
Wipe the rubber part of the power cord into the wall socket securely. Reload the removed paper into the tray, and then push the tray carefully into place. Connect all the interface cables that , wipe it clicks into the printer until it with a dry cloth to remove moisture. After that were removed.. 8. Wipe the friction pad with a soft damp cloth. Cleaning the Friction Pad and the Paper Feed Roller CMC084 5. CMC085 6. CMC109 7. 4. Turn on the power. 101 Insert the plug of the roller with a damp cloth.

Manuals
Page 104
Cleaning the Printer • If jams or multi-sheet feeds occur after cleaning the friction pad, contact your sales or service representative. • If the optional tray 2 is installed, clean its friction pad and paper feed roller in the same way as you did for tray 1. 102 7.
Cleaning the Printer • If jams or multi-sheet feeds occur after cleaning the friction pad, contact your sales or service representative. • If the optional tray 2 is installed, clean its friction pad and paper feed roller in the same way as you did for tray 1. 102 7.
Manuals
Page 107
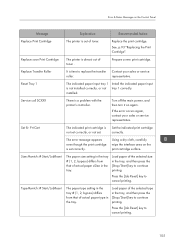
..., and then turn it on the print cartridge surface. Load paper of toner . Press the [Job Reset] key to cancel printing. Replace Transfer Roller It is time to continue printing. Service call SCXXX There is out of actual paper si0ze in the tray. Size Msmtch: # Start/JobReset The...appears even though the print cartridge is not set correctly, or not set correctly. installed. If the error occurs again, contact your sales or service roller. Using a dry cloth, carefully wipe the interface area on again. Press the [Job Reset] key to cancel printing. 105 Load paper of ...
..., and then turn it on the print cartridge surface. Load paper of toner . Press the [Job Reset] key to cancel printing. Replace Transfer Roller It is time to continue printing. Service call SCXXX There is out of actual paper si0ze in the tray. Size Msmtch: # Start/JobReset The...appears even though the print cartridge is not set correctly, or not set correctly. installed. If the error occurs again, contact your sales or service roller. Using a dry cloth, carefully wipe the interface area on again. Press the [Job Reset] key to cancel printing. 105 Load paper of ...
Manuals
Page 114
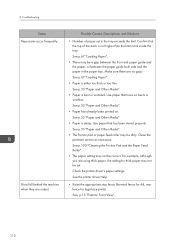
... See p.53 "Paper and Other Media". • Paper has already been printed on. See p.100 "Cleaning the Friction Pad and the Paper Feed Roller". • The paper setting may not be a gap between the front end paper guide and the paper, or between the paper guide both side ...set . Clean the pertinent section as necessary. Confirm that have no gaps. See p.53 "Paper and Other Media". • The friction pad or paper feed roller may be set in the paper tray. See, p.15 "Exterior: Front View". 112 8. Troubleshooting Status Paper jams occur frequently. See p.67 "Loading Paper". &#...
... See p.53 "Paper and Other Media". • Paper has already been printed on. See p.100 "Cleaning the Friction Pad and the Paper Feed Roller". • The paper setting may not be a gap between the front end paper guide and the paper, or between the paper guide both side ...set . Clean the pertinent section as necessary. Confirm that have no gaps. See p.53 "Paper and Other Media". • The friction pad or paper feed roller may be set in the paper tray. See, p.15 "Exterior: Front View". 112 8. Troubleshooting Status Paper jams occur frequently. See p.67 "Loading Paper". &#...
Manuals
Page 116
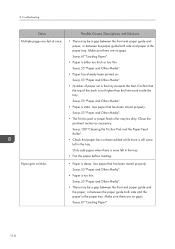
... there are no gaps. Troubleshooting Status Multiple pages are no gaps. See p.53 "Paper and Other Media". • The friction pad or paper feed roller may be a gap between the front end paper guide and the paper, or between the paper guide both side and the paper in the paper...has already been printed on. See p.53 "Paper and Other Media". • Paper is damp. See p.100 "Cleaning the Friction Pad and the Paper Feed Roller". • Check that the top of paper set in the tray. • Fan the paper before loading. • Paper is static. Clean the pertinent ...
... there are no gaps. Troubleshooting Status Multiple pages are no gaps. See p.53 "Paper and Other Media". • The friction pad or paper feed roller may be a gap between the front end paper guide and the paper, or between the paper guide both side and the paper in the paper...has already been printed on. See p.53 "Paper and Other Media". • Paper is damp. See p.100 "Cleaning the Friction Pad and the Paper Feed Roller". • Check that the top of paper set in the tray. • Fan the paper before loading. • Paper is static. Clean the pertinent ...
Manuals
Page 147
... 18 Attaching Paper Feed Unit 36 B Bond paper 57 C Cardstock 57 CAUTION labels 8 CD-ROM 12 Cleaning the friction pad 100 Cleaning the paper feed roller 100 Cleaning the printer 99 Color paper 57 Configuration 43 Connecting the printer network connection 39 USB connection 41 Consumables 138 Control panel 18 D Data...
... 18 Attaching Paper Feed Unit 36 B Bond paper 57 C Cardstock 57 CAUTION labels 8 CD-ROM 12 Cleaning the friction pad 100 Cleaning the paper feed roller 100 Cleaning the printer 99 Color paper 57 Configuration 43 Connecting the printer network connection 39 USB connection 41 Consumables 138 Control panel 18 D Data...

Manuals
Page 148
O OK key 18 Operating instructions 12 Options 142 Other printing problems 111 P Panel indicator 106 Paper capacity 53 Paper feed roller 100 Paper Feed Unit 36 Paper Feed Unit TK1080 142 Paper recommendations 56 Paper size 53 Paper storage 65 Paper type 53, 57 Paper weight ...
O OK key 18 Operating instructions 12 Options 142 Other printing problems 111 P Panel indicator 106 Paper capacity 53 Paper feed roller 100 Paper Feed Unit 36 Paper Feed Unit TK1080 142 Paper recommendations 56 Paper size 53 Paper storage 65 Paper type 53, 57 Paper weight ...
Software Guide
Page 72
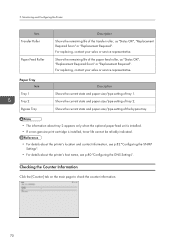
...contact your sales or service representative. For replacing, contact your sales or service representative. Shows the remaining life of the paper feed roller, as "Status OK", "Replacement Required Soon" or "Replacement Required". Shows the current state and paper size/type setting of ... the DNS Settings". Shows the current state and paper size/type setting of tray 2. Monitoring and Configuring the Printer Item Transfer Roller Paper Feed Roller Paper Tray Item Tray 1 Tray 2 Bypass Tray Description Shows the remaining life of tray 1. Checking the Counter Information Click the...
...contact your sales or service representative. For replacing, contact your sales or service representative. Shows the remaining life of the paper feed roller, as "Status OK", "Replacement Required Soon" or "Replacement Required". Shows the current state and paper size/type setting of ... the DNS Settings". Shows the current state and paper size/type setting of tray 2. Monitoring and Configuring the Printer Item Transfer Roller Paper Feed Roller Paper Tray Item Tray 1 Tray 2 Bypass Tray Description Shows the remaining life of tray 1. Checking the Counter Information Click the...
Software Guide
Page 102
...; Attached Equipment Shows "Tray 2" if tray 2 is attached. • Print Cartridge Shows the remaining life of the print cartridge. • Transfer Roller Shows the remaining life of the transfer roller. • Paper Feed Roller Shows the remaining life of the paper feed roller. • Fusing Unit Shows the remaining life of the fusing unit.
...; Attached Equipment Shows "Tray 2" if tray 2 is attached. • Print Cartridge Shows the remaining life of the print cartridge. • Transfer Roller Shows the remaining life of the transfer roller. • Paper Feed Roller Shows the remaining life of the paper feed roller. • Fusing Unit Shows the remaining life of the fusing unit.

