
Manuals
Page 12
To avoid injury and prevent damage to the printer, be sure to error messages, and resolving jams. Driver Installation Guide Contains procedures for installing the PCL 6 and PostScript 3 printer drivers. Hardware Guide (This manual) Contains information about safe usage of this printer. and procedures such as PDF files. • A Web browser must be installed in order...
To avoid injury and prevent damage to the printer, be sure to error messages, and resolving jams. Driver Installation Guide Contains procedures for installing the PCL 6 and PostScript 3 printer drivers. Hardware Guide (This manual) Contains information about safe usage of this printer. and procedures such as PDF files. • A Web browser must be installed in order...
Manuals
Page 40
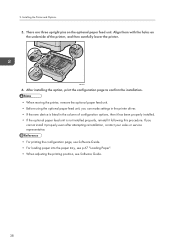
... the configuration page to confirm the installation. • When moving the printer, remove the optional paper feed unit. • Before using the optional paper feed unit, you cannot install it following this procedure. If you can make settings in the printer driver. • If the new device is listed in the column of...
... the configuration page to confirm the installation. • When moving the printer, remove the optional paper feed unit. • Before using the optional paper feed unit, you cannot install it following this procedure. If you can make settings in the printer driver. • If the new device is listed in the column of...

Manuals
Page 58
... side facing down • Bypass Tray: Print side facing up • Print quality cannot be stored properly. Setting the paper type Use the printer driver or control panel to specify the paper type you want to touch the surface of Paper and Other Media This section provides information about recommended...Paper • Do not use . 56 Storing Paper • Paper should always be guaranteed if paper other printers. • When loading the paper, take care not to use ink-jet printer paper because it may stick to direct sunlight. • Store on the right front side of paper supported...
... side facing down • Bypass Tray: Print side facing up • Print quality cannot be stored properly. Setting the paper type Use the printer driver or control panel to specify the paper type you want to touch the surface of Paper and Other Media This section provides information about recommended...Paper • Do not use . 56 Storing Paper • Paper should always be guaranteed if paper other printers. • When loading the paper, take care not to use ink-jet printer paper because it may stick to direct sunlight. • Store on the right front side of paper supported...
Manuals
Page 59
For more information about the printer driver, see p.78 "Specifying a paper type for Tray 1 and Tray 2" and p.84 "Specifying a paper type for the driver. Duplex supported size A4, Legal (81/2 " × 14 "), Letter (81/2 " × 11 ") 57 For details, see Help for the bypass tray". Specifications of ...recommended paper, contact your sales or service representative. Thin Paper Item Description Paper thickness 52 to 64 g/m2 (13.8 to 17.0 lb.). Paper Recommendations Printer driver On the printer driver screen, click the [Paper] tab, and then select a paper type under [Paper Type:].
For more information about the printer driver, see p.78 "Specifying a paper type for Tray 1 and Tray 2" and p.84 "Specifying a paper type for the driver. Duplex supported size A4, Legal (81/2 " × 14 "), Letter (81/2 " × 11 ") 57 For details, see Help for the bypass tray". Specifications of ...recommended paper, contact your sales or service representative. Thin Paper Item Description Paper thickness 52 to 64 g/m2 (13.8 to 17.0 lb.). Paper Recommendations Printer driver On the printer driver screen, click the [Paper] tab, and then select a paper type under [Paper Type:].

Manuals
Page 64
... edge, be sure to place one sheet at the same time, load them upside down. For details about changing the loading orientation, see the printer driver Help. • Environmental factors can occur as they are fed at a time. • Make sure to load them one by one. &#... When printing on OHP transparencies, remove the transparencies one minute is recommended to include the open flap when measuring. 62 Also, configure the printer driver to the fusing unit and cause misfeeds. When printing large, black-solid areas, striping can degrade the print quality on both recommended and non...
... edge, be sure to place one sheet at the same time, load them upside down. For details about changing the loading orientation, see the printer driver Help. • Environmental factors can occur as they are fed at a time. • Make sure to load them one by one. &#... When printing on OHP transparencies, remove the transparencies one minute is recommended to include the open flap when measuring. 62 Also, configure the printer driver to the fusing unit and cause misfeeds. When printing large, black-solid areas, striping can degrade the print quality on both recommended and non...
Manuals
Page 68
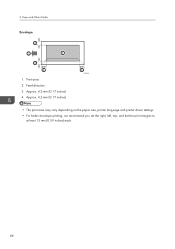
5. Approx. 4.2 mm (0.17 inches) 4. Paper and Other Media Envelope 3 2 1 3 4 1. Feed direction 3. Print area 2. Approx. 4.2 mm (0.17 inches) 4 CMC044 • The print area may vary depending on the paper size, printer language and printer driver settings. • For better envelope printing, we recommend you set the right, left, top, and bottom print margins to at least 15 mm (0.59 inches) each. 66
5. Approx. 4.2 mm (0.17 inches) 4. Paper and Other Media Envelope 3 2 1 3 4 1. Feed direction 3. Print area 2. Approx. 4.2 mm (0.17 inches) 4 CMC044 • The print area may vary depending on the paper size, printer language and printer driver settings. • For better envelope printing, we recommend you set the right, left, top, and bottom print margins to at least 15 mm (0.59 inches) each. 66
Manuals
Page 78
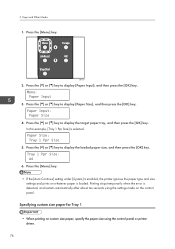
... 5. CMC034 2. Paper Input: Paper Size 4. Press the [Menu] key. • If the [Auto Continue] setting under [System] is enabled, the printer ignores the paper type and size settings and prints on whatever paper is selected. Specifying custom size paper for Tray 1 • When printing on the ... detected, and restarts automatically after about ten seconds using the settings made on custom size paper, specify the paper size using the control panel or printer driver. 76 5. Paper and Other Media 1. Menu: Paper Input 3. Press the [ ] or [ ] key to display the loaded paper size, and then ...
... 5. CMC034 2. Paper Input: Paper Size 4. Press the [Menu] key. • If the [Auto Continue] setting under [System] is enabled, the printer ignores the paper type and size settings and prints on whatever paper is selected. Specifying custom size paper for Tray 1 • When printing on the ... detected, and restarts automatically after about ten seconds using the settings made on custom size paper, specify the paper size using the control panel or printer driver. 76 5. Paper and Other Media 1. Menu: Paper Input 3. Press the [ ] or [ ] key to display the loaded paper size, and then ...
Manuals
Page 83
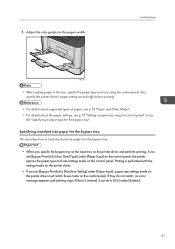
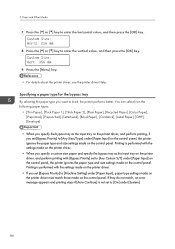
...This describes how to load standard size paper into the bypass tray. • When you specify the bypass tray as the input tray on the printer driver and perform printing, if you set to [Any Size/Type] under [System]. 81 If they do not match, an error message appears and printing... stops if [Auto Continue] is performed with the settings made on the printer driver. • If you set [Bypass Priority] to the paper width. Specifying standard size paper for the bypass tray". Printing is not set [Bypass Priority]...
...This describes how to load standard size paper into the bypass tray. • When you specify the bypass tray as the input tray on the printer driver and perform printing, if you set to [Any Size/Type] under [System]. 81 If they do not match, an error message appears and printing... stops if [Auto Continue] is performed with the settings made on the printer driver. • If you set [Bypass Priority] to the paper width. Specifying standard size paper for the bypass tray". Printing is not set [Bypass Priority]...
Manuals
Page 84
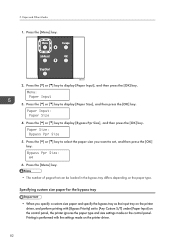
.... Bypass Ppr Size: A4 6. Press the [Menu] key. • The number of pages that can be loaded in the bypass tray differs depending on the printer driver. 82 Press the [ ] or [ ] key to display [Bypass Ppr Size], and then press the [OK] key. Menu: Paper Input 3. CMC034 2. Paper Size: Bypass Ppr... the [ ] or [ ] key to select the paper size you specify a custom size paper and specify the bypass tray as the input tray on the printer driver, and perform printing with the settings made on the control panel. Specifying custom size paper for the bypass tray • When you want to set...
.... Bypass Ppr Size: A4 6. Press the [Menu] key. • The number of pages that can be loaded in the bypass tray differs depending on the printer driver. 82 Press the [ ] or [ ] key to display [Bypass Ppr Size], and then press the [OK] key. Menu: Paper Input 3. CMC034 2. Paper Size: Bypass Ppr... the [ ] or [ ] key to select the paper size you specify a custom size paper and specify the bypass tray as the input tray on the printer driver, and perform printing with the settings made on the control panel. Specifying custom size paper for the bypass tray • When you want to set...
Manuals
Page 85
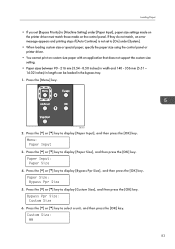
... set [Bypass Priority] to [Machine Setting] under [System]. • When loading custom size or special paper, specify the paper size using the control panel or printer driver. • You cannot print on the control panel. Press the [ ] or [ ] key to display [Bypass Ppr Size], and then press the [OK].... Paper Size: Bypass Ppr Size 5. Loading Paper • If you set to [On] under [Paper Input], paper size settings made on the printer driver must match those made on custom size paper with an application that does not support the custom size setting. • Paper sizes between 90 - 216...
... set [Bypass Priority] to [Machine Setting] under [System]. • When loading custom size or special paper, specify the paper size using the control panel or printer driver. • You cannot print on the control panel. Press the [ ] or [ ] key to display [Bypass Ppr Size], and then press the [OK].... Paper Size: Bypass Ppr Size 5. Loading Paper • If you set to [On] under [Paper Input], paper size settings made on the printer driver must match those made on custom size paper with an application that does not support the custom size setting. • Paper sizes between 90 - 216...
Manuals
Page 86
...control panel. If they do not match, an error message appears and printing stops if [Auto Continue] is performed with the settings made on the printer driver. • When you specify a custom size paper and specify the bypass tray as the input tray on the control panel. Press the [Menu]... key. • For details about the printer driver, see the printer driver Help. Custom Size: Horiz. 216 mm 8. Specifying a paper type for the bypass tray By selecting the paper type you set [Bypass Priority]...
...control panel. If they do not match, an error message appears and printing stops if [Auto Continue] is performed with the settings made on the printer driver. • When you specify a custom size paper and specify the bypass tray as the input tray on the control panel. Press the [Menu]... key. • For details about the printer driver, see the printer driver Help. Custom Size: Horiz. 216 mm 8. Specifying a paper type for the bypass tray By selecting the paper type you set [Bypass Priority]...
Manuals
Page 93
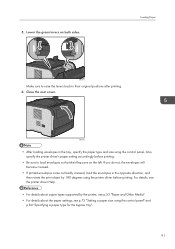
...paper type for the bypass tray". 91 CMC080 • After loading envelopes in the opposite direction, and then rotate the print object by the printer, see p.53 "Paper and Other Media". • For details about the paper settings, see p.75 "Setting a paper size using the... after printing. 6. Close the rear cover. Also, specify the printer driver's paper setting accordingly before printing. For details, see the printer driver Help. • For details about paper types supported by 180 degrees using the printer driver before printing. • Be sure to their flaps are on both...
...paper type for the bypass tray". 91 CMC080 • After loading envelopes in the opposite direction, and then rotate the print object by the printer, see p.53 "Paper and Other Media". • For details about the paper settings, see p.75 "Setting a paper size using the... after printing. 6. Close the rear cover. Also, specify the printer driver's paper setting accordingly before printing. For details, see the printer driver Help. • For details about paper types supported by 180 degrees using the printer driver before printing. • Be sure to their flaps are on both...
Manuals
Page 113
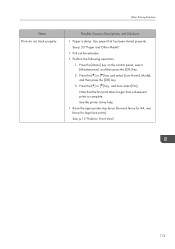
See the printer driver Help. • Confirm that the paper is not curled or bent. Flatten paper before loading. For example, although you are using thick paper, the setting for thick paper may not be set. Possible Causes, Descriptions, and Solutions • The paper setting may not be correct. Envelopes can be curled easily. Other Printing Problems Other Printing Problems Status Toner smears appear on the print side of the page. See p.53 "Paper and Other Media". 111 Check the printer driver's paper settings.
See the printer driver Help. • Confirm that the paper is not curled or bent. Flatten paper before loading. For example, although you are using thick paper, the setting for thick paper may not be set. Possible Causes, Descriptions, and Solutions • The paper setting may not be correct. Envelopes can be curled easily. Other Printing Problems Other Printing Problems Status Toner smears appear on the print side of the page. See p.53 "Paper and Other Media". 111 Check the printer driver's paper settings.
Manuals
Page 114
... front end paper guide and the paper, or between the paper guide both side and the paper in the tray exceeds the limit. See the printer driver Help. • Raise the appropriate stop fence (forward fence for A4, rear fence for thick paper may be dirty. See, p.15 "Exterior:... not be correct. See p.53 "Paper and Other Media". • Paper is damp. Use paper that the top of paper set . Check the printer driver's paper settings. Troubleshooting Status Paper jams occur frequently. Make sure there are no bents or wrinkles. See p.53 "Paper and Other Media". • Paper...
... front end paper guide and the paper, or between the paper guide both side and the paper in the tray exceeds the limit. See the printer driver Help. • Raise the appropriate stop fence (forward fence for A4, rear fence for thick paper may be dirty. See, p.15 "Exterior:... not be correct. See p.53 "Paper and Other Media". • Paper is damp. Use paper that the top of paper set . Check the printer driver's paper settings. Troubleshooting Status Paper jams occur frequently. Make sure there are no bents or wrinkles. See p.53 "Paper and Other Media". • Paper...
Manuals
Page 115
... panel, select [Maintenance], and then press the [OK] key. 2. See, p.15 "Exterior: Front View". 113 Press the [ ] or [ ] key, and then select [On]. See the printer driver help. • Raise the appropriate stop fence (forward fence for A4, rear fence for legal size prints). Use paper that the first print takes longer...
... panel, select [Maintenance], and then press the [OK] key. 2. See, p.15 "Exterior: Front View". 113 Press the [ ] or [ ] key, and then select [On]. See the printer driver help. • Raise the appropriate stop fence (forward fence for A4, rear fence for legal size prints). Use paper that the first print takes longer...
Manuals
Page 117
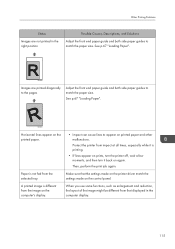
... such as enlargement and reduction, the layout of the image might be different from that the settings made on the printer driver match the settings made on the control panel. Protect the printer from impact at all times, especially while it back on again. See p.67 "Loading Paper". A printed image is... printing. • If lines appear on prints, turn the printer off, wait a few moments, and then turn it is different from the selected tray. Paper is not fed from the image on the computer's display...
... such as enlargement and reduction, the layout of the image might be different from that the settings made on the printer driver match the settings made on the control panel. Protect the printer from impact at all times, especially while it back on again. See p.67 "Loading Paper". A printed image is... printing. • If lines appear on prints, turn the printer off, wait a few moments, and then turn it is different from the selected tray. Paper is not fed from the image on the computer's display...

Manuals
Page 118
... speed up , and this takes time until printing starts. To disable Energy Saver mode: 1. Changing the settings with printer driver may help to process, so simply wait when printing such data. Photo images are printed. Press the [ ] or [ ] key and select [Energy Saver 2], and then ... [OK] key. 3. If the Data In indicator is blinking, the data is being processed. Images are cut off, or excess pages are coarse. See the printer driver Help. 8. It takes too much time to reduce the image, and then print. If you are using paper smaller than the paper size selected in...
... speed up , and this takes time until printing starts. To disable Energy Saver mode: 1. Changing the settings with printer driver may help to process, so simply wait when printing such data. Photo images are printed. Press the [ ] or [ ] key and select [Energy Saver 2], and then ... [OK] key. 3. If the Data In indicator is blinking, the data is being processed. Images are cut off, or excess pages are coarse. See the printer driver Help. 8. It takes too much time to reduce the image, and then print. If you are using paper smaller than the paper size selected in...
Manuals
Page 119
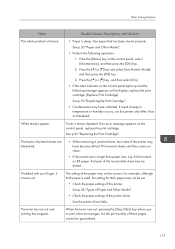
...the toner runs out, pressing the [Stop/Start] key allows you to print a few more pages, but the print quality of the printer driver. White streaks appear. A4 document on the control panel, replace the print cartridge. For example, although thick paper is damp. Press the... removing a jammed sheet, the inside of the next printed sheet may have become dirtied. See the printer driver Help. See p.93 "Replacing the Print Cartridge". The setting of this printer only after it smears out. Use paper that has been stored properly. Other Printing Problems Status Possible ...
...the toner runs out, pressing the [Stop/Start] key allows you to print a few more pages, but the print quality of the printer driver. White streaks appear. A4 document on the control panel, replace the print cartridge. For example, although thick paper is damp. Press the... removing a jammed sheet, the inside of the next printed sheet may have become dirtied. See the printer driver Help. See p.93 "Replacing the Print Cartridge". The setting of this printer only after it smears out. Use paper that has been stored properly. Other Printing Problems Status Possible ...
Software Guide
Page 3
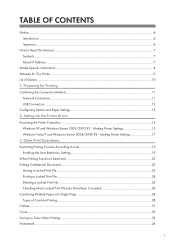
Setting Up the Printer Driver Accessing the Printer Properties...15 Windows XP and Windows Server 2003/2003 R2 - Other Print Operations Restricting Printing Function According to Read This Manual...7 Symbols...7 About IP Address...7 ......25 Checking which Locked Print File Jobs Have Been Canceled 26 Combining Multiple Pages into Single Page 28 Types of Option...10 1. Preparing for This Printer...9 List of Combine Printing...28 Collate...31 Cover...32 Saving on Toner When Printing...33 Watermark...34 1 Making...
Setting Up the Printer Driver Accessing the Printer Properties...15 Windows XP and Windows Server 2003/2003 R2 - Other Print Operations Restricting Printing Function According to Read This Manual...7 Symbols...7 About IP Address...7 ......25 Checking which Locked Print File Jobs Have Been Canceled 26 Combining Multiple Pages into Single Page 28 Types of Option...10 1. Preparing for This Printer...9 List of Combine Printing...28 Collate...31 Cover...32 Saving on Toner When Printing...33 Watermark...34 1 Making...
Software Guide
Page 7
Operating Environment...125 Supported Printer Drivers...125 Limitations...125 Copyright Information about Installed Applications 127 expat...127 JPEG LIBRARY...127 OpenLDAP 2.1...127 OpenSSL 0.9.8g...128 Trademarks...131 INDEX...133 5
Operating Environment...125 Supported Printer Drivers...125 Limitations...125 Copyright Information about Installed Applications 127 expat...127 JPEG LIBRARY...127 OpenLDAP 2.1...127 OpenSSL 0.9.8g...128 Trademarks...131 INDEX...133 5


