Manuals
Page 1
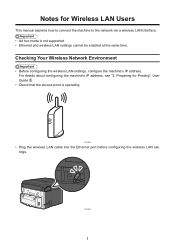
...Check that the access point is not supported. • Ethernet and wireless LAN settings cannot be enabled at the same time. For details about configuring the machine's IP address, see "2. Preparing for Wireless LAN Users This manual explains how to connect the machine to the network... via a wireless LAN interface. • Ad hoc mode is operating. CHV601 1 Checking Your Wireless Network Environment • Before configuring the wireless LAN settings, configure the machine's ...
...Check that the access point is not supported. • Ethernet and wireless LAN settings cannot be enabled at the same time. For details about configuring the machine's IP address, see "2. Preparing for Wireless LAN Users This manual explains how to connect the machine to the network... via a wireless LAN interface. • Ad hoc mode is operating. CHV601 1 Checking Your Wireless Network Environment • Before configuring the wireless LAN settings, configure the machine's ...
Manuals
Page 2
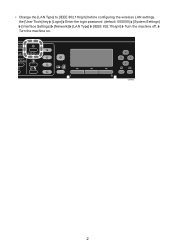
Turn the machine on. the [User Tools] key [Login] Enter the login password. (default: 000000) [System Settings] [Interface Settings] [Network] [LAN Type] [IEEE 802.11b/g/n] Turn the machine off. • Change the [LAN Type] to [IEEE 802.11b/g/n] before configuring the wireless LAN settings. CHV632 2
Turn the machine on. the [User Tools] key [Login] Enter the login password. (default: 000000) [System Settings] [Interface Settings] [Network] [LAN Type] [IEEE 802.11b/g/n] Turn the machine off. • Change the [LAN Type] to [IEEE 802.11b/g/n] before configuring the wireless LAN settings. CHV632 2
Manuals
Page 3
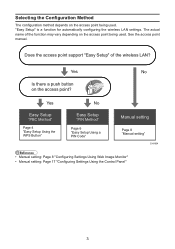
... access point support "Easy Setup" of the function may vary depending on the access point being used . "Easy Setup" is a function for automatically configuring the wireless LAN settings. Yes Easy Setup "PBC Method" Page 4 "Easy Setup Using the WPS Button" No Easy Setup "PIN Method" Page 6 "Easy Setup Using a PIN Code... Panel" 3 See the access point manual. Selecting the Configuration Method The configuration method depends on the access point being used . The actual name of the wireless LAN? Yes No Is there a push button on the access point?
... access point support "Easy Setup" of the function may vary depending on the access point being used . "Easy Setup" is a function for automatically configuring the wireless LAN settings. Yes Easy Setup "PBC Method" Page 4 "Easy Setup Using the WPS Button" No Easy Setup "PIN Method" Page 6 "Easy Setup Using a PIN Code... Panel" 3 See the access point manual. Selecting the Configuration Method The configuration method depends on the access point being used . The actual name of the wireless LAN? Yes No Is there a push button on the access point?
Manuals
Page 7
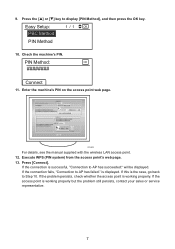
.... is the case, go back to AP has succeeded." will be displayed. PIN Method: Connect 11. CHV609 For details, see the manual supplied with the wireless LAN access point. 12. Press [Connect]. Easy Setup: 1/1 PBC Method PIN Method 10. If the connection fails, "Connection to display [PIN Method], and then press...
.... is the case, go back to AP has succeeded." will be displayed. PIN Method: Connect 11. CHV609 For details, see the manual supplied with the wireless LAN access point. 12. Press [Connect]. Easy Setup: 1/1 PBC Method PIN Method 10. If the connection fails, "Connection to display [PIN Method], and then press...
Manuals
Page 8
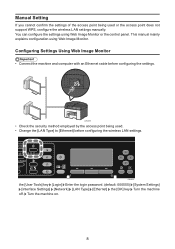
... settings manually. Configuring Settings Using Web Image Monitor • Connect the machine and computer with an Ethernet cable before configuring the wireless LAN settings. This manual mainly explains configuration using Web Image Monitor or the control panel. Turn the machine on. 8 CHV632 the [User Tools] key [Login] ...
... settings manually. Configuring Settings Using Web Image Monitor • Connect the machine and computer with an Ethernet cable before configuring the wireless LAN settings. This manual mainly explains configuration using Web Image Monitor or the control panel. Turn the machine on. 8 CHV632 the [User Tools] key [Login] ...
Manuals
Page 12
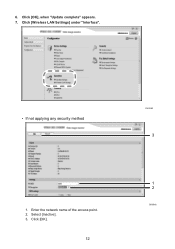
Enter the network name of the access point. 2. Select [Inactive]. 3. Click [OK], when "Update complete" appears. 7. Click [Wireless LAN Settings] under "Interface". • If not applying any security method 1. Click [OK]. 12 CHV640 3 1 2 CHV646 6.
Enter the network name of the access point. 2. Select [Inactive]. 3. Click [OK], when "Update complete" appears. 7. Click [Wireless LAN Settings] under "Interface". • If not applying any security method 1. Click [OK]. 12 CHV640 3 1 2 CHV646 6.
Manuals
Page 16
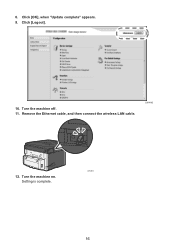
Setting is complete. Remove the Ethernet cable, and then connect the wireless LAN cable. 8. Turn the machine off. 11. CHV601 16 CHV642 12. Turn the machine on. Click [OK], when "Update complete" appears. 9. Click [Logout]. 10.
Setting is complete. Remove the Ethernet cable, and then connect the wireless LAN cable. 8. Turn the machine off. 11. CHV601 16 CHV642 12. Turn the machine on. Click [OK], when "Update complete" appears. 9. Click [Logout]. 10.
Manuals
Page 17
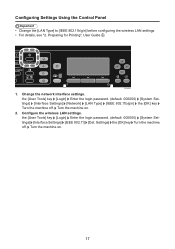
... [Login] Enter the login password. (default: 000000) [System Settings] [Interface Settings] [IEEE 802.11] [Det. Settings] the [OK] key Turn the machine off . Configure the wireless LAN settings. the [User Tools] key [Login] Enter the login password. (default: 000000) [System Settings] [Interface Settings] [Network] [LAN Type] [IEEE 802.11b/g/n] the [OK... machine on . 2. Preparing for Printing", User Guide . Configuring Settings Using the Control Panel • Change the [LAN Type] to [IEEE 802.11b/g/n] before configuring the wireless LAN settings. • For details, see "2.
... [Login] Enter the login password. (default: 000000) [System Settings] [Interface Settings] [IEEE 802.11] [Det. Settings] the [OK] key Turn the machine off . Configure the wireless LAN settings. the [User Tools] key [Login] Enter the login password. (default: 000000) [System Settings] [Interface Settings] [Network] [LAN Type] [IEEE 802.11b/g/n] the [OK... machine on . 2. Preparing for Printing", User Guide . Configuring Settings Using the Control Panel • Change the [LAN Type] to [IEEE 802.11b/g/n] before configuring the wireless LAN settings. • For details, see "2.
User Guide
Page 18
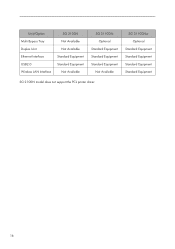
Unit/Option Multi Bypass Tray Duplex Unit Ethernet Interface USB2.0 Wireless LAN Interface SG 2100N Not Available Not Available Standard Equipment Standard Equipment Not Available SG 3110DN Optional Standard Equipment Standard Equipment Standard Equipment Not Available SG 3110DNw Optional Standard Equipment Standard Equipment Standard Equipment Standard Equipment SG 2100N model does not support the PCL printer driver. 16
Unit/Option Multi Bypass Tray Duplex Unit Ethernet Interface USB2.0 Wireless LAN Interface SG 2100N Not Available Not Available Standard Equipment Standard Equipment Not Available SG 3110DN Optional Standard Equipment Standard Equipment Standard Equipment Not Available SG 3110DNw Optional Standard Equipment Standard Equipment Standard Equipment Standard Equipment SG 2100N model does not support the PCL printer driver. 16
User Guide
Page 21
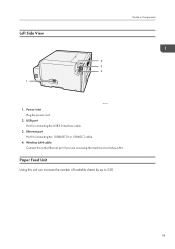
Ethernet port Port for connecting the USB2.0 interface cable. 3. Wireless LAN cable Connect this unit can increase the number of loadable sheets by up to 250. 19 USB port Port for connecting the 100BASE-TX or 10BASE-T cable. 4. Paper Feed Unit Using this to Components 2 3 4 1 CHU113 1. Left Side View Guide to the Ethernet port if you are accessing the machine via wireless LAN. Power inlet Plug the power cord. 2.
Ethernet port Port for connecting the USB2.0 interface cable. 3. Wireless LAN cable Connect this unit can increase the number of loadable sheets by up to 250. 19 USB port Port for connecting the 100BASE-TX or 10BASE-T cable. 4. Paper Feed Unit Using this to Components 2 3 4 1 CHU113 1. Left Side View Guide to the Ethernet port if you are accessing the machine via wireless LAN. Power inlet Plug the power cord. 2.
User Guide
Page 53
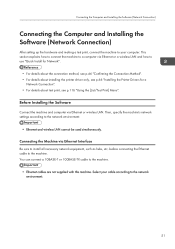
...Be sure to the network environment. 51 Select your computer. Before Installing the Software Connect the machine and computer via Ethernet or a wireless LAN and how to the machine. • Ethernet cables are not supplied with this machine. Connecting the Computer and Installing the ... Connection) After setting up the hardware and making a test print, connect the machine to the network environment. • Ethernet and wireless LAN cannot be used simultaneously. Then, specify the machine's network settings according to your cable according to install all necessary network equipment,...
...Be sure to the network environment. 51 Select your computer. Before Installing the Software Connect the machine and computer via Ethernet or a wireless LAN and how to the machine. • Ethernet cables are not supplied with this machine. Connecting the Computer and Installing the ... Connection) After setting up the hardware and making a test print, connect the machine to the network environment. • Ethernet and wireless LAN cannot be used simultaneously. Then, specify the machine's network settings according to your cable according to install all necessary network equipment,...
User Guide
Page 54
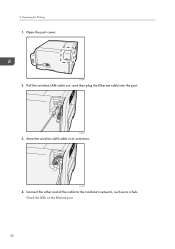
Pull the wireless LAN cable out, and then plug the Ethernet cable into the port. Check the LEDs on the Ethernet port. 52 Open the port cover. Connect the other end of the cable to the machine's network, such as to a hub. CHU091 2. CHU094 4. Store the wireless LAN cable in its container. CHU093 3. 2. Preparing for Printing 1.
Pull the wireless LAN cable out, and then plug the Ethernet cable into the port. Check the LEDs on the Ethernet port. 52 Open the port cover. Connect the other end of the cable to the machine's network, such as to a hub. CHU091 2. CHU094 4. Store the wireless LAN cable in its container. CHU093 3. 2. Preparing for Printing 1.
User Guide
Page 55
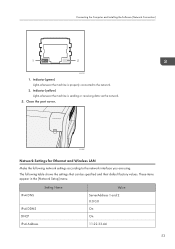
... Address Value ServerAddress 1 and 2 0.0.0.0 On On 11.22.33.44 53 The following network settings according to the network. 2. CHU095 Network Settings for Ethernet and Wireless LAN Make the following table shows the settings that can be specified and their default factory values. Close the port cover. Connecting the Computer and...
... Address Value ServerAddress 1 and 2 0.0.0.0 On On 11.22.33.44 53 The following network settings according to the network. 2. CHU095 Network Settings for Ethernet and Wireless LAN Make the following table shows the settings that can be specified and their default factory values. Close the port cover. Connecting the Computer and...

User Guide
Page 58
... 10. Default 56 IP Address: 192. 2. 33. 44 To return to print a configuration page, see p.116 "Printing a Configuration Page". These items appear in [Wireless LAN] under the [Host Interface] menu. Preparing for the machine, contact your network administrator. Press the [#Enter] key. IP Address: 1. 22. 33. 44 To... get an IP address for Printing 6. Press the [ ] or [ /Menu] key to the network via a Wireless LAN Interface This section explains how to connect the machine to enter the left most entry field of the IP address, and then press the...
... 10. Default 56 IP Address: 192. 2. 33. 44 To return to print a configuration page, see p.116 "Printing a Configuration Page". These items appear in [Wireless LAN] under the [Host Interface] menu. Preparing for the machine, contact your network administrator. Press the [#Enter] key. IP Address: 1. 22. 33. 44 To... get an IP address for Printing 6. Press the [ ] or [ /Menu] key to the network via a Wireless LAN Interface This section explains how to connect the machine to enter the left most entry field of the IP address, and then press the...

User Guide
Page 59
...the SSID to for network access. Press the [ ] or [ /Menu] key to enter the characters, and then press [#Enter] key. Host Interface: Wireless LAN 4. Press the [#Enter] key. If you select [WPA] or [WPA2], authentication settings and certificate installation settings are ASCII 0x20-0x7e (32 bytes)....[ ] or [ /Menu] key to display the [Host Interface] menu, and then press the [#Enter] key. Setting Security Method of the wireless access point that can also be used are required. Connecting the Computer and Installing the Software (Network Connection) Setting the SSID To use . Ask...
...the SSID to for network access. Press the [ ] or [ /Menu] key to enter the characters, and then press [#Enter] key. Host Interface: Wireless LAN 4. Press the [#Enter] key. If you select [WPA] or [WPA2], authentication settings and certificate installation settings are ASCII 0x20-0x7e (32 bytes)....[ ] or [ /Menu] key to display the [Host Interface] menu, and then press the [#Enter] key. Setting Security Method of the wireless access point that can also be used are required. Connecting the Computer and Installing the Software (Network Connection) Setting the SSID To use . Ask...
User Guide
Page 109
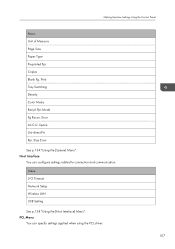
Ppr. PCL Menu You can configure settings related to connection and communication. Menu I/O Timeout Network Setup Wireless LAN USB Setting See p.138 "Using the [Host Interface] Menu". Making Machine Settings Using the Control Panel Menu Unit of Measure Page Size Paper Type Preprinted Ppr Copies Blank Pg. Size Error See p.134 "Using the [System] Menu". Print Tray Switching Density Color Mode Recycl.Ppr.Mode Pg Recov. Host Interface You can specify settings applied when using the PCL driver. 107 Error Ink C.U. Space Uni-direct.Prt.
Ppr. PCL Menu You can configure settings related to connection and communication. Menu I/O Timeout Network Setup Wireless LAN USB Setting See p.138 "Using the [Host Interface] Menu". Making Machine Settings Using the Control Panel Menu Unit of Measure Page Size Paper Type Preprinted Ppr Copies Blank Pg. Size Error See p.134 "Using the [System] Menu". Print Tray Switching Density Color Mode Recycl.Ppr.Mode Pg Recov. Host Interface You can specify settings applied when using the PCL driver. 107 Error Ink C.U. Space Uni-direct.Prt.
User Guide
Page 142
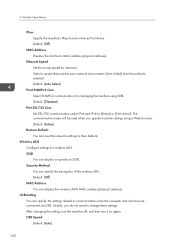
... Configure settings for networks. Security Method You can display the wireless LAN's MAC address (physical address). After changing this setting, turn the machine off, and then turn it on again. Select a speed that matches your network ... do not need to communication when the computer and machine are connected via USB. Default: [Off] MAC Address You can specify the encryption of the wireless LAN. Default: [Active] Restore Default You can specify the settings related to change these settings. Default: [Auto Select] Prmt SNMPv3 Com Select SNMPv3 communication for...
... Configure settings for networks. Security Method You can display the wireless LAN's MAC address (physical address). After changing this setting, turn the machine off, and then turn it on again. Select a speed that matches your network ... do not need to communication when the computer and machine are connected via USB. Default: [Off] MAC Address You can specify the encryption of the wireless LAN. Default: [Active] Restore Default You can specify the settings related to change these settings. Default: [Auto Select] Prmt SNMPv3 Com Select SNMPv3 communication for...
User Guide
Page 153
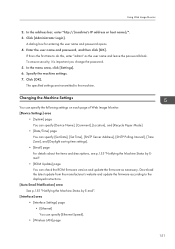
... the displayed instructions. [Auto Email Notification] area See p.155 "Notifying the Machine Status by Email". • [ROM Update] page You can specify [Ethernet Speed]. • [Wireless LAN] page 151 A dialog box for entering the user name and password opens. 4. Using Web Image Monitor 2. To ensure security, it is the first time...
... the displayed instructions. [Auto Email Notification] area See p.155 "Notifying the Machine Status by Email". • [ROM Update] page You can specify [Ethernet Speed]. • [Wireless LAN] page 151 A dialog box for entering the user name and password opens. 4. Using Web Image Monitor 2. To ensure security, it is the first time...
User Guide
Page 154
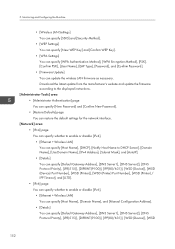
...settings for the network interface. [Network] area • [IPv4] page You can specify whether to enable or disable [IPv4]. • [Ethernet + Wireless LAN] You can specify [Host Name], [DHCP], [Notify Host Name to DHCP Server], [Domain Name], [Use Domain Name], [IPv4 Address], [Subnet...can specify [Host Name], [Domain Name], and [Manual Configuration Address]. • [Details] You can update the wireless LAN firmware as necessary. Monitoring and Configuring the Machine • [Wireless LAN Settings] You can specify [SSID] and [Security Method]. • [WEP Settings] You can specify [New ...
...settings for the network interface. [Network] area • [IPv4] page You can specify whether to enable or disable [IPv4]. • [Ethernet + Wireless LAN] You can specify [Host Name], [DHCP], [Notify Host Name to DHCP Server], [Domain Name], [Use Domain Name], [IPv4 Address], [Subnet...can specify [Host Name], [Domain Name], and [Manual Configuration Address]. • [Details] You can update the wireless LAN firmware as necessary. Monitoring and Configuring the Machine • [Wireless LAN Settings] You can specify [SSID] and [Security Method]. • [WEP Settings] You can specify [New ...
User Guide
Page 156
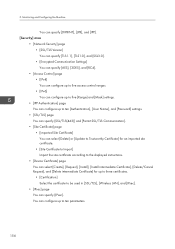
...] page You can select [Create], [Request], [Install], [Install intermediate Certificate], [Delete/Cancel Request], and [Delete intermediate Certificate] for up to be used in [SSL/TLS], [Wireless LAN], and [IPsec]. • [IPsec] page You can configure up to three certificates. • [Certification] Select the certificate to ten parameters. 154 5.
...] page You can select [Create], [Request], [Install], [Install intermediate Certificate], [Delete/Cancel Request], and [Delete intermediate Certificate] for up to be used in [SSL/TLS], [Wireless LAN], and [IPsec]. • [IPsec] page You can configure up to three certificates. • [Certification] Select the certificate to ten parameters. 154 5.