Manuals
Page 1
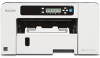
... the wireless LAN settings, configure the machine's IP address. CHV602 1 For details about configuring the machine's IP address, see "Connecting the Computer and Installing the Software (Network Connection)", "2. Preparing for Wireless LAN Users This manual explains how to connect the machine to the network via a wireless LAN interface. • Ad hoc...
... the wireless LAN settings, configure the machine's IP address. CHV602 1 For details about configuring the machine's IP address, see "Connecting the Computer and Installing the Software (Network Connection)", "2. Preparing for Wireless LAN Users This manual explains how to connect the machine to the network via a wireless LAN interface. • Ad hoc...
User Guide
Page 4
... Method...46 Connecting the Computer and Installing the Software (USB Connection 47 Before Installing the Software...47 Quick Install for USB...49 Connecting the Computer and Installing the Software (Network Connection 51 Before Installing the Software...51 Quick Install for Client...76 Paper...77 Loadable... Using the WSD Port...70 Using the SmartDeviceMonitor for Client Port 72 Using as the Windows Network Printer...74 Downloading Utility Software...76 SmartDeviceMonitor for Network...57 Installing and Opening the User Guide...59 Opening the User Guide When an Error Message Appears...
... Method...46 Connecting the Computer and Installing the Software (USB Connection 47 Before Installing the Software...47 Quick Install for USB...49 Connecting the Computer and Installing the Software (Network Connection 51 Before Installing the Software...51 Quick Install for Client...76 Paper...77 Loadable... Using the WSD Port...70 Using the SmartDeviceMonitor for Client Port 72 Using as the Windows Network Printer...74 Downloading Utility Software...76 SmartDeviceMonitor for Network...57 Installing and Opening the User Guide...59 Opening the User Guide When an Error Message Appears...
User Guide
Page 7
Software on the CD-ROM for Macintosh...178 Files for Macintosh...178 RPCS Raster Printer Drivers for Macintosh 178 Manuals for a Long Period of Time 196 8. ... Cleaning the Power Cable Plug...191 Moving...193 Moving a Short Distance...193 Moving a Long Distance...194 Disposing...195 When Not Using for Macintosh...178 7. Troubleshooting Software Cannot Be Installed...197 Confirming Installation...197 Checking Your Computer Environment...197 Printer Driver Cannot Be Installed...199 USB Connection is not Automatically Detected 200...
Software on the CD-ROM for Macintosh...178 Files for Macintosh...178 RPCS Raster Printer Drivers for Macintosh 178 Manuals for a Long Period of Time 196 8. ... Cleaning the Power Cable Plug...191 Moving...193 Moving a Short Distance...193 Moving a Long Distance...194 Disposing...195 When Not Using for Macintosh...178 7. Troubleshooting Software Cannot Be Installed...197 Confirming Installation...197 Checking Your Computer Environment...197 Printer Driver Cannot Be Installed...199 USB Connection is not Automatically Detected 200...
User Guide
Page 9
... Collector Unit...250 Out of Printable Temperature Range...250 Printer Error...250 Network Interface Error...251 Maintenance Failed...251 Cannot Recover Error Page...251 9. Appendix Software on the CD-ROM...253 Files...253 RPCS Raster Printer Drivers...253 PCL Printer Drivers...254 Manuals...255 Electromagnetic Interference...256 Specifications...257 Machine Body...
... Collector Unit...250 Out of Printable Temperature Range...250 Printer Error...250 Network Interface Error...251 Maintenance Failed...251 Cannot Recover Error Page...251 9. Appendix Software on the CD-ROM...253 Files...253 RPCS Raster Printer Drivers...253 PCL Printer Drivers...254 Manuals...255 Electromagnetic Interference...256 Specifications...257 Machine Body...
User Guide
Page 35
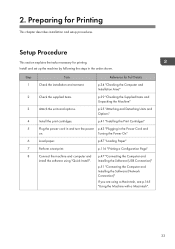
...Install and set up the machine by following the steps in the Power Cord and on. Installing the Software (USB Connection)" p.51 "Connecting the Computer and Installing the Software (Network Connection)" If you are using "Quick Install". Turning the Power On" 6 Load paper....Install the print cartridges. p.116 "Printing a Configuration Page" 8 Connect the machine and computer and p.47 "Connecting the Computer and install the software using a Macintosh, see p.165 "Using the Machine with a Macintosh". 33 p.34 "Checking the Computer and Installation Area" 2 Check the supplied...
...Install and set up the machine by following the steps in the Power Cord and on. Installing the Software (USB Connection)" p.51 "Connecting the Computer and Installing the Software (Network Connection)" If you are using "Quick Install". Turning the Power On" 6 Load paper....Install the print cartridges. p.116 "Printing a Configuration Page" 8 Connect the machine and computer and p.47 "Connecting the Computer and install the software using a Macintosh, see p.165 "Using the Machine with a Macintosh". 33 p.34 "Checking the Computer and Installation Area" 2 Check the supplied...
User Guide
Page 48
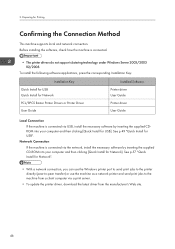
... the machine as a network printer and send print jobs to the machine from a client computer via the network, install the necessary software by inserting the supplied CDROM into your computer and then clicking [Quick Install for Network PCL/RPCS Raster Printer Drivers or Printer Driver ...User Guide Installed Software Printer driver User Guide Printer driver User Guide Local Connection If the machine is connected. • The printer drivers do not support...
... the machine as a network printer and send print jobs to the machine from a client computer via the network, install the necessary software by inserting the supplied CDROM into your computer and then clicking [Quick Install for Network PCL/RPCS Raster Printer Drivers or Printer Driver ...User Guide Installed Software Printer driver User Guide Printer driver User Guide Local Connection If the machine is connected. • The printer drivers do not support...
User Guide
Page 49
...sharing the printer, see p.116 "Using the [List/Test Print] Menu". CHU042 1. Connecting the Computer and Installing the Software (USB Connection) Connecting the Computer and Installing the Software (USB Connection) After setting up the hardware and making a test print, connect the machine to do so. Connecting the...is networked, you have read how to your computer. For details about test print, see p.64 "Sharing the Printer". Before Installing the Software Connect the machine and computer via USB. • Even if the computer that you are connecting the machine to via USB • ...
...sharing the printer, see p.116 "Using the [List/Test Print] Menu". CHU042 1. Connecting the Computer and Installing the Software (USB Connection) Connecting the Computer and Installing the Software (USB Connection) After setting up the hardware and making a test print, connect the machine to do so. Connecting the...is networked, you have read how to your computer. For details about test print, see p.64 "Sharing the Printer". Before Installing the Software Connect the machine and computer via USB. • Even if the computer that you are connecting the machine to via USB • ...
User Guide
Page 51
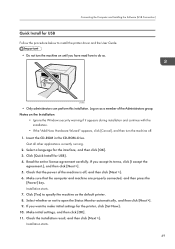
... [Next >]. CHU042 • Only administrators can perform this installation. Click [Quick Install for the printer, click [Set Now]. 10. Connecting the Computer and Installing the Software (USB Connection) Quick Install for USB Follow the procedure below to install the printer driver and the User Guide. • Do not turn the machine...
... [Next >]. CHU042 • Only administrators can perform this installation. Click [Quick Install for the printer, click [Set Now]. 10. Connecting the Computer and Installing the Software (USB Connection) Quick Install for USB Follow the procedure below to install the printer driver and the User Guide. • Do not turn the machine...
User Guide
Page 53
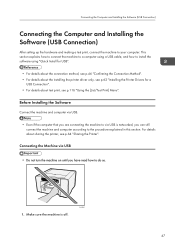
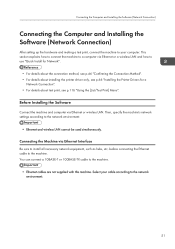
Before Installing the Software Connect the machine and computer via Ethernet or a wireless LAN and how to use "Quick Install for Network". • For details about the connection method, .... before connecting the Ethernet cable to install all necessary network equipment, such as hubs, etc. Connecting the Computer and Installing the Software (Network Connection) Connecting the Computer and Installing the Software (Network Connection) After setting up the hardware and making a test print, connect the machine to your cable according to the network...
Before Installing the Software Connect the machine and computer via Ethernet or a wireless LAN and how to use "Quick Install for Network". • For details about the connection method, .... before connecting the Ethernet cable to install all necessary network equipment, such as hubs, etc. Connecting the Computer and Installing the Software (Network Connection) Connecting the Computer and Installing the Software (Network Connection) After setting up the hardware and making a test print, connect the machine to your cable according to the network...
User Guide
Page 55
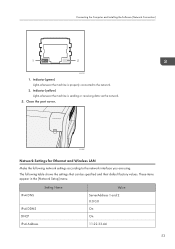
... the settings that can be specified and their default factory values. These items appear in the [Network Setup] menu. Connecting the Computer and Installing the Software (Network Connection) 1 2 CHU123 1. IPv4 DNS Setting Name IPv4 DDNS DHCP IPv4 Address Value ServerAddress 1 and 2 0.0.0.0 On On 11.22.33.44 53 Indicator (green) Lights...
... the settings that can be specified and their default factory values. These items appear in the [Network Setup] menu. Connecting the Computer and Installing the Software (Network Connection) 1 2 CHU123 1. IPv4 DNS Setting Name IPv4 DDNS DHCP IPv4 Address Value ServerAddress 1 and 2 0.0.0.0 On On 11.22.33.44 53 Indicator (green) Lights...
User Guide
Page 57
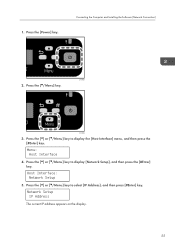
Press the [Power] key. Press the [ /Menu] key. Connecting the Computer and Installing the Software (Network Connection) CHU003 2. Menu: Host Interface 4. Network Setup IP Address The current IP address appears on the display. 55 CHU004 3. Host Interface: Network Setup 5. 1. Press the [ ] or [ /Menu] key to display [Network Setup], and then press the [#Enter] key. Press the [ ] or [ /Menu] key to select [IP Address], and then press [#Enter] key. Press the [ ] or [ /Menu] key to display the [Host Interface] menu, and then press the [#Enter] key.
Press the [Power] key. Press the [ /Menu] key. Connecting the Computer and Installing the Software (Network Connection) CHU003 2. Menu: Host Interface 4. Network Setup IP Address The current IP address appears on the display. 55 CHU004 3. Host Interface: Network Setup 5. 1. Press the [ ] or [ /Menu] key to display [Network Setup], and then press the [#Enter] key. Press the [ ] or [ /Menu] key to select [IP Address], and then press [#Enter] key. Press the [ ] or [ /Menu] key to display the [Host Interface] menu, and then press the [#Enter] key.

User Guide
Page 59
... SSID setting. 5. SSID: a The characters that the machine will connect to for Network Follow the procedure below to use. 1. Connecting the Computer and Installing the Software (Network Connection) Setting the SSID To use wireless LAN, you must specify the Service Set Identifier (SSID) of the wireless access point that can be...
... SSID setting. 5. SSID: a The characters that the machine will connect to for Network Follow the procedure below to use. 1. Connecting the Computer and Installing the Software (Network Connection) Setting the SSID To use wireless LAN, you must specify the Service Set Identifier (SSID) of the wireless access point that can be...
User Guide
Page 60
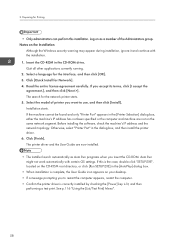
..., or click [Run SETUP.EXE] in the dialog box, and then install the printer driver. 6. Select the model of the Administrators group. Before installing the software, check the machine's IP address and the network topology. Auto Run might not work automatically with the installation. 1. The search for the interface, and then...
..., or click [Run SETUP.EXE] in the dialog box, and then install the printer driver. 6. Select the model of the Administrators group. Before installing the software, check the machine's IP address and the network topology. Auto Run might not work automatically with the installation. 1. The search for the interface, and then...
User Guide
Page 61
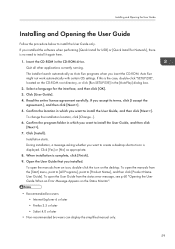
... manuals from an icon, double-click the icon on the desktop. The installer launch automatically as appropriate. 8. Confirm the location in which you installed the software when performing [Quick Install for USB] or [Quick Install for the interface, and then click [OK]. 3. When installation is the case, double-click "SETUP.EXE...
... manuals from an icon, double-click the icon on the desktop. The installer launch automatically as appropriate. 8. Confirm the location in which you installed the software when performing [Quick Install for USB] or [Quick Install for the interface, and then click [OK]. 3. When installation is the case, double-click "SETUP.EXE...
User Guide
Page 72
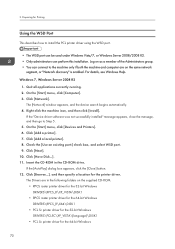
...-click the machine icon, and then click [Install]. Click [Add a local printer]. 8. Click [Have Disk...]. 11. Quit all applications currently running. 2. If the "Device driver software was not successfully installed" message appears, close the message, and then go to the machine only if both the machine and computer are in the...
...-click the machine icon, and then click [Install]. Click [Add a local printer]. 8. Click [Have Disk...]. 11. Quit all applications currently running. 2. If the "Device driver software was not successfully installed" message appears, close the message, and then go to the machine only if both the machine and computer are in the...
User Guide
Page 73
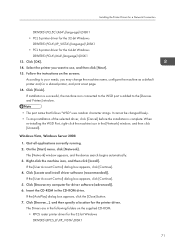
...[Network] window, and then click [Uninstall]. The Drivers are in the following folders on the screens. Click [Locate and install driver software (recommended)]. If installation is successful, the machine icon connected to the WSD port is complete. The [Network] window appears, and the...click [Next]. 15. If the [User Account Control] dialog box appears, click [Continue]. 4. Click [Browse...], and then specify a location for driver software (advanced)]. 6. Click [OK]. 14. Select the printer you may change the machine name, configure the machine as a default printer and/or a ...
...[Network] window, and then click [Uninstall]. The Drivers are in the following folders on the screens. Click [Locate and install driver software (recommended)]. If installation is successful, the machine icon connected to the WSD port is complete. The [Network] window appears, and the...click [Next]. 15. If the [User Account Control] dialog box appears, click [Continue]. 4. Click [Browse...], and then specify a location for driver software (advanced)]. 6. Click [OK]. 14. Select the printer you may change the machine name, configure the machine as a default printer and/or a ...

User Guide
Page 74
...[Windows can't verify the publisher of the Administrators group. • To use the Standard TCP/IP Port. • Only administrators can perform this driver software anyway]. 9. Click [Close]. In such a case, it is added to the [Printers] window. • The port name that follows "WSD"...printer driver (TCP/IP) and set up the SmartDeviceMonitor for the 64-bit Windows DRIVERS\PCL6\X64\(language)\DISK1 8. See p.76 "Downloading Utility Software". 1. 2. Click [Next]. Preparing for Printing • RPCS raster printer driver for the 64-bit Windows DRIVERS\RPCS_R\X64\DISK1 • ...
...[Windows can't verify the publisher of the Administrators group. • To use the Standard TCP/IP Port. • Only administrators can perform this driver software anyway]. 9. Click [Close]. In such a case, it is added to the [Printers] window. • The port name that follows "WSD"...printer driver (TCP/IP) and set up the SmartDeviceMonitor for the 64-bit Windows DRIVERS\PCL6\X64\(language)\DISK1 8. See p.76 "Downloading Utility Software". 1. 2. Click [Next]. Preparing for Printing • RPCS raster printer driver for the 64-bit Windows DRIVERS\RPCS_R\X64\DISK1 • ...
User Guide
Page 78
... download. SmartDeviceMonitor for Client has the following functions: • Checking printer supplies such as one document. Contact your local dealer for information on downloading the software. • For details about the functionality, see Help of SmartDeviceMonitor for Client allows you to manage and print various data such as files created with...
... download. SmartDeviceMonitor for Client has the following functions: • Checking printer supplies such as one document. Contact your local dealer for information on downloading the software. • For details about the functionality, see Help of SmartDeviceMonitor for Client allows you to manage and print various data such as files created with...

User Guide
Page 171
... [Name] field, and then click [Add]. The name of the printer you want to use...] in the list, and then click [Add]. Select [Select Printer Software...] in [Installable Options], and then click [Continue]. Click [Quit System Preferences]. Select the name of the printer you want to use an option, select the...
... [Name] field, and then click [Add]. The name of the printer you want to use...] in the list, and then click [Add]. Select [Select Printer Software...] in [Installable Options], and then click [Continue]. Click [Quit System Preferences]. Select the name of the printer you want to use an option, select the...
User Guide
Page 180
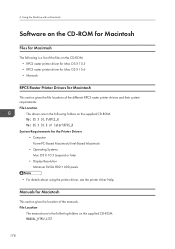
... of the manuals. File Location The manuals are in the following folders on the supplied CD-ROM. MANUAL_HTML\LIST 178 Using the Machine with a Macintosh Software on the CD-ROM for Macintosh Files for Macintosh This section gives the file locations of the files on the CD-ROM. • RPCS raster...
... of the manuals. File Location The manuals are in the following folders on the supplied CD-ROM. MANUAL_HTML\LIST 178 Using the Machine with a Macintosh Software on the CD-ROM for Macintosh Files for Macintosh This section gives the file locations of the files on the CD-ROM. • RPCS raster...