Quick Use Guide
Page 3
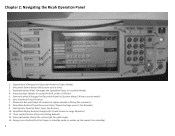
... Standby mode or wakes up the copier from standby) 3 Printer button (Access to Start Copy, Fax & Scan) 10. User Interface (Touch Screen) 7. Start button (Used to Locked Print & Online / Off Line) 5. Chapter 2: Navigating the Ricoh Operation Panel 1. Numerical Key pad (Input of number of... copies needed / Dialing Fax numbers) 8. Interrupt button (Pause the current job for quick copy) 13. Scanner button (Changes the Operation Panel to Scanner Mode / Allows scan to Copier Mode) 2. Copy button (...
... Standby mode or wakes up the copier from standby) 3 Printer button (Access to Start Copy, Fax & Scan) 10. User Interface (Touch Screen) 7. Start button (Used to Locked Print & Online / Off Line) 5. Chapter 2: Navigating the Ricoh Operation Panel 1. Numerical Key pad (Input of number of... copies needed / Dialing Fax numbers) 8. Interrupt button (Pause the current job for quick copy) 13. Scanner button (Changes the Operation Panel to Scanner Mode / Allows scan to Copier Mode) 2. Copy button (...
Quick Start Guide
Page 2
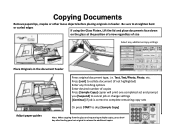
... face down on the glass at the position of arrow regardless of size Select any finishing options Enter desired number of copies Press [Sample Copy] copier will print one completed set and prompt you [Suspend] to cancel job or change settings [Continue] if job is correct to complete remaining copy sets...
... face down on the glass at the position of arrow regardless of size Select any finishing options Enter desired number of copies Press [Sample Copy] copier will print one completed set and prompt you [Suspend] to cancel job or change settings [Continue] if job is correct to complete remaining copy sets...
Quick Start Guide
Page 4
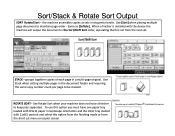
... paper tray loaded with 11x8.5 portrait and select this option from the finishing mode or from the next set from the short cut menu on copier screen. Sort/Stack & Rotate Sort Output SORT Rotate/Sort - Use [Sort] when placing multiple page document to keep jobs separated . STACK - To use this option...
... paper tray loaded with 11x8.5 portrait and select this option from the finishing mode or from the next set from the short cut menu on copier screen. Sort/Stack & Rotate Sort Output SORT Rotate/Sort - Use [Sort] when placing multiple page document to keep jobs separated . STACK - To use this option...
Quick Start Guide
Page 7
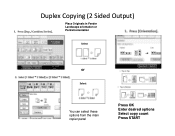
Duplex Copying (2 Sided Output) Place Originals in Feeder Landscape orientation or Portrait orientation Select or Select You can select these options from the main copier panel Press OK Enter desired options Select copy count Press START
Duplex Copying (2 Sided Output) Place Originals in Feeder Landscape orientation or Portrait orientation Select or Select You can select these options from the main copier panel Press OK Enter desired options Select copy count Press START
Quick Start Guide
Page 9
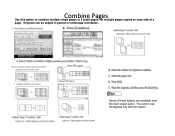
Originals can be copied in portrait or landscape orientation. Some of a page. You cannot use the Bypass tray with this option to combine multiple single pages or 2 sided pages for multiple pages copied on each side of these options are available from the main copier panel. Combine Pages Use this option.
Originals can be copied in portrait or landscape orientation. Some of a page. You cannot use the Bypass tray with this option to combine multiple single pages or 2 sided pages for multiple pages copied on each side of these options are available from the main copier panel. Combine Pages Use this option.
Quick Start Guide
Page 21
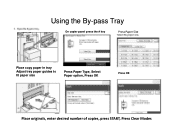
Using the By-pass Tray On copier panel press the # key Press Paper Size Place copy paper in tray Adjust tray paper guides to fit paper size Press Paper Type, Select Paper option, Press OK Press OK Place originals, enter desired number of copies, press START, Press Clear Modes
Using the By-pass Tray On copier panel press the # key Press Paper Size Place copy paper in tray Adjust tray paper guides to fit paper size Press Paper Type, Select Paper option, Press OK Press OK Place originals, enter desired number of copies, press START, Press Clear Modes
Quick Start Guide
Page 23
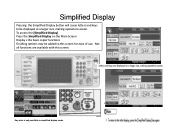
To access the [Simplified Display] Press the Simplified Display on the Main Screen Display s the basic copier functions Finishing options may be displayed at a larger size, making operations easier. Simplified Display Pressing the Simplified Display button will cause letters and keys to be added to this screen. Not all functions are available with this screen for ease of use. Key color is only available in simplified display mode.
To access the [Simplified Display] Press the Simplified Display on the Main Screen Display s the basic copier functions Finishing options may be displayed at a larger size, making operations easier. Simplified Display Pressing the Simplified Display button will cause letters and keys to be added to this screen. Not all functions are available with this screen for ease of use. Key color is only available in simplified display mode.
Quick Start Guide
Page 33
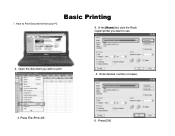
Enter desired number of copies. 3. How to use 2. In the [Name] list, click the Ricoh Copier/printer you wish to print 5. !. Press File>Print>OK 6. Press [OK] Open the document you want to Print Documents from your PC Basic Printing 4.
Enter desired number of copies. 3. How to use 2. In the [Name] list, click the Ricoh Copier/printer you wish to print 5. !. Press File>Print>OK 6. Press [OK] Open the document you want to Print Documents from your PC Basic Printing 4.
Quick Start Guide
Page 34
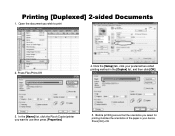
Click the [Setup] tab, click your device. In the [Name] list, click the Ricoh Copier/printer you want to print 2. Open the document you select for printing matches the orientation of the paper in your preferred two-sided printing method in the [Duplex] list, and then click [OK]. 3. Press File>Print>OK 4. Press [OK] >OK Before printing ensure that the orientation you wish to use then press [Properties] 5. Printing [Duplexed] 2-sided Documents 1.
Click the [Setup] tab, click your device. In the [Name] list, click the Ricoh Copier/printer you want to print 2. Open the document you select for printing matches the orientation of the paper in your preferred two-sided printing method in the [Duplex] list, and then click [OK]. 3. Press File>Print>OK 4. Press [OK] >OK Before printing ensure that the orientation you wish to use then press [Properties] 5. Printing [Duplexed] 2-sided Documents 1.
Quick Start Guide
Page 35
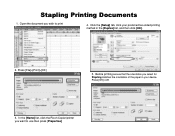
Press [File]>[Print]>[OK] 5. Before printing ensure that the orientation you want to print 4. In the [Name] list, click the Ricoh Copier/printer you select for Stapling matches the orientation of the paper in your preferred two-sided printing method in the [Duplex] list, and then click [OK]. 2. Stapling Printing Documents 1. Click the [Setup] tab, click your device. Press [OK] >OK 3. Open the document you wish to use then press [Properties]
Press [File]>[Print]>[OK] 5. Before printing ensure that the orientation you want to print 4. In the [Name] list, click the Ricoh Copier/printer you select for Stapling matches the orientation of the paper in your preferred two-sided printing method in the [Duplex] list, and then click [OK]. 2. Stapling Printing Documents 1. Click the [Setup] tab, click your device. Press [OK] >OK 3. Open the document you wish to use then press [Properties]
Quick Start Guide
Page 36
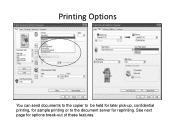
Printing Options You can send documents to the copier to be held for later pick-up, confidential printing, for sample printing or to the document server for options break-out of these features. See next page for reprinting.
Printing Options You can send documents to the copier to be held for later pick-up, confidential printing, for sample printing or to the document server for options break-out of these features. See next page for reprinting.
Quick Start Guide
Page 40
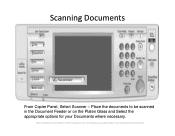
Your display may vary depending on the Platen Glass and Select the appropriate options for reference purposes only. Place the documents to be scanned in the Document Feeder or on your Documents where necessary. (Note: Screenshots are provided for your operating system and device.) Scanning Documents From Copier Panel, Select Scanner -
Your display may vary depending on the Platen Glass and Select the appropriate options for reference purposes only. Place the documents to be scanned in the Document Feeder or on your Documents where necessary. (Note: Screenshots are provided for your operating system and device.) Scanning Documents From Copier Panel, Select Scanner -
Quick Start Guide
Page 42
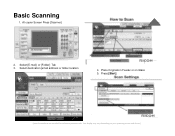
Select [E-mail] or [Folder] Tab 3. Press [Start] (Note: Screenshots are provided for reference purposes only. Basic Scanning 1. Your display may vary depending on Glass 5. At copier Screen Press [Scanner] 2. Select destination [email address or folder location 4. Place Originals in Feeder or on your operating system and device.)
Select [E-mail] or [Folder] Tab 3. Press [Start] (Note: Screenshots are provided for reference purposes only. Basic Scanning 1. Your display may vary depending on Glass 5. At copier Screen Press [Scanner] 2. Select destination [email address or folder location 4. Place Originals in Feeder or on your operating system and device.)

Security Target
Page 16
... for Product - Quick Reference Fax Guide D483-8503 Copyright (c) 2012 RICOH COMPANY, LTD. C230/C230SR/C240/C240SR LD130C/LD130CSR/LD140C/LD140CSR Aficio MP C300/C300SR/C400/C400SR Operating Instructions Troubleshooting M026-7415 - Notes to users in a Network ...Environment Compliant with IEEE Std. 2600.1TM-2009 M026-7442 - All rights reserved. Fax Option Type C400 (Machine Code: D483) Installation Procedure For Machine Code: M022/ M024/ M026/ M028 Copiers...
... for Product - Quick Reference Fax Guide D483-8503 Copyright (c) 2012 RICOH COMPANY, LTD. C230/C230SR/C240/C240SR LD130C/LD130CSR/LD140C/LD140CSR Aficio MP C300/C300SR/C400/C400SR Operating Instructions Troubleshooting M026-7415 - Notes to users in a Network ...Environment Compliant with IEEE Std. 2600.1TM-2009 M026-7442 - All rights reserved. Fax Option Type C400 (Machine Code: D483) Installation Procedure For Machine Code: M022/ M024/ M026/ M028 Copiers...

Security Target
Page 17
.../ M024/ M026/ M028 Copiers D483-8610A [English version-3] TOE Components MFP Table 4 : Guidance for English Version-3 Guidance Documents for Users M026-7510 - MP C300/C300SR/C400/C400SR MP C300/C300SR/C400/C400SR Aficio MP C300/C300SR/C400/C400SR Operating Instructions About This Machine... (c) 2012 RICOH COMPANY, LTD. All rights reserved. Quick Reference Printer Guide M026-7428 - CE Marking Traceability Information (For EU Countries Only) AA00-0253A - Notes for Administrators Security Reference Aficio MP C300/MP C300SR/MP C400/MP C400SR MP C300/MP C300SR/MP C400/MP C400SR M026-6910...
.../ M024/ M026/ M028 Copiers D483-8610A [English version-3] TOE Components MFP Table 4 : Guidance for English Version-3 Guidance Documents for Users M026-7510 - MP C300/C300SR/C400/C400SR MP C300/C300SR/C400/C400SR Aficio MP C300/C300SR/C400/C400SR Operating Instructions About This Machine... (c) 2012 RICOH COMPANY, LTD. All rights reserved. Quick Reference Printer Guide M026-7428 - CE Marking Traceability Information (For EU Countries Only) AA00-0253A - Notes for Administrators Security Reference Aficio MP C300/MP C300SR/MP C400/MP C400SR MP C300/MP C300SR/MP C400/MP C400SR M026-6910...

Security Target
Page 18
...Machine Code: M022/ M024/ M026/ M028 Copiers D483-8610A 1.4.3 Definition of normal users, ...Aficio MP C300/MP C300SR/MP C400/MP C400SR MP C300/MP C300SR/MP C400/MP C400SR M026-6904 - User Information on Electrical & Electronic Equipment D127-6601 - Quick Reference Copy Guide M026-7413 - MP C300/C300SR/C400/C400SR MP C300/C300SR/C400/C400SR Aficio MP C300/C300SR/C400/C400SR Operating Instructions Troubleshooting M026-7417 - Notes for Administrators Aficio MP C300/MP C300SR/MP C400/MP C400SR MP C300/MP C300SR/MP C400/MP C400SR M026-6905 - Copyright (c) 2012 RICOH...
...Machine Code: M022/ M024/ M026/ M028 Copiers D483-8610A 1.4.3 Definition of normal users, ...Aficio MP C300/MP C300SR/MP C400/MP C400SR MP C300/MP C300SR/MP C400/MP C400SR M026-6904 - User Information on Electrical & Electronic Equipment D127-6601 - Quick Reference Copy Guide M026-7413 - MP C300/C300SR/C400/C400SR MP C300/C300SR/C400/C400SR Aficio MP C300/C300SR/C400/C400SR Operating Instructions Troubleshooting M026-7417 - Notes for Administrators Aficio MP C300/MP C300SR/MP C400/MP C400SR MP C300/MP C300SR/MP C400/MP C400SR M026-6905 - Copyright (c) 2012 RICOH...


