User Guide
Page 14
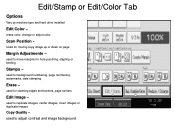
used to move margins for background numbering, page numbering, watermarks, date stamping Erase - Used for cleaning edges and borders, page centers Edit Image - used for hole-punching, stapling or binding Stamps - Edit/Stamp or Edit/Color Tab Options Vary by machine type and hard drive installed Edit Color - used for moving copy image up or down on page Margin Adjustments - used to adjust contrast and image background erase color, change or adjust color Scan Position - used to replicate images, center images, invert images or duplicate images Copy Quality -
used to move margins for background numbering, page numbering, watermarks, date stamping Erase - Used for cleaning edges and borders, page centers Edit Image - used for hole-punching, stapling or binding Stamps - Edit/Stamp or Edit/Color Tab Options Vary by machine type and hard drive installed Edit Color - used for moving copy image up or down on page Margin Adjustments - used to adjust contrast and image background erase color, change or adjust color Scan Position - used to replicate images, center images, invert images or duplicate images Copy Quality -
User Guide
Page 22
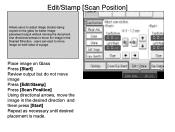
Use directional arrows to move image on both sides of a page. users can elect to move the image in the Desired Direction. Edit/Stamp [Scan Position] Allows users to adjust image (books) being copied on Glass Press [Start] Review output but do not move image Press [Edit/Stamp] Press [Scan Position] Using directional arrows, move the image in the desired direction and them press [Start] Repeat as necessary until desired placement is made. Place image on the glass for better image placement output without moving the document.
Use directional arrows to move image on both sides of a page. users can elect to move the image in the Desired Direction. Edit/Stamp [Scan Position] Allows users to adjust image (books) being copied on Glass Press [Start] Review output but do not move image Press [Edit/Stamp] Press [Scan Position] Using directional arrows, move the image in the desired direction and them press [Start] Repeat as necessary until desired placement is made. Place image on the glass for better image placement output without moving the document.

User Guide
Page 40
Document Server Usage Documents may be scanned or Printed to Document Server for: -Confidential Printing -Print and Hold -Sample Printing -Forms printing -File Merge (different types) -Electronic Distribution -HIPPA Compliancy -Label Printing -Cost Savings
Document Server Usage Documents may be scanned or Printed to Document Server for: -Confidential Printing -Print and Hold -Sample Printing -Forms printing -File Merge (different types) -Electronic Distribution -HIPPA Compliancy -Label Printing -Cost Savings
User Guide
Page 41
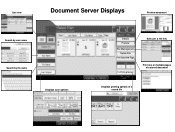
List view Document Server Displays Preview document Search by user name Search by file name Displays scan options Details Preview File Management Delete File Print Specified Page To Printing Screen Edit user & file Info Print one or multiple pages of a stored document Displays printing options of a stored file
List view Document Server Displays Preview document Search by user name Search by file name Displays scan options Details Preview File Management Delete File Print Specified Page To Printing Screen Edit user & file Info Print one or multiple pages of a stored document Displays printing options of a stored file
User Guide
Page 42
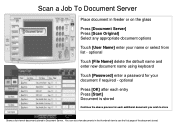
... the document stored. optional Press [OK] after each entry Press [Start] Document is stored Continue the above process for your name or select from list - Scan a Job To Document Server Place document in Document Server. optional Touch [File Name] delete the default name and enter new document name using keyboard Touch... a password for each additional document you wish to see the first page of documents stored in feeder or on the glass Press [Document Server] Press [Scan Original] Select any appropriate document options Touch [User Name] enter your document if required -
... the document stored. optional Press [OK] after each entry Press [Start] Document is stored Continue the above process for your name or select from list - Scan a Job To Document Server Place document in Document Server. optional Touch [File Name] delete the default name and enter new document name using keyboard Touch... a password for each additional document you wish to see the first page of documents stored in feeder or on the glass Press [Document Server] Press [Scan Original] Select any appropriate document options Touch [User Name] enter your document if required -
User Guide
Page 51
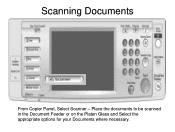
Place the documents to be scanned in the Document Feeder or on the Platen Glass and Select the appropriate options for your Documents where necessary. Scanning Documents From Copier Panel, Select Scanner -
Place the documents to be scanned in the Document Feeder or on the Platen Glass and Select the appropriate options for your Documents where necessary. Scanning Documents From Copier Panel, Select Scanner -
User Guide
Page 52
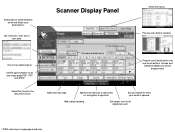
...email is opened. Add subject heading. encryption & signature. Select tabs to document i.e. Add email message. Preview scan before sending. Set file types between email and folder scan destinations. Add security features to switch between multi and single page PDF, TIFF and JPEG* Select file stored ...in single page mode only. One or two sided original. Groups and individual addresses can be programmed. Set resolution, scan size & scan type. Set sender from list of registered users. * JPEG scanning in the document server. Scanner Display Panel Check file status.
...email is opened. Add subject heading. encryption & signature. Select tabs to document i.e. Add email message. Preview scan before sending. Set file types between email and folder scan destinations. Add security features to switch between multi and single page PDF, TIFF and JPEG* Select file stored ...in single page mode only. One or two sided original. Groups and individual addresses can be programmed. Set resolution, scan size & scan type. Set sender from list of registered users. * JPEG scanning in the document server. Scanner Display Panel Check file status.
User Guide
Page 53
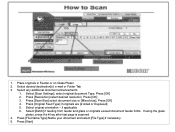
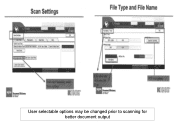
Select [Scan Settings], select original document Type, Press [OK] 2. Press [Resolution] select desired resolution, Press [OK] 3. Press [Start] Select any additional document enhancements 1. Press [Original Feed Type] ... [Batch] if feeding from feeder and glass or originals exceed document feeder limits. Place originals in Feeder or on Glass Platen 2. Select original orientation - 1. Press [Scan Size] select document size or [Mixed size], Press [OK] 4. If using the glass platen, press the # key after last page is...
Select [Scan Settings], select original document Type, Press [OK] 2. Press [Resolution] select desired resolution, Press [OK] 3. Press [Start] Select any additional document enhancements 1. Press [Original Feed Type] ... [Batch] if feeding from feeder and glass or originals exceed document feeder limits. Place originals in Feeder or on Glass Platen 2. Select original orientation - 1. Press [Scan Size] select document size or [Mixed size], Press [OK] 4. If using the glass platen, press the # key after last page is...
User Guide
Page 54
User selectable options may be changed prior to scanning for better document output
User selectable options may be changed prior to scanning for better document output
User Guide
Page 56
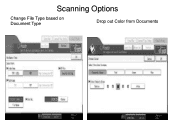
Scanning Options Change File Type based on Document Type Drop out Color from Documents
Scanning Options Change File Type based on Document Type Drop out Color from Documents
User Guide
Page 59
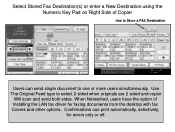
When Networked, users have the option of Copier Use to Store a FAX Destination Users can print automatically, selectively, for faxing documents from the desktop with fax Covers and other options. Select Stored Fax Destination(s) or enter a New Destination using the Numeric Key Pad on Right Side of Installing the LAN fax driver for errors only or off. Use The Original Feed type to one or more users simultaneously. Confirmations can send single document to select 2 sided when originals are 2 sided and copier Will scan and send both sides.
When Networked, users have the option of Copier Use to Store a FAX Destination Users can print automatically, selectively, for faxing documents from the desktop with fax Covers and other options. Select Stored Fax Destination(s) or enter a New Destination using the Numeric Key Pad on Right Side of Installing the LAN fax driver for errors only or off. Use The Original Feed type to one or more users simultaneously. Confirmations can send single document to select 2 sided when originals are 2 sided and copier Will scan and send both sides.

Quick Reference Guide
Page 1
... button again. Enter a file name 4. Photo Press this button when you need. to make into sets. Press [Store File] 2. Make the scanning settings for the original 7. Press the [Start] key Paper Supply Check this button to see what paper is mostly text. Job List Press this ...originals 6. Corner Staple Press this button to keep as text. Punch (if available) Press this button when you want to select punch options. Ricoh Multi Function Device Quick Reference Guide Text (default) Press this button if you want to 1 sided copy- Photo/Text Press this button when ...
... button again. Enter a file name 4. Photo Press this button when you need. to make into sets. Press [Store File] 2. Make the scanning settings for the original 7. Press the [Start] key Paper Supply Check this button to see what paper is mostly text. Job List Press this ...originals 6. Corner Staple Press this button to keep as text. Punch (if available) Press this button when you want to select punch options. Ricoh Multi Function Device Quick Reference Guide Text (default) Press this button if you want to 1 sided copy- Photo/Text Press this button when ...
Operating Instructions
Page 5
... Function 75 Status Messages...75 Messages Displayed on the Client Computer 116 3 Troubleshooting When Using the Scanner Function When Scanning Is Not Done As Expected 101 When You Cannot Send Scanned Files...103 When Stored Files Cannot Be Accessed 103 When You Cannot Browse the Network to Send...Cannot Be Edited...104 When the Network Delivery Function Cannot Be Used 104 When S/MIME Cannot Be Used...104 When You Cannot Send Scan Files Using WSD 105 Operations Are Not Possible When Messages Are Displayed 105 Messages Displayed When Using the Scanner Function 107 Messages Displayed on...
... Function 75 Status Messages...75 Messages Displayed on the Client Computer 116 3 Troubleshooting When Using the Scanner Function When Scanning Is Not Done As Expected 101 When You Cannot Send Scanned Files...103 When Stored Files Cannot Be Accessed 103 When You Cannot Browse the Network to Send...Cannot Be Edited...104 When the Network Delivery Function Cannot Be Used 104 When S/MIME Cannot Be Used...104 When You Cannot Send Scan Files Using WSD 105 Operations Are Not Possible When Messages Are Displayed 105 Messages Displayed When Using the Scanner Function 107 Messages Displayed on...

Operating Instructions
Page 23
...appears. If the message does not disappear in the hard disk. • Press [Store File] to store pages that have been scanned. The user code entry screen is set. Code Authentication. Basic Authentication, Windows Authentication, LDAP Authentication or Integration Server Authentication is Users ...is full. Delete unnecessary files by pressing [Delete File]. The entered login user name or login password is warming up to store scanned file?" appears. "Memory is showing. authentication. 21 Ask the user administrator for a while. When You Have Problems Operating the Machine...
...appears. If the message does not disappear in the hard disk. • Press [Store File] to store pages that have been scanned. The user code entry screen is set. Code Authentication. Basic Authentication, Windows Authentication, LDAP Authentication or Integration Server Authentication is Users ...is full. Delete unnecessary files by pressing [Delete File]. The entered login user name or login password is warming up to store scanned file?" appears. "Memory is showing. authentication. 21 Ask the user administrator for a while. When You Have Problems Operating the Machine...
Operating Instructions
Page 27
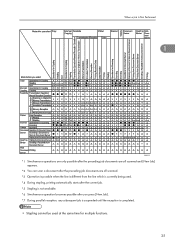
When a Job Is Not Performed 1 BQN001S *1 Simultaneous operations are only possible after the preceding job documents are all scanned and [New Job] appears. *2 You can scan a document after the preceding job documents are all scanned. *3 Operation is possible when the line is different from the line which is currently being used. *4 During stapling, printing...
When a Job Is Not Performed 1 BQN001S *1 Simultaneous operations are only possible after the preceding job documents are all scanned and [New Job] appears. *2 You can scan a document after the preceding job documents are all scanned. *3 Operation is possible when the line is different from the line which is currently being used. *4 During stapling, printing...

Operating Instructions
Page 28
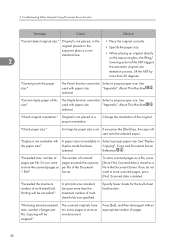
... "General Features", Network and System Settings Guide . • While printing is capable of executing multiple functions simultaneously, specify which function should have priority in progress, scanning a document using another function may take longer than usual. 26
... "General Features", Network and System Settings Guide . • While printing is capable of executing multiple functions simultaneously, specify which function should have priority in progress, scanning a document using another function may take longer than usual. 26
Operating Instructions
Page 30
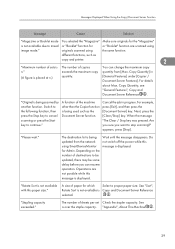
...original correctly. Printing will start onto the selected paper. selected. Change the orientation of multi-sheet fold. To store scanned pages as a file in a proper orientation. Scanned data is not placed in the Document Server. original placed on the exposure glass, the lifting/ 2 lowering action ...", Copy and Document Server selected. If you want to store as 1 file?" "Exceeded max. Do you do not want to store the scanned pages as one document. Original is deleted. Original is stored as a file, press [Store File]. Copying will be Select a proper paper ...
...original correctly. Printing will start onto the selected paper. selected. Change the orientation of multi-sheet fold. To store scanned pages as a file in a proper orientation. Scanned data is not placed in the Document Server. original placed on the exposure glass, the lifting/ 2 lowering action ...", Copy and Document Server selected. If you want to store as 1 file?" "Exceeded max. Do you do not want to store the scanned pages as one document. Original is deleted. Original is stored as a file, press [Store File]. Copying will be Select a proper paper ...
Operating Instructions
Page 31
...the [Document Server] key. Depending on the number of sets is being scanned by another function. Switch to the following function, then press the Stop key to cancel scanning or press the Start key to stop scanning?" When the message "The Clear / Stop key was pressed. "Please wait...." Operations are scanned using the same function. A size of sheets per set Check the stapler...
...the [Document Server] key. Depending on the number of sets is being scanned by another function. Switch to the following function, then press the Stop key to cancel scanning or press the Start key to stop scanning?" When the message "The Clear / Stop key was pressed. "Please wait...." Operations are scanned using the same function. A size of sheets per set Check the stapler...
Operating Instructions
Page 34
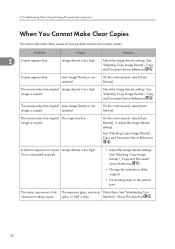
... image is dirty. Problem Cause Solution 2 Copies appear dirty. See "Adjusting Copy Image Density", Copy and Document Server Reference . image is dirty The exposure glass, scanning Clean them. See "Adjusting Copy Image Density", Copy and Document Server Reference . On the control panel, select [Auto Density], or adjust the image density settings...
... image is dirty. Problem Cause Solution 2 Copies appear dirty. See "Adjusting Copy Image Density", Copy and Document Server Reference . image is dirty The exposure glass, scanning Clean them. See "Adjusting Copy Image Density", Copy and Document Server Reference . On the control panel, select [Auto Density], or adjust the image density settings...
Operating Instructions
Page 35
Use recommended paper only and be copied. Set originals correctly. The correct paper size is scanned. When You Cannot Make Clear Copies Problem Cause Solution The same copy area is dirty whenever making copies. • The original that has already been ...
Use recommended paper only and be copied. Set originals correctly. The correct paper size is scanned. When You Cannot Make Clear Copies Problem Cause Solution The same copy area is dirty whenever making copies. • The original that has already been ...


