
User's Guide
Page 1
For safe and correct use this manual before using the machine. SP 5100N User's Guide Read this manual carefully before you use , please be sure to read the Safety Information in this machine and keep it handy for future reference.
For safe and correct use this manual before using the machine. SP 5100N User's Guide Read this manual carefully before you use , please be sure to read the Safety Information in this machine and keep it handy for future reference.
User's Guide
Page 10
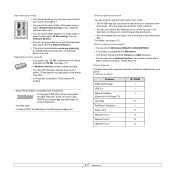
...the Zoran logo, IPS/PS3 and OneImage are trademarks of paper to save toner. See the Software Section. • This printer automatically conserves electricity by your computer in the hard disk, proofing a job, and printing private documents. • You ...page 2.7. • You can print on a single sheet of Zoran Corporation. * 136 PS3 fonts • Contains UFST and MicroType from your printer. (I: Installed, O: Option) Features SP 5100N IEEE 1284 Parallel I USB 2.0 I Network Interface I (Ethernet 10/100 Base TX) Hard Disk O PostScript* Emulation I Duplex Unit O ...
...the Zoran logo, IPS/PS3 and OneImage are trademarks of paper to save toner. See the Software Section. • This printer automatically conserves electricity by your computer in the hard disk, proofing a job, and printing private documents. • You ...page 2.7. • You can print on a single sheet of Zoran Corporation. * 136 PS3 fonts • Contains UFST and MicroType from your printer. (I: Installed, O: Option) Features SP 5100N IEEE 1284 Parallel I USB 2.0 I Network Interface I (Ethernet 10/100 Base TX) Hard Disk O PostScript* Emulation I Duplex Unit O ...

User's Guide
Page 11
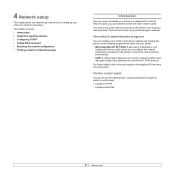
Front view Printer overview Rear view 1 power switch 2 rear cover 3 duplex unit 4 power receptacle * The figure above shows an SP 5100N with all available options. 5 parallel port 6 USB port 7 network port * The figure above shows an SP 5100N with all available options. 1 output tray 2 control panel 3 control board cover 4 tray 1 5 optional tray 2 6 optional tray 3 7 optional tray 4 8 handle 9 paper level indicator 10 multi-purpose tray 11 top cover 12 output support 13 multi-purpose tray paper width guides 14 multi-purpose tray extension 1.3
Front view Printer overview Rear view 1 power switch 2 rear cover 3 duplex unit 4 power receptacle * The figure above shows an SP 5100N with all available options. 5 parallel port 6 USB port 7 network port * The figure above shows an SP 5100N with all available options. 1 output tray 2 control panel 3 control board cover 4 tray 1 5 optional tray 2 6 optional tray 3 7 optional tray 4 8 handle 9 paper level indicator 10 multi-purpose tray 11 top cover 12 output support 13 multi-purpose tray paper width guides 14 multi-purpose tray extension 1.3
User's Guide
Page 23
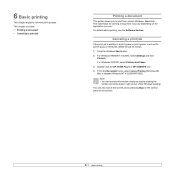
... up by -step instructions for setting up the following programs that came with your printer: • Web Image Monitor SP 5100N: A web server embedded to your network print server, which allows you to configure the network parameters necessary for the printer to connect to various network environments. • SetIP: A utility program allowing you to...
... up by -step instructions for setting up the following programs that came with your printer: • Web Image Monitor SP 5100N: A web server embedded to your network print server, which allows you to configure the network parameters necessary for the printer to connect to various network environments. • SetIP: A utility program allowing you to...
User's Guide
Page 34
... panel of the Windows desktop. Canceling a print job If the print job is waiting in a print queue or print spooler, such as the printer group in Windows, delete the job as follows: 1 Click the Windows Start button. 2 For Windows 98/Me/NT 4.0/2000, select Settings and then... you use. Note • You can also cancel the current job by double-clicking the printer icon at the bottom right corner of your printer. 6.1 For Windows XP/2003, select Printers and Faxes. 3 Double-click the SP 5100N PCL 6 or SP 5100N PS icon. 4 From the Document menu, select Cancel Printing (Windows 98/ Me) or ...
... panel of the Windows desktop. Canceling a print job If the print job is waiting in a print queue or print spooler, such as the printer group in Windows, delete the job as follows: 1 Click the Windows Start button. 2 For Windows 98/Me/NT 4.0/2000, select Settings and then... you use. Note • You can also cancel the current job by double-clicking the printer icon at the bottom right corner of your printer. 6.1 For Windows XP/2003, select Printers and Faxes. 3 Double-click the SP 5100N PCL 6 or SP 5100N PS icon. 4 From the Document menu, select Cancel Printing (Windows 98/ Me) or ...
User's Guide
Page 51
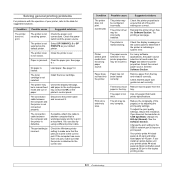
... try adjusting the print quality settings. Condition The printer does not print. The printer is not selected as your printer, refer to the table for suggested solutions. Select SP 5100N PCL 6 or SP 5100N PS as the default printer. See page 5.4. The printer driver may be very complex. The paper source ... correctly. There is attached to print a document. The job may be incorrect. If you install an option duplex unit your printer prints A4-sized paper at 29 ipm and letter-sized paper at 45 ppm. The toner cartridge is found under the Paper ...
... try adjusting the print quality settings. Condition The printer does not print. The printer is not selected as your printer, refer to the table for suggested solutions. Select SP 5100N PCL 6 or SP 5100N PS as the default printer. See page 5.4. The printer driver may be very complex. The paper source ... correctly. There is attached to print a document. The job may be incorrect. If you install an option duplex unit your printer prints A4-sized paper at 29 ipm and letter-sized paper at 45 ppm. The toner cartridge is found under the Paper ...

User's Guide
Page 52
... assumes you have already printed successfully. Select Download as thick paper, should not be debris inside the printer. From the Start menu, choose Settings and Printers. Use the rear cover (face-up) instead. Rightclick the SP 5100N PCL 6 printer icon, choose Properties, click the Details tab, and then choose the Spool Settings button. Simplify the...
... assumes you have already printed successfully. Select Download as thick paper, should not be debris inside the printer. From the Start menu, choose Settings and Printers. Use the rear cover (face-up) instead. Rightclick the SP 5100N PCL 6 printer icon, choose Properties, click the Details tab, and then choose the Spool Settings button. Simplify the...
User's Guide
Page 58
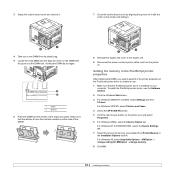
... is installed on your computer. For Windows XP/2003, select Printers and Faxes. 4 Select the SP 5100N PS printer. 5 Click the right mouse button on . 3 Grasp the control board cover and remove it. 7 Close the control board cover by its use. 1 Make sure that ... fit over the notches located on either side of the DIMM. 8 Reinstall the duplex-slot cover or the duplex unit. 9 Reconnect the power cord and printer cable, and turn the printer on the printer icon and select Properties. 6 For Windows 98/Me, select the Device Option tab. Setting the memory in the PostScript...
... is installed on your computer. For Windows XP/2003, select Printers and Faxes. 4 Select the SP 5100N PS printer. 5 Click the right mouse button on . 3 Grasp the control board cover and remove it. 7 Close the control board cover by its use. 1 Make sure that ... fit over the notches located on either side of the DIMM. 8 Reinstall the duplex-slot cover or the duplex unit. 9 Reconnect the power cord and printer cable, and turn the printer on the printer icon and select Properties. 6 For Windows 98/Me, select the Device Option tab. Setting the memory in the PostScript...
User's Guide
Page 60
... and then check Optional Hard Disk Drive (HDD). For Windows XP/2003, select Printers and Faxes. 3 Select the SP 5100N PCL 6 printer icon or SP 5100N PS printer icon. 4 Click the right mouse button on the printer icon and select Properties. 10.4 Take the following steps: 1 Click the Windows Start menu. 2 For Windows 98/Me/NT 4.0/2000, select...
... and then check Optional Hard Disk Drive (HDD). For Windows XP/2003, select Printers and Faxes. 3 Select the SP 5100N PCL 6 printer icon or SP 5100N PS printer icon. 4 Click the right mouse button on the printer icon and select Properties. 10.4 Take the following steps: 1 Click the Windows Start menu. 2 For Windows 98/Me/NT 4.0/2000, select...
User's Guide
Page 77
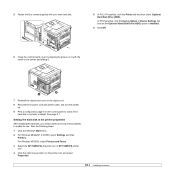
..., enter the port name and the IP address for local printing and you select SP 5100N, the window asking you want to install from the language selection window, and click OK. NOTE: If your printer is done, click Finish. • If you do not see a component list... Windows Start menu. 2 Select Programs or All Programs and then SP 5100N. 3 Select Language Selection. 4 Select the desired language from the list and then click Next. Then the installation will start and a test page will see your printer to the network. Changing the Software Language After installation of the...
..., enter the port name and the IP address for local printing and you select SP 5100N, the window asking you want to install from the language selection window, and click OK. NOTE: If your printer is done, click Finish. • If you do not see a component list... Windows Start menu. 2 Select Programs or All Programs and then SP 5100N. 3 Select Language Selection. 4 Select the desired language from the list and then click Next. Then the installation will start and a test page will see your printer to the network. Changing the Software Language After installation of the...
User's Guide
Page 78
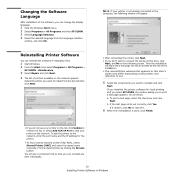
The selected driver and all of its components are removed from your selection, click Yes. Removing Printer Software 1 Start Windows. 2 From the Start menu select Programs or All Programs → SP 5100N →Maintenance. 3 Select Remove and click Next. You will see a component list so that you can remove any item individually. 4 Select the components you want to remove and then click Next. 5 When your computer asks you to confirm your computer. 6 After the software is removed, click Finish. 11 Installing Printer Software in Windows
The selected driver and all of its components are removed from your selection, click Yes. Removing Printer Software 1 Start Windows. 2 From the Start menu select Programs or All Programs → SP 5100N →Maintenance. 3 Select Remove and click Next. You will see a component list so that you can remove any item individually. 4 Select the components you want to remove and then click Next. 5 When your computer asks you to confirm your computer. 6 After the software is removed, click Finish. 11 Installing Printer Software in Windows
User's Guide
Page 93
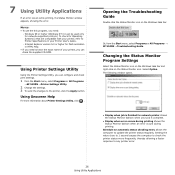
...select Programs or All Programs → SP 5100N →Troubleshooting Guide. Or, from the Start menu, select Programs or All Programs →SP 5100N →Printer Settings Utility. 2 Change the settings. 3 To send the changes to Printer Specifications in your printer, you need to know the exact name... of your Printer User's Guide. - Setting the value close to 1 ...
...select Programs or All Programs → SP 5100N →Troubleshooting Guide. Or, from the Start menu, select Programs or All Programs →SP 5100N →Printer Settings Utility. 2 Change the settings. 3 To send the changes to Printer Specifications in your printer, you need to know the exact name... of your Printer User's Guide. - Setting the value close to 1 ...
User's Guide
Page 108
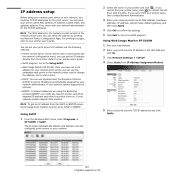
...the Using SetIP. • Web Image Monitor SP 5100N: Once you can set your print server's IP address via the following methods: • Printer control panel: If your printer user's guide. Using Web Image Monitor SP 5100N 1 Run your web browser. 2 Enter your printer and click . You can set TCP/IP... for the print server. NOTE: To get an IP address automatically assigned by printing the Network Printer Configuration Page. Using SetIP 1 From the Windows Start menu, select Programs Æ SP 5100N Æ SetIP. NOTE: The MAC address is the hardware serial number of your print server's...
...the Using SetIP. • Web Image Monitor SP 5100N: Once you can set your print server's IP address via the following methods: • Printer control panel: If your printer user's guide. Using Web Image Monitor SP 5100N 1 Run your web browser. 2 Enter your printer and click . You can set TCP/IP... for the print server. NOTE: To get an IP address automatically assigned by printing the Network Printer Configuration Page. Using SetIP 1 From the Windows Start menu, select Programs Æ SP 5100N Æ SetIP. NOTE: The MAC address is the hardware serial number of your print server's...
User's Guide
Page 111
...5. Select [Details] tab, and Click [Add Port]. DNS Name - Auto detection on the installed Printer icon and select [Properties]. 2. Select [Next], and select [Next] again and the printer driver will be submitted from a client workstation. IPX/SPX Address - Other options in the list and... by the file extension .inf. Browse to install and setup the printer drivers on the workstation. Search a printer using the following steps: 1 Open a document on a client workstation. 2 Select the SP 5100N as the printer for sending documents to. 3 Print the document on the device and...
...5. Select [Details] tab, and Click [Add Port]. DNS Name - Auto detection on the installed Printer icon and select [Properties]. 2. Select [Next], and select [Next] again and the printer driver will be submitted from a client workstation. IPX/SPX Address - Other options in the list and... by the file extension .inf. Browse to install and setup the printer drivers on the workstation. Search a printer using the following steps: 1 Open a document on a client workstation. 2 Select the SP 5100N as the printer for sending documents to. 3 Print the document on the device and...
User's Guide
Page 112
...network print server through Web Image Monitor SP 5100N using BOOTP. In an IP network, each device needs a unique IP address. Addresses of management information between network devices. The Network Printer Card has a built-in Web Image Monitor SP 5100N select Network Settings Æ SNMP. ...• trap: is a communication protocol enabling network administrators to centrally manage and to Network Menu settings in your printer user's guide. • Web Image Monitor SP 5100N: Select Network Settings Æ TCP/IP and select DHCP or BOOTP from network devices. 4.1 TCP/IP environment...
...network print server through Web Image Monitor SP 5100N using BOOTP. In an IP network, each device needs a unique IP address. Addresses of management information between network devices. The Network Printer Card has a built-in Web Image Monitor SP 5100N select Network Settings Æ SNMP. ...• trap: is a communication protocol enabling network administrators to centrally manage and to Network Menu settings in your printer user's guide. • Web Image Monitor SP 5100N: Select Network Settings Æ TCP/IP and select DHCP or BOOTP from network devices. 4.1 TCP/IP environment...
User's Guide
Page 113
... of attributes or keywords, which describe the service. SLP uses multicasting and can configure SLP protocol settings through Web Image Monitor SP 5100N as printers, Web servers, fax machines, video cameras, file systems, backup devices (tape drives), databases, directories, mail servers, and calendars...Let the DHCP server provide updated information to the DNS server. 2 Configure the same DDNS domain through Web Image Monitor SP 5100N. However, many customers including Microsoft maintain WINS systems and need devices to interoperate with name resolution in the DNS server. ...
... of attributes or keywords, which describe the service. SLP uses multicasting and can configure SLP protocol settings through Web Image Monitor SP 5100N as printers, Web servers, fax machines, video cameras, file systems, backup devices (tape drives), databases, directories, mail servers, and calendars...Let the DHCP server provide updated information to the DNS server. 2 Configure the same DDNS domain through Web Image Monitor SP 5100N. However, many customers including Microsoft maintain WINS systems and need devices to interoperate with name resolution in the DNS server. ...
User's Guide
Page 114
... will create an IP address of its IP address. In the network print server 1 Configure the WINS server address through Web Image Monitor SP 5100N. 2 Reboot the print server. Bonjour Bonjour allows for a wide breadth of subnets that leverages TCP/IP and Web technologies to enable seamless...server IP address in an XML page (http://xxx.xxx.xxx.xxx:5200/printer.xml). 4.3 TCP/IP environment This control point is more than just a simple extension of vendors. Configuring WINS Access Web Image Monitor SP 5100N and select Network Settings Æ TCP/IP. The WINS server will configure...
... will create an IP address of its IP address. In the network print server 1 Configure the WINS server address through Web Image Monitor SP 5100N. 2 Reboot the print server. Bonjour Bonjour allows for a wide breadth of subnets that leverages TCP/IP and Web technologies to enable seamless...server IP address in an XML page (http://xxx.xxx.xxx.xxx:5200/printer.xml). 4.3 TCP/IP environment This control point is more than just a simple extension of vendors. Configuring WINS Access Web Image Monitor SP 5100N and select Network Settings Æ TCP/IP. The WINS server will configure...
User's Guide
Page 115
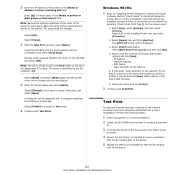
...and select TCP/IP Protocol Æ Microsoft TCP/IP Printing. Adding an LPR port 1 From the Windows Start menu, select Settings Æ Printers. 2 Click Add Printer. 3 Click My Computer and then Next. 4 Click Add Port and select LPR Port from the Print Setup dialogue box. 4.4 TCP/IP environment...NT computer, or install the software, if necessary. You can enable or disable the Standard TCP/IP Printing port through Web Image Monitor SP 5100N. Configuring an LPR port You can only install Microsoft TCP/IP Printing if you have administrator privileges. The default port number is installed...
...and select TCP/IP Protocol Æ Microsoft TCP/IP Printing. Adding an LPR port 1 From the Windows Start menu, select Settings Æ Printers. 2 Click Add Printer. 3 Click My Computer and then Next. 4 Click Add Port and select LPR Port from the Print Setup dialogue box. 4.4 TCP/IP environment...NT computer, or install the software, if necessary. You can enable or disable the Standard TCP/IP Printing port through Web Image Monitor SP 5100N. Configuring an LPR port You can only install Microsoft TCP/IP Printing if you have administrator privileges. The default port number is installed...

User's Guide
Page 116
...the URL where you are an Internet user, no incoming data after the specified number of seconds, the printer ends reception. • Time to your web browser and access Web Image Monitor SP 5100N. 2 Click Network Settings Æ Raw TCP/IP, LPR, IPP. 3 Configure the IPP parameters: ...• Printer Name: Enter the network printer's name to be used to send print jobs from a remote place if you are . Printer Port A Network Printer port is physically located. ...
...the URL where you are an Internet user, no incoming data after the specified number of seconds, the printer ends reception. • Time to your web browser and access Web Image Monitor SP 5100N. 2 Click Network Settings Æ Raw TCP/IP, LPR, IPP. 3 Configure the IPP parameters: ...• Printer Name: Enter the network printer's name to be used to send print jobs from a remote place if you are . Printer Port A Network Printer port is physically located. ...

User's Guide
Page 117
... the password should not include symbols. However, these settings do not affect the printer properties of your network parameter settings to the printer. Setting IPP security Web Image Monitor SP 5100N allows administrators to choose an authentication method and to create or modify user accounts....the website. You can set up to http digest authentication in the print server. 1 Run your printer's firmware using Web Image Monitor SP 5100N. 1 Run your web browser and access Web Image Monitor SP 5100N. 2 Click Network Settings Æ Raw TCP/IP, LPR, IPP. • Authentication: You...
... the password should not include symbols. However, these settings do not affect the printer properties of your network parameter settings to the printer. Setting IPP security Web Image Monitor SP 5100N allows administrators to choose an authentication method and to create or modify user accounts....the website. You can set up to http digest authentication in the print server. 1 Run your printer's firmware using Web Image Monitor SP 5100N. 1 Run your web browser and access Web Image Monitor SP 5100N. 2 Click Network Settings Æ Raw TCP/IP, LPR, IPP. • Authentication: You...


