
Operating Instructions
Page 12
...machine's control panel. {} Keys on the machine's display panel. [] Keys and buttons that does not involve personal injury when you misuse the machine without following the instructions under this . How to Read This Manual Symbols The following set of symbols is not followed, paper might... be misfed, originals might be lost. Be sure to read the instructions, all of which are notes for operation, or actions to operating. Important If this instruction is used...
...machine's control panel. {} Keys on the machine's display panel. [] Keys and buttons that does not involve personal injury when you misuse the machine without following the instructions under this . How to Read This Manual Symbols The following set of symbols is not followed, paper might... be misfed, originals might be lost. Be sure to read the instructions, all of which are notes for operation, or actions to operating. Important If this instruction is used...

Operating Instructions
Page 20
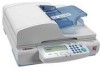
... automatically load multiple originals into this machine. 7. Control panel Used to be loaded into this key to start scanning. 12. {#} key Used to display list of this key to enter various IP addresses. Original table Set originals here to configure settings and operate this machine using ADF. Display panel Displays the configuration items and processes. 12 AFJ002S 8. (User Tools) key Press this key to configure various settings such as send scan, print scan, network, etc. 9. (Clear Modes...
... automatically load multiple originals into this machine. 7. Control panel Used to be loaded into this key to start scanning. 12. {#} key Used to display list of this key to enter various IP addresses. Original table Set originals here to configure settings and operate this machine using ADF. Display panel Displays the configuration items and processes. 12 AFJ002S 8. (User Tools) key Press this key to configure various settings such as send scan, print scan, network, etc. 9. (Clear Modes...

Operating Instructions
Page 45
... browser on this manual does not cover, see p.161 "Printing Scanned Image Files". 37 ure settings using the control panel of the above. For information about how to view the Web Status Monitor, see p.89 "Accessing the Scanner" Configure [1.System Settings] on a client computer, 3) items that you can config- Monitor Recall the Settings on the Web Status See the Web Status Monitor Help. Reference There...
... browser on this manual does not cover, see p.161 "Printing Scanned Image Files". 37 ure settings using the control panel of the above. For information about how to view the Web Status Monitor, see p.89 "Accessing the Scanner" Configure [1.System Settings] on a client computer, 3) items that you can config- Monitor Recall the Settings on the Web Status See the Web Status Monitor Help. Reference There...

Operating Instructions
Page 58
... FTP Print TWAIN Scanner Web Print Scan Max. Name(s) Key Display Assign Title Attachment Type (Automatically assigned) (null) (null) ABC/1/On Network Printer b ×b b ×b b ×b b ×b ×b Printer *1 Default Printer Locked Print Paper Source Tray No *2 Off Auto Tray Select b ×b b ×b b ×b *1 Available up to Redeliver Off b Job Delivery Data Max. 1 b Setting ×b ×b b b *3 *1 Automatically configured when you register this machine. of Copies 999 Color/Black and White Black and White b bb b bb Program No...
... FTP Print TWAIN Scanner Web Print Scan Max. Name(s) Key Display Assign Title Attachment Type (Automatically assigned) (null) (null) ABC/1/On Network Printer b ×b b ×b b ×b b ×b ×b Printer *1 Default Printer Locked Print Paper Source Tray No *2 Off Auto Tray Select b ×b b ×b b ×b *1 Available up to Redeliver Off b Job Delivery Data Max. 1 b Setting ×b ×b b b *3 *1 Automatically configured when you register this machine. of Copies 999 Color/Black and White Black and White b bb b bb Program No...

Operating Instructions
Page 72
... this machine stands by , the message "Unable to make configurations because Scanner is currently in use. Note ❒ Compressing data increases the number of the following options is selected for [Scan Settings] → [Scan Type] : "Black and White:Text", "Black and White:Text/Photo", or "Black and White:Photo". Configuring the Scanner Settings ❖ TWAIN Standby Time This item lets you specify the time after power-on when this item to...
... this machine stands by , the message "Unable to make configurations because Scanner is currently in use. Note ❒ Compressing data increases the number of the following options is selected for [Scan Settings] → [Scan Type] : "Black and White:Text", "Black and White:Text/Photo", or "Black and White:Photo". Configuring the Scanner Settings ❖ TWAIN Standby Time This item lets you specify the time after power-on when this item to...

Operating Instructions
Page 76
... original. Note ❒ You can erase the borderline using a white line, which the setting menu appears. Configuring the Scanner Settings • Clear Settings after Each Scan Job The initial screen displayed immediately after power-on appears on the display panel of this machine, and files are sent. Press [PrevMenu] to return to the initial screen when the power is turned on. ❖ Erase Border 3 When you can specify...
... original. Note ❒ You can erase the borderline using a white line, which the setting menu appears. Configuring the Scanner Settings • Clear Settings after Each Scan Job The initial screen displayed immediately after power-on appears on the display panel of this machine, and files are sent. Press [PrevMenu] to return to the initial screen when the power is turned on. ❖ Erase Border 3 When you can specify...

Operating Instructions
Page 91
... Scanner Features menu. it]. Scan Settings S While the Scan Settings menu is displayed when you turn off the power of pressing [Exit], you have configured, and return this machine before the standby screen is displayed. The setting screen for each of them in the same way that is displayed, press the {2}, {3} or {4} key to the Default Scan Settings menu. Image Density" appears. T Repeat steps D through R for each of "User 1", "User...
... Scanner Features menu. it]. Scan Settings S While the Scan Settings menu is displayed when you turn off the power of pressing [Exit], you have configured, and return this machine before the standby screen is displayed. The setting screen for each of them in the same way that is displayed, press the {2}, {3} or {4} key to the Default Scan Settings menu. Image Density" appears. T Repeat steps D through R for each of "User 1", "User...

Operating Instructions
Page 115
.... 107 Configuring Settings Using a Web Browser ❖ Default Printer Click [Yes] to set the printer as the default. 3 ❖ Locked Print Select [On] to print scanned images only after a password is entered on the control panel. Set another printer as the default printer. Note ❒ When only one printer can be set as the default automatically. ❒ If [Yes] is displayed only when you select "All" in the box of the machine, the printer moves to ] box...
.... 107 Configuring Settings Using a Web Browser ❖ Default Printer Click [Yes] to set the printer as the default. 3 ❖ Locked Print Select [On] to print scanned images only after a password is entered on the control panel. Set another printer as the default printer. Note ❒ When only one printer can be set as the default automatically. ❒ If [Yes] is displayed only when you select "All" in the box of the machine, the printer moves to ] box...

Operating Instructions
Page 119
...; For installation in the CD-ROM root directory. ❒ If you use this case, launch "Setup.exe" located in Windows 2000, Windows XP, Windows NT 4.0, or Win- List of the administrators group. 111 Note ❒ Auto Run might not automatically work with the USB TWAIN driver. If [Cancel] has been pressed, reinstall the remaining software after restarting the client computer. tings. In this machine as a member of Files...
...; For installation in the CD-ROM root directory. ❒ If you use this case, launch "Setup.exe" located in Windows 2000, Windows XP, Windows NT 4.0, or Win- List of the administrators group. 111 Note ❒ Auto Run might not automatically work with the USB TWAIN driver. If [Cancel] has been pressed, reinstall the remaining software after restarting the client computer. tings. In this machine as a member of Files...

Operating Instructions
Page 120
Configuring the Scanner Settings Software for Using a TWAIN Scanner To use the machine as a TWAIN scanner, it is essential to also install DeskTopBinder Lite. System requirements 3 Limitation ❒ Under Windows NT with RISC-based processors (MIPS R series, Alpha AXP, or PowerPC), this driver is not available. • Hardware PC/AT compatible • CPU Pentium or faster (Pentium 150 MHz or faster recommended) • Operating system Microsoft Windows 95...
Configuring the Scanner Settings Software for Using a TWAIN Scanner To use the machine as a TWAIN scanner, it is essential to also install DeskTopBinder Lite. System requirements 3 Limitation ❒ Under Windows NT with RISC-based processors (MIPS R series, Alpha AXP, or PowerPC), this driver is not available. • Hardware PC/AT compatible • CPU Pentium or faster (Pentium 150 MHz or faster recommended) • Operating system Microsoft Windows 95...

Operating Instructions
Page 124
... screen ap- 3 pears. A Start Windows, and then insert the supplied CD-ROM labeled "Scanner Driver(s), Utilities and Operating Instructions" into the CD-ROM drive of the software to read them before use. 116 Note ❒ After the installation is complete, the "SmartDeviceMonitor for Admin" or "SmartDeviceMonitor for Client" folder is in "Readme.txt". Configuring the Scanner Settings Installing SmartDeviceMonitor Use Auto Run for Client Setup screen appears C Follow the instructions on the Start menu. Help can be installed...
... screen ap- 3 pears. A Start Windows, and then insert the supplied CD-ROM labeled "Scanner Driver(s), Utilities and Operating Instructions" into the CD-ROM drive of the software to read them before use. 116 Note ❒ After the installation is complete, the "SmartDeviceMonitor for Admin" or "SmartDeviceMonitor for Client" folder is in "Readme.txt". Configuring the Scanner Settings Installing SmartDeviceMonitor Use Auto Run for Client Setup screen appears C Follow the instructions on the Start menu. Help can be installed...

Operating Instructions
Page 145
... setup items. Note ❒ You can confirm the current scan set - This returns to the E-mail/Send File standby screen, and the current scan settings are finished, press [Exit]. Making Scan Settings B Use [↓Next] or [↑Prev.] to scroll through the pages, use the number keys to specify the values. F Press [OK]. Confirming the Scan Settings You can confirm the [Default] set - below, unless you want to [Default], [User 1], [User...
... setup items. Note ❒ You can confirm the current scan set - This returns to the E-mail/Send File standby screen, and the current scan settings are finished, press [Exit]. Making Scan Settings B Use [↓Next] or [↑Prev.] to scroll through the pages, use the number keys to specify the values. F Press [OK]. Confirming the Scan Settings You can confirm the [Default] set - below, unless you want to [Default], [User 1], [User...

Operating Instructions
Page 172
... to print scan • Color/Black and White data using the selected printer. The Print Scan Ready screen is displayed. See p.165 "Configuring Print Settings" to fifth items on this ma- 8 tings) are displayed as the sec- See p.169 "Selecting Color/Black and White" for information about changing the number of copies. • Printer The default printer is selected using [Scan Type], [Image Density], [Original Size], and [Reduce/Enlarge] in [3.Print Scan Settings] under the Scanner Features password, if asked. B Check...
... to print scan • Color/Black and White data using the selected printer. The Print Scan Ready screen is displayed. See p.165 "Configuring Print Settings" to fifth items on this ma- 8 tings) are displayed as the sec- See p.169 "Selecting Color/Black and White" for information about changing the number of copies. • Printer The default printer is selected using [Scan Type], [Image Density], [Original Size], and [Reduce/Enlarge] in [3.Print Scan Settings] under the Scanner Features password, if asked. B Check...

Operating Instructions
Page 175
... "original size → copy paper size" on the third line of the screen. Printing Scan Data Note ❒ If you change the settings in step B below, unless you configure the print settings manually. G Highlight the option you want to select by selecting [Manual] in [Enlarge], [Reduce] and [Create Margin], only the latest setting that you have entered, and returns to [Default], [User 1], [User 2] or [User 3]. light [Manual], [User 1], [User 2] or [User 3] on the third line of the screen.
... "original size → copy paper size" on the third line of the screen. Printing Scan Data Note ❒ If you change the settings in step B below, unless you configure the print settings manually. G Highlight the option you want to select by selecting [Manual] in [Enlarge], [Reduce] and [Create Margin], only the latest setting that you have entered, and returns to [Default], [User 1], [User 2] or [User 3]. light [Manual], [User 1], [User 2] or [User 3] on the third line of the screen.

Operating Instructions
Page 187
... to make the data size smaller. SADF ← Scanning starts when you are scanning the originals which are scanning the duplex printed originals, set the originals one by one page image. 256 Colors (in the left to a simplex one on the ADF. 179 When you set the originals on the place to set characters/Date/Counter You can divide two-page spread originals to two individual page images, or combine duplex printed...
... to make the data size smaller. SADF ← Scanning starts when you are scanning the originals which are scanning the duplex printed originals, set the originals one by one page image. 256 Colors (in the left to a simplex one on the ADF. 179 When you set the originals on the place to set characters/Date/Counter You can divide two-page spread originals to two individual page images, or combine duplex printed...

Operating Instructions
Page 192
... first original has failed. ed, change to a Windows shared folder or an FTP server 184 Specify a lower resolution, if the current setting is select- Appendix Scan settings error messages Message Possible Cause and Required Action Cannot detect the scan size. Check whether the original is set to an angle of the following settings larger using a delivery server • [Configuration] → [File Send Settings] → [Send File] → [Job Delivery Data Max. mail...
... first original has failed. ed, change to a Windows shared folder or an FTP server 184 Specify a lower resolution, if the current setting is select- Appendix Scan settings error messages Message Possible Cause and Required Action Cannot detect the scan size. Check whether the original is set to an angle of the following settings larger using a delivery server • [Configuration] → [File Send Settings] → [Send File] → [Job Delivery Data Max. mail...

Operating Instructions
Page 193
... Scan (E-mail, Send File (SMB/FTP) or Delivery Server) operation error messages Message Updating the destination list... Updating destination list failed. Depending on the delivery server. Send the current scanned data or delete to wait a moment while the address book is being serviced. • The delivery server is not being updated. Troubleshooting Message Exceeded Job Delivery Data Max. Try scanning with such settings that make data size smaller, or perform scanning several times to the previous page scanned...
... Scan (E-mail, Send File (SMB/FTP) or Delivery Server) operation error messages Message Updating the destination list... Updating destination list failed. Depending on the delivery server. Send the current scanned data or delete to wait a moment while the address book is being serviced. • The delivery server is not being updated. Troubleshooting Message Exceeded Job Delivery Data Max. Try scanning with such settings that make data size smaller, or perform scanning several times to the previous page scanned...

Operating Instructions
Page 195
...] Cover Open Check the printer. [Exit] Paper Misfeed Check the printer. [Exit] Functional Problems • The printer has functional problems other than those 11 Check the printer. No response from the de- • The printer is not supported. Press the {Online} key on , and the cables are connected and cables. Press [Exit] to start printing. Check the power the printer is displayed. mentioned above. Troubleshooting Print Scan operation error messages Message Printer is ready. Cannot print. See the manual that the printer [Exit] operates...
...] Cover Open Check the printer. [Exit] Paper Misfeed Check the printer. [Exit] Functional Problems • The printer has functional problems other than those 11 Check the printer. No response from the de- • The printer is not supported. Press the {Online} key on , and the cables are connected and cables. Press [Exit] to start printing. Check the power the printer is displayed. mentioned above. Troubleshooting Print Scan operation error messages Message Printer is ready. Cannot print. See the manual that the printer [Exit] operates...

Operating Instructions
Page 229
... LDAP Server Port Number, 104 List of Scan Option, 66 Entered Program Information, 202 Erase Border, 68 Erase Color, 78 Error Message Print Scan operation, 187 Scanner unit, 183 Scan settings, 184 Send Scan (E-mail, Send File (SMB/FTP) or Delivery Server) operation, 185 Web Status Monitor, 188 Example Procedures Using [Configuration] Main Menu, 92 Expat, 219 Exposure Glass, 193 Exposure glass, 13 Exposure glass for the ADF, 13 F File Locations, 151, 158 File Names, 152, 158...
... LDAP Server Port Number, 104 List of Scan Option, 66 Entered Program Information, 202 Erase Border, 68 Erase Color, 78 Error Message Print Scan operation, 187 Scanner unit, 183 Scan settings, 184 Send Scan (E-mail, Send File (SMB/FTP) or Delivery Server) operation, 185 Web Status Monitor, 188 Example Procedures Using [Configuration] Main Menu, 92 Expat, 219 Exposure Glass, 193 Exposure glass, 13 Exposure glass for the ADF, 13 F File Locations, 151, 158 File Names, 152, 158...

Operating Instructions
Page 230
... the ADF, 123 Polling Interval, 98 Power connector, 13 Power switch, 12 Prepare Carriage Lock, 55 Printer, 105 Printer IP Address, 106 Printer Name, 105 Printing Scan Data, 164 Printing Scanned Image Files, 161 Print Scan Settings, 72 Print Settings, 84 Procedure Breakdown Printing Scanned Image Files, 161 Sending a Scanned File to a Registered Shared Folder, 144 Sending Scan File by E-mail, 125 Sending Scan File by Scan to FTP, 155 Sending Scan Files Using Delivery Server, 171 Using [Enter Custom Send File] to Send a Scanned File to Print, 37 Use the Network...
... the ADF, 123 Polling Interval, 98 Power connector, 13 Power switch, 12 Prepare Carriage Lock, 55 Printer, 105 Printer IP Address, 106 Printer Name, 105 Printing Scan Data, 164 Printing Scanned Image Files, 161 Print Scan Settings, 72 Print Settings, 84 Procedure Breakdown Printing Scanned Image Files, 161 Sending a Scanned File to a Registered Shared Folder, 144 Sending Scan File by E-mail, 125 Sending Scan File by Scan to FTP, 155 Sending Scan Files Using Delivery Server, 171 Using [Enter Custom Send File] to Send a Scanned File to Print, 37 Use the Network...


