
Operating Instructions
Page 6
... 172 Scanner unit error message 172 Scan settings error messages 173 Send Scan (E-mail, Send File (SMB/FTP) or Delivery Server) operation error messages 175 Print Scan operation error messages 176 Error messages displayed on the Web Status Monitor 177 Other Problems ...178 Cleaning...180 Cleaning the Exposure Glass, ADF Exposure Glass, White Sheet, and White Plate .... 180 Cleaning the Feed Roller 181 Cleaning the Document Roller 181 iv Cleaning the Document Rolling Unit 182 Using [Enter Custom Send File] to Send a Scanned File to an Unregistered Shared Folder 143...
... 172 Scanner unit error message 172 Scan settings error messages 173 Send Scan (E-mail, Send File (SMB/FTP) or Delivery Server) operation error messages 175 Print Scan operation error messages 176 Error messages displayed on the Web Status Monitor 177 Other Problems ...178 Cleaning...180 Cleaning the Exposure Glass, ADF Exposure Glass, White Sheet, and White Plate .... 180 Cleaning the Feed Roller 181 Cleaning the Document Roller 181 iv Cleaning the Document Rolling Unit 182 Using [Enter Custom Send File] to Send a Scanned File to an Unregistered Shared Folder 143...
Operating Instructions
Page 13
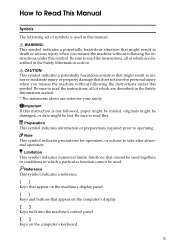
...instructions, all of symbols is not followed, paper might be misfed, originals might be damaged, or data might be used in this symbol. Limitation This symbol indicates numerical limits, functions that might result in minor or moderate injury or property damage that appear on the computer's display. {} Keys built into the machine's control panel.... {} Keys on the machine's display panel. [] Keys and buttons that does not involve personal injury when you misuse the machine without following the instructions under this instruction is used together, or ...
...instructions, all of symbols is not followed, paper might be misfed, originals might be damaged, or data might be used in this symbol. Limitation This symbol indicates numerical limits, functions that might result in minor or moderate injury or property damage that appear on the computer's display. {} Keys built into the machine's control panel.... {} Keys on the machine's display panel. [] Keys and buttons that does not involve personal injury when you misuse the machine without following the instructions under this instruction is used together, or ...

Operating Instructions
Page 21
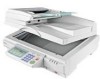
... been loaded by the ADF are output here after scanning. 4. Output table The originals that you to automatically load multiple originals into this key to configure various settings such as send scan, print scan, network, etc. Control panel Used to configure settings and operate this machine. 7. {User Tools} key Press this machine using the ADF (Automatic Document Feeder). 2. Guide to this Scanner Guide to this machine. Number keys Used to select a menu item displayed on the Screen" for selecting an...
... been loaded by the ADF are output here after scanning. 4. Output table The originals that you to automatically load multiple originals into this key to configure various settings such as send scan, print scan, network, etc. Control panel Used to configure settings and operate this machine. 7. {User Tools} key Press this machine using the ADF (Automatic Document Feeder). 2. Guide to this Scanner Guide to this machine. Number keys Used to select a menu item displayed on the Screen" for selecting an...
Operating Instructions
Page 42
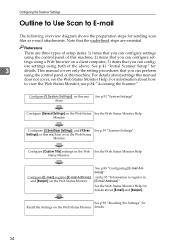
... information about settings this manual does not cover, see p.84 "Accessing the Scanner" Configure [1.System Settings] on the Web Status Monitor See p.88 "Configuring [E-mail Address]" and p.91 "Information to E-mail The following overview diagram shows the preparation steps for 3 details. ure settings using the control panel of this machine. See p.41 "Initial Scanner Setup" for sending scan files as e-mail attachments. tings using the control panel of...
... information about settings this manual does not cover, see p.84 "Accessing the Scanner" Configure [1.System Settings] on the Web Status Monitor See p.88 "Configuring [E-mail Address]" and p.91 "Information to E-mail The following overview diagram shows the preparation steps for 3 details. ure settings using the control panel of this machine. See p.41 "Initial Scanner Setup" for sending scan files as e-mail attachments. tings using the control panel of...
Operating Instructions
Page 54
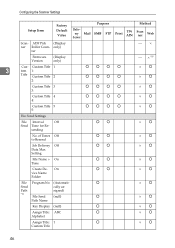
... Title b ×b 46 ADF Pick (Display ner Roller Coun- sending bb ×b No. On vice Name Folder bb ×b File Program No. (Automati- b Send cally as- only) ter × Firmware Version (Display only) × *18 Cus- Configuring the Scanner Settings Setup Item Factory Default Value Purpose Method Delivery Mail Server SMB FTP Print TW AIN Scan ner Web Scan- of Times Off to...
... Title b ×b 46 ADF Pick (Display ner Roller Coun- sending bb ×b No. On vice Name Folder bb ×b File Program No. (Automati- b Send cally as- only) ter × Firmware Version (Display only) × *18 Cus- Configuring the Scanner Settings Setup Item Factory Default Value Purpose Method Delivery Mail Server SMB FTP Print TW AIN Scan ner Web Scan- of Times Off to...

Operating Instructions
Page 67
...), from the last operation of the control panel of this machine. onds in [System Settings] ❖ 1. When you can use this machine as the Send Scan initial screen. This means that the machine stands by , the message " Unable to make configurations because Scanner is performed on this machine. Select Method " to " TWAIN ", this setup item is dimmed and cannot be configured. ❖ TWAIN Standby Time This...
...), from the last operation of the control panel of this machine. onds in [System Settings] ❖ 1. When you can use this machine as the Send Scan initial screen. This means that the machine stands by , the message " Unable to make configurations because Scanner is performed on this machine. Select Method " to " TWAIN ", this setup item is dimmed and cannot be configured. ❖ TWAIN Standby Time This...

Operating Instructions
Page 71
... [New Job] and line is turned on the screen. ❖ ADF Thin Paper This item lets you select how the ADF works. • On Select this option when you scan the originals other than those of recommended Originals". 63 The ADF works at its highest speed when you perform a scan opera- You can specify using the ADF. The option selected for displaying messages on . (0.2"). Scanner Settings ❒...
... [New Job] and line is turned on the screen. ❖ ADF Thin Paper This item lets you select how the ADF works. • On Select this option when you scan the originals other than those of recommended Originals". 63 The ADF works at its highest speed when you perform a scan opera- You can specify using the ADF. The option selected for displaying messages on . (0.2"). Scanner Settings ❒...
Operating Instructions
Page 78
... a Send Scan (email, Send File (SMB/FTP) or Delivery Server) operation. Note ❒ Selecting [ Colour:Full Colour ] reduces the number of original pages that can be scanned at a time. ❖ Resolution This item lets you send scan data. Memory areas named " Default ", " User 1", " User 2", and " User 3" are automatically selected according to Register in [Send Scan Settings] ❖ Scan Type This item lets you send scan data without selecting " User 1", " User 2", or " User...
... a Send Scan (email, Send File (SMB/FTP) or Delivery Server) operation. Note ❒ Selecting [ Colour:Full Colour ] reduces the number of original pages that can be scanned at a time. ❖ Resolution This item lets you send scan data. Memory areas named " Default ", " User 1", " User 2", and " User 3" are automatically selected according to Register in [Send Scan Settings] ❖ Scan Type This item lets you send scan data without selecting " User 1", " User 2", or " User...

Operating Instructions
Page 85
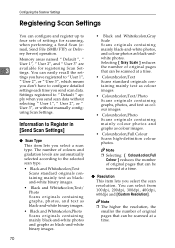
... User Scan Settings menu. Image Density " appears as the setup item currently selected. Note ❒ To correct the number you want . "4. Orig- Registering Scan Settings B Use the {1} and {0} keys to highlight the item you lected, and returns to the Default Scan Settings menu. 3 have entered, use the {1} and {0} keys to highlight it, and then press the {Clear /Stop} key to clear the number. ❒ You can also use the number keys...
... User Scan Settings menu. Image Density " appears as the setup item currently selected. Note ❒ To correct the number you want . "4. Orig- Registering Scan Settings B Use the {1} and {0} keys to highlight the item you lected, and returns to the Default Scan Settings menu. 3 have entered, use the {1} and {0} keys to highlight it, and then press the {Clear /Stop} key to clear the number. ❒ You can also use the number keys...
Operating Instructions
Page 107
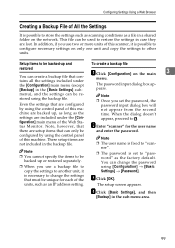
... user name is fixed to D. The setup screen appears. D Click [Basic Settings], and then [Backup] in case they are configured by using the backup file. When the dialog doesn't appear, proceed to "scan- units, such as the factory default. Setup items to be used to restore the settings in the sub-menu area. 99 pears. Note, however, that are lost. configured by using [Configuration] → [Basic copy the settings to...
... user name is fixed to D. The setup screen appears. D Click [Basic Settings], and then [Backup] in case they are configured by using the backup file. When the dialog doesn't appear, proceed to "scan- units, such as the factory default. Setup items to be used to restore the settings in the sub-menu area. 99 pears. Note, however, that are lost. configured by using [Configuration] → [Basic copy the settings to...

Operating Instructions
Page 110
... not automatically work with certain operating system set- tings.In this machine as a member of Files CDROM Drive Wizard for the TWAIN driver and utilities DRIVERS TWAIN TWAIN driver for MON Client Auto Run Program When the CD-ROM is inserted into a client computer in the CD-ROM root directory. ❒ If you use this case, launch "Setup.exe" located in Windows 95/98/Me,Windows XP, Windows 2000, or Windows NT 4.0, the installer starts automatically(Auto...
... not automatically work with certain operating system set- tings.In this machine as a member of Files CDROM Drive Wizard for the TWAIN driver and utilities DRIVERS TWAIN TWAIN driver for MON Client Auto Run Program When the CD-ROM is inserted into a client computer in the CD-ROM root directory. ❒ If you use this case, launch "Setup.exe" located in Windows 95/98/Me,Windows XP, Windows 2000, or Windows NT 4.0, the installer starts automatically(Auto...
Operating Instructions
Page 111
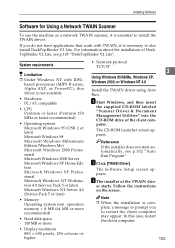
A Start Windows, and then insert the supplied CD-ROM labeled "Scanner Driver & Document Management Utilities" into the CD-ROM drive of the TWAIN driv- The CD-ROM Launcher screen appears. er starts. Installing Software Software for Using a Network TWAIN Scanner To use the machine as a network TWAIN scanner, it is necessary to install the TWAIN driver. If you to restart the client computer may appear. For information about the installation of DeskTopBinder V2 Lite, see p.102 "Auto Run Program". Reference If the...
A Start Windows, and then insert the supplied CD-ROM labeled "Scanner Driver & Document Management Utilities" into the CD-ROM drive of the TWAIN driv- The CD-ROM Launcher screen appears. er starts. Installing Software Software for Using a Network TWAIN Scanner To use the machine as a network TWAIN scanner, it is necessary to install the TWAIN driver. If you to restart the client computer may appear. For information about the installation of DeskTopBinder V2 Lite, see p.102 "Auto Run Program". Reference If the...

Operating Instructions
Page 115
... for Client], and then the SmartDeviceMonitor for Client Setup screen appears C Follow the instructions on the Start menu. A Start Windows, and then insert the supplied CD-ROM labeled "Scanner Driver & Document Management Utilities" into the 3 CD-ROM drive of this machine). Note ❒ After the installation is complete, the " SmartDeviceMonitor for Admin " or " SmartDeviceMonitor for Client " folder is in "Readme.txt". Installing Software *1 You cannot use . 107 Installing SmartDeviceMonitor Use Auto Run for...
... for Client], and then the SmartDeviceMonitor for Client Setup screen appears C Follow the instructions on the Start menu. A Start Windows, and then insert the supplied CD-ROM labeled "Scanner Driver & Document Management Utilities" into the 3 CD-ROM drive of this machine). Note ❒ After the installation is complete, the " SmartDeviceMonitor for Admin " or " SmartDeviceMonitor for Client " folder is in "Readme.txt". Installing Software *1 You cannot use . 107 Installing SmartDeviceMonitor Use Auto Run for...

Operating Instructions
Page 136
...list is automatically updated when you press [Dest.]. D Use [Next] and [Prev.] to scroll through the pages, and display the destination you want to this machine. Note ❒ If [To:] is highlighted, press [Settings]. B Press [Dest.]. The E-mail/Send File standby screen is displayed. See p.61 "Auto Update Destination List" for [Auto Update Destination List] in [2.Send Scan Settings] under the Scanner Features menu... This selects the check box next to clear the check box (this step when the E-mail/Send File standby screen is displayed. The list of the destinations ...
...list is automatically updated when you press [Dest.]. D Use [Next] and [Prev.] to scroll through the pages, and display the destination you want to this machine. Note ❒ If [To:] is highlighted, press [Settings]. B Press [Dest.]. The E-mail/Send File standby screen is displayed. See p.61 "Auto Update Destination List" for [Auto Update Destination List] in [2.Send Scan Settings] under the Scanner Features menu... This selects the check box next to clear the check box (this step when the E-mail/Send File standby screen is displayed. The list of the destinations ...

Operating Instructions
Page 141
... status screen without changing anything, press [Cancel]. Making Scan Settings Note ❒ Pressing [Cancel] discards the selected option, and returns to the previous screen. ❒ When you want to confirm. 6 [PrevMenu]. light [Manual], [User 1], [User 2] or [User 3] on the third line of the screen. E When you are finished, press C Use [Next] and [Prev.] to display the setting of the setup item you want to apply the scan settings...
... status screen without changing anything, press [Cancel]. Making Scan Settings Note ❒ Pressing [Cancel] discards the selected option, and returns to the previous screen. ❒ When you want to confirm. 6 [PrevMenu]. light [Manual], [User 1], [User 2] or [User 3] on the third line of the screen. E When you are finished, press C Use [Next] and [Prev.] to display the setting of the setup item you want to apply the scan settings...
Operating Instructions
Page 148
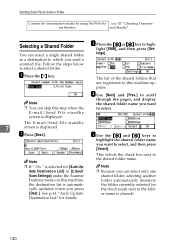
... File standby 7 screen is cleared). 140 See p.61 "Auto Update Destination List" for [Auto Update Destination List] in [2.Send Scan Settings] under the Scanner Features menu on this step when the E-mail/Send File standby screen is selected for details. tings]. B Press [Dest.]. Note ❒ If " On " is displayed. light [SMB], and then press [Set- sion Results" Selecting a Shared Folder You can skip this machine, the destination list is automatically updated...
... File standby 7 screen is cleared). 140 See p.61 "Auto Update Destination List" for [Auto Update Destination List] in [2.Send Scan Settings] under the Scanner Features menu on this step when the E-mail/Send File standby screen is selected for details. tings]. B Press [Dest.]. Note ❒ If " On " is displayed. light [SMB], and then press [Set- sion Results" Selecting a Shared Folder You can skip this machine, the destination list is automatically updated...

Operating Instructions
Page 170
... " message changes to print scan data using [Scan Type], [Image Density], [Original Size], and [Reduce/Enlarge] in [5.Print Settings] under the Scanner Features menu) is displayed at the top right of copies. ". 162 Printing Scanned Image Files Printing Scan Data Follow the steps below to " Printing... C Press the {Start} key of The original is selected using [Default Printer] in [3.Print Scan Settings] under the Scanner Features menu are the way you want . • Color/Black and White The default setting selected using the selected printer. • Printer The default...
... " message changes to print scan data using [Scan Type], [Image Density], [Original Size], and [Reduce/Enlarge] in [5.Print Settings] under the Scanner Features menu) is displayed at the top right of copies. ". 162 Printing Scanned Image Files Printing Scan Data Follow the steps below to " Printing... C Press the {Start} key of The original is selected using [Default Printer] in [3.Print Scan Settings] under the Scanner Features menu are the way you want . • Color/Black and White The default setting selected using the selected printer. • Printer The default...

Operating Instructions
Page 173
... the setting of the setup item you want to set - Note ❒ You can confirm the current print settings, or the print settings that you have registered to the second page of your selection appears. D When you configure the print settings manually. it]. 165 A While the Print Scan standby screen is displayed, press [Print]. This saves the ratio you have entered, and returns to [Default], [User 1], [User 2] or [User 3]. I Press [OK]. B Use...
... the setting of the setup item you want to set - Note ❒ You can confirm the current print settings, or the print settings that you have registered to the second page of your selection appears. D When you configure the print settings manually. it]. 165 A While the Print Scan standby screen is displayed, press [Print]. This saves the ratio you have entered, and returns to [Default], [User 1], [User 2] or [User 3]. I Press [OK]. B Use...

Operating Instructions
Page 201
... exported using a CSV file, create the file with its password entries are fixed to a CSV file using the Web Status Monitor. E-mail Address Book Data Format and Device Tag Information ❖ [1] : Register as Sender Determines whether the e-mail address is used not only as the destination but as the sender also. [0] : Not used as sender [1] : Used as " [], [] " in the exported CSV file from [Configuration] → [Email Settings...
... exported using a CSV file, create the file with its password entries are fixed to a CSV file using the Web Status Monitor. E-mail Address Book Data Format and Device Tag Information ❖ [1] : Register as Sender Determines whether the e-mail address is used not only as the destination but as the sender also. [0] : Not used as sender [1] : Used as " [], [] " in the exported CSV file from [Configuration] → [Email Settings...

Operating Instructions
Page 223
...-ROM USB Interface Card USB Cable Power Cord Tools Control Panel Unit Screw Safety Instruction Sheet Card slot cover Ferrite Core (Europe only) Remove the plastic bag. ZDLH215E Image Scanner Attaching the Control Panel Unit to the power cord. QUICK INSTALLATION GUIDE Please read the Safety Information in the correct direction. Do not place heavy object on the carriers body. ZDLH025E DISENGAGING THE LOCK Set the lock switch on a strong and level surface. TDLH140E G421-8600 Environments to Avoid Important ❒ Locations...
...-ROM USB Interface Card USB Cable Power Cord Tools Control Panel Unit Screw Safety Instruction Sheet Card slot cover Ferrite Core (Europe only) Remove the plastic bag. ZDLH215E Image Scanner Attaching the Control Panel Unit to the power cord. QUICK INSTALLATION GUIDE Please read the Safety Information in the correct direction. Do not place heavy object on the carriers body. ZDLH025E DISENGAGING THE LOCK Set the lock switch on a strong and level surface. TDLH140E G421-8600 Environments to Avoid Important ❒ Locations...


