
General Settings Guide
Page 11
Troubleshooting If Your Machine Does Not Operate As You Want 107 General ...107 Document Server 110 Maintenance...110 BLoading Paper 111 Loading Paper into Paper Trays and Paper Tray Unit 111 Loading Paper into Large Capacity Tray (optional 112 ...133 2 Tray Finisher ...133 Booklet Finisher ...134 Replacing the Stamp Cartridge 135 Adjusting the Colour Registration 136 Auto Colour Registration 136 Fuser Adjustment for Thick Paper 136 Checking the Fuser Adjustment Sheet 139 Auto Colour Calibration 140 6. Remarks Dos and Don'ts 143 Saving Colour Copies 144 Toner ...145 Handling Toner......
Troubleshooting If Your Machine Does Not Operate As You Want 107 General ...107 Document Server 110 Maintenance...110 BLoading Paper 111 Loading Paper into Paper Trays and Paper Tray Unit 111 Loading Paper into Large Capacity Tray (optional 112 ...133 2 Tray Finisher ...133 Booklet Finisher ...134 Replacing the Stamp Cartridge 135 Adjusting the Colour Registration 136 Auto Colour Registration 136 Fuser Adjustment for Thick Paper 136 Checking the Fuser Adjustment Sheet 139 Auto Colour Calibration 140 6. Remarks Dos and Don'ts 143 Saving Colour Copies 144 Toner ...145 Handling Toner......
General Settings Guide
Page 148
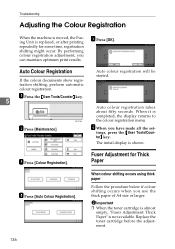
...before the adjustment. 136 When it is not available. Important ❒ When the toner cartridge is almost empty, "Fuser Adjustment: Thick Paper" is completed, the display returns to ZFLS110E the colour registration menu. Troubleshooting Adjusting the Colour ...Registration When the machine is moved, the Fusing Unit is replaced, or after printing repeatedly for Thick Paper D Press [Auto Colour Registration]. E Press [OK]. ter} key. By performing colour registration adjustment,...
...before the adjustment. 136 When it is not available. Important ❒ When the toner cartridge is almost empty, "Fuser Adjustment: Thick Paper" is completed, the display returns to ZFLS110E the colour registration menu. Troubleshooting Adjusting the Colour ...Registration When the machine is moved, the Fusing Unit is replaced, or after printing repeatedly for Thick Paper D Press [Auto Colour Registration]. E Press [OK]. ter} key. By performing colour registration adjustment,...
General Settings Guide
Page 149
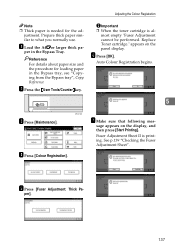
Prepare thick paper similar to what you normally use. appears on the display, and then press [Start Printing]. G Make sure that following mes- E Press [Fuser Adjustment: Thick Pa- per ]. 137 F Press [OK]. ZFLS110E D Press [Colour Registration]. sage appears on the ... is needed for loading paper in the Bypass Tray. justment. See p.139 "Checking the Fuser Adjustment Sheet". Adjusting the Colour Registration Note ❒ Thick paper is almost empty "Fuser Adjustment cannot be performed. Replace Toner cartridge." Auto Colour Registration begins. 5 C Press [...
Prepare thick paper similar to what you normally use. appears on the display, and then press [Start Printing]. G Make sure that following mes- E Press [Fuser Adjustment: Thick Pa- per ]. 137 F Press [OK]. ZFLS110E D Press [Colour Registration]. sage appears on the ... is needed for loading paper in the Bypass Tray. justment. See p.139 "Checking the Fuser Adjustment Sheet". Adjusting the Colour Registration Note ❒ Thick paper is almost empty "Fuser Adjustment cannot be performed. Replace Toner cartridge." Auto Colour Registration begins. 5 C Press [...

General Settings Guide
Page 150
...box matches the sample. ed pattern box at the bottom of the Fuser Adjustment Sheet II. Troubleshooting H Compare the sample with the print- Keep adjusting until the printed pattern looks the same as the printed pattern, and then specify "0". If you specify "0", setting is shown.... 138 Specify which square in Step H reappears. If you specify "-1" or "+1", the following display appears. 5 Press [Start Printing]. An adjusted Fuser Adjustment Sheet II is printed and the display that appeared in step returns. I After making all the settings, press the {User Tools/Counter} key.
...box matches the sample. ed pattern box at the bottom of the Fuser Adjustment Sheet II. Troubleshooting H Compare the sample with the print- Keep adjusting until the printed pattern looks the same as the printed pattern, and then specify "0". If you specify "0", setting is shown.... 138 Specify which square in Step H reappears. If you specify "-1" or "+1", the following display appears. 5 Press [Start Printing]. An adjusted Fuser Adjustment Sheet II is printed and the display that appeared in step returns. I After making all the settings, press the {User Tools/Counter} key.
General Settings Guide
Page 151
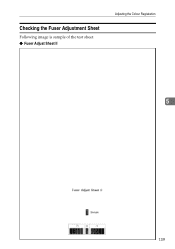
Checking the Fuser Adjustment Sheet Following image is sample of the test sheet. ❖ Fuser Adjust Sheet II Adjusting the Colour Registration 5 139
Checking the Fuser Adjustment Sheet Following image is sample of the test sheet. ❖ Fuser Adjust Sheet II Adjusting the Colour Registration 5 139
General Settings Guide
Page 188
...Book Management, 63 ADF, 19 Adjusting the Colour Registration, 136 Auto Colour Registration, 136 Fuser Adjustment for thick paper, 136 Adjust/Program Colour key, 21 Administrator Authentication Management, 61... Auto Erase Memory Setting, 67 Auto Off, 28 Auto off timer, 59 Auto reset timer copier/Document Server, 60 facsimile, 60 scanner, 60 system, 60 B Booklet finisher, 19, 166 Browse network, 88... Station/Receiving Station, 104 Deleting a user, 72 Deleting a user code, 74 Display/Clear/Print Counter per User, 62 Displaying names registered in groups, 95 Displaying the Counter for each user...
...Book Management, 63 ADF, 19 Adjusting the Colour Registration, 136 Auto Colour Registration, 136 Fuser Adjustment for thick paper, 136 Adjust/Program Colour key, 21 Administrator Authentication Management, 61... Auto Erase Memory Setting, 67 Auto Off, 28 Auto off timer, 59 Auto reset timer copier/Document Server, 60 facsimile, 60 scanner, 60 system, 60 B Booklet finisher, 19, 166 Browse network, 88... Station/Receiving Station, 104 Deleting a user, 72 Deleting a user code, 74 Display/Clear/Print Counter per User, 62 Displaying names registered in groups, 95 Displaying the Counter for each user...
General Settings Guide
Page 189
...19 Firmware Version, 66 Front cover, 18 FTP, 91 Function keys, 22 Function Priority, 53 Function reset timer, 54 Function status indicators, 22 Fuser Adjustment Sheet II, 139 I Indicators, 21 Inquiry, 154 Internal options, 20 Interrupt key, 22 K # key, 22 Key Counter Management, 61..., 56 printer, 56 Paper type bypass tray, 57 tray 1-4, 57 Power connection, 147 Power indicator, 22 Print Address Book Destination List, 65 Printing the Counter for each user code, 75 Print Priority, 53 Program/ Change Administrator, 61 Program / Change / Delete LDAP Server, 66 Program key, 22 Protection...
...19 Firmware Version, 66 Front cover, 18 FTP, 91 Function keys, 22 Function Priority, 53 Function reset timer, 54 Function status indicators, 22 Fuser Adjustment Sheet II, 139 I Indicators, 21 Inquiry, 154 Internal options, 20 Interrupt key, 22 K # key, 22 Key Counter Management, 61..., 56 printer, 56 Paper type bypass tray, 57 tray 1-4, 57 Power connection, 147 Power indicator, 22 Print Address Book Destination List, 65 Printing the Counter for each user code, 75 Print Priority, 53 Program/ Change Administrator, 61 Program / Change / Delete LDAP Server, 66 Program key, 22 Protection...
Network Guide
Page 124
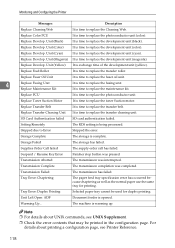
... Error: Chaptering The paper feed tray specification error has occurred because chaptering as well as the normal paper use the same tray for duplex printing. Replace Color PCU It is time to replace the photoconductor unit (color). Unit (Cyan) It is time to replace the development unit... failed. Replace Develop. Replace Develop. Unit (Magenta) It is time to replace the toner Suction motor. Replace Fuser Oil Unit It is time to replace the fuser oil unit. 4 Replace Fusing Unit Replace Maintenance Kit It is time to replace the transfer belt. Replace Toner ...
... Error: Chaptering The paper feed tray specification error has occurred because chaptering as well as the normal paper use the same tray for duplex printing. Replace Color PCU It is time to replace the photoconductor unit (color). Unit (Cyan) It is time to replace the development unit... failed. Replace Develop. Replace Develop. Unit (Magenta) It is time to replace the toner Suction motor. Replace Fuser Oil Unit It is time to replace the fuser oil unit. 4 Replace Fusing Unit Replace Maintenance Kit It is time to replace the transfer belt. Replace Toner ...