
General Settings Guide
Page 11
Troubleshooting If Your Machine Does Not Operate As You Want 107 General ...107 Document Server 110 Maintenance...110 BLoading Paper 111 Loading Paper into Paper Trays and Paper Tray Unit 111 Loading Paper into Large Capacity Tray (optional 112 DAdding Toner 114 Inserting Toner ...115 ... ...133 Booklet Finisher ...134 Replacing the Stamp Cartridge 135 Adjusting the Colour Registration 136 Auto Colour Registration 136 Fuser Adjustment for Thick Paper 136 Checking the Fuser Adjustment Sheet 139 Auto Colour Calibration 140 6. Remarks Dos and Don'ts 143 Saving Colour Copies 144 Toner ...
Troubleshooting If Your Machine Does Not Operate As You Want 107 General ...107 Document Server 110 Maintenance...110 BLoading Paper 111 Loading Paper into Paper Trays and Paper Tray Unit 111 Loading Paper into Large Capacity Tray (optional 112 DAdding Toner 114 Inserting Toner ...115 ... ...133 Booklet Finisher ...134 Replacing the Stamp Cartridge 135 Adjusting the Colour Registration 136 Auto Colour Registration 136 Fuser Adjustment for Thick Paper 136 Checking the Fuser Adjustment Sheet 139 Auto Colour Calibration 140 6. Remarks Dos and Don'ts 143 Saving Colour Copies 144 Toner ...
General Settings Guide
Page 148
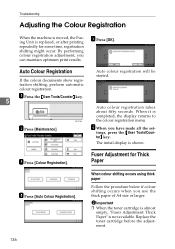
F When you can maintain optimum print results. Fuser Adjustment for some time, registration shifting might occur. Important ❒ When the toner cartridge is almost empty, "Fuser Adjustment: Thick Paper" is shown. B Press [Maintenance]. The initial display is not available. E Press [OK... cartridge before the adjustment. 136 Troubleshooting Adjusting the Colour Registration When the machine is moved, the Fusing Unit is replaced, or after printing repeatedly for Thick Paper D Press [Auto Colour Registration]. Auto Colour Registration If the colour documents show ...
F When you can maintain optimum print results. Fuser Adjustment for some time, registration shifting might occur. Important ❒ When the toner cartridge is almost empty, "Fuser Adjustment: Thick Paper" is shown. B Press [Maintenance]. The initial display is not available. E Press [OK... cartridge before the adjustment. 136 Troubleshooting Adjusting the Colour Registration When the machine is moved, the Fusing Unit is replaced, or after printing repeatedly for Thick Paper D Press [Auto Colour Registration]. Auto Colour Registration If the colour documents show ...
General Settings Guide
Page 188
...unit, 19 A Adding a Group to Another Group, 97 Adding staples, 129 Adding toner, 114 Address Book Change Order, 64 Edit Title, 65 Program/Change/Delete Group, 63 Select Title, 66 Address book, 68 Address Book Management, 63 ADF, 19 Adjusting the Colour Registration, 136 Auto Colour Registration, 136 Fuser..., 67 Auto Off, 28 Auto off timer, 59 Auto reset timer copier/Document Server, 60 facsimile, 60 scanner, 60 system, 60 B Booklet finisher, 19, 166... 104 Deleting a user, 72 Deleting a user code, 74 Display/Clear/Print Counter per User, 62 Displaying names registered in groups, 95 Displaying the ...
...unit, 19 A Adding a Group to Another Group, 97 Adding staples, 129 Adding toner, 114 Address Book Change Order, 64 Edit Title, 65 Program/Change/Delete Group, 63 Select Title, 66 Address book, 68 Address Book Management, 63 ADF, 19 Adjusting the Colour Registration, 136 Auto Colour Registration, 136 Fuser..., 67 Auto Off, 28 Auto off timer, 59 Auto reset timer copier/Document Server, 60 facsimile, 60 scanner, 60 system, 60 B Booklet finisher, 19, 166... 104 Deleting a user, 72 Deleting a user code, 74 Display/Clear/Print Counter per User, 62 Displaying names registered in groups, 95 Displaying the ...
General Settings Guide
Page 189
... keys, 22 Function Priority, 53 Function reset timer, 54 Function status indicators, 22 Fuser Adjustment Sheet II, 139 I Indicators, 21 Inquiry, 154 Internal options, 20 Interrupt ... power indicator, 22 Main power switch, 17, 26 Maintaining Your Machine, 148 Main Unit, 159 Misfeeds, 117 Moving, 146 Multi-Access, 31 N Number keys, 22 O...type bypass tray, 57 tray 1-4, 57 Power connection, 147 Power indicator, 22 Print Address Book Destination List, 65 Printing the Counter for each user code, 75 Print Priority, 53 Program/ Change Administrator, 61 Program / Change / Delete LDAP Server...
... keys, 22 Function Priority, 53 Function reset timer, 54 Function status indicators, 22 Fuser Adjustment Sheet II, 139 I Indicators, 21 Inquiry, 154 Internal options, 20 Interrupt ... power indicator, 22 Main power switch, 17, 26 Maintaining Your Machine, 148 Main Unit, 159 Misfeeds, 117 Moving, 146 Multi-Access, 31 N Number keys, 22 O...type bypass tray, 57 tray 1-4, 57 Power connection, 147 Power indicator, 22 Print Address Book Destination List, 65 Printing the Counter for each user code, 75 Print Priority, 53 Program/ Change Administrator, 61 Program / Change / Delete LDAP Server...
Network Guide
Page 124
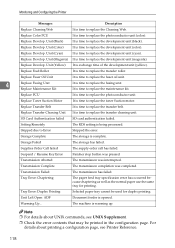
... is time to replace the fusing unit. Replace Develop. Replace Fuser Oil Unit It is time to replace the fuser oil unit. 4 Replace Fusing Unit Replace Maintenance Kit It is time to replace the development unit (black). Transmission Complete The transmission completion was interrupted. Replace Develop. ...The paper feed tray specification error has occurred because chaptering as well as the normal paper use the same tray for duplex printing. Unit (Color) It is time to Error Skipped the error. Suspend / Resume Key Error Finisher stop button was pressed. Monitoring...
... is time to replace the fusing unit. Replace Develop. Replace Fuser Oil Unit It is time to replace the fuser oil unit. 4 Replace Fusing Unit Replace Maintenance Kit It is time to replace the development unit (black). Transmission Complete The transmission completion was interrupted. Replace Develop. ...The paper feed tray specification error has occurred because chaptering as well as the normal paper use the same tray for duplex printing. Unit (Color) It is time to Error Skipped the error. Suspend / Resume Key Error Finisher stop button was pressed. Monitoring...