Operating Instructions
Page 3
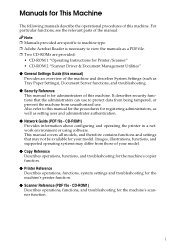
... as Tray Paper Settings), Document Server functions, and troubleshooting. ❖ Security Reference This manual is necessary to view the manuals as a PDF file. ❒ Two CD-ROMs are provided: • CD-ROM 1 "Operating Instructions for administrators of the machine and describes System Settings (such as setting user and administrator authentication. ❖ Network Guide (PDF file - CD-ROM1) Provides information about configuring and operating the printer in a network environment or using software. Also refer to this machine. Note ❒ Manuals provided are specific...
... as Tray Paper Settings), Document Server functions, and troubleshooting. ❖ Security Reference This manual is necessary to view the manuals as a PDF file. ❒ Two CD-ROMs are provided: • CD-ROM 1 "Operating Instructions for administrators of the machine and describes System Settings (such as setting user and administrator authentication. ❖ Network Guide (PDF file - CD-ROM1) Provides information about configuring and operating the printer in a network environment or using software. Also refer to this machine. Note ❒ Manuals provided are specific...
Operating Instructions
Page 4
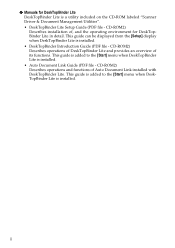
... the [Start] menu when DeskTopBinder Lite is a utility included on the CD-ROM labeled "Scanner Driver & Document Management Utilities". • DeskTopBinder Lite Setup Guide (PDF file - CD-ROM2) Describes operations and functions of , and the operating environment for DeskTopBinder Lite DeskTopBinder Lite is installed. ii ❖ Manuals for DeskTopBinder Lite in detail. This guide can be displayed from the [Setup] display when DeskTopBinder Lite is installed. • Auto Document Link Guide (PDF file - CD...
... the [Start] menu when DeskTopBinder Lite is a utility included on the CD-ROM labeled "Scanner Driver & Document Management Utilities". • DeskTopBinder Lite Setup Guide (PDF file - CD-ROM2) Describes operations and functions of , and the operating environment for DeskTopBinder Lite DeskTopBinder Lite is installed. ii ❖ Manuals for DeskTopBinder Lite in detail. This guide can be displayed from the [Setup] display when DeskTopBinder Lite is installed. • Auto Document Link Guide (PDF file - CD...
Operating Instructions
Page 9
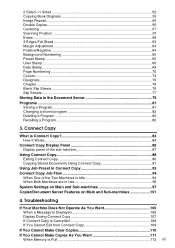
... a Message Is Displayed 105 Display During Connect Copy 107 If Connect Copy is Idle 94 When Both Machines are in the Document Server 79 Programs ...81 Storing a Program ...81 Changing a stored program 82 Deleting a Program 82 Recalling a Program 82 3. 2 Sided→1 Sided ...52 Copying Book Originals 53 Image Repeat...55 Double Copies...56 Centering...57 Scanning Position ...57 Erase...58 3 Edges Full Bleed 63 Margin Adjustment 64 Positive/Negative ...64 Background Numbering 65 Preset Stamp ...65 User Stamp ...66 Date...
... a Message Is Displayed 105 Display During Connect Copy 107 If Connect Copy is Idle 94 When Both Machines are in the Document Server 79 Programs ...81 Storing a Program ...81 Changing a stored program 82 Deleting a Program 82 Recalling a Program 82 3. 2 Sided→1 Sided ...52 Copying Book Originals 53 Image Repeat...55 Double Copies...56 Centering...57 Scanning Position ...57 Erase...58 3 Edges Full Bleed 63 Margin Adjustment 64 Positive/Negative ...64 Background Numbering 65 Preset Stamp ...65 User Stamp ...66 Date...
Operating Instructions
Page 15
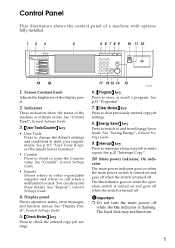
...Modes} key Press to clear previously entered copy job settings. 8. {Energy Saver} key Press to switch to store or recall a program. Important ❒ Do not turn the main power off . Control Panel This illustration shows the control panel of the display panel. 2. See p.115 "User Tools (Copier/Document Server Features)". • Counter Press to check or print the Counter value. Display panel Shows operation status, error messages, and function menus. Screen Contrast knob Adjusts the brightness of a machine with options fully installed. 1. See "Inquiry", General Settings Guide...
...Modes} key Press to clear previously entered copy job settings. 8. {Energy Saver} key Press to switch to store or recall a program. Important ❒ Do not turn the main power off . Control Panel This illustration shows the control panel of the display panel. 2. See p.115 "User Tools (Copier/Document Server Features)". • Counter Press to check or print the Counter value. Display panel Shows operation status, error messages, and function menus. Screen Contrast knob Adjusts the brightness of a machine with options fully installed. 1. See "Inquiry", General Settings Guide...
Operating Instructions
Page 26
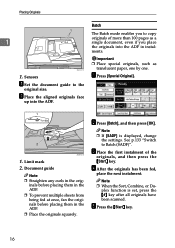
B Place the aligned originals face up into the ADF in instal- C Place the first instalment of more than 100 pages as translucent paper, one by one. plex function is displayed, change the settings. Limit mark 2. Note ❒ If [SADF] is set, press the {#} key after all originals have been scanned. D After the originals has been fed, place the next instalment. Sensors A Set the document guide to Batch (SADF...
B Place the aligned originals face up into the ADF in instal- C Place the first instalment of more than 100 pages as translucent paper, one by one. plex function is displayed, change the settings. Limit mark 2. Note ❒ If [SADF] is set, press the {#} key after all originals have been scanned. D After the originals has been fed, place the next instalment. Sensors A Set the document guide to Batch (SADF...
Operating Instructions
Page 83
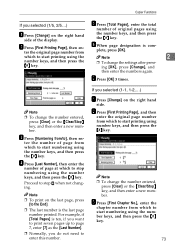
... change the number entered, press [Clear] or the {Clear/Stop} key, and then enter a new number. C Press [Numbering from F When page designation is the last page number printed. B Press [First Printing Page], and then enter the original page number from which to start numbering using the number keys, and then press the {#} key. G Press [OK] 3 times. ter the number of page from which to start printing using number keys, and then press the {#} key. Proceed to start printing using the Note 2 number keys, and then press the {#} key. ❒ To change the settings...
... change the number entered, press [Clear] or the {Clear/Stop} key, and then enter a new number. C Press [Numbering from F When page designation is the last page number printed. B Press [First Printing Page], and then enter the original page number from which to start numbering using the number keys, and then press the {#} key. G Press [OK] 3 times. ter the number of page from which to start printing using number keys, and then press the {#} key. Proceed to start printing using the Note 2 number keys, and then press the {#} key. ❒ To change the settings...
Operating Instructions
Page 101
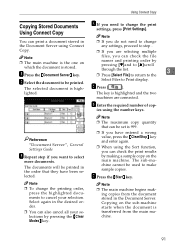
... high- Note ❒ The maximum copy quantity that can print a document stored in the order that they have entered a wrong value, press the {Clear/Stop} key and enter again. ❒ When using the Sort function, you can also cancel all your selection. G Press the {Start} key. Select Files to make sample copies. lighted. Using Connect Copy Copying Stored Documents Using Connect Copy D If you do not need to change the print settings, press [Print Settings]. Note You can be used to Print display.
... high- Note ❒ The maximum copy quantity that can print a document stored in the order that they have entered a wrong value, press the {Clear/Stop} key and enter again. ❒ When using the Sort function, you can also cancel all your selection. G Press the {Start} key. Select Files to make sample copies. lighted. Using Connect Copy Copying Stored Documents Using Connect Copy D If you do not need to change the print settings, press [Print Settings]. Note You can be used to Print display.
Operating Instructions
Page 107
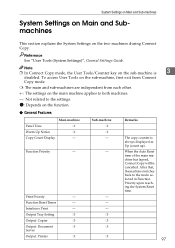
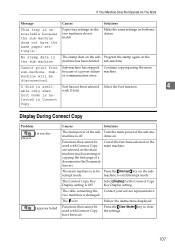
... machine has lapsed, Connect Copy will be cancelled. Note ❒ In Connect Copy mode, the User Tools/Counter key on the two machines during Connect Copy. After that, the machine switches back to the settings. $: Depends on the main machine applies to both machines. -: Not related to the mode selected in Function Priority upon reaching the System Reset time. 97 Output Tray Setting ❍ ❍ Output: Copier ❍ ❍ Output: Document ❍ ❍ Server Output: Printer ❍ ❍ Remarks The copy counter is 3 disabled. To access User...
... machine has lapsed, Connect Copy will be cancelled. Note ❒ In Connect Copy mode, the User Tools/Counter key on the two machines during Connect Copy. After that, the machine switches back to the settings. $: Depends on the main machine applies to both machines. -: Not related to the mode selected in Function Priority upon reaching the System Reset time. 97 Output Tray Setting ❍ ❍ Output: Copier ❍ ❍ Output: Document ❍ ❍ Server Output: Printer ❍ ❍ Remarks The copy counter is 3 disabled. To access User...

Operating Instructions
Page 108
...the same paper tray settings. The bypass tray can only be used with the same size, orientation and paper type of paper can be used in Connect Copy mode. Only paper trays with the Covers and Chapter functions. 98 Connect Copy Main machine ADF Original Table ❍ Elevation Job List Display Time ❍ Z-fold Position ❍ Sub-machine - - ❍ ❖ Tray Paper Settings 3 Main machine Paper Tray Priority: ❍ Copier Paper Tray Priority: ❍ Printer Tray Paper Size: Tray 2 ❍ Tray Paper Size: Tray 3 ❍ Sub-machine ❍ ❍...
...the same paper tray settings. The bypass tray can only be used with the same size, orientation and paper type of paper can be used in Connect Copy mode. Only paper trays with the Covers and Chapter functions. 98 Connect Copy Main machine ADF Original Table ❍ Elevation Job List Display Time ❍ Z-fold Position ❍ Sub-machine - - ❍ ❖ Tray Paper Settings 3 Main machine Paper Tray Priority: ❍ Copier Paper Tray Priority: ❍ Printer Tray Paper Size: Tray 2 ❍ Tray Paper Size: Tray 3 ❍ Sub-machine ❍ ❍...
Operating Instructions
Page 110
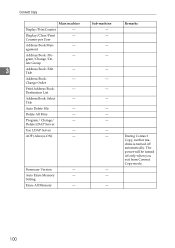
Counter per User Address Book Man- - lete Group 3 Address Book: Edit Title - Delete LDAP Server Use LDAP Server - AOF (Always ON) - Address Book: - Delete All Files - Display/Clear/Print - Auto Erase Memory - - Title Auto Delete File - Remarks During Connect Copy, neither machine is turned off only when you exit from Connect Copy mode. 100 Program/ Change/ - Setting Erase All Memory - - Change Order Print Address Book: - agement Address Book: Pro- - gram/Change/De- The power will be turned off automatically. Connect Copy ...
Counter per User Address Book Man- - lete Group 3 Address Book: Edit Title - Delete LDAP Server Use LDAP Server - AOF (Always ON) - Address Book: - Delete All Files - Display/Clear/Print - Auto Erase Memory - - Title Auto Delete File - Remarks During Connect Copy, neither machine is turned off only when you exit from Connect Copy mode. 100 Program/ Change/ - Setting Erase All Memory - - Change Order Print Address Book: - agement Address Book: Pro- - gram/Change/De- The power will be turned off automatically. Connect Copy ...
Operating Instructions
Page 117
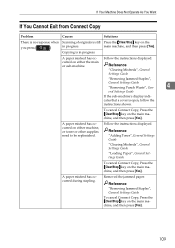
.... Turn the main power of the sub- Cancel the functions selected on the sub- Press the {Interrupt} key on the main machine. terrupt mode. The cable connecting the Contact your service representative. The L is se- Functions that cannot be used with Connect Copy are selected on both machines. or communication error. lected in In- chine on the two machines do not match. The Connect Copy Key Display setting is avail- Follow the instructions displayed. Paper tray settings...
.... Turn the main power of the sub- Cancel the functions selected on the sub- Press the {Interrupt} key on the main machine. terrupt mode. The cable connecting the Contact your service representative. The L is se- Functions that cannot be used with Connect Copy are selected on both machines. or communication error. lected in In- chine on the two machines do not match. The Connect Copy Key Display setting is avail- Follow the instructions displayed. Paper tray settings...
Operating Instructions
Page 119
... sub-machine. Reference "Adding Toner", General Settings Guide "Clearing Misfeeds", General Settings Guide "Loading Paper", General Settings Guide To cancel Connect Copy, Press the {Clear/Stop} key on the main machine, and then press [Yes]. 109 Removed the jammed paper. Follow the instructions displayed. A paper misfeed has occurred during stapling. Reference "Clearing Misfeeds", General Settings Guide "Removing Jammed Staples", General Settings Guide "Removing Punch Waste", Gen- 4 eral Settings Guide If the sub-machine's display indicates that a cover is open, follow...
... sub-machine. Reference "Adding Toner", General Settings Guide "Clearing Misfeeds", General Settings Guide "Loading Paper", General Settings Guide To cancel Connect Copy, Press the {Clear/Stop} key on the main machine, and then press [Yes]. 109 Removed the jammed paper. Follow the instructions displayed. A paper misfeed has occurred during stapling. Reference "Clearing Misfeeds", General Settings Guide "Removing Jammed Staples", General Settings Guide "Removing Punch Waste", Gen- 4 eral Settings Guide If the sub-machine's display indicates that a cover is open, follow...
Operating Instructions
Page 122
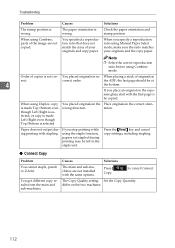
... The main and sub-machines are not copied. differ on the expo- When using Combine mode. When using the staple function, papers not stapled during printing may be left in the staple unit. You get different copy results from the main and sub-machines. using Combine, parts of originals in the wrong direction. Press the {Reset} key and cancel copy settings, including stapling. ❖ Connect Copy Problem You cannot staple, punch...
... The main and sub-machines are not copied. differ on the expo- When using Combine mode. When using the staple function, papers not stapled during printing may be left in the staple unit. You get different copy results from the main and sub-machines. using Combine, parts of originals in the wrong direction. Press the {Reset} key and cancel copy settings, including stapling. ❖ Connect Copy Problem You cannot staple, punch...
Operating Instructions
Page 135
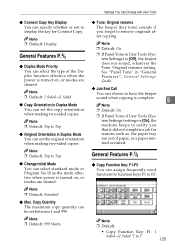
... paper tray ran out of paper, or a paper misfeed occurred. See "Panel Tone" in Duplex Mode You can select the type of the Duplex function effective when the power is turned on , or modes are cleared. Note ❒ Default: Display General Features P.2/5 ❖ Duplex Mode Priority You can set between 1 and 999. Copy Quantity The maximum copy quantity can assign frequently used functions to function keys F1 to F5. Settings You Can Change with User Tools ❖ Connect Copy Key Display You...
... paper tray ran out of paper, or a paper misfeed occurred. See "Panel Tone" in Duplex Mode You can select the type of the Duplex function effective when the power is turned on , or modes are cleared. Note ❒ Default: Display General Features P.2/5 ❖ Duplex Mode Priority You can set between 1 and 999. Copy Quantity The maximum copy quantity can assign frequently used functions to function keys F1 to F5. Settings You Can Change with User Tools ❖ Connect Copy Key Display You...
Operating Instructions
Page 164
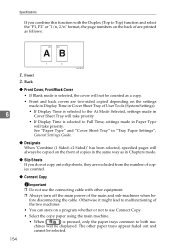
... two machines. • You can store on a program whether or not to use the connecting cable with the Duplex (Top to Top) function and select the "P1, P2" or "1/n, 2/n" format, the page numbers on the back of are two-sided copied depending on the settings made in Display Time in Cover Sheet Tray of User Tools (System Settings). 6 • If Display Time is selected to the At Mode Selected, settings made in Cover Sheet Tray will...
... two machines. • You can store on a program whether or not to use the connecting cable with the Duplex (Top to Top) function and select the "P1, P2" or "1/n, 2/n" format, the page numbers on the back of are two-sided copied depending on the settings made in Display Time in Cover Sheet Tray of User Tools (System Settings). 6 • If Display Time is selected to the At Mode Selected, settings made in Cover Sheet Tray will...
Operating Instructions
Page 165
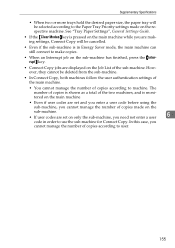
... sub-machine has finished, press the {Interrupt} key. • Connect Copy jobs are set and you enter a user code before using the sub-machine, you cannot manage the number of copies made on the respective machine. See "Tray Paper Settings", General Settings Guide. • If the {Clear Modes} key is pressed on the main machine while you are making settings, Connect Copy will be selected according to the Paper Tray Priority settings made on the sub-machine. • If user codes are displayed on...
... sub-machine has finished, press the {Interrupt} key. • Connect Copy jobs are set and you enter a user code before using the sub-machine, you cannot manage the number of copies made on the respective machine. See "Tray Paper Settings", General Settings Guide. • If the {Clear Modes} key is pressed on the main machine while you are making settings, Connect Copy will be selected according to the Paper Tray Priority settings made on the sub-machine. • If user codes are displayed on...
Quick Start Guide
Page 5
...; card has already been installed by an authorized Ricoh service technician. • These installation instructions also assume that you have been reported problems with installation of the Technesis Java application when GlobalScan has already been installed. Network settings of 50 Technesis Ricoh Java Application Please verify these settings with the Configuration - Technesis®, Inc. Technesis®, Inc. These settings can be enabled for copy and fax functions. Page 5 of the device. •...
...; card has already been installed by an authorized Ricoh service technician. • These installation instructions also assume that you have been reported problems with installation of the Technesis Java application when GlobalScan has already been installed. Network settings of 50 Technesis Ricoh Java Application Please verify these settings with the Configuration - Technesis®, Inc. Technesis®, Inc. These settings can be enabled for copy and fax functions. Page 5 of the device. •...
Quick Start Guide
Page 6
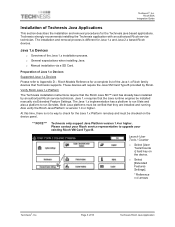
.... Ricoh Models Reference for Java 1.x and Java 2.x based Ricoh devices. Java 1.x requires that Technesis supports. Please contact your existing Ricoh VM Card Type B. Page 6 of Java 1.x Devices Supported Java 1.x Devices Please refer to check for the Technesis java based applications. The Java 1.x implementation has a platform to run Xlets and also a platform to upgrade your Ricoh service representative to run Servlets. Launch User Tools / Counter o Select [User Tools/Counte r] hard key on the device panel...
.... Ricoh Models Reference for Java 1.x and Java 2.x based Ricoh devices. Java 1.x requires that Technesis supports. Please contact your existing Ricoh VM Card Type B. Page 6 of Java 1.x Devices Supported Java 1.x Devices Please refer to check for the Technesis java based applications. The Java 1.x implementation has a platform to run Xlets and also a platform to upgrade your Ricoh service representative to run Servlets. Launch User Tools / Counter o Select [User Tools/Counte r] hard key on the device panel...
Quick Start Guide
Page 16
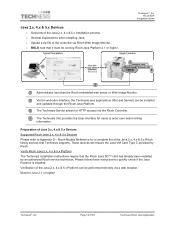
... the Ricoh Java SD™ card has already been installed by Ricoh. Please follow these instructions to enter user and/or billing information. Must be performed remotely via Ricoh Web Image Monitor. Java 2.x, 4.x & 5.x Devices o Overview of 50 Technesis Ricoh Java Application Ricoh ESA Integration Guide Administrator launches the Ricoh embedded web server or Web Image Monitor. The Technesis Xlet provides the User Interface for users to quickly check if the Java Runtime is installed. Page 16...
... the Ricoh Java SD™ card has already been installed by Ricoh. Please follow these instructions to enter user and/or billing information. Must be performed remotely via Ricoh Web Image Monitor. Java 2.x, 4.x & 5.x Devices o Overview of 50 Technesis Ricoh Java Application Ricoh ESA Integration Guide Administrator launches the Ricoh embedded web server or Web Image Monitor. The Technesis Xlet provides the User Interface for users to quickly check if the Java Runtime is installed. Page 16...

Quick Start Guide
Page 46
.... A Ricoh Service Technician must be changed to not prompt the user for your environment: o Copier/Document Server Auto Reset Timer o Printer Auto Reset Timer o Scanner Auto Reset Timer Appendix B - Technesis®, Inc. This enables access to save the setting. without manually logging out of 50 Technesis Ricoh Java Application Switch Method) When the Ricoh Java Platform is assigned to supply a valid user login. Ricoh ESA Integration Guide Appendix Appendix A - If users walk away from the device without having to a specific function key...
.... A Ricoh Service Technician must be changed to not prompt the user for your environment: o Copier/Document Server Auto Reset Timer o Printer Auto Reset Timer o Scanner Auto Reset Timer Appendix B - Technesis®, Inc. This enables access to save the setting. without manually logging out of 50 Technesis Ricoh Java Application Switch Method) When the Ricoh Java Platform is assigned to supply a valid user login. Ricoh ESA Integration Guide Appendix Appendix A - If users walk away from the device without having to a specific function key...


