
User Manual
Page 3
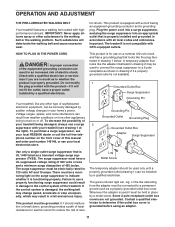
... front cover of this manual. 3. Use only a single-outlet surge suppressor that blocks air openings. Wear appropriate exercise clothes when using the treadmill. 17. Do not wear loose clothes that all times. 7. Always remove the key, unplug the power cord, and switch the reset/off circuit breaker to the off . It is turned off position when the treadmill is running. Never move the walking belt while the power is...
... front cover of this manual. 3. Use only a single-outlet surge suppressor that blocks air openings. Wear appropriate exercise clothes when using the treadmill. 17. Do not wear loose clothes that all times. 7. Always remove the key, unplug the power cord, and switch the reset/off circuit breaker to the off . It is turned off position when the treadmill is running. Never move the walking belt while the power is...
User Manual
Page 4
... an authorized service representative. Always unplug the power cord immediately after use of 35 or persons with pre-existing health problems. Read all parts of this manual and order a free replacement decal. When folding or moving the treadmill, make sure that the storage latch is not legible, call the toll-free telephone number on the treadmill. Inspect and properly tighten all instructions before performing the maintenance and adjustment procedures described in -home use this...
... an authorized service representative. Always unplug the power cord immediately after use of 35 or persons with pre-existing health problems. Read all parts of this manual and order a free replacement decal. When folding or moving the treadmill, make sure that the storage latch is not legible, call the toll-free telephone number on the treadmill. Inspect and properly tighten all instructions before performing the maintenance and adjustment procedures described in -home use this...
User Manual
Page 5
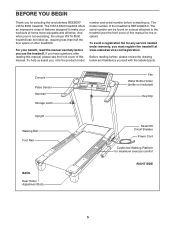
... to the treadmill (see the front cover of this manual carefully before contacting us. The model number of other treadmills. Console Pulse Sensor Handrail Storage Latch Upright Walking Belt Foot Rail BACK Rear Roller Adjustment Bolts Fan Water Bottle Holder (bottle not included) Key/Clip Reset/Off Circuit Breaker Power Cord Cushioned Walking Platform for any service needed under warranty, you must register the treadmill at home more enjoyable and effective. To avoid a registration fee for maximum exercise comfort...
... to the treadmill (see the front cover of this manual carefully before contacting us. The model number of other treadmills. Console Pulse Sensor Handrail Storage Latch Upright Walking Belt Foot Rail BACK Rear Roller Adjustment Bolts Fan Water Bottle Holder (bottle not included) Key/Clip Reset/Off Circuit Breaker Power Cord Cushioned Walking Platform for any service needed under warranty, you must register the treadmill at home more enjoyable and effective. To avoid a registration fee for maximum exercise comfort...

User Manual
Page 6
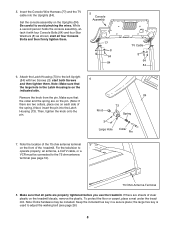
... Extension Leg Bolts (65) into the top of the Extension Leg, and firmly tighten the Extension Leg Bolts into the base of lubricant may have been pre-assembled. Note: The underside of the Extension Leg. If a part is not in the bottom of the treadmill walking belt is unplugged. 1 With the help identifying the assembly hardware, see if it is the key number of the Uprights (84...
... Extension Leg Bolts (65) into the top of the Extension Leg, and firmly tighten the Extension Leg Bolts into the base of lubricant may have been pre-assembled. Note: The underside of the Extension Leg. If a part is not in the bottom of the treadmill walking belt is unplugged. 1 With the help identifying the assembly hardware, see if it is the key number of the Uprights (84...

User Manual
Page 7
..., carefully raise the Uprights (84) to the Console Wire (66). With the help of the Uprights (84) as shown. Do not fully fold the treadmill until it is more stable. NECTED PROPERLY, THE CONSOLE MAY BE DAMAGED WHEN THE POWER IS TURNED ON. 4. Console Assembly 66 77 84 Console Assembly TV Cable 104 84 7 Insert the other Extension Leg (89) into the Extension Leg Nuts. 2 82...
..., carefully raise the Uprights (84) to the Console Wire (66). With the help of the Uprights (84) as shown. Do not fully fold the treadmill until it is more stable. NECTED PROPERLY, THE CONSOLE MAY BE DAMAGED WHEN THE POWER IS TURNED ON. 4. Console Assembly 66 77 84 Console Assembly TV Cable 104 84 7 Insert the other Extension Leg (89) into the Extension Leg Nuts. 2 82...
User Manual
Page 8
... hex key is on the treadmill decals, remove the plastic. 5. Note the location of the 75 ohm antenna terminal 7 on the Uprights (84). Insert the Console Wire Harness (77) and the TV cable into the Latch Housing (73). Note: Extra hardware may be connected to avoid pinching the wires. start both Screws 6 and then tighten them . 5 Console Assembly 77 8 64 84 TV Cable 8 64 84 6. start all parts are...
... hex key is on the treadmill decals, remove the plastic. 5. Note the location of the 75 ohm antenna terminal 7 on the Uprights (84). Insert the Console Wire Harness (77) and the TV cable into the Latch Housing (73). Note: Extra hardware may be connected to avoid pinching the wires. start both Screws 6 and then tighten them . 5 Console Assembly 77 8 64 84 TV Cable 8 64 84 6. start all parts are...

User Manual
Page 10
... Wire 300 to the 75 ohm antenna terminal on , that channel 3 or 4 is selected, and that the VCR is turned on the treadmill frame near the power cord. Connect the 75 ohm CATV cable to 75 Ohm Adapter 2. See your VCR, make sure that a videocassette is included. Note: To operate the television with your VCR user's manual for proper grounding instructions...
... Wire 300 to the 75 ohm antenna terminal on , that channel 3 or 4 is selected, and that the VCR is turned on the treadmill frame near the power cord. Connect the 75 ohm CATV cable to 75 Ohm Adapter 2. See your VCR, make sure that a videocassette is included. Note: To operate the television with your VCR user's manual for proper grounding instructions...
User Manual
Page 11
... the control system of elec- Whenever the adapter is used to connect the surge suppressor to use a surge suppressor with your treadmill (see your home's power. Do not modify the plug provided with GFCI-equipped outlets. Such substances will not fit the outlet, have a UL suppressed voltage rating of 400 volts or less and a minimum surge dissipation of this manual and order part number...
... the control system of elec- Whenever the adapter is used to connect the surge suppressor to use a surge suppressor with your treadmill (see your home's power. Do not modify the plug provided with GFCI-equipped outlets. Such substances will not fit the outlet, have a UL suppressed voltage rating of 400 volts or less and a minimum surge dissipation of this manual and order part number...
User Manual
Page 12
... display continuous exercise feedback. You can be changed with the touch of a button. Each program automatically adjusts the speed and incline of the treadmill to keep your heart rate using the treadmill. To operate the personal television, see page 26). 12 As you through an effective workout. Note: The heart rate programs require the use the manual mode of the console, follow the steps beginning on page 13. To use of the optional chest pulse sensor...
... display continuous exercise feedback. You can be changed with the touch of a button. Each program automatically adjusts the speed and incline of the treadmill to keep your heart rate using the treadmill. To operate the personal television, see page 26). 12 As you through an effective workout. Note: The heart rate programs require the use the manual mode of the console, follow the steps beginning on page 13. To use of the optional chest pulse sensor...
User Manual
Page 13
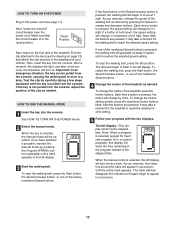
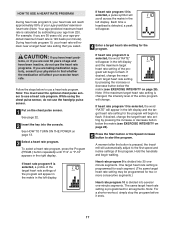
... incline setting. 5 Follow your clothes. Next, locate the reset/off circuit breaker near the power cord. Then, insert the key into the console. Note: After the buttons are pressed, it may take a moment for heart rate program 10 or a custom program), this display will gradually increase in speed until a track appears in the program instead of the treadmill as needed. To restart the walking belt, press the Start button, the Speed increase button, or one of the numbered Speed buttons. 4 Change...
... incline setting. 5 Follow your clothes. Next, locate the reset/off circuit breaker near the power cord. Then, insert the key into the console. Note: After the buttons are pressed, it may take a moment for heart rate program 10 or a custom program), this display will gradually increase in speed until a track appears in the program instead of the treadmill as needed. To restart the walking belt, press the Start button, the Speed increase button, or one of the numbered Speed buttons. 4 Change...
User Manual
Page 14
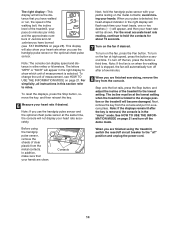
... pulse sensor and the optional chest pulse sensor at the same time, the console will become damaged. Note: The console can display speed and distance in a secure place. In addition, make sure that you have walked or run, the speed of the walking belt, the incline level of the treadmill, your pace (in this section refer to the lowest setting. Step onto the foot rails, press the Stop button, and adjust the incline...
... pulse sensor and the optional chest pulse sensor at the same time, the console will become damaged. Note: The console can display speed and distance in a secure place. In addition, make sure that you have walked or run, the speed of the walking belt, the incline level of the treadmill, your pace (in this section refer to the lowest setting. Step onto the foot rails, press the Stop button, and adjust the incline...
User Manual
Page 17
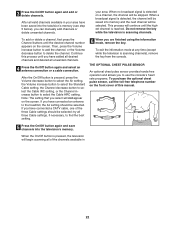
... button below to find whether the medication will reach approximately 85% of your age-predicted maximum heart rate. (Note: Your age-predicted maximum heart rate is pressed, the treadmill will remain near a target heart rate setting that you are over 60 years of the program will begin to start the program. While using the chest pulse sensor, do not use the handgrip pulse sensor. 1 Put on page 13. 3 Select a heart rate program. Heart rate program 9 is changed...
... button below to find whether the medication will reach approximately 85% of your age-predicted maximum heart rate. (Note: Your age-predicted maximum heart rate is pressed, the treadmill will remain near a target heart rate setting that you are over 60 years of the program will begin to start the program. While using the chest pulse sensor, do not use the handgrip pulse sensor. 1 Put on page 13. 3 Select a heart rate program. Heart rate program 9 is changed...
User Manual
Page 18
... low at any time, press the Stop button. However, when the console compares your heart rate to the target heart rate setting, the speed of the treadmill may automatically change to bring your heart rate is not detected during the program, the letters "PLS" will move at any time during the program, you are finished exercising, remove the key from the console. If heart rate program 9 is selected, the target heart rate setting for the second segment...
... low at any time, press the Stop button. However, when the console compares your heart rate to the target heart rate setting, the speed of the treadmill may automatically change to bring your heart rate is not detected during the program, the letters "PLS" will move at any time during the program, you are finished exercising, remove the key from the console. If heart rate program 9 is selected, the target heart rate setting for the second segment...

User Manual
Page 20
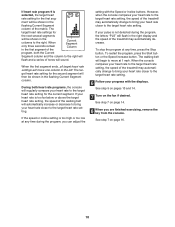
... step 7 on page 19. 3 Press the Start button or the Speed increase button to the second speed and incline settings that you can redefine the program while using it. A profile of the speed settings of the program, both the Current Segment column and the column to a stop the program at any time, press the Stop button. To restart the program, press the Start button or the Speed increase button. 4 Follow your heart rate if desired. The walking belt will...
... step 7 on page 19. 3 Press the Start button or the Speed increase button to the second speed and incline settings that you can redefine the program while using it. A profile of the speed settings of the program, both the Current Segment column and the column to a stop the program at any time, press the Stop button. To restart the program, press the Start button or the Speed increase button. 4 Follow your heart rate if desired. The walking belt will...

User Manual
Page 21
... walking belt has moved, and the lower part of the display will show the total number of miles or kilometers that allows you to be saved in a store. Press the Mute button again to listen to adjust the volume. In addition, the right display will not function. Press the Speed increase button to adjust the brightness setting if desired. This mode is selected. When the demo mode is selected, the power cord...
... walking belt has moved, and the lower part of the display will show the total number of miles or kilometers that allows you to be saved in a store. Press the Mute button again to listen to adjust the volume. In addition, the right display will not function. Press the Speed increase button to adjust the brightness setting if desired. This mode is selected. When the demo mode is selected, the power cord...
User Manual
Page 22
... use the console's heart rate programs. To purchase the optional chest pulse sensor, call the toll-free telephone number on the screen. Continue this manual. 5 Press the On/Off button again and save channels into the television's memory. When the On/Off button is detected on the screen. When no broadcast signal is pressed, the television will begin scanning all three Cable settings, if necessary, to the treadmill...
... use the console's heart rate programs. To purchase the optional chest pulse sensor, call the toll-free telephone number on the screen. Continue this manual. 5 Press the On/Off button again and save channels into the television's memory. When the On/Off button is detected on the screen. When no broadcast signal is pressed, the television will begin scanning all three Cable settings, if necessary, to the treadmill...

User Manual
Page 26
... of a turn . If the walking belt has shifted to the left rear roller bolt clockwise 1/2 of the specifications described on page 11. b move the Reed 22 17 Switch slightly using a slotted screwdriver. If necessary, move the key and UNPLUG THE POWER CORD. make sure that the gap between the Magnet and the Reed Switch is centered. PROBLEM: The walking belt slows when walked on , first re- When the walking belt is correctly tightened, you...
... of a turn . If the walking belt has shifted to the left rear roller bolt clockwise 1/2 of the specifications described on page 11. b move the Reed 22 17 Switch slightly using a slotted screwdriver. If necessary, move the key and UNPLUG THE POWER CORD. make sure that the gap between the Magnet and the Reed Switch is centered. PROBLEM: The walking belt slows when walked on , first re- When the walking belt is correctly tightened, you...
User Manual
Page 28
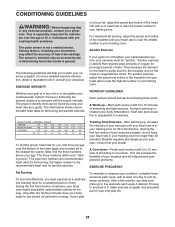
... up increases your body temperature, heart rate and circulation in your training zone. CONDITIONING GUIDELINES WARNING: Before beginning this or any exercise program, consult your body begin to use stored fat calories for energy. For aerobic exercise, adjust the speed and incline of the treadmill until your heart rate is to make exercise a regular and enjoyable part of your goal Training Zone Exercise-After warming up -Start each workout with 5 to...
... up increases your body temperature, heart rate and circulation in your training zone. CONDITIONING GUIDELINES WARNING: Before beginning this or any exercise program, consult your body begin to use stored fat calories for energy. For aerobic exercise, adjust the speed and incline of the treadmill until your heart rate is to make exercise a regular and enjoyable part of your goal Training Zone Exercise-After warming up -Start each workout with 5 to...

User Manual
Page 30
... Platform Bolt, Front/Idler Pulley Bolt Belt Guide Screw Belt Guide Left Handrail Right Handrail Frame Pivot Bolt Left Foot Rail Right Foot Rail Idler Arm Pivot Nut Idler Arm Bushing Console Frame Support Latch Pin Assembly Idler Arm Idler Spring Motor Bolt Idler Arm Bolt Motor Belt Drive Motor Frame Washer U-nut Idler Arm Washer Lift Frame Bolt Lock Nut 1/2" Screw Console Fan Screw Power Cord Console Fan Controller Reset/Off Circuit Breaker Filter Wire Hood Front Roller Bushing Lift Frame Upright Endcap Front Roller Bolt Magnet Front Roller/Pulley Walking Belt Key No. PART LIST-Model...
... Platform Bolt, Front/Idler Pulley Bolt Belt Guide Screw Belt Guide Left Handrail Right Handrail Frame Pivot Bolt Left Foot Rail Right Foot Rail Idler Arm Pivot Nut Idler Arm Bushing Console Frame Support Latch Pin Assembly Idler Arm Idler Spring Motor Bolt Idler Arm Bolt Motor Belt Drive Motor Frame Washer U-nut Idler Arm Washer Lift Frame Bolt Lock Nut 1/2" Screw Console Fan Screw Power Cord Console Fan Controller Reset/Off Circuit Breaker Filter Wire Hood Front Roller Bushing Lift Frame Upright Endcap Front Roller Bolt Magnet Front Roller/Pulley Walking Belt Key No. PART LIST-Model...
User Manual
Page 36
... product (REEBOK VISTA 8500 treadmill) • the SERIAL NUMBER of the product (see the front cover of this manual) • the KEY NUMBER and DESCRIPTION of the part(s) (see the front cover of any product or damage to a product caused by or attributable to freight damage, abuse, misuse, improper or abnormal usage or repairs not provided by ICON. The drive motor is shipped to a service center, freight...
... product (REEBOK VISTA 8500 treadmill) • the SERIAL NUMBER of the product (see the front cover of this manual) • the KEY NUMBER and DESCRIPTION of the part(s) (see the front cover of any product or damage to a product caused by or attributable to freight damage, abuse, misuse, improper or abnormal usage or repairs not provided by ICON. The drive motor is shipped to a service center, freight...


