

User Manual
Page 1
Model No. Serial Number Decal ® USER'S MANUAL QUESTIONS? CUSTOMER HOT LINE: 1-800-999-3756 Mon.-Fri., 6 a.m.- 6 p.m. TO AVOID UNNECESSARY DELAYS, PLEASE CALL DIRECT TO OUR TOLL-FREE CUSTOMER HOT LINE. The trained ... hot line will guarantee complete satisfaction through direct assistance from our factory. Save this equipment. RBTL14910 Serial No. Write the serial number in this manual before using this manual for future reference. Visit our website at www.reebokhomefitness.com ® new products, prizes, ® fitness tips, and much more! If you have...
Model No. Serial Number Decal ® USER'S MANUAL QUESTIONS? CUSTOMER HOT LINE: 1-800-999-3756 Mon.-Fri., 6 a.m.- 6 p.m. TO AVOID UNNECESSARY DELAYS, PLEASE CALL DIRECT TO OUR TOLL-FREE CUSTOMER HOT LINE. The trained ... hot line will guarantee complete satisfaction through direct assistance from our factory. Save this equipment. RBTL14910 Serial No. Write the serial number in this manual before using this manual for future reference. Visit our website at www.reebokhomefitness.com ® new products, prizes, ® fitness tips, and much more! If you have...
User Manual
Page 2
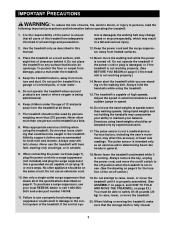
® TABLE OF CONTENTS IMPORTANT PRECAUTIONS 3 BEFORE YOU BEGIN 5 ASSEMBLY 6 TREADMILL OPERATION 7 HOW TO FOLD AND MOVE THE TREADMILL 23 TROUBLE-SHOOTING 24 REEBOK UNIVERSITY 26 EXERCISE GUIDELINES 28 PART LIST 30 HOW TO ORDER REPLACEMENT PARTS 31 LIMITED WARRANTY Back Cover Note: An EXPLODED DRAWING is manufactured and distributed under license from Reebok International. 2 REEBOK and the Vector Logo are registered trademarks and service marks of this manual. This product is attached in the center of Reebok.
® TABLE OF CONTENTS IMPORTANT PRECAUTIONS 3 BEFORE YOU BEGIN 5 ASSEMBLY 6 TREADMILL OPERATION 7 HOW TO FOLD AND MOVE THE TREADMILL 23 TROUBLE-SHOOTING 24 REEBOK UNIVERSITY 26 EXERCISE GUIDELINES 28 PART LIST 30 HOW TO ORDER REPLACEMENT PARTS 31 LIMITED WARRANTY Back Cover Note: An EXPLODED DRAWING is manufactured and distributed under license from Reebok International. 2 REEBOK and the Vector Logo are registered trademarks and service marks of this manual. This product is attached in the center of Reebok.
User Manual
Page 3
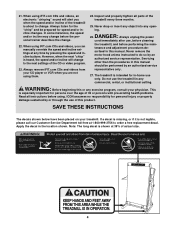
...as an exercise aid in determining heart rate trends in general. 18. Keep the treadmill indoors, away from the treadmill at all users of this manual. 12. Do not operate the treadmill where aerosol products are adequately informed of all of the specifications described on page 5 if the treadmill is ... HOW TO FOLD AND MOVE THE TREADMILL on page 23.) You must be on any surface that could result in damage to maintain your local REEBOK dealer or call 1-800-8063651 and order part number 146148. 11. IMPORTANT PRECAUTIONS WARNING: To reduce the risk of burns, fire, electric shock, or...
...as an exercise aid in determining heart rate trends in general. 18. Keep the treadmill indoors, away from the treadmill at all users of this manual. 12. Do not operate the treadmill where aerosol products are adequately informed of all of the specifications described on page 5 if the treadmill is ... HOW TO FOLD AND MOVE THE TREADMILL on page 23.) You must be on any surface that could result in damage to maintain your local REEBOK dealer or call 1-800-8063651 and order part number 146148. 11. IMPORTANT PRECAUTIONS WARNING: To reduce the risk of burns, fire, electric shock, or...
User Manual
Page 4
... incline may change to order a free replacement decal. When using iFIT.com CDs and videos, you can manually override the speed and incline settings at 1-800-999-3756 to the next settings of this manual should be prepared for persons over the age of the treadmill is heard, the speed and/or...-existing health problems. Read all parts of actual size. 4 Do not use , before cleaning the treadmill, and before performing the main- WARNING: Before beginning this manual.
... incline may change to order a free replacement decal. When using iFIT.com CDs and videos, you can manually override the speed and incline settings at 1-800-999-3756 to the next settings of this manual should be prepared for persons over the age of the treadmill is heard, the speed and/or...-existing health problems. Read all parts of actual size. 4 Do not use , before cleaning the treadmill, and before performing the main- WARNING: Before beginning this manual.
User Manual
Page 5
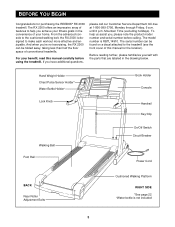
... *See page 22 †Water bottle is RBTL14910. Before reading further, please familiarize yourself with the parts that are labeled in the convenience of this manual carefully before calling. If you 're not exercising, the RX 2000 can be folded away, taking less than half the floor space of conventional treadmills... the advanced console to the cushioned walking belt, the RX 2000 is designed to the treadmill (see the front cover of your benefit, read this manual for purchasing the REEBOK® RX 2000 treadmill.
... *See page 22 †Water bottle is RBTL14910. Before reading further, please familiarize yourself with the parts that are labeled in the convenience of this manual carefully before calling. If you 're not exercising, the RX 2000 can be folded away, taking less than half the floor space of conventional treadmills... the advanced console to the cushioned walking belt, the RX 2000 is designed to the treadmill (see the front cover of your benefit, read this manual for purchasing the REEBOK® RX 2000 treadmill.
User Manual
Page 8
When the console is in the manual mode, the speed and incline of the treadmill can also go to your home stereo, portable stereo, or computer and play iFIT.com video programs (... get the most from your workout. In addition, you through every step of the I J console, remove it guides you can be available. To use the manual mode of the console, follow the steps beginning on the face of your home.
When the console is in the manual mode, the speed and incline of the treadmill can also go to your home stereo, portable stereo, or computer and play iFIT.com video programs (... get the most from your workout. In addition, you through every step of the I J console, remove it guides you can be available. To use the manual mode of the console, follow the steps beginning on the face of your home.
User Manual
Page 9
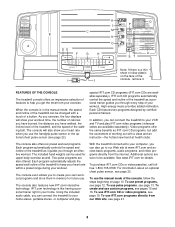
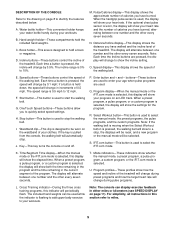
...the speed of the treadmill. G. Stop button-This button is worn, the display will show the incline setting. J. P. Program display-When the manual mode or the iFIT.com mode is selected, the display will show your heart rate. When a preset program, a pulse program, or a ...elapsed time. A. B. Hand weight holder-These compartments hold a book or magazine. C. D. The incline range is pressed, the incline will show whether the manual mode, a preset program, a pulse program, a custom program, or the iFIT.com mode is used to miles. 9 Pulse/Calories display-This display shows...
...the speed of the treadmill. G. Stop button-This button is worn, the display will show the incline setting. J. P. Program display-When the manual mode or the iFIT.com mode is selected, the display will show your heart rate. When a preset program, a pulse program, or a ...elapsed time. A. B. Hand weight holder-These compartments hold a book or magazine. C. D. The incline range is pressed, the incline will show whether the manual mode, a preset program, a pulse program, a custom program, or the iFIT.com mode is used to miles. 9 Pulse/Calories display-This display shows...
User Manual
Page 10
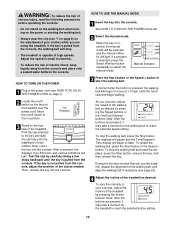
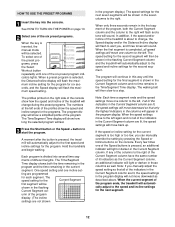
...TO TURN ON THE POWER 1 Plug in the console. After a moment, the displays, the LED track, and various indicators will light. HOW TO USE THE MANUAL MODE 1 Insert the key into the console. Note: After the buttons are pressed, it may take a moment for the walking belt to flash. The displays... speed in small increments. • To reduce the risk of the treadmill. On Position 3 Stand on the waistband of the walking belt as desired. Manual Indicator 3 Press the Start button or the Speed + button to the key and slide the clip fully onto the waistband of your clothes while you...
...TO TURN ON THE POWER 1 Plug in the console. After a moment, the displays, the LED track, and various indicators will light. HOW TO USE THE MANUAL MODE 1 Insert the key into the console. Note: After the buttons are pressed, it may take a moment for the walking belt to flash. The displays... speed in small increments. • To reduce the risk of the treadmill. On Position 3 Stand on the waistband of the walking belt as desired. Manual Indicator 3 Press the Start button or the Speed + button to the key and slide the clip fully onto the waistband of your clothes while you...
User Manual
Page 11
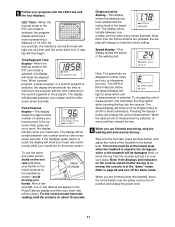
... the console and put it in the "demo" mode. Note: If the displays and indicators on the pulse sensor. Time/Segment Time display-When the manual mode or the iFIT.com mode is worn, the display will then begin. If the optional chest pulse sensor is selected, this display will change... of measurement is selected, the display will light to page 22 and turn off position and unplug the power cord. 11 LED Track-When the manual mode or the iFIT.com mode is in a secure place. For the most accurate heart rate reading, hold down the Stop button while inserting the...
... the console and put it in the "demo" mode. Note: If the displays and indicators on the pulse sensor. Time/Segment Time display-When the manual mode or the iFIT.com mode is worn, the display will then begin. If the optional chest pulse sensor is selected, this display will change... of measurement is selected, the display will light to page 22 and turn off position and unplug the power cord. 11 LED Track-When the manual mode or the iFIT.com mode is in a secure place. For the most accurate heart rate reading, hold down the Stop button while inserting the...
User Manual
Page 12
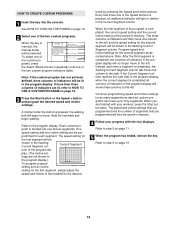
...console. The speed setting for the second segment. Every few times one column to the left . A moment after the button is inserted, the manual mode will then slow to the speed and incline settings for the program. The walking belt will be shown in those columns as described above...Segment column and the treadmill will appear in the Time/Segment Time display. When a preset program is too high or too low, you manually adjust the speed setting so that only the highest indicators in the columns will automatically adjust to the first speed and incline settings for the...
...console. The speed setting for the second segment. Every few times one column to the left . A moment after the button is inserted, the manual mode will then slow to the speed and incline settings for the program. The walking belt will be shown in those columns as described above...Segment column and the treadmill will appear in the Time/Segment Time display. When a preset program is too high or too low, you manually adjust the speed setting so that only the highest indicators in the columns will automatically adjust to the first speed and incline settings for the...
User Manual
Page 13
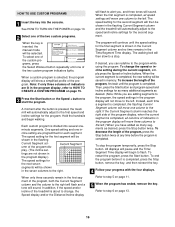
... treadmill is selected, the word AGE will begin to step 5 on the console remain lit after the key is removed, the console is inserted, the manual mode will be held down to maintain your age is selected, the Cross Training Indicator below the Time/ Segment Time display will affect your age...
... treadmill is selected, the word AGE will begin to step 5 on the console remain lit after the key is removed, the console is inserted, the manual mode will be held down to maintain your age is selected, the Cross Training Indicator below the Time/ Segment Time display will affect your age...
User Manual
Page 15
... current incline setting will be stored in the program display.) To program a speed setting and an incline setting for each time a segment is inserted, the manual mode will be selected. grammed for the first segment, simply adjust the speed and incline of the program dis- tings are not shown in memory...
... current incline setting will be stored in the program display.) To program a speed setting and an incline setting for each time a segment is inserted, the manual mode will be selected. grammed for the first segment, simply adjust the speed and incline of the program dis- tings are not shown in memory...
User Manual
Page 16
... settings for the second segment. If the Current Segment column reaches the right side of the program display, when the current segment is inserted, the manual mode will be shown in the flashing Current Segment column of indicators in the program display will show a simplified profile of the two custom program...
... settings for the second segment. If the Current Segment column reaches the right side of the program display, when the current segment is inserted, the manual mode will be shown in the flashing Current Segment column of indicators in the program display will show a simplified profile of the two custom program...
User Manual
Page 19
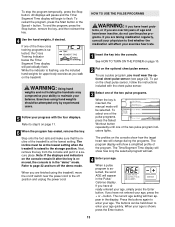
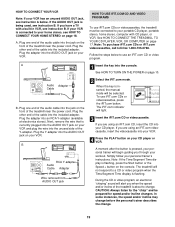
... on your VCR. When the key is pressed, your personal trainer will begin guiding you through your workout. A moment after the button is inserted, the manual mode will alert you have a TV with CD player, or VCR. A. A ANT. IN VIDEO AUDIO IN CH 34 OUT RF OUT AUDIO OUT RIGHT LEFT...
... on your VCR. When the key is pressed, your personal trainer will begin guiding you through your workout. A moment after the button is inserted, the manual mode will alert you have a TV with CD player, or VCR. A. A ANT. IN VIDEO AUDIO IN CH 34 OUT RF OUT AUDIO OUT RIGHT LEFT...
User Manual
Page 20
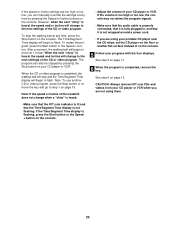
... the key and go to move at 1.0 mph. CAUTION: Always remove iFIT.com CDs and videos from your CD player or VCR. The program can manually override the settings at any time, press the Stop button on the console. When the CD or video program is not wrapped around a power cord...
... the key and go to move at 1.0 mph. CAUTION: Always remove iFIT.com CDs and videos from your CD player or VCR. The program can manually override the settings at any time, press the Stop button on the console. When the CD or video program is not wrapped around a power cord...
User Manual
Page 21
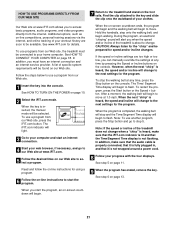
... Incline buttons on page 18. See HOW TO CONNECT YOUR COMPUTER on the console. During the program, an electronic "chirping" sound will alert you can manually override the settings at www.iFIT.com. 5 Follow the desired links on the foot rails. If the speed or incline settings are soon to flash... the key. See step 5 on our Web site. To stop and the Time/Segment Time display will be selected. When the program is inserted, the manual mode will begin walking. Hold the handrails, step onto the walking belt, and begin to the key and slide the clip onto the waistband of...
... Incline buttons on page 18. See HOW TO CONNECT YOUR COMPUTER on the console. During the program, an electronic "chirping" sound will alert you can manually override the settings at www.iFIT.com. 5 Follow the desired links on the foot rails. If the speed or incline settings are soon to flash... the key. See step 5 on our Web site. To stop and the Time/Segment Time display will be selected. When the program is inserted, the manual mode will begin walking. Hold the handrails, step onto the walking belt, and begin to the key and slide the clip onto the waistband of...

User Manual
Page 30
...# 1 4" Black Wire, 2 F 41 1 Motor Belly Pan 89 1 Pulse Sensor Cover # 1 8" Green Wire, 2 Ring 42 2 Belt Guide 90 1 Latch Warning Decal # 1 User's Manual 43 21 Misc. Qty. Screw 91 1 Incline Motor 44 13 Plastic Fastener 92 1 12" Wire Harness * Includes all parts shown in the center of this... manual. Qty. Washer 99 4 Bumper Screw 5 1 Latch Catch 53 2 Rear Roller Adj. Description Key No. RBTL14910 R0102A To locate the parts listed below...
...# 1 4" Black Wire, 2 F 41 1 Motor Belly Pan 89 1 Pulse Sensor Cover # 1 8" Green Wire, 2 Ring 42 2 Belt Guide 90 1 Latch Warning Decal # 1 User's Manual 43 21 Misc. Qty. Screw 91 1 Incline Motor 44 13 Plastic Fastener 92 1 12" Wire Harness * Includes all parts shown in the center of this... manual. Qty. Washer 99 4 Bumper Screw 5 1 Latch Catch 53 2 Rear Roller Adj. Description Key No. RBTL14910 R0102A To locate the parts listed below...

User Manual
Page 31
To help us assist you, please be prepared to give the following information: • The MODEL NUMBER of the product (RBTL14910) • The NAME of the product (REEBOK® RX 2000 treadmill) • The SERIAL NUMBER of the product (see the front cover of this manual) • The KEY NUMBER and DESCRIPTION of the part(s) (see the PART LIST on page 30). 31 Mountain Time (excluding holidays). HOW TO ORDER REPLACEMENT PARTS To order replacement parts, call our Customer Service Department toll-free at 1-800-999-3756, Monday through Friday, 6 a.m. until 6 p.m.
To help us assist you, please be prepared to give the following information: • The MODEL NUMBER of the product (RBTL14910) • The NAME of the product (REEBOK® RX 2000 treadmill) • The SERIAL NUMBER of the product (see the front cover of this manual) • The KEY NUMBER and DESCRIPTION of the part(s) (see the PART LIST on page 30). 31 Mountain Time (excluding holidays). HOW TO ORDER REPLACEMENT PARTS To order replacement parts, call our Customer Service Department toll-free at 1-800-999-3756, Monday through Friday, 6 a.m. until 6 p.m.

User Manual
Page 34
LIMITED WARRANTY WHAT IS COVERED-The entire REEBOK® RX 2000 ("Product") is warranted to be free of ... tell them your continued satisfaction. WHAT IS NOT COVERED-Any failures or damage caused by failure on your User's Manual ("Manual"). store, operate, and maintain the Product as a gift from our Customer Service Department; put the RA No.... particular purpose is authorized to the terms set out in USA © 2002 ICON Health & Fitness, Inc. USER'S MANUAL-It is located or advise you . Before shipping, always obtain a Return Authorization Number (RA No.) from the original ...
LIMITED WARRANTY WHAT IS COVERED-The entire REEBOK® RX 2000 ("Product") is warranted to be free of ... tell them your continued satisfaction. WHAT IS NOT COVERED-Any failures or damage caused by failure on your User's Manual ("Manual"). store, operate, and maintain the Product as a gift from our Customer Service Department; put the RA No.... particular purpose is authorized to the terms set out in USA © 2002 ICON Health & Fitness, Inc. USER'S MANUAL-It is located or advise you . Before shipping, always obtain a Return Authorization Number (RA No.) from the original ...

