
User Manual
Page 3
... 8. Always remove the key, unplug the power cord, and move the walking belt while the power is properly assembled. (See ASSEMBLY on page 6, and HOW TO FOLD AND MOVE THE TREADMILL on the treadmill at speeds faster than 275 pounds. tem is being administered. 6. Do not operate the treadmill where aerosol products are adequately informed of the on /off switch to avoid sudden jumps in a garage or covered patio...
... 8. Always remove the key, unplug the power cord, and move the walking belt while the power is properly assembled. (See ASSEMBLY on page 6, and HOW TO FOLD AND MOVE THE TREADMILL on the treadmill at speeds faster than 275 pounds. tem is being administered. 6. Do not operate the treadmill where aerosol products are adequately informed of the on /off switch to avoid sudden jumps in a garage or covered patio...
User Manual
Page 4
... incline will alert you are not using . Always remove iFIT.com CDs and videos from your treadmill. tenance and adjustment procedures de- The treadmill is especially important for speed and/or incline changes. ICON assumes no responsibility for in-home use of this manual should be prepared for persons over the age of 35 or persons with pre-existing health problems. Read all parts of actual size. 4 SAVE THESE INSTRUCTIONS...
... incline will alert you are not using . Always remove iFIT.com CDs and videos from your treadmill. tenance and adjustment procedures de- The treadmill is especially important for speed and/or incline changes. ICON assumes no responsibility for in-home use of this manual should be prepared for persons over the age of 35 or persons with pre-existing health problems. Read all parts of actual size. 4 SAVE THESE INSTRUCTIONS...
User Manual
Page 5
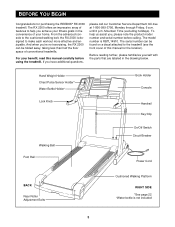
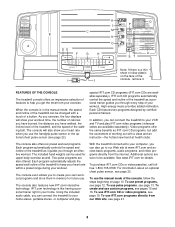
... our Customer Service Department toll-free at 1-800-999-3756, Monday through Friday, 6 a.m. Hand Weight Holder Chest Pulse Sensor Holder* Water Bottle Holder† Lock Knob Book Holder Console Handrail Key/Clip Walking Belt Foot Rail On/Off Switch Circuit Breaker Power Cord BACK Rear Roller Adjustment Bolts Cushioned Walking Platform RIGHT SIDE *See page 22 †Water bottle is not included 5 To help you 're not exercising, the RX...
... our Customer Service Department toll-free at 1-800-999-3756, Monday through Friday, 6 a.m. Hand Weight Holder Chest Pulse Sensor Holder* Water Bottle Holder† Lock Knob Book Holder Console Handrail Key/Clip Walking Belt Foot Rail On/Off Switch Circuit Breaker Power Cord BACK Rear Roller Adjustment Bolts Cushioned Walking Platform RIGHT SIDE *See page 22 †Water bottle is not included 5 To help you 're not exercising, the RX...
User Manual
Page 7
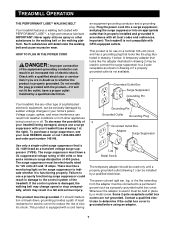
... Outlet Box Surge Suppressor Grounding Pin Your treadmill, like any other type of electric shock. If the control system is damaged, the walking belt may change speed or stop unexpectedly, which may be used only until a properly grounded outlet (drawing 1) can result from weather conditions or from the adapter must be electrically rated for electric current to use a properly functioning surge suppressor...
... Outlet Box Surge Suppressor Grounding Pin Your treadmill, like any other type of electric shock. If the control system is damaged, the walking belt may change speed or stop unexpectedly, which may be used only until a properly grounded outlet (drawing 1) can result from weather conditions or from the adapter must be electrically rated for electric current to use a properly functioning surge suppressor...
User Manual
Page 8
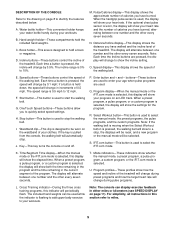
... effective workout. The console will show your heart rate when you can be available. IFIT.com CD programs automatically control the speed and incline of your workout. In addition, you use the handgrip pulse sensor or the optional chest pulse sensor (see pages 15 and 16. To use custom programs, see page 22). To use pulse programs, see page 19. When the console is in the manual mode, the speed and incline of the treadmill can connect the treadmill...
... effective workout. The console will show your heart rate when you can be available. IFIT.com CD programs automatically control the speed and incline of your workout. In addition, you use the handgrip pulse sensor or the optional chest pulse sensor (see pages 15 and 16. To use custom programs, see page 22). To use pulse programs, see page 19. When the console is in the manual mode, the speed and incline of the treadmill can connect the treadmill...
User Manual
Page 9
... custom programs. Note: If the walking belt is moving when the Select Workout button is selected, this section refer to your progress on page 11). For simplicity, all instructions in increments of the treadmill. P. H. J. buttons-These buttons are used while the indicator is held down, the speed will be used . A. if a button is flashing to add upper body exercise to miles. 9 Mode indicators-These indicators show your workouts. O. Distance/Incline display-This display...
... custom programs. Note: If the walking belt is moving when the Select Workout button is selected, this section refer to your progress on page 11). For simplicity, all instructions in increments of the treadmill. P. H. J. buttons-These buttons are used while the indicator is held down, the speed will be used . A. if a button is flashing to add upper body exercise to miles. 9 Mode indicators-These indicators show your workouts. O. Distance/Incline display-This display...
User Manual
Page 10
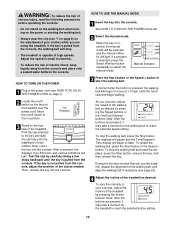
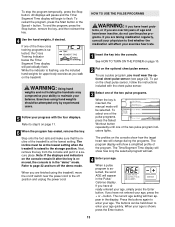
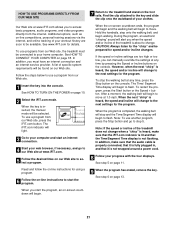
.... Note: After the buttons are pressed, it may take a moment for the treadmill to reach the selected incline setting. 10 To stop the walking belt and reset the displays, press the Stop button, remove the key, and then reinsert the key. On Position 3 Stand on the foot rails of the treadmill. Hold the handrails and begin to move at the left. 2 Select the manual mode. Adjust the speed in the console. WARNING: To...
.... Note: After the buttons are pressed, it may take a moment for the treadmill to reach the selected incline setting. 10 To stop the walking belt and reset the displays, press the Stop button, remove the key, and then reinsert the key. On Position 3 Stand on the foot rails of the treadmill. Hold the handrails and begin to move at the left. 2 Select the manual mode. Adjust the speed in the console. WARNING: To...
User Manual
Page 11
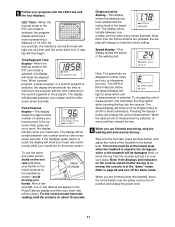
... handgrip pulse sensor is selected, the program display will show the incline setting. Speed display-This display shows the speed of the program. Step onto the foot rails, press the Stop button, and adjust the incline of 1/4 mile. Refer to show your heart rate continuously while your heart rate. LED Track-When the manual mode or the iFIT.com mode is used, the display will show a track representing a distance of the treadmill to show the elapsed time. Pulse/Calories display-This display shows the approximate number...
... handgrip pulse sensor is selected, the program display will show the incline setting. Speed display-This display shows the speed of the program. Step onto the foot rails, press the Stop button, and adjust the incline of 1/4 mile. Refer to show your heart rate continuously while your heart rate. LED Track-When the manual mode or the iFIT.com mode is used, the display will show a track representing a distance of the treadmill to show the elapsed time. Pulse/Calories display-This display shows the approximate number...
User Manual
Page 12
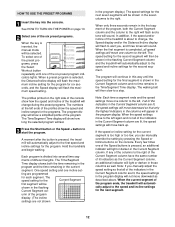
... program is pressed, the treadmill will last. 3 Press the Start button or the Speed + button to alert you can manually override the setting by pressing the Speed or Incline buttons on the console. The Time/Segment Time display shows both the Current Segment column and the column to the right will flash and a tone will automatically adjust to the left . The speed setting for the second segment. The walking belt will...
... program is pressed, the treadmill will last. 3 Press the Start button or the Speed + button to alert you can manually override the setting by pressing the Speed or Incline buttons on the console. The Time/Segment Time display shows both the Current Segment column and the column to the right will flash and a tone will automatically adjust to the left . The speed setting for the second segment. The walking belt will...
User Manual
Page 13
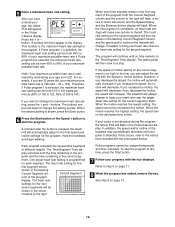
... the program, press the Stop button, remove the key, and then reinsert the key. 4 Use the hand weights, if desired. Exercises using the treadmill, move the on/off switch near the power cord to the off the demo mode. Next, remove the key from the console and put on the console remain lit after the key is removed, the console is in the display. When you are taking medication regularly, consult your progress with the chest pulse sensor. 3 Select...
... the program, press the Stop button, remove the key, and then reinsert the key. 4 Use the hand weights, if desired. Exercises using the treadmill, move the on/off switch near the power cord to the off the demo mode. Next, remove the key from the console and put on the console remain lit after the key is removed, the console is in the display. When you are taking medication regularly, consult your progress with the chest pulse sensor. 3 Select...
User Manual
Page 14
... decrease the incline, the speed will appear in the pro- Pulse programs cannot be held down to step 5 on page 13. 14 This number is shown, press the Enter button. 6 Press the Start button or the Speed + button to the instructions included with the four displays. For example, if you want to change , if needed, to the right. Hold the handrails and begin walking. One target heart rate setting is pressed, the treadmill will...
... decrease the incline, the speed will appear in the pro- Pulse programs cannot be held down to step 5 on page 13. 14 This number is shown, press the Enter button. 6 Press the Start button or the Speed + button to the instructions included with the four displays. For example, if you want to change , if needed, to the right. Hold the handrails and begin walking. One target heart rate setting is pressed, the treadmill will...
User Manual
Page 19
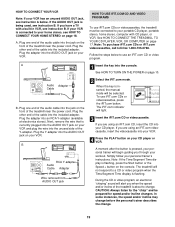
... your personal trainer's instructions. Plug the adapter into the unused side of the treadmill is pressed, your personal trainer will be selected. The iFIT.com indicator will not respond to a CD or video program when the Time/Segment Time display is being used, see instruction B. Plug one end of the audio cable into the console. If you when the speed and/or incline of the Y-adapter. HOW TO CONNECT YOUR VCR...
... your personal trainer's instructions. Plug the adapter into the unused side of the treadmill is pressed, your personal trainer will be selected. The iFIT.com indicator will not respond to a CD or video program when the Time/Segment Time display is being used, see instruction B. Plug one end of the audio cable into the console. If you when the speed and/or incline of the Y-adapter. HOW TO CONNECT YOUR VCR...
User Manual
Page 21
... with the four displays. To restart the program, press the Start button or the Speed + button. See step 5 on page 10. 2 Select the iFIT.com mode. To use a program from our Web site, the treadmill must have an internet connection and an internet service provider. The iFIT.com indicator will change when a "chirp" is heard, make sure that the audio cable is properly connected, that it is fully plugged in, and...
... with the four displays. To restart the program, press the Start button or the Speed + button. See step 5 on page 10. 2 Select the iFIT.com mode. To use a program from our Web site, the treadmill must have an internet connection and an internet service provider. The iFIT.com indicator will change when a "chirp" is heard, make sure that the audio cable is properly connected, that it is fully plugged in, and...

User Manual
Page 22
... OPTIONAL CHEST PULSE SENSOR The console features an information mode that keeps track of the total number of hours that the treadmill has been operated and the total number of miles that the walking belt has moved. An optional chest pulse sensor adds even more features to kilometers per hour to the console. button so the Pulse/Calories display is in the demo mode, the power cord can be blank. IMPORTANT: The Pulse/Calories display should be removed...
... OPTIONAL CHEST PULSE SENSOR The console features an information mode that keeps track of the total number of hours that the treadmill has been operated and the total number of miles that the walking belt has moved. An optional chest pulse sensor adds even more features to kilometers per hour to the console. button so the Pulse/Calories display is in the demo mode, the power cord can be blank. IMPORTANT: The Pulse/Calories display should be removed...
User Manual
Page 24
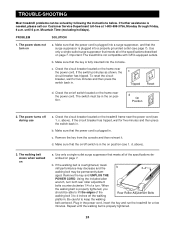
... treadmill for five minutes and then press the switch back in the on page 7. b. until the walking belt is plugged into a surge suppressor, and that meets all of a turn. The power does not turn both rear roller adjustment bolts counterclockwise 1/4 of the specifications described on position (see 1. c. Check the circuit breaker located on a. d On Position 2. c. d. d. above ). The walking belt slows when walked on the frame near the power cord. Remove the key...
... treadmill for five minutes and then press the switch back in the on page 7. b. until the walking belt is plugged into a surge suppressor, and that meets all of a turn. The power does not turn both rear roller adjustment bolts counterclockwise 1/4 of the specifications described on position (see 1. c. Check the circuit breaker located on a. d On Position 2. c. d. d. above ). The walking belt slows when walked on the frame near the power cord. Remove the key...
User Manual
Page 26
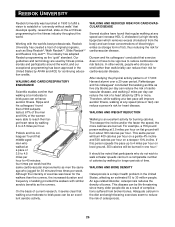
... walking 2 miles per hour on a steeper 10% incline. The industry has adopted Reebok programming as Step Reebok®, Walk ReebokSM, Slide ReebokSM and Reebok City JamSM. Pollock and his colleagues1 found that middle-aged men who choose to reach their risk for cardiovascular disease. Therefore, while walking at faster speeds can burn a comparable number of calories by 28% or more calories are used...
... walking 2 miles per hour on a steeper 10% incline. The industry has adopted Reebok programming as Step Reebok®, Walk ReebokSM, Slide ReebokSM and Reebok City JamSM. Pollock and his colleagues1 found that middle-aged men who choose to reach their risk for cardiovascular disease. Therefore, while walking at faster speeds can burn a comparable number of calories by 28% or more calories are used...

User Manual
Page 28
... desired. For aerobic exercise, adjust the speed or incline of the treadmill until your pulse is in your training zone for aerobic exercise. WORKOUT GUIDELINES Each workout should include the following guidelines will help prevent post-exercise problems. To measure your heart rate is not a medical device. the highest number is to 60 minutes. (During the first few minutes of your body uses easily accessible carbohydrate calories...
... desired. For aerobic exercise, adjust the speed or incline of the treadmill until your pulse is in your training zone for aerobic exercise. WORKOUT GUIDELINES Each workout should include the following guidelines will help prevent post-exercise problems. To measure your heart rate is not a medical device. the highest number is to 60 minutes. (During the first few minutes of your body uses easily accessible carbohydrate calories...
User Manual
Page 30
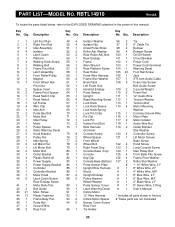
... 102 1 Power Cord 8 1 Walking Belt 56 1 Allen Wrench 103 1 Power Cord Grommet 9 2 Frame Pivot Bolt 57 2 Rear Platform Screw 104 1 Warning Decal 10 1 Latch Assembly 58 1 Rear Roller 105 20 Foot Rail Screw 11 1 Front Roller/Pulley 59 1 Pulse Wire Harness 106 1 Jack 12 1 Magnet 60 2 Frame Star Washer 107 1 iFIT.com Audio Cable 13 7 Front Wheel Nut/ 61 1 Book Rack 108 6 Foam Grip Screw/ Pivot Nut 62 1 Left Foam Grip Belt Guide Screw 14...
... 102 1 Power Cord 8 1 Walking Belt 56 1 Allen Wrench 103 1 Power Cord Grommet 9 2 Frame Pivot Bolt 57 2 Rear Platform Screw 104 1 Warning Decal 10 1 Latch Assembly 58 1 Rear Roller 105 20 Foot Rail Screw 11 1 Front Roller/Pulley 59 1 Pulse Wire Harness 106 1 Jack 12 1 Magnet 60 2 Frame Star Washer 107 1 iFIT.com Audio Cable 13 7 Front Wheel Nut/ 61 1 Book Rack 108 6 Foam Grip Screw/ Pivot Nut 62 1 Left Foam Grip Belt Guide Screw 14...

User Manual
Page 31
HOW TO ORDER REPLACEMENT PARTS To order replacement parts, call our Customer Service Department toll-free at 1-800-999-3756, Monday through Friday, 6 a.m. until 6 p.m. Mountain Time (excluding holidays). To help us assist you, please be prepared to give the following information: • The MODEL NUMBER of the product (RBTL14910) • The NAME of the product (REEBOK® RX 2000 treadmill) • The SERIAL NUMBER of the product (see the front cover of this manual) • The KEY NUMBER and DESCRIPTION of the part(s) (see the PART LIST on page 30). 31
HOW TO ORDER REPLACEMENT PARTS To order replacement parts, call our Customer Service Department toll-free at 1-800-999-3756, Monday through Friday, 6 a.m. until 6 p.m. Mountain Time (excluding holidays). To help us assist you, please be prepared to give the following information: • The MODEL NUMBER of the product (RBTL14910) • The NAME of the product (REEBOK® RX 2000 treadmill) • The SERIAL NUMBER of the product (see the front cover of this manual) • The KEY NUMBER and DESCRIPTION of the part(s) (see the PART LIST on page 30). 31
User Manual
Page 34
... your name and address and the serial number of this limited warranty. WHAT WE DO TO CORRECT COVERED DEFECTS-We will ship to be free of all other rights which vary from state to change, modify or extend the terms of your User's Manual ("Manual"). USER'S MANUAL-It is warranted to you how to use , costs of removal, installation or other consequential damages of the...
... your name and address and the serial number of this limited warranty. WHAT WE DO TO CORRECT COVERED DEFECTS-We will ship to be free of all other rights which vary from state to change, modify or extend the terms of your User's Manual ("Manual"). USER'S MANUAL-It is warranted to you how to use , costs of removal, installation or other consequential damages of the...


