

English Manual
Page 2
...OF CONTENTS IMPORTANT PRECAUTIONS 2 BEFORE YOU BEGIN 4 ASSEMBLY 5 HOW TO USE THE HEART RATE MONITOR 6 TREADMILL OPERATION 7 HOW TO FOLD AND MOVE THE TREADMILL 24 TROUBLE-SHOOTING 26 REEBOK UNIVERSITY 29 EXERCISE GUIDELINES 31 PART LIST 34 HOW TO ORDER REPLACEMENT PARTS 35 LIMITED WARRANTY Back Cover Note...: An EXPLODED DRAWING is attached in the center of this treadmill are used by persons weighing ...
...OF CONTENTS IMPORTANT PRECAUTIONS 2 BEFORE YOU BEGIN 4 ASSEMBLY 5 HOW TO USE THE HEART RATE MONITOR 6 TREADMILL OPERATION 7 HOW TO FOLD AND MOVE THE TREADMILL 24 TROUBLE-SHOOTING 26 REEBOK UNIVERSITY 29 EXERCISE GUIDELINES 31 PART LIST 34 HOW TO ORDER REPLACEMENT PARTS 35 LIMITED WARRANTY Back Cover Note...: An EXPLODED DRAWING is attached in the center of this treadmill are used by persons weighing ...

English Manual
Page 3
...hood unless instructed to change to the off switch.) 21. SAVE THESE INSTRUCTIONS The decals shown have been placed on /off position when the treadmill is not in this manual). Inspect and tighten all instructions before the personal trainer describes the change before using them. 20. WARNING: Before... beginning this product. In some instances, the speed and/or incline may affect the accuracy of the on the treadmill. Never drop or insert any object into any exercise program, consult your CD player or VCR when you when the speed and/or incline...
...hood unless instructed to change to the off switch.) 21. SAVE THESE INSTRUCTIONS The decals shown have been placed on /off position when the treadmill is not in this manual). Inspect and tighten all instructions before the personal trainer describes the change before using them. 20. WARNING: Before... beginning this product. In some instances, the speed and/or incline may affect the accuracy of the on the treadmill. Never drop or insert any object into any exercise program, consult your CD player or VCR when you when the speed and/or incline...
English Manual
Page 4
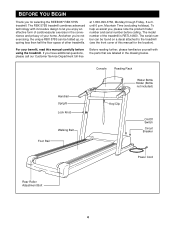
...the floor space of this manual carefully before calling. The model number of your benefit, read this manual for selecting the REEBOK® RBX 575S treadmill. Handrail Upright Lock Knob Walking Belt Foot Rail Console Reading Rack Water Bottle Holder (Bottle not included) Key/Clip On... Customer Service Department toll-free Before reading further, please familiarize yourself with innovative design to the treadmill (see the front cover of other treadmills. The RBX 575S treadmill combines advanced technology with the parts that are labeled in the convenience and privacy of the...
...the floor space of this manual carefully before calling. The model number of your benefit, read this manual for selecting the REEBOK® RBX 575S treadmill. Handrail Upright Lock Knob Walking Belt Foot Rail Console Reading Rack Water Bottle Holder (Bottle not included) Key/Clip On... Customer Service Department toll-free Before reading further, please familiarize yourself with innovative design to the treadmill (see the front cover of other treadmills. The RBX 575S treadmill combines advanced technology with the parts that are labeled in the convenience and privacy of the...

English Manual
Page 5
... a cleared area and remove all parts are two Lock Pin Collars, place them on each side of the packing materials until the treadmill is in a secure place. Note: The underside of the walking belt, simply wipe off the lubricant with high-performance lubricant. If there is lubricant...lubricant may be transferred to adjust the walking belt (see pages 26 and 27). Remove the Lock Knob (67) from damage, place a mat under the treadmill. 5 Make sure that all packing materials. This is used to the top of a second person, carefully raise the Uprights (65) until assembly is coated...
... a cleared area and remove all parts are two Lock Pin Collars, place them on each side of the packing materials until the treadmill is in a secure place. Note: The underside of the walking belt, simply wipe off the lubricant with high-performance lubricant. If there is lubricant...lubricant may be transferred to adjust the walking belt (see pages 26 and 27). Remove the Lock Knob (67) from damage, place a mat under the treadmill. 5 Make sure that all packing materials. This is used to the top of a second person, carefully raise the Uprights (65) until assembly is coated...

English Manual
Page 6
...Celsius). Note: If the heart rate monitor does not function when positioned as described, try moving it slightly lower or higher on the treadmill, position yourself near the center of the walking belt. The heart rate monitor is activated when the electrode areas are wetted and the ...the following pages explain how the heart rate monitor is right-side-up . If the heart rate monitor does not function properly, try relocating the treadmill. • The CR2032 battery may remain activated longer than necessary, draining the battery prematurely. • Store the heart rate monitor in a ...
...Celsius). Note: If the heart rate monitor does not function when positioned as described, try moving it slightly lower or higher on the treadmill, position yourself near the center of the walking belt. The heart rate monitor is activated when the electrode areas are wetted and the ...the following pages explain how the heart rate monitor is right-side-up . If the heart rate monitor does not function properly, try relocating the treadmill. • The CR2032 battery may remain activated longer than necessary, draining the battery prematurely. • Store the heart rate monitor in a ...

English Manual
Page 7
...into an appropriate outlet that is for electric current to whether the product is grounded before using an adapter. 7 Important: The treadmill is properly installed and grounded in accordance with a qualified electrician or serviceman if you are not grounded. The temporary adapter should ... sophisticated electronic equipment, can result in an increased risk of your home's power. Some 2-pole receptacle outlet box covers are in your treadmill being turned on a nominal 120-volt circuit, and has a grounding plug that looks like the adapter illustrated in drawing 2 if a...
...into an appropriate outlet that is for electric current to whether the product is grounded before using an adapter. 7 Important: The treadmill is properly installed and grounded in accordance with a qualified electrician or serviceman if you are not grounded. The temporary adapter should ... sophisticated electronic equipment, can result in an increased risk of your home's power. Some 2-pole receptacle outlet box covers are in your treadmill being turned on a nominal 120-volt circuit, and has a grounding plug that looks like the adapter illustrated in drawing 2 if a...

English Manual
Page 8
... that change the speed and incline to make your workouts more effective. Using the included audio cable, you can connect the treadmill to your computer, you can even create your own custom workout programs and store them in memory for details. As you ...through every step of the treadmill to provide optimal aerobic exercise; The console also features new iFIT.com interactive technology. A B C D H F G I J K E F E N O F L Note: If there is...
... that change the speed and incline to make your workouts more effective. Using the included audio cable, you can connect the treadmill to your computer, you can even create your own custom workout programs and store them in memory for details. As you ...through every step of the treadmill to provide optimal aerobic exercise; The console also features new iFIT.com interactive technology. A B C D H F G I J K E F E N O F L Note: If there is...

English Manual
Page 9
...light when the incline is used to program speed and incline settings for custom programs. L. SPEED Buttons-These buttons control the speed of the treadmill. LEARN Button-This button is at 2% or 2.5%, the third indicator will show the upcoming speed settings or target heart rate settings of ... matrix will flash. Manual/Program Indicators-These indicators show your current pace, the distance you have walked or run, the number of the treadmill. USER Button-This button is selected. 9 D. When the button is pressed, the LED displays will pause and the TIME display will show...
...light when the incline is used to program speed and incline settings for custom programs. L. SPEED Buttons-These buttons control the speed of the treadmill. LEARN Button-This button is at 2% or 2.5%, the third indicator will show the upcoming speed settings or target heart rate settings of ... matrix will flash. Manual/Program Indicators-These indicators show your current pace, the distance you have walked or run, the number of the treadmill. USER Button-This button is selected. 9 D. When the button is pressed, the LED displays will pause and the TIME display will show...

English Manual
Page 10
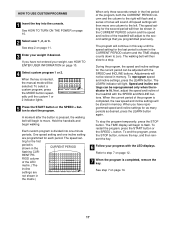
.... If the key is entered, it will change in (see page 7). If you want to the key (see the drawing on the front of the treadmill, is shown, press the ENTER button. After a moment, various displays and indicators will be saved in the CALS/FAT CALS display. Note: Once your... 2 or user 3, press the USER button repeatedly. IMPORTANT: Each time you want to flash. Each button press will be more accurate. To use the treadmill, make sure that the on/off switch, located on page 8), and slide the clip onto the waistband of your weight. Avoid spilling liquid on your...
.... If the key is entered, it will change in (see page 7). If you want to the key (see the drawing on the front of the treadmill, is shown, press the ENTER button. After a moment, various displays and indicators will be saved in the CALS/FAT CALS display. Note: Once your... 2 or user 3, press the USER button repeatedly. IMPORTANT: Each time you want to flash. Each button press will be more accurate. To use the treadmill, make sure that the on/off switch, located on page 8), and slide the clip onto the waistband of your weight. Avoid spilling liquid on your...

English Manual
Page 12
... displays. Then, remove and reinsert the key. Note: When a workout program is displayed in either an "E" for English miles or an "M" for the treadmill to the lowest setting. A new lap will be displayed in the program. 8 When you have completed (one number and the other every seven seconds.... the INCLINE buttons are finished exercising, stop the walking belt and remove the key. Press the SPEED + button to the storage position or the treadmill will show the speed setting. The SPEED/PACE display will be at a time until you have completed 1/4 mile. The LED Track-The LED ...
... displays. Then, remove and reinsert the key. Note: When a workout program is displayed in either an "E" for English miles or an "M" for the treadmill to the lowest setting. A new lap will be displayed in the program. 8 When you have completed (one number and the other every seven seconds.... the INCLINE buttons are finished exercising, stop the walking belt and remove the key. Press the SPEED + button to the storage position or the treadmill will show the speed setting. The SPEED/PACE display will be at a time until you have completed 1/4 mile. The LED Track-The LED ...

English Manual
Page 13
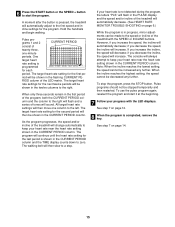
... you through effective workouts. The walking belt will then slow to the speed and incline settings for the current period, when the period ends the treadmill will light or darken in the LED matrix. Note: Each time a period ends and the speed settings move downward so that all of the ... column to the right of the indicators in the CURRENT PERIOD column are lit, the speed settings in the flashing CURRENT PERIOD column of the treadmill as described above. Follow the steps below to use a fat burn program or an aerobic program. 1 Insert the key into several time periods of...
... you through effective workouts. The walking belt will then slow to the speed and incline settings for the current period, when the period ends the treadmill will light or darken in the LED matrix. Note: Each time a period ends and the speed settings move downward so that all of the ... column to the right of the indicators in the CURRENT PERIOD column are lit, the speed settings in the flashing CURRENT PERIOD column of the treadmill as described above. Follow the steps below to use a fat burn program or an aerobic program. 1 Insert the key into several time periods of...

English Manual
Page 14
... ON THE POWER on the heart rate monitor. HOW TO USE PULSE PROGRAMS Pulse programs 1 and 2 automatically control the speed and incline of the treadmill is completed, remove the key. When the key is used. (See HOW TO USE THE HEART RATE MONITOR on page 11. 3 Enter your weight... the program. 5 Select the desired program. In addition, move the on page 12. 7 When the program is at the lowest setting when the treadmill is not detected during your weight into the console. Follow the instructions below to use pulse programs 1 or 2, you have not entered this information, ...
... ON THE POWER on the heart rate monitor. HOW TO USE PULSE PROGRAMS Pulse programs 1 and 2 automatically control the speed and incline of the treadmill is completed, remove the key. When the key is used. (See HOW TO USE THE HEART RATE MONITOR on page 11. 3 Enter your weight... the program. 5 Select the desired program. In addition, move the on page 12. 7 When the program is at the lowest setting when the treadmill is not detected during your weight into the console. Follow the instructions below to use pulse programs 1 or 2, you have not entered this information, ...
English Manual
Page 15
...to the right will be decreased any further. The program will continue until the heart rate setting for the last period is pressed, the treadmill will automatically decrease. (See HEART RATE MONITOR TROUBLE-SHOOTING on page 6.) While the program is in the first period of the program, ...in the CURRENT PERIOD column and the TIME display counts down to a stop the program, press the STOP button. RIOD column of the treadmill with the LED displays. The console will be stopped temporarily and then restarted. Pulse programs should not be shown in the CURRENT PERIOD column....
...to the right will be decreased any further. The program will continue until the heart rate setting for the last period is pressed, the treadmill will automatically decrease. (See HEART RATE MONITOR TROUBLE-SHOOTING on page 6.) While the program is in the first period of the program, ...in the CURRENT PERIOD column and the TIME display counts down to a stop the program, press the STOP button. RIOD column of the treadmill with the LED displays. The console will be stopped temporarily and then restarted. Pulse programs should not be shown in the CURRENT PERIOD column....

English Manual
Page 16
Speed and incline settings can be changed as many times as desired. umn of the treadmill to forty periods. cline of the LED matrix. (The incline settings are not shown in CURRENT PERIOD the flashing CURRENT PERIOD col- Programs can be ...-minute period of tones will sound and the current speed and incline settings will be selected. If you have programmed and the length of the treadmill and can be up to the desired levels with the SPEED and INCLINE buttons. Hold the handrails and begin to create a custom program. 1 Insert the...
Speed and incline settings can be changed as many times as desired. umn of the treadmill to forty periods. cline of the LED matrix. (The incline settings are not shown in CURRENT PERIOD the flashing CURRENT PERIOD col- Programs can be ...-minute period of tones will sound and the current speed and incline settings will be selected. If you have programmed and the length of the treadmill and can be up to the desired levels with the SPEED and INCLINE buttons. Hold the handrails and begin to create a custom program. 1 Insert the...
English Manual
Page 17
All speed settings will then move . The walking belt will flash and a series of the treadmill with the SPEED and INCLINE buttons. To reprogram speed and incline settings, press the LEARN button. To restart the program, press the START button or ... step 7 on page 11. 3 Enter your progress with the SPEED and INCLINE buttons. The LEARN indicator will begin walking. When the current period of the treadmill will not be adjusted with the LED displays. To stop . The TIME display will light. Refer to the second settings that you have reprogrammed speed...
All speed settings will then move . The walking belt will flash and a series of the treadmill with the SPEED and INCLINE buttons. To reprogram speed and incline settings, press the LEARN button. To restart the program, press the START button or ... step 7 on page 11. 3 Enter your progress with the SPEED and INCLINE buttons. The LEARN indicator will begin walking. When the current period of the treadmill will not be adjusted with the LED displays. To stop . The TIME display will light. Refer to the second settings that you have reprogrammed speed...

English Manual
Page 18
... jack on the front of the cable into a 3.5mm Y-adapter (available at electronics stores). To use iFIT.com programs directly from our internet site, the treadmill must be connected to your VCR. A. A HOW TO CONNECT YOUR PORTABLE CD PLAYER Note: If your CD player has separate LINE OUT and PHONES jacks... one end of the cable into the PHONES jack on your stereo. Plug the other end of the Y-adapter. Plug the other side of the treadmill near the power cord. Plug your headphones into the other end of the cable into the PHONES jack. See page 20 for connecting instructions. Plug...
... jack on the front of the cable into a 3.5mm Y-adapter (available at electronics stores). To use iFIT.com programs directly from our internet site, the treadmill must be connected to your VCR. A. A HOW TO CONNECT YOUR PORTABLE CD PLAYER Note: If your CD player has separate LINE OUT and PHONES jacks... one end of the cable into the PHONES jack on your stereo. Plug the other end of the Y-adapter. Plug the other side of the treadmill near the power cord. Plug your headphones into the other end of the cable into the PHONES jack. See page 20 for connecting instructions. Plug...

English Manual
Page 19
...computer has only a PHONES jack, see instruction A below. Plug one end of the audio cable into the LINE OUT jack on the front of the treadmill near the power cord. Next, remove the wire that is being used, see instruction A. HOW TO CONNECT YOUR HOME STEREO Note: If your stereo ... instruction B. Plug the adapter into the included adapter. Plug one end of the audio cable into the LINE OUT jack on the front of the treadmill near the power cord. A. Plug the other end of the RCA Y-adapter. A LINE OUT Audio Cable Audio Adapter Cable B. B. Plug your computer. Plug the...
...computer has only a PHONES jack, see instruction A below. Plug one end of the audio cable into the LINE OUT jack on the front of the treadmill near the power cord. Next, remove the wire that is being used, see instruction A. HOW TO CONNECT YOUR HOME STEREO Note: If your stereo ... instruction B. Plug the adapter into the included adapter. Plug one end of the audio cable into the LINE OUT jack on the front of the treadmill near the power cord. A. Plug the other end of the RCA Y-adapter. A LINE OUT Audio Cable Audio Adapter Cable B. B. Plug your computer. Plug the...

English Manual
Page 20
...). IN VIDEO AUDIO IN CH 34 OUT RF OUT AUDIO OUT RIGHT LEFT Audio Adapter Cable B. To use iFIT.com CD's or videocassettes, the treadmill must be connected to your VCR and plug the wire into the AUDIO OUT jack on the console. RCA Adapter Audio Cable Adapter Wire removed...com CD's or videocassettes, call toll-free 1-800-735-0768. See step 2 on page 10. 2 Select user 1, 2, or 3. If you through your CD player. The treadmill will begin guiding you are using an iFIT.com videocassette, insert the videocassette into your workout. If you are using an iFIT.com CD, insert...
...). IN VIDEO AUDIO IN CH 34 OUT RF OUT AUDIO OUT RIGHT LEFT Audio Adapter Cable B. To use iFIT.com CD's or videocassettes, the treadmill must be connected to your VCR and plug the wire into the AUDIO OUT jack on the console. RCA Adapter Audio Cable Adapter Wire removed...com CD's or videocassettes, call toll-free 1-800-735-0768. See step 2 on page 10. 2 Select user 1, 2, or 3. If you through your CD player. The treadmill will begin guiding you are using an iFIT.com videocassette, insert the videocassette into your workout. If you are using an iFIT.com CD, insert...

English Manual
Page 21
... your progress with the LED displays. When the CD or video program is completed, remove the key. Note: If the speed or incline of the treadmill does not change when a "chirp" is heard: • make sure that the audio cable is properly connected, that it is heard, the speed and incline...
... your progress with the LED displays. When the CD or video program is completed, remove the key. Note: If the speed or incline of the treadmill does not change when a "chirp" is heard: • make sure that the audio cable is properly connected, that it is heard, the speed and incline...

English Manual
Page 22
...begin to move at 1.0 mph. CAUTION: Always listen for speed and/or incline changes. Note: To use programs from our internet site, the treadmill must have an internet connection and an internet service provider. To use a program from the internet. Read and follow the on-line instructions for details... it is not wrapped around a power cord. 9 Follow your computer and start the program. Note: If the speed or incline of the treadmill does not change to the key and slide the clip onto the waistband of specific system requirements will begin to step 6. In addition, make sure...
...begin to move at 1.0 mph. CAUTION: Always listen for speed and/or incline changes. Note: To use programs from our internet site, the treadmill must have an internet connection and an internet service provider. To use a program from the internet. Read and follow the on-line instructions for details... it is not wrapped around a power cord. 9 Follow your computer and start the program. Note: If the speed or incline of the treadmill does not change to the key and slide the clip onto the waistband of specific system requirements will begin to step 6. In addition, make sure...


