Reebok Rt500 Support and Manuals
Get Help and Manuals for this Reebok item

View All Support Options Below
Free Reebok Rt500 manuals!
Problems with Reebok Rt500?
Ask a Question
Free Reebok Rt500 manuals!
Problems with Reebok Rt500?
Ask a Question
Popular Reebok Rt500 Manual Pages
Uk Manual - Page 1

... your treadmill, please contact our Customer Service Department at the numbers or addresses below: Call us: +44 (0)870 33 000 24 Fax us: +44 (0)870 777 2330 Email us: Send us your questions and comments via e-mail at service@reebokfitness.co.uk
CAUTION
Read all precautions and instructions in this manual before using this manual for...
Uk Manual - Page 2

...treadmill. Athletic support clothes are used only by persons weighing 113 kg or less.
9. Do not operate the treadmill if the power cord or plug is damaged, or if the treadmill...FOLD AND MOVE THE TREADMILL 10 TROUBLE-SHOOTING 12 CONDITIONING GUIDELINES 14 HOW TO ORDER REPLACEMENT PARTS Back Cover LIMITED WARRANTY Back Cover
Note: An EXPLODED DRAWING and a PART LIST are adequately informed...
Uk Manual - Page 3

... cover of this manual
should be able to safely lift 20 kg to order a free replacement decal (see HOW TO ORDER REPLACEMENT PARTS on the walking belt. Do not attempt to raise, lower, or move the treadmill.
19. Inspect and tighten all parts of 35 or persons with pre-existing health problems.
Read all instructions before performing the...
Uk Manual - Page 4

... selecting the new REEBOK® RT500 treadmill. Before reading further, please review the drawing below and familiarise yourself with innovative design to the treadmill (see the front cover of other treadmills. To help us assist you enjoy an excellent form of cardiovascular exercise in the convenience and privacy of your benefit, read this manual for the location...
Uk Manual - Page 5

... coated with a soft cloth and a mild, non-abrasive cleaner. Be sure to push on the head of the Extension Leg. ASSEMBLY
Assembly requires two people. Set the treadmill in - Extension Leg Screw (53)-4
Latch Screw (35)-2
1.
Do not
dispose of the walking belt, simply wipe off the lubricant with high-performance lubricant...
Uk Manual - Page 6

... described above. If the holes are not aligned, rotate the Handrail away from the treadmill to position it
against the bracket on the Extension Leg (34). Make sure that the... avoid scratching the finish. Make sure that all parts are aligned. Repeat, if necessary, until the holes are tightened before you use the treadmill. Keep the included allen wrench in drawing 3.
...
Uk Manual - Page 9

...speed control to
the other.
DISTANCE display- To reset the displays at a time until you just installed batteries, the displays will not turn on
page 14.) Every seven sec-
Inserting the key will ... and fat
calories you exercise, the indicators around the track will change the incline of the treadmill, press the top or bottom of 1/4 mile (400 m). Arrows in the centre of the...
Uk Manual - Page 12

... in. SYMPTOM: THE DISPLAYS OF THE CONSOLE DO NOT FUNCTION PROPERLY
a. See BATTERY INSTALLATION on page 9. Retighten the Screw. SYMPTOM: THE POWER DOES NOT TURN ON
a. After...please call our Customer Service Department.
3.
c. See step 1 on page 8. Check the batteries in . b. Make sure that the key is no longer than 1.5 meters. TROUBLE-SHOOTING
Most treadmill problems can be solved by...
Uk Manual - Page 13

... CORD.
Plug in the power cord, insert the key and run the treadmill for a few minutes. b. Remove the key and UNPLUG THE POWER CORD. Plug in ...key
and run , please call our Customer Service Department.
5. utes.
Repeat until the walking belt is properly tightened.
Repeat until the walking
belt is overtightened, treadmill performance may decrease and the walking belt may...
Uk Manual - Page 14

... too low, adjust the speed or incline of the treadmill accordingly. Aerobic exercise is the recommended heart rate for ... for energy. Start each workout with pre-existing health problems.
The following guidelines will help you exercise-never hold ... as a guide.
The proper intensity level can be "aerobic." WORKOUT GUIDELINES
A well-rounded workout includes three important parts:
A Warm...
Uk Manual - Page 15

...15 counts, then relax. Stretches: Hamstrings, back of the opposite foot to prevent post-exercise problems.
To maintain or improve your condition, complete three workouts each week, with the soles of ... floor. Repeat 3 times for several basic stretches is to make exercise a regular and enjoyable part of your feet together and your back and shoulders to five workouts each week if desired. ...
Uk Manual - Page 16

... affect your proof of purchase if you believe the service is warranted to be prepared to give the following information:
• The MODEL NUMBER of the product (RETL14000)
• The NAME of the product (REEBOK® RT500 treadmill)
• The KEY NUMBER DESCRIPTION OF THE PART(S) (see the PART LIST and the EXPLODED DRAWING attached in USA...
Uk Manual - Page 17

For information about ordering replacement parts, see the back cover of the User's Manual.
34 REMOVE THIS EXPLODED DRAWING AND PART LIST FROM THE MANUAL
Save this EXPLODED DRAWING and PART LIST for future reference.
Note: Specifications are subject to change without notice.
Uk Manual - Page 18
...Assembly Electronic Bracket 1" Grommet Filter Euro Power Cord Set Motor Pivot Bushing 8" White Wire, Pigtail User's Manual
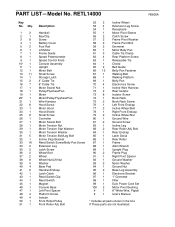
* Includes all parts shown in the box # These parts are not illustrated
R0800A PART LIST-Model No. Qty.
1
2
2
1
3
8...
Handrail Key/Clip Screw Battery Cover Foot Rail Lift Motor Frame Guide Speed Potentiometer Speed Control Knob Console Assembly Upright Motor Belt Small...
Uk Manual - Page 19

... 82
81
38
80
79
31
52 77
16 15
61 33
60 33
33
40
39
25
33 33
22 22
R0800A
EXPLODED DRAWING-Model No.
Reebok Rt500 Reviews
We have not received any reviews for Reebok yet.