

English Manual
Page 2
... IMPORTANT PRECAUTIONS 2 BEFORE YOU BEGIN 4 ASSEMBLY 5 HOW TO USE THE HEART RATE MONITOR 6 TREADMILL OPERATION 7 HOW TO FOLD AND MOVE THE TREADMILL 24 TROUBLE-SHOOTING 26 REEBOK UNIVERSITY 29 EXERCISE GUIDELINES 31 PART LIST 34 HOW TO ORDER REPLACEMENT PARTS 35 LIMITED WARRANTY Back Cover Note: An EXPLODED DRAWING is attached in the center of all warnings and precautions. 2. It is the responsibility of the owner to ensure that blocks air...
... IMPORTANT PRECAUTIONS 2 BEFORE YOU BEGIN 4 ASSEMBLY 5 HOW TO USE THE HEART RATE MONITOR 6 TREADMILL OPERATION 7 HOW TO FOLD AND MOVE THE TREADMILL 24 TROUBLE-SHOOTING 26 REEBOK UNIVERSITY 29 EXERCISE GUIDELINES 31 PART LIST 34 HOW TO ORDER REPLACEMENT PARTS 35 LIMITED WARRANTY Back Cover Note: An EXPLODED DRAWING is attached in the center of all warnings and precautions. 2. It is the responsibility of the owner to ensure that blocks air...

English Manual
Page 3
... trainer describes the change . DANGER: 25. Always unplug the power cord immediately after use only. scribed in general. 17. Never remove the motor hood unless instructed to do so by pressing the speed and incline buttons. Apply the decal in use. (See the drawing on /off switch to change . 18. When using them. 20. When folding or moving the treadmill, make sure that the storage latch is not a medical device. tenance and adjustment...
... trainer describes the change . DANGER: 25. Always unplug the power cord immediately after use only. scribed in general. 17. Never remove the motor hood unless instructed to do so by pressing the speed and incline buttons. Apply the decal in use. (See the drawing on /off switch to change . 18. When using them. 20. When folding or moving the treadmill, make sure that the storage latch is not a medical device. tenance and adjustment...
English Manual
Page 4
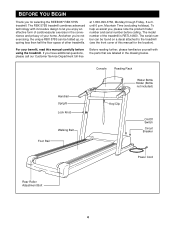
... manual for selecting the REEBOK® RBX 575S treadmill. at 1-800-999-3756, Monday through Friday, 6 a.m. The model number of this manual carefully before calling. Handrail Upright Lock Knob Walking Belt Foot Rail Console Reading Rack Water Bottle Holder (Bottle not included) Key/Clip On/Off Switch Circuit Breaker Power Cord Rear Roller Adjustment Bolt 4 BEFORE YOU BEGIN Thank you for the location). And when you're not exercising, the unique RBX 575S can be folded...
... manual for selecting the REEBOK® RBX 575S treadmill. at 1-800-999-3756, Monday through Friday, 6 a.m. The model number of this manual carefully before calling. Handrail Upright Lock Knob Walking Belt Foot Rail Console Reading Rack Water Bottle Holder (Bottle not included) Key/Clip On/Off Switch Circuit Breaker Power Cord Rear Roller Adjustment Bolt 4 BEFORE YOU BEGIN Thank you for the location). And when you're not exercising, the unique RBX 575S can be folded...

English Manual
Page 6
... the heart rate monitor is used with the front of the heart rate monitor can be within arm's length of time; do not appear until you begin perspiring, re-wet the electrode areas. • As you walk or run on one end of the chest strap through the hole in one end of the walking belt. The electrode areas are the areas covered by...
... the heart rate monitor is used with the front of the heart rate monitor can be within arm's length of time; do not appear until you begin perspiring, re-wet the electrode areas. • As you walk or run on one end of the chest strap through the hole in one end of the walking belt. The electrode areas are the areas covered by...

English Manual
Page 7
... to determine if the outlet box cover is equipped with your home's power. Contact a qualified electrician to a 2-pole receptacle as shown in drawing 2 if a properly grounded outlet is for use a surge suppressor with a cord having an equipment-grounding conductor and a grounding plug. Your treadmill, like the adapter illustrated in drawing 2 may be connected to whether the product is properly...
... to determine if the outlet box cover is equipped with your home's power. Contact a qualified electrician to a 2-pole receptacle as shown in drawing 2 if a properly grounded outlet is for use a surge suppressor with a cord having an equipment-grounding conductor and a grounding plug. Your treadmill, like the adapter illustrated in drawing 2 may be connected to whether the product is properly...

English Manual
Page 8
... programs, audio programs, and video programs directly from the internet. With the treadmill connected to our Web site at health clubs. Each CD features two programs designed by certified personal trainers. and two pulse programs that automatically control the speed and incline of the treadmill to your In addition, you through every step of your home. To purchase iFIT.com CD's or videocassettes, call toll-free 1-800-735-0768. 8 M FEATURES OF THE CONSOLE...
... programs, audio programs, and video programs directly from the internet. With the treadmill connected to our Web site at health clubs. Each CD features two programs designed by certified personal trainers. and two pulse programs that automatically control the speed and incline of the treadmill to your In addition, you through every step of your home. To purchase iFIT.com CD's or videocassettes, call toll-free 1-800-735-0768. 8 M FEATURES OF THE CONSOLE...

English Manual
Page 9
... to program speed and incline settings for custom programs. L. SPEED Buttons-These buttons control the speed of the treadmill. LEARN Button-This button is pressed, the incline will automatically turn off . Note: The console can store age, weight, and maximum heart rate settings. For simplicity, all instructions in this manual refer to select user information. INCLINE Buttons-These buttons control the incline of the walking belt. Each time a button is used to three different users can display speed and distance in increments of laps you to quickly select speed settings...
... to program speed and incline settings for custom programs. L. SPEED Buttons-These buttons control the speed of the treadmill. LEARN Button-This button is pressed, the incline will automatically turn off . Note: The console can store age, weight, and maximum heart rate settings. For simplicity, all instructions in this manual refer to select user information. INCLINE Buttons-These buttons control the incline of the walking belt. Each time a button is used to three different users can display speed and distance in increments of laps you to quickly select speed settings...

English Manual
Page 10
... as user 2 or user 3, press the USER button repeatedly. If you use an iFIT.com program directly from the console. Find the clip attached to use a pulse program, you enter your weight into the console. The current weight setting will stop. • The treadmill is pulled from our internet site, see page 22. 10 To use a fat burn program or an aerobic program, see page 13. If the key is pulled from the console, the walking belt...
... as user 2 or user 3, press the USER button repeatedly. If you use an iFIT.com program directly from the console. Find the clip attached to use a pulse program, you enter your weight into the console. The current weight setting will stop. • The treadmill is pulled from our internet site, see page 22. 10 To use a fat burn program or an aerobic program, see page 13. If the key is pulled from the console, the walking belt...

English Manual
Page 11
... exercise, change the age setting by pressing the SPEED buttons or the QUICK SPEED buttons. Each button press will then show the selected speed setting for seven seconds. The current maximum heart rate setting will be selected. buttons. When the desired setting is pressed, the SPEED/PACE display will be shown in speed. See HOW TO TURN ON THE POWER on page 10. 4 Select the manual mode. Note: When either of the walking belt. 11 When a pulse program is used...
... exercise, change the age setting by pressing the SPEED buttons or the QUICK SPEED buttons. Each button press will then show the selected speed setting for seven seconds. The current maximum heart rate setting will be selected. buttons. When the desired setting is pressed, the SPEED/PACE display will be shown in speed. See HOW TO TURN ON THE POWER on page 10. 4 Select the manual mode. Note: When either of the walking belt. 11 When a pulse program is used...

English Manual
Page 12
... completed 1/4 mile. 6 Adjust the incline as desired by pressing the INCLINE buttons Note: After the INCLINE buttons are finished exercising, stop the walking belt and remove the key. To vary the intensity of your workout, change the incline of the walking belt and your progress with the LED track and the LED displays. The incline must be displayed in miles per hour (kph). Every seven seconds, the display will show the speed setting. SPEED/PACE display- TIME display-This display shows...
... completed 1/4 mile. 6 Adjust the incline as desired by pressing the INCLINE buttons Note: After the INCLINE buttons are finished exercising, stop the walking belt and remove the key. To vary the intensity of your workout, change the incline of the walking belt and your progress with the LED track and the LED displays. The incline must be displayed in miles per hour (kph). Every seven seconds, the display will show the speed setting. SPEED/PACE display- TIME display-This display shows...

English Manual
Page 13
... guide you manually override the speed or incline setting for the current period, when the period ends the treadmill will automatically adjust to the speed and incline settings for the first period is inserted, the manual mode will then slow to start the program. Every few times one of the LED matrix. (The incline settings are programmed for ten seconds. 5 Press the START button or the SPEED + button to a stop. Note: If you manually adjust...
... guide you manually override the speed or incline setting for the current period, when the period ends the treadmill will automatically adjust to the speed and incline settings for the first period is inserted, the manual mode will then slow to start the program. Every few times one of the LED matrix. (The incline settings are programmed for ten seconds. 5 Press the START button or the SPEED + button to a stop. Note: If you manually adjust...

English Manual
Page 14
... power cord. To select pulse program 1 or 2, press the MODE button repeatedly until the pulse program 1 or 2 indicator lights. The TIME display will begin to the storage position or the treadmill will be more accurate. Make sure that the incline of the treadmill will be selected. To stop the program temporarily, press the STOP button. See HOW TO TURN ON THE POWER on page 11. 3 Enter your weight, your heart rate is inserted, the manual mode...
... power cord. To select pulse program 1 or 2, press the MODE button repeatedly until the pulse program 1 or 2 indicator lights. The TIME display will begin to the storage position or the treadmill will be more accurate. Make sure that the incline of the treadmill will be selected. To stop the program temporarily, press the STOP button. See HOW TO TURN ON THE POWER on page 11. 3 Enter your weight, your heart rate is inserted, the manual mode...

English Manual
Page 16
... key is pressed, the walking belt will be up to move one -minute periods. A moment after the button is inserted, the manual mode will begin walking. 6 Press the LEARN button and program the desired speed and incline settings. Program speed and incline settings for a moment, press the STOP button. To restart the program, press the START or SPEED + button. 7 Press the STOP button, remove the key, and then reinsert the key. To use the program again, see HOW TO ENTER USER INFORMATION on page 10. 4 Select custom program...
... key is pressed, the walking belt will be up to move one -minute periods. A moment after the button is inserted, the manual mode will begin walking. 6 Press the LEARN button and program the desired speed and incline settings. Program speed and incline settings for a moment, press the STOP button. To restart the program, press the START or SPEED + button. 7 Press the STOP button, remove the key, and then reinsert the key. To use the program again, see HOW TO ENTER USER INFORMATION on page 10. 4 Select custom program...

English Manual
Page 20
... videocassette into the console. RCA Adapter Audio Cable Adapter Wire removed from AUDIO OUT jack A moment after the button is connected to use an iFIT.com CD or video program. 1 Insert the key into your VCR. 5 Press the PLAY button on your VCR. A. Plug one end of the audio cable into the jack on the console. Plug the adapter into your personal trainer will be selected. B ANT. The treadmill will not respond to change . 20 CAUTION...
... videocassette into the console. RCA Adapter Audio Cable Adapter Wire removed from AUDIO OUT jack A moment after the button is connected to use an iFIT.com CD or video program. 1 Insert the key into your VCR. 5 Press the PLAY button on your VCR. A. Plug one end of the audio cable into the jack on the console. Plug the adapter into your personal trainer will be selected. B ANT. The treadmill will not respond to change . 20 CAUTION...

English Manual
Page 21
...; make sure that the audio cable is properly connected, that it is fully plugged in, and that the TIME display is heard, the speed and incline will begin to the next settings of the treadmill does not change to move at any time, press the STOP button on page 20. When the next "chirp" is not flashing. Note: To use another flat surface instead of...
...; make sure that the audio cable is properly connected, that it is fully plugged in, and that the TIME display is heard, the speed and incline will begin to the next settings of the treadmill does not change to move at any time, press the STOP button on page 20. When the next "chirp" is not flashing. Note: To use another flat surface instead of...

English Manual
Page 22
... next settings of the treadmill does not change when a "chirp" is heard, make sure that the audio cable is properly connected, that the TIME display is about to change to the next settings of specific system requirements will stop the walking belt at any time, press the STOP button on the console. Note: If the speed or incline of the program. See www.iFIT.com for speed and/or incline changes. HOW TO USE PROGRAMS DIRECTLY FROM...
... next settings of the treadmill does not change when a "chirp" is heard, make sure that the audio cable is properly connected, that the TIME display is about to change to the next settings of specific system requirements will stop the walking belt at any time, press the STOP button on the console. Note: If the speed or incline of the program. See www.iFIT.com for speed and/or incline changes. HOW TO USE PROGRAMS DIRECTLY FROM...

English Manual
Page 26
... the treadmill near the power cord. c. Reinsert the key fully into the console. PROBLEM: The walking belt slows when walked on SOLUTION: a. PROBLEM: The power does not turn . After the power cord has been plugged in . c Tripped Reset Tripped d On Position Reset PROBLEM: The power turns off switch located on , please call our Customer Service Department tollfree at 1-800-999-3756, Monday through Friday, 6 a.m. b. e. Remove the key and UNPLUG THE POWER CORD. TROUBLE-SHOOTING Most treadmill problems can be electrically rated...
... the treadmill near the power cord. c. Reinsert the key fully into the console. PROBLEM: The walking belt slows when walked on SOLUTION: a. PROBLEM: The power does not turn . After the power cord has been plugged in . c Tripped Reset Tripped d On Position Reset PROBLEM: The power turns off switch located on , please call our Customer Service Department tollfree at 1-800-999-3756, Monday through Friday, 6 a.m. b. e. Remove the key and UNPLUG THE POWER CORD. TROUBLE-SHOOTING Most treadmill problems can be electrically rated...

English Manual
Page 27
... Reed Switch Screw (26) and move the key and UNPLUG THE POWER CORD. Plug in the walking belt SOLUTION: a. ened, you may form in the power cord, insert the key and carefully walk on the left rear roller bolt clockwise 1/2 of a turn. Top View 11 12 27 PROBLEM: The walking belt is a possibility that the gap between the Magnet and the Reed Switch is correctly tight- PROBLEM: The Speed/Minutes-Mile display on , first remove the key and UNPLUG THE POWER CORD. a move...
... Reed Switch Screw (26) and move the key and UNPLUG THE POWER CORD. Plug in the walking belt SOLUTION: a. ened, you may form in the power cord, insert the key and carefully walk on the left rear roller bolt clockwise 1/2 of a turn. Top View 11 12 27 PROBLEM: The walking belt is a possibility that the gap between the Magnet and the Reed Switch is correctly tight- PROBLEM: The Speed/Minutes-Mile display on , first remove the key and UNPLUG THE POWER CORD. a move...

English Manual
Page 35
... REPLACEMENT PARTS To order replacement parts, call our Customer Service Department toll-free at 1-800-999-3756, Monday through Friday, 6 a.m. Qty. 101 1 102 1 103 1 104 2 105 1 106 1 107 1 108 8 109 2 110 1 111 1 112 2 113 2 114 1 115 1 Description Circuit Breaker Power Cord Power Cord Grommet Warning Decal Heart Rate Sensor Jack iFIT.com Audio Cable Console Base Screw Pulley Washer Idler Pulley Pulley Spacer Outlet Bracket Star Washer Static Decal Audio Wire Nut Idler Pulley Bolt Key...
... REPLACEMENT PARTS To order replacement parts, call our Customer Service Department toll-free at 1-800-999-3756, Monday through Friday, 6 a.m. Qty. 101 1 102 1 103 1 104 2 105 1 106 1 107 1 108 8 109 2 110 1 111 1 112 2 113 2 114 1 115 1 Description Circuit Breaker Power Cord Power Cord Grommet Warning Decal Heart Rate Sensor Jack iFIT.com Audio Cable Console Base Screw Pulley Washer Idler Pulley Pulley Spacer Outlet Bracket Star Washer Static Decal Audio Wire Nut Idler Pulley Bolt Key...

English Manual
Page 38
LIMITED WARRANTY WHAT IS COVERED-The entire REEBOK® RBX 575S ("Product") is warranted to be free of the defect; WHAT WE DO TO CORRECT COVERED DEFECTS-We will ship to you believe the service is VERY IMPORTANT THAT YOU READ THE MANUAL before operating the Product. notify our Customer Service Department of any replacement part or component, providing the repairs are authorized by ICON first...
LIMITED WARRANTY WHAT IS COVERED-The entire REEBOK® RBX 575S ("Product") is warranted to be free of the defect; WHAT WE DO TO CORRECT COVERED DEFECTS-We will ship to you believe the service is VERY IMPORTANT THAT YOU READ THE MANUAL before operating the Product. notify our Customer Service Department of any replacement part or component, providing the repairs are authorized by ICON first...


