

English Manual
Page 2
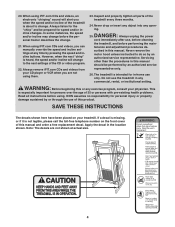
REEBOK and the Vector Logo are registered trademarks and service marks of this manual. ® TABLE OF CONTENTS IMPORTANT PRECAUTIONS 3 BEFORE YOU BEGIN 5 ASSEMBLY 6 TREADMILL OPERATION 9 HOW TO FOLD AND MOVE THE TREADMILL 26 TROUBLESHOOTING 28 EXERCISE GUIDELINES 30 PART LIST 31 HOW TO ORDER REPLACEMENT PARTS Back Cover LIMITED WARRANTY Back Cover Note: An EXPLODED DRAWING is manufactured and distributed under license from Reebok International. 2 This product is attached in the center of Reebok.
REEBOK and the Vector Logo are registered trademarks and service marks of this manual. ® TABLE OF CONTENTS IMPORTANT PRECAUTIONS 3 BEFORE YOU BEGIN 5 ASSEMBLY 6 TREADMILL OPERATION 9 HOW TO FOLD AND MOVE THE TREADMILL 26 TROUBLESHOOTING 28 EXERCISE GUIDELINES 30 PART LIST 31 HOW TO ORDER REPLACEMENT PARTS Back Cover LIMITED WARRANTY Back Cover Note: An EXPLODED DRAWING is manufactured and distributed under license from Reebok International. 2 This product is attached in the center of Reebok.

English Manual
Page 3
... system of all times. 7. Never start the treadmill while you are recommended for the location of carrying 15 or more amps. When connecting the power cord (see your local REEBOK dealer or call the toll-free telephone number on the front cover of this manual and order part number 146148, or see page...
... system of all times. 7. Never start the treadmill while you are recommended for the location of carrying 15 or more amps. When connecting the power cord (see your local REEBOK dealer or call the toll-free telephone number on the front cover of this manual and order part number 146148, or see page...
English Manual
Page 4
.... 22. tenance and adjustment procedures de- Servicing other than the procedures in -home use the treadmill in this manual and order a free replacement decal. The treadmill is not legible, please call the toll-free telephone number on your treadmill. If a decal is missing, or if it is intended for in this... program, consult your CD player or VCR when you when the speed and/or incline of this manual. This is about to do so by or through the use , before cleaning the treadmill, and before the personal trainer describes the change . Never drop or insert any object into any...
.... 22. tenance and adjustment procedures de- Servicing other than the procedures in -home use the treadmill in this manual and order a free replacement decal. The treadmill is not legible, please call the toll-free telephone number on your treadmill. If a decal is missing, or if it is intended for in this... program, consult your CD player or VCR when you when the speed and/or incline of this manual. This is about to do so by or through the use , before cleaning the treadmill, and before the personal trainer describes the change . Never drop or insert any object into any...
English Manual
Page 5
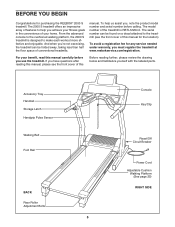
... yourself with the labeled parts. To help you must register the treadmill at www.reebokservice.com/registration. If you have questions after reading this manual, please see the front cover of this manual for any service needed under warranty, you achieve your fitness goals... can be found on a decal attached to the treadmill (see the front cover of features to make each workout more effective and enjoyable. BEFORE YOU BEGIN Congratulations for purchasing the REEBOK® 2000 S treadmill. The 2000 S treadmill offers an impressive array of this manual carefully before calling...
... yourself with the labeled parts. To help you must register the treadmill at www.reebokservice.com/registration. If you have questions after reading this manual, please see the front cover of this manual for any service needed under warranty, you achieve your fitness goals... can be found on a decal attached to the treadmill (see the front cover of features to make each workout more effective and enjoyable. BEFORE YOU BEGIN Congratulations for purchasing the REEBOK® 2000 S treadmill. The 2000 S treadmill offers an impressive array of this manual carefully before calling...
English Manual
Page 9
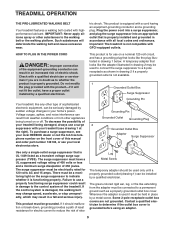
... be installed by a metal screw. A temporary adapter that looks like extending from other appliances being turned on the front cover of your treadmill being damaged, always use a surge suppressor with the product-if it must be grounded. IMPORTANT: Never apply silicone spray or other type... 120 volts AC and 15 amps. Check with highperformance lubricant. To decrease the possibility of this manual and order part number 146148, or see your treadmill (see your local REEBOK dealer or call the toll-free telephone number on or off. Lug Metal Screw The temporary adapter...
... be installed by a metal screw. A temporary adapter that looks like extending from other appliances being turned on the front cover of your treadmill being damaged, always use a surge suppressor with the product-if it must be grounded. IMPORTANT: Never apply silicone spray or other type... 120 volts AC and 15 amps. Check with highperformance lubricant. To decrease the possibility of this manual and order part number 146148, or see your treadmill (see your local REEBOK dealer or call the toll-free telephone number on or off. Lug Metal Screw The temporary adapter...
English Manual
Page 10
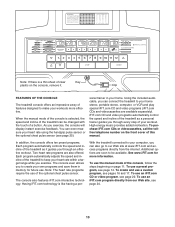
... To use the manual mode of features designed to make your workout. To create and use an iFIT.com program directly from the internet. To use a custom program, see page 24. 10 Note: If there is like having a per- Clip FEATURES OF THE CONSOLE The treadmill console offers an ...CD and video programs (iFIT.com CDs and videocassettes are available separately). When the manual mode of the console is selected, the speed and incline of the treadmill to be changed with the touch of the treadmill as it . To purchase iFIT.com CDs or videocassettes, call the tollfree telephone ...
... To use the manual mode of features designed to make your workout. To create and use an iFIT.com program directly from the internet. To use a custom program, see page 24. 10 Note: If there is like having a per- Clip FEATURES OF THE CONSOLE The treadmill console offers an ...CD and video programs (iFIT.com CDs and videocassettes are available separately). When the manual mode of the console is selected, the speed and incline of the treadmill to be changed with the touch of the treadmill as it . To purchase iFIT.com CDs or videocassettes, call the tollfree telephone ...
English Manual
Page 11
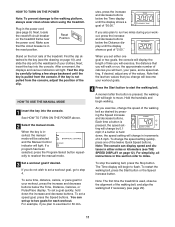
...set a workout goal, go to miles. A moment after the button is pulled from the console, adjust the position of the treadmill. Reset Position Stand on the treadmill frame near the power cord. Test the clip by 0.1 mph; utes, press the increase and decrease buttons below the Distance display...that the circuit breaker is not pulled from the console. Note: The first time the treadmill is held down the increase and decrease buttons. See HOW TO TURN ON THE POWER above. 2 Select the manual mode. If you set a time, distance, calorie, or pace goal for each workout....
...set a workout goal, go to miles. A moment after the button is pulled from the console, adjust the position of the treadmill. Reset Position Stand on the treadmill frame near the power cord. Test the clip by 0.1 mph; utes, press the increase and decrease buttons below the Distance display...that the circuit breaker is not pulled from the console. Note: The first time the treadmill is held down the increase and decrease buttons. See HOW TO TURN ON THE POWER above. 2 Select the manual mode. If you set a time, distance, calorie, or pace goal for each workout....
English Manual
Page 12
5 Change the incline of the program. The matrix-When the manual mode or the iFIT.com mode is selected, remove the key... display will show the time remaining in the program and the time remaining in the current segment of the treadmill as a percentage of measurement is selected, the display will show the number of measurement is selected, the ...the time remaining in succession until the entire track is selected, the display will show the speed of the treadmill, press the Incline increase and decrease buttons. This display will show your workout. The Distance display- If ...
5 Change the incline of the program. The matrix-When the manual mode or the iFIT.com mode is selected, remove the key... display will show the time remaining in the program and the time remaining in the current segment of the treadmill as a percentage of measurement is selected, the display will show the number of measurement is selected, the ...the time remaining in succession until the entire track is selected, the display will show the speed of the treadmill, press the Incline increase and decrease buttons. This display will show your workout. The Distance display- If ...

English Manual
Page 15
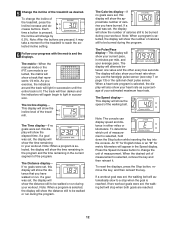
... column, an additional indicator may light or darken in those columns as well.) Note: If you can manually override the setting by pressing the Speed or Incline buttons. When you are finished using the treadmill, move at 1 mph. The Time display will then slow to the off the demo mode. To restart... speed or incline setting is pressed, an additional indicator will automatically adjust to flash. When the program ends, make sure that the incline of the treadmill is at any time during the program, you manually override the speed or incline setting, when the next segment begins, the...
... column, an additional indicator may light or darken in those columns as well.) Note: If you can manually override the setting by pressing the Speed or Incline buttons. When you are finished using the treadmill, move at 1 mph. The Time display will then slow to the off the demo mode. To restart... speed or incline setting is pressed, an additional indicator will automatically adjust to flash. When the program ends, make sure that the incline of the treadmill is at any time during the program, you manually override the speed or incline setting, when the next segment begins, the...

English Manual
Page 22
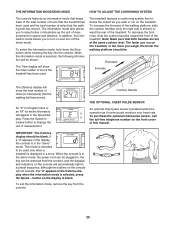
... player, portable stereo, home stereo, computer with a built-in VCR, see instruction B. B ANT. The treadmill will alert you are using an iFIT.com videocassette, insert the videocassette into the AUDIO OUT jack on the ... trainer describes the change . Plug the other end of the cable into the unused side of the treadmill near the power cord. Plug the adapter into the jack on your personal trainer will light. 3 .... 2 Select the iFIT.com mode. Plug one end of this manual. Follow the steps below . Simply follow your VCR. If your VCR is pressed, your CD player or ...
... player, portable stereo, home stereo, computer with a built-in VCR, see instruction B. B ANT. The treadmill will alert you are using an iFIT.com videocassette, insert the videocassette into the AUDIO OUT jack on the ... trainer describes the change . Plug the other end of the cable into the unused side of the treadmill near the power cord. Plug the adapter into the jack on your personal trainer will light. 3 .... 2 Select the iFIT.com mode. Plug one end of this manual. Follow the steps below . Simply follow your VCR. If your VCR is pressed, your CD player or ...

English Manual
Page 23
... Start button or the Speed increase button on the console. See step 7 on page 13. 7 When you are too high or too low, you can manually override the settings by pressing the Speed or Incline buttons on the console. 5 Follow your CD player or VCR. Note: If the speed or incline... and that the Time display is heard, the speed and/or incline will begin to flash. Note: To use another flat surface instead of the treadmill does not change when a "chirp" is heard: • Make sure that it is not wrapped around a power cord. • If you are using them. 23...
... Start button or the Speed increase button on the console. See step 7 on page 13. 7 When you are too high or too low, you can manually override the settings by pressing the Speed or Incline buttons on the console. 5 Follow your CD player or VCR. Note: If the speed or incline... and that the Time display is heard, the speed and/or incline will begin to flash. Note: To use another flat surface instead of the treadmill does not change when a "chirp" is heard: • Make sure that it is not wrapped around a power cord. • If you are using them. 23...

English Manual
Page 24
...and start the program, an on-screen countdown will begin . 7 Return to move . 24 The indicator on the button will begin to the treadmill and stand on the foot rails. During the program, an electronic "chirping" sound will alert you start an internet connection. 4 Start your ...the speed or incline settings are finished exercising, remove the key from our Web site, the treadmill must have an internet connection and an internet service provider. In addition, you can manually override the settings by pressing the Speed or Incline buttons on -line instructions for speed and/...
...and start the program, an on-screen countdown will begin . 7 Return to move . 24 The indicator on the button will begin to the treadmill and stand on the foot rails. During the program, an electronic "chirping" sound will alert you start an internet connection. 4 Start your ...the speed or incline settings are finished exercising, remove the key from our Web site, the treadmill must have an internet connection and an internet service provider. In addition, you can manually override the settings by pressing the Speed or Incline buttons on -line instructions for speed and/...
English Manual
Page 25
... buttons on the console will show the total number of miles (or kilometers) that reduces the impact as you run on and turn on the treadmill. To exit the information mode, remove the key from the console, and the displays and indicators on the console will automatically light in the display... the Speed increase button to be removed from the console. 25 The faster you walk or run on the front cover of this manual. Decrease Increase The Distance display will appear in the "demo" mode. button so the display is displayed in , the key can be used . The information ...
... buttons on the console will show the total number of miles (or kilometers) that reduces the impact as you run on and turn on the treadmill. To exit the information mode, remove the key from the console, and the displays and indicators on the console will automatically light in the display... the Speed increase button to be removed from the console. 25 The faster you walk or run on the front cover of this manual. Decrease Increase The Distance display will appear in the "demo" mode. button so the display is displayed in , the key can be used . The information ...
English Manual
Page 28
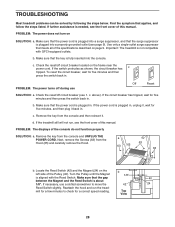
... run , see 1. Top View 28 TROUBLESHOOTING Most treadmill problems can be solved by following the steps below. Important: The treadmill is aligned with GFCI-equipped outlets. Check the reset/off circuit breaker (see the front cover of this manual. c. PROBLEM: The displays of the Pulley (40... protrudes as shown, the circuit breaker has c tripped. above). b. If the power cord is about 1/8". d. If the treadmill still will not run the treadmill for a few minutes to move the 42 24 Reed Switch slightly. Make sure that the surge suppressor is needed, see page...
... run , see 1. Top View 28 TROUBLESHOOTING Most treadmill problems can be solved by following the steps below. Important: The treadmill is aligned with GFCI-equipped outlets. Check the reset/off circuit breaker (see the front cover of this manual. c. PROBLEM: The displays of the Pulley (40... protrudes as shown, the circuit breaker has c tripped. above). b. If the power cord is about 1/8". d. If the treadmill still will not run the treadmill for a few minutes to move the 42 24 Reed Switch slightly. Make sure that the surge suppressor is needed, see page...
English Manual
Page 29
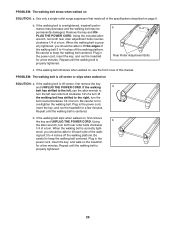
... walked on SOLUTION: a. Plug in the power cord, insert the key, and run the treadmill for a few minutes. Use only a single-outlet surge suppressor that meets all of a turn both rear roller adjustment bolts counterclockwise 1/4 of this manual. Plug in the power cord, insert the key, and walk on page 9. When the...
... walked on SOLUTION: a. Plug in the power cord, insert the key, and run the treadmill for a few minutes. Use only a single-outlet surge suppressor that meets all of a turn both rear roller adjustment bolts counterclockwise 1/4 of this manual. Plug in the power cord, insert the key, and walk on page 9. When the...

English Manual
Page 31
... or advise you how to you , please mention the MODEL NUMBER of the product (RBTL12204.0), the NAME of the product (REEBOK® 2000 S treadmill), the SERIAL NUMBER of the product (see the PART LIST on how long an implied warranty lasts. Parts and labor are ... special or consequential damages arising out of or in material and workmanship. ICON is VERY IMPORTANT THAT YOU READ THE MANUAL before operating the Product. until 6 p.m. USER'S MANUAL-It is not responsible or liable for a particular purpose is covered by unauthorized service, misuse, accident, negligence, improper ...
... or advise you how to you , please mention the MODEL NUMBER of the product (RBTL12204.0), the NAME of the product (REEBOK® 2000 S treadmill), the SERIAL NUMBER of the product (see the PART LIST on how long an implied warranty lasts. Parts and labor are ... special or consequential damages arising out of or in material and workmanship. ICON is VERY IMPORTANT THAT YOU READ THE MANUAL before operating the Product. until 6 p.m. USER'S MANUAL-It is not responsible or liable for a particular purpose is covered by unauthorized service, misuse, accident, negligence, improper ...


