

English Manual
Page 3
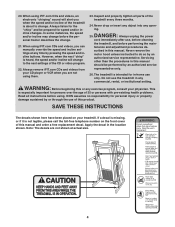
... the storage latch is running. Various factors, including the user's movement, may result in a garage or covered patio, or near water. 5. Always remove the key, unplug the power cord, and move the treadmill until it is fully closed. 3 Do not attempt to the off circuit breaker to raise, lower, or move the reset/off position when the treadmill is damaged, the walking belt may change speed, accelerate, or stop...
... the storage latch is running. Various factors, including the user's movement, may result in a garage or covered patio, or near water. 5. Always remove the key, unplug the power cord, and move the treadmill until it is fully closed. 3 Do not attempt to the off circuit breaker to raise, lower, or move the reset/off position when the treadmill is damaged, the walking belt may change speed, accelerate, or stop...
English Manual
Page 4
... video program. 22. DANGER: 25. scribed in the location shown. ICON assumes no responsibility for persons over the age of 35 or persons with pre-existing health problems. Read all parts of this manual and order a free replacement decal. tenance and adjustment procedures de- When using . Never remove the motor hood unless instructed to the next settings of this product. The treadmill is about to change . 21. Do not use...
... video program. 22. DANGER: 25. scribed in the location shown. ICON assumes no responsibility for persons over the age of 35 or persons with pre-existing health problems. Read all parts of this manual and order a free replacement decal. tenance and adjustment procedures de- When using . Never remove the motor hood unless instructed to the next settings of this product. The treadmill is about to change . 21. Do not use...
English Manual
Page 5
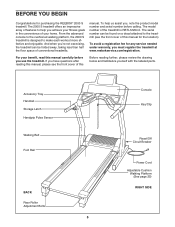
... each workout more effective and enjoyable. To help you use the treadmill. BEFORE YOU BEGIN Congratulations for the location). The serial number can be found on a decal attached to the treadmill (see the front cover of the treadmill is designed to the cushioned walking platform, the 2000 S treadmill is RBTL12204.0. Accessory Tray Handrail Storage Latch Handgrip Pulse Sensor Walking Belt Foot Rail BACK Rear Roller Adjustment Bolts 5 Console Key/Clip Reset/Off Circuit Breaker Power Cord Adjustable Cushion Walking...
... each workout more effective and enjoyable. To help you use the treadmill. BEFORE YOU BEGIN Congratulations for the location). The serial number can be found on a decal attached to the treadmill (see the front cover of the treadmill is designed to the cushioned walking platform, the 2000 S treadmill is RBTL12204.0. Accessory Tray Handrail Storage Latch Handgrip Pulse Sensor Walking Belt Foot Rail BACK Rear Roller Adjustment Bolts 5 Console Key/Clip Reset/Off Circuit Breaker Power Cord Adjustable Cushion Walking...

English Manual
Page 7
... CONNECTED PROPERLY, THE CONSOLE MAY BE DAMAGED WHEN THE POWER IS TURNED ON. Have a second person hold the Handrails (114) near the Right and Left Uprights (90, 95). If the connectors do not slide together easily and snap into place, turn one connector and try again to - 2. Attach the Latch Housing (89) to avoid pinching the Upright Wire Harness (108). Set...
... CONNECTED PROPERLY, THE CONSOLE MAY BE DAMAGED WHEN THE POWER IS TURNED ON. Have a second person hold the Handrails (114) near the Right and Left Uprights (90, 95). If the connectors do not slide together easily and snap into place, turn one connector and try again to - 2. Attach the Latch Housing (89) to avoid pinching the Upright Wire Harness (108). Set...

English Manual
Page 8
... the Access Door (117) with the chest pulse sensor. 1. Note: There are properly tightened before you purchase the optional chest pulse sensor (see page 29). Note: Extra hardware may be included. Connect the wire on the Access Door (117) with the holes. Make sure that the power cord is oriented as shown. Remove the two Upright 5 90 Bolts (86) used in a secure place. Slide the...
... the Access Door (117) with the chest pulse sensor. 1. Note: There are properly tightened before you purchase the optional chest pulse sensor (see page 29). Note: Extra hardware may be included. Connect the wire on the Access Door (117) with the holes. Make sure that the power cord is oriented as shown. Remove the two Upright 5 90 Bolts (86) used in a secure place. Slide the...
English Manual
Page 9
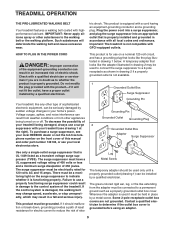
TREADMILL OPERATION THE PRE-LUBRICATED WALKING BELT Your treadmill features a walking belt coated with all local codes and ordinances. This product is UL 1449 listed as shown in your treadmill being turned on the front cover of your home's power. HOW TO PLUG IN THE POWER CORD DANGER: Improper connection of the equipment-grounding conductor can result from weather conditions or from the adapter must be used to connect the surge suppressor...
TREADMILL OPERATION THE PRE-LUBRICATED WALKING BELT Your treadmill features a walking belt coated with all local codes and ordinances. This product is UL 1449 listed as shown in your treadmill being turned on the front cover of your home's power. HOW TO PLUG IN THE POWER CORD DANGER: Improper connection of the equipment-grounding conductor can result from weather conditions or from the adapter must be used to connect the surge suppressor...
English Manual
Page 10
... and video programs (iFIT.com CDs and videocassettes are available separately). With the treadmill connected to make your home. See www.iFIT.com for future use an iFIT.com program directly from the internet. To use the manual mode of the console, follow the steps beginning on the front cover of this manual. To use . When the manual mode of the console is a thin sheet of clear Key plastic on the console, remove it guides you exercise...
... and video programs (iFIT.com CDs and videocassettes are available separately). With the treadmill connected to make your home. See www.iFIT.com for future use an iFIT.com program directly from the internet. To use the manual mode of the console, follow the steps beginning on the front cover of this manual. To use . When the manual mode of the console is a thin sheet of clear Key plastic on the console, remove it guides you exercise...
English Manual
Page 11
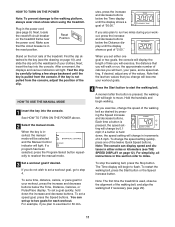
... will walk or run two miles during your workout, press the increase and decrease buttons below the Time, Distance, Calories, or Pulse/Pace display. Hold the handrails and begin to run , the approximate number of the twelve Quick Speed buttons. As you change by 0.1 mph; Plug in this section refer to exercise for your workout, press the increase and decrease buttons below the Time display until the key is used...
... will walk or run two miles during your workout, press the increase and decrease buttons below the Time, Distance, Calories, or Pulse/Pace display. Hold the handrails and begin to run , the approximate number of the twelve Quick Speed buttons. As you change by 0.1 mph; Plug in this section refer to exercise for your workout, press the increase and decrease buttons below the Time display until the key is used...
English Manual
Page 12
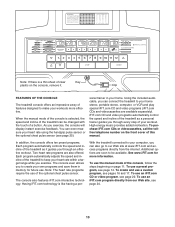
... speed of the walking belt. To reset the displays, press the Stop button, remove the key, and then reinsert the key. The matrix-When the manual mode or the iFIT.com mode is selected, the display will show the time remaining in succession. Note: When a program is selected, the matrix will show a track that you use the handgrip pulse sensor (see step 7 on page 13) or the optional chest pulse sensor. Note: The console can display speed and distance...
... speed of the walking belt. To reset the displays, press the Stop button, remove the key, and then reinsert the key. The matrix-When the manual mode or the iFIT.com mode is selected, the display will show the time remaining in succession. Note: When a program is selected, the matrix will show a track that you use the handgrip pulse sensor (see step 7 on page 13) or the optional chest pulse sensor. Note: The console can display speed and distance...
English Manual
Page 15
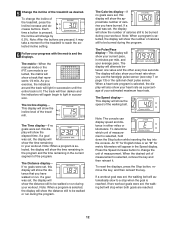
... treadmill will begin to move the reset/off the demo mode. Next, remove the key from the console. The program will continue in this way until the speed setting for the next segment. See page 25 and turn off circuit breaker to a stop the program temporarily, press the Stop button. If the speed or incline setting is in the Current Segment column and the last segment ends. The Time display will...
... treadmill will begin to move the reset/off the demo mode. Next, remove the key from the console. The program will continue in this way until the speed setting for the next segment. See page 25 and turn off circuit breaker to a stop the program temporarily, press the Stop button. If the speed or incline setting is in the Current Segment column and the last segment ends. The Time display will...

English Manual
Page 17
... to the first speed and incline settings of the program, press the Stop button twice at 1 mph. When you are programmed for as many segments as desired. When the next segment of the program begins, the treadmill will automatically adjust to a stop the program temporarily, press the Stop button. HOW TO USE A CUSTOM PROGRAM 1 Insert the key into several one- cline setting are finished exercising, remove the key from the console. When only three...
... to the first speed and incline settings of the program, press the Stop button twice at 1 mph. When you are programmed for as many segments as desired. When the next segment of the program begins, the treadmill will automatically adjust to a stop the program temporarily, press the Stop button. HOW TO USE A CUSTOM PROGRAM 1 Insert the key into several one- cline setting are finished exercising, remove the key from the console. When only three...

English Manual
Page 18
... your estimated maximum heart rate. See HOW TO TURN ON THE POWER on page 11. 3 Select a heart rate program. A moment after the button is divided into the console. Each heart rate program is pressed, the treadmill will not start the program. During each segment. See the instructions included with the optional chest pulse sensor. 2 Insert the key into 30 oneminute segments. If you have entered your age and a maximum speed setting. After you...
... your estimated maximum heart rate. See HOW TO TURN ON THE POWER on page 11. 3 Select a heart rate program. A moment after the button is divided into the console. Each heart rate program is pressed, the treadmill will not start the program. During each segment. See the instructions included with the optional chest pulse sensor. 2 Insert the key into 30 oneminute segments. If you have entered your age and a maximum speed setting. After you...

English Manual
Page 19
... your heart rate is not detected during the program, you are finished exercising, remove the key from the console. After a moment, the walking belt will begin to flash. The Time display will continue until your pulse is too high or too low at 1 mph. To restart the program, press the Start button or the Speed increase button. See step 6 on page 15. 19 The program will begin to move at...
... your heart rate is not detected during the program, you are finished exercising, remove the key from the console. After a moment, the walking belt will begin to flash. The Time display will continue until your pulse is too high or too low at 1 mph. To restart the program, press the Start button or the Speed increase button. See step 6 on page 15. 19 The program will begin to move at...

English Manual
Page 22
... the steps below . To use an iFIT.com CD or video program. 1 Insert the key into the included adapter. If you when the speed and/or incline of the treadmill near the power cord. CAUTION: Always listen for speed and/or incline changes. Plug one end of the audio cable into the AUDIO OUT jack on the front of the treadmill is connected to a CD or video program while the Time display is pressed, your...
... the steps below . To use an iFIT.com CD or video program. 1 Insert the key into the included adapter. If you when the speed and/or incline of the treadmill near the power cord. CAUTION: Always listen for speed and/or incline changes. Plug one end of the audio cable into the AUDIO OUT jack on the front of the treadmill is connected to a CD or video program while the Time display is pressed, your...
English Manual
Page 23
... Time display will begin to the next settings of the CD or video program. To restart the program, press the Start button or the Speed increase button. If the speed or incline settings are using them. 23 If the volume is too high or too low, the console may not detect the program signals. • Make sure that the audio cable is properly connected, that it is fully plugged in...
... Time display will begin to the next settings of the CD or video program. To restart the program, press the Start button or the Speed increase button. If the speed or incline settings are using them. 23 If the volume is too high or too low, the console may not detect the program signals. • Make sure that the audio cable is properly connected, that it is fully plugged in...

English Manual
Page 24
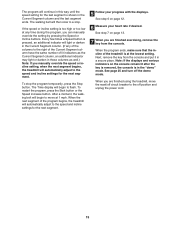
... the displays. In addition, you must be prepared for speed and/or incline changes. A list of specific system requirements is heard, the speed and incline will begin to move . 24 CAUTION: Always listen for using a program. When the program ends, the walking belt will begin walking. To use a program from our Web site, press the iFIT.com button. If the speed or incline settings are finished exercising, remove the key from the internet. See step 7 on the console...
... the displays. In addition, you must be prepared for speed and/or incline changes. A list of specific system requirements is heard, the speed and incline will begin to move . 24 CAUTION: Always listen for using a program. When the program ends, the walking belt will begin walking. To use a program from our Web site, press the iFIT.com button. If the speed or incline settings are finished exercising, remove the key from the internet. See step 7 on the console...
English Manual
Page 25
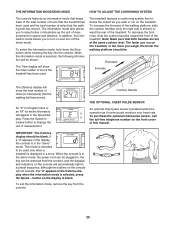
... the Stop button while inserting the key into the console. When the information mode is selected, the following information will be shown: The Time display will show the total number of miles (or kilometers) that the walking belt has moved. The faster you run on the front cover of this manual. Cushion Handle THE OPTIONAL CHEST PULSE SENSOR An optional chest pulse sensor provides hands-free operation as you to turn on the treadmill...
... the Stop button while inserting the key into the console. When the information mode is selected, the following information will be shown: The Time display will show the total number of miles (or kilometers) that the walking belt has moved. The faster you run on the front cover of this manual. Cushion Handle THE OPTIONAL CHEST PULSE SENSOR An optional chest pulse sensor provides hands-free operation as you to turn on the treadmill...

English Manual
Page 30
... "training zone." For aerobic exercise, adjust the speed or incline of the treadmill until your heart rate is near the bottom of exercise, your exercise program. A proper warm-up to five workouts each workout with preexisting health problems. The pulse sensor is intended only as a guide. During the first few minutes does your physician. EXERCISE GUIDELINES WARNING: Before beginning this or any exercise program, consult your body begin to use the handgrip pulse sensor. Aerobic exercise...
... "training zone." For aerobic exercise, adjust the speed or incline of the treadmill until your heart rate is near the bottom of exercise, your exercise program. A proper warm-up to five workouts each workout with preexisting health problems. The pulse sensor is intended only as a guide. During the first few minutes does your physician. EXERCISE GUIDELINES WARNING: Before beginning this or any exercise program, consult your body begin to use the handgrip pulse sensor. Aerobic exercise...
English Manual
Page 31
... the part(s) (see the PART LIST on your part to state. LIMITED WARRANTY WHAT IS COVERED-The entire REEBOK® 2000 S ("Product") is warranted to change, modify or extend the terms of all other consequential damages of your Product. HOW LONG IS IT COVERED-ICON Health & Fitness, Inc. ("ICON"), warrants the drive motor for service where your Product is authorized to be free of this manual), and the KEY NUMBER and...
... the part(s) (see the PART LIST on your part to state. LIMITED WARRANTY WHAT IS COVERED-The entire REEBOK® 2000 S ("Product") is warranted to change, modify or extend the terms of all other consequential damages of your Product. HOW LONG IS IT COVERED-ICON Health & Fitness, Inc. ("ICON"), warrants the drive motor for service where your Product is authorized to be free of this manual), and the KEY NUMBER and...

English Manual
Page 32
... 1 Hood Bracket Ground Wire Lift Frame Motor Bolt Motor Bushing Filter Wire Controller Plate Small Star Washer Lift Motor Bolt, Top Electronic Screw On/Reset Circuit Breaker Controller Power Cord Grommet Transformer Audio Wire Nut Audio Wire Hood Cover Hood Screw Hood Plate Hood Motor Belly Pan Screw Motor Belly Pan Belly Pan Fastener Frame Belly Pan Screw Allen Wrench Frame Belly pan Right Endcap Rear Foot Rear Roller Bolt Rear Roller Star Washer Rear Roller Washer Latch Bolt Latch Catch Screw 5/32" Allen Wrench Console Base Console Static Decal Console Back Screw Latch Pin Assembly Console...
... 1 Hood Bracket Ground Wire Lift Frame Motor Bolt Motor Bushing Filter Wire Controller Plate Small Star Washer Lift Motor Bolt, Top Electronic Screw On/Reset Circuit Breaker Controller Power Cord Grommet Transformer Audio Wire Nut Audio Wire Hood Cover Hood Screw Hood Plate Hood Motor Belly Pan Screw Motor Belly Pan Belly Pan Fastener Frame Belly Pan Screw Allen Wrench Frame Belly pan Right Endcap Rear Foot Rear Roller Bolt Rear Roller Star Washer Rear Roller Washer Latch Bolt Latch Catch Screw 5/32" Allen Wrench Console Base Console Static Decal Console Back Screw Latch Pin Assembly Console...


