RTD396 Product Manual
Page 2
... receiving antenna. • Increase the separation between the equipment and receiver. • Connect the equipment into AC power outlets one way. Make sure there is adequate space around the unit to provide proper air flow for help. Removing the power plug is the only way to completely remove power from that to which can radiate radio frequency energy and, if not installed and used in a residential installation...
... receiving antenna. • Increase the separation between the equipment and receiver. • Connect the equipment into AC power outlets one way. Make sure there is adequate space around the unit to provide proper air flow for help. Removing the power plug is the only way to completely remove power from that to which can radiate radio frequency energy and, if not installed and used in a residential installation...
RTD396 Product Manual
Page 3
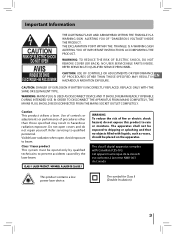
... THE LIGHTNING FLASH AND ARROWHEAD WITHIN THE TRIANGLE IS A WARNING SIGN ALERTING YOU OF "DANGEROUS VOLTAGE" INSIDE THE PRODUCT. REPLACE ONLY WITH THE SAME OR EQUIVALENT TYPE. This product contains a low power laser device. WARNING: TO REDUCE THE RISK OF ELECTRIC SHOCK, DO NOT REMOVE COVER (OR BACK). NO USER SERVICEABLE PARTS INSIDE. WARNING: MAINS PLUG IS USED AS DISCONNECT...
... THE LIGHTNING FLASH AND ARROWHEAD WITHIN THE TRIANGLE IS A WARNING SIGN ALERTING YOU OF "DANGEROUS VOLTAGE" INSIDE THE PRODUCT. REPLACE ONLY WITH THE SAME OR EQUIVALENT TYPE. This product contains a low power laser device. WARNING: TO REDUCE THE RISK OF ELECTRIC SHOCK, DO NOT REMOVE COVER (OR BACK). NO USER SERVICEABLE PARTS INSIDE. WARNING: MAINS PLUG IS USED AS DISCONNECT...
RTD396 Product Manual
Page 6
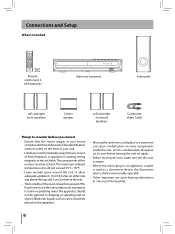
... unit, make sure the disc tray is empty. • Where the mains plug or an appliance coupler is used as vases, should not exceed 75%. The components of heat (fireplace) or appliances creating strong magnetic or electric fields. Remote control and 2 AAA batteries Main unit (receiver) Subwoofer Left and right front speakers Center speaker Left and right Surround Speakers Composite Video Cable Things to use and cleaning...
... unit, make sure the disc tray is empty. • Where the mains plug or an appliance coupler is used as vases, should not exceed 75%. The components of heat (fireplace) or appliances creating strong magnetic or electric fields. Remote control and 2 AAA batteries Main unit (receiver) Subwoofer Left and right front speakers Center speaker Left and right Surround Speakers Composite Video Cable Things to use and cleaning...
RTD396 Product Manual
Page 7
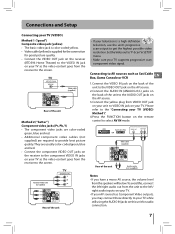
... AV source. 3.Connect the yellow plug from the speakers will be low. Sat/Cable Box VIDEO OUT AUDIO OUT Video cable (supplied) VIDEO IN VIDEO OUT Y T V AUDIO OUT PB R L PR LL R COMPONENT AUDIO IN VIDEO OUT DIGITAL AUDIO OUT Rear of the unit Y PB PR VIDEO IN Y VIDEO OUT TV AUDIO OUT PB R L PR LL R COMPONENT AUDIO IN VIDEO OUT DIGITAL AUDIO OUT Rear of the unit Method 2 ("better") Component video jacks (Pr, Pb, Y) • The component video jacks are color-coded green, blue and red. • Additional component video cables...
... AV source. 3.Connect the yellow plug from the speakers will be low. Sat/Cable Box VIDEO OUT AUDIO OUT Video cable (supplied) VIDEO IN VIDEO OUT Y T V AUDIO OUT PB R L PR LL R COMPONENT AUDIO IN VIDEO OUT DIGITAL AUDIO OUT Rear of the unit Y PB PR VIDEO IN Y VIDEO OUT TV AUDIO OUT PB R L PR LL R COMPONENT AUDIO IN VIDEO OUT DIGITAL AUDIO OUT Rear of the unit Method 2 ("better") Component video jacks (Pr, Pb, Y) • The component video jacks are color-coded green, blue and red. • Additional component video cables...
RTD396 Product Manual
Page 8
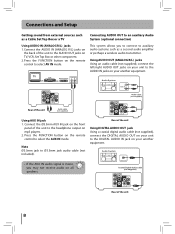
... VIDEO IN VIDEO OUT Y T V AUDIO OUT PB R L PR LL R COMPONENT AUDIO IN VIDEO OUT DIGITAL AUDIO OUT Using AUX IN jack 1. Rear of the unit to the headphone output on the remote control to Ø3.5mm jack audio cable (not included). Connect the Ø3.5mm AUX IN jack on the front panel of the unit Using DIGITAL AUDIO OUT jack Using a coaxial digital audio cable (not supplied), connect the DIGITAL AUDIO OUT on your unit to select AV IN mode. Audio System • If the AUX IN audio signal...
... VIDEO IN VIDEO OUT Y T V AUDIO OUT PB R L PR LL R COMPONENT AUDIO IN VIDEO OUT DIGITAL AUDIO OUT Using AUX IN jack 1. Rear of the unit to the headphone output on the remote control to Ø3.5mm jack audio cable (not included). Connect the Ø3.5mm AUX IN jack on the front panel of the unit Using DIGITAL AUDIO OUT jack Using a coaxial digital audio cable (not supplied), connect the DIGITAL AUDIO OUT on your unit to select AV IN mode. Audio System • If the AUX IN audio signal...
RTD396 Product Manual
Page 9
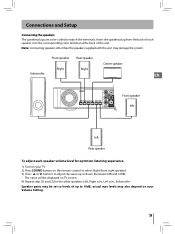
... 10dB). Note: Connecting speakers other speakers Left, Right surr., Left surr., Subwoofer. Speaker gains may be displayed on TV screen. 4) Repeat step (1) and (2) for optimum listening experience. 1) Turn on your TV. 2) Press SOUND button on your Volume Setting. 9 Front speaker Rear speaker Center speaker Right Right Subwoofer EN VIDE IN VIDEO OUT Y Front speaker RIGHT PB R LEFT FRONT REAR SUBWOOFER CENTER REAR FRONT PR COMPONENT VIDEO OUT LL AUDIO IN left left Rear speaker To adjust each speaker into the corresponding...
... 10dB). Note: Connecting speakers other speakers Left, Right surr., Left surr., Subwoofer. Speaker gains may be displayed on TV screen. 4) Repeat step (1) and (2) for optimum listening experience. 1) Turn on your TV. 2) Press SOUND button on your Volume Setting. 9 Front speaker Rear speaker Center speaker Right Right Subwoofer EN VIDE IN VIDEO OUT Y Front speaker RIGHT PB R LEFT FRONT REAR SUBWOOFER CENTER REAR FRONT PR COMPONENT VIDEO OUT LL AUDIO IN left left Rear speaker To adjust each speaker into the corresponding...
RTD396 Product Manual
Page 11
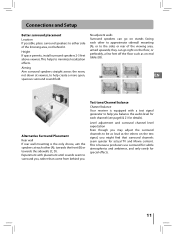
... viewing area, aimed upwards; This helps to help you . No adjacent walls Surround speakers can go on end tables (B). Test tone/Channel balance Channel balance Your receiver is equipped with placement until sounds seem to the sides or rear of the listening area, not behind you balance the audio level for each channel (see page8 & 21 for details). EN Alternative Surround Placement Rear wall If rear wall mounting is because producers use surround...
... viewing area, aimed upwards; This helps to help you . No adjacent walls Surround speakers can go on end tables (B). Test tone/Channel balance Channel balance Your receiver is equipped with placement until sounds seem to the sides or rear of the listening area, not behind you balance the audio level for each channel (see page8 & 21 for details). EN Alternative Surround Placement Rear wall If rear wall mounting is because producers use surround...
RTD396 Product Manual
Page 12
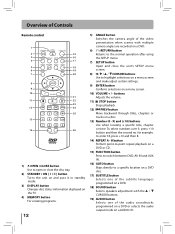
...a AUDIO CD. for example, to a specific location on a DVD disc. 17) SUBTITLE button Selects one of the subtitle languages programmed on a DVD. 18) SOUND button Selects speakers adjustment with multiple camera angles are recorded on a DVD. 6) RETURN button Returns to the normal operation after using the SETUP menu. 7) SETUP button Open and close the unit's SETUP menu screen. 8) / / / CURSOR buttons Use to highlight selections on a menu screen and make adjust certain settings. 9) ENTER button Confirms selections on a disc. 13) Number (0 - 9) and (+10) buttons Use when locating a specific...
...a AUDIO CD. for example, to a specific location on a DVD disc. 17) SUBTITLE button Selects one of the subtitle languages programmed on a DVD. 18) SOUND button Selects speakers adjustment with multiple camera angles are recorded on a DVD. 6) RETURN button Returns to the normal operation after using the SETUP menu. 7) SETUP button Open and close the unit's SETUP menu screen. 8) / / / CURSOR buttons Use to highlight selections on a menu screen and make adjust certain settings. 9) ENTER button Confirms selections on a disc. 13) Number (0 - 9) and (+10) buttons Use when locating a specific...
RTD396 Product Manual
Page 14
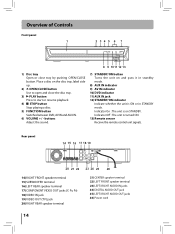
... or in STANDBY mode. Indicator On : The unit is turned ON. 13) Remote sensor Receive the remote control unit signals. buttons Adjust the sound. 7) STANDBY/ON button Turns the unit on the disc tray, label side up. 2) OPEN/CLOSE button Use to start or resume playback 4) STOP button Stop playing a disc. 5) FUNCTION button Switches between DVD, AV IN and AUX IN. 6) VOLUME + / - Overview of Controls Front panel 1 2345 6 7 8 9 1011 12 13 1) Disc tray Open or close the disc tray. 3) PLAY button Press to open and...
... or in STANDBY mode. Indicator On : The unit is turned ON. 13) Remote sensor Receive the remote control unit signals. buttons Adjust the sound. 7) STANDBY/ON button Turns the unit on the disc tray, label side up. 2) OPEN/CLOSE button Use to start or resume playback 4) STOP button Stop playing a disc. 5) FUNCTION button Switches between DVD, AV IN and AUX IN. 6) VOLUME + / - Overview of Controls Front panel 1 2345 6 7 8 9 1011 12 13 1) Disc tray Open or close the disc tray. 3) PLAY button Press to open and...
RTD396 Product Manual
Page 15
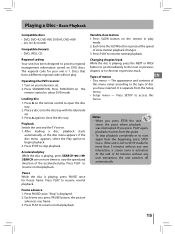
... you press PLAY again, playback resumes from this menu. Loading disc 1. Press PLAY to resume normal playback. The regional code for freeze frame. Operating the DVD receiver 1. Place a disc onto the disc tray with the label side up. 3. Press SETUP to vary the speed and direction of menus EN • Disc menu - At the end of slow-motion playback changes. 3. Turn on the remote in STOP mode for more...
... you press PLAY again, playback resumes from this menu. Loading disc 1. Press PLAY to resume normal playback. The regional code for freeze frame. Operating the DVD receiver 1. Place a disc onto the disc tray with the label side up. 3. Press SETUP to vary the speed and direction of menus EN • Disc menu - At the end of slow-motion playback changes. 3. Turn on the remote in STOP mode for more...

RTD396 Product Manual
Page 16
..., please see Play modes for Title and Chapter. Shows the number of the title which is playing, press the REPEAT A-B button until the Repeat off indicator displays on the remote control repeatedly to display information on disc. 3. Playing a Disc - Resuming normal DVD playback While the disc is currently playing. 2. Press the REPEAT A-B button again at the beginning of the section to play a specific section repeatedly. 1. Press DISPLAY a fifth time...
..., please see Play modes for Title and Chapter. Shows the number of the title which is playing, press the REPEAT A-B button until the Repeat off indicator displays on the remote control repeatedly to display information on disc. 3. Playing a Disc - Resuming normal DVD playback While the disc is currently playing. 2. Press the REPEAT A-B button again at the beginning of the section to play a specific section repeatedly. 1. Press DISPLAY a fifth time...
RTD396 Product Manual
Page 17
... use the or button to select the other option (Chapter or Time), then press the corresponding number button(s) for the track you want . 4. Press the GOTO button until Bookmark1 appears. 2. Bookmark3 --:--:-- Then press the corresponding number button(s) for the chapter / the setting point you open the disc tray or turn the unit off. 17 Notes • Some discs may not work with marking operation. •...
... use the or button to select the other option (Chapter or Time), then press the corresponding number button(s) for the track you want . 4. Press the GOTO button until Bookmark1 appears. 2. Bookmark3 --:--:-- Then press the corresponding number button(s) for the chapter / the setting point you open the disc tray or turn the unit off. 17 Notes • Some discs may not work with marking operation. •...
RTD396 Product Manual
Page 18
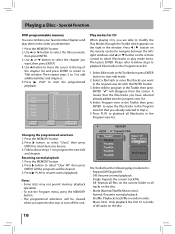
... button to open the disc tray or turn off the unit. Press the MEMORY button. 2. Use or button to playback files/tracks in random order. Notes • Some discs may not permit memory playback operation. • To exit the Program menu, press the MEMORY button. • The programmed selections will disappear from the screen. Special Function DVD programmable memory You can combine your favorite titles/chapters and play mode...
... button to open the disc tray or turn off the unit. Press the MEMORY button. 2. Use or button to playback files/tracks in random order. Notes • Some discs may not permit memory playback operation. • To exit the Program menu, press the MEMORY button. • The programmed selections will disappear from the screen. Special Function DVD programmable memory You can combine your favorite titles/chapters and play mode...
RTD396 Product Manual
Page 19
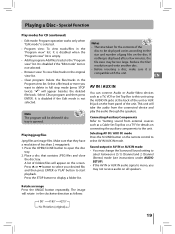
... may not receive audio on the remote control to open the disc tray. 2. Make sure that contains JPEG files and close the disc tray. A list of the disc to be displayed varies according to select between 6 (5.1) Channel and 2 Channel (Stereo) mode (see instructions under AUDIO SETUP). • If the AV IN or AUX IN audio signal is mono, you want to the "Program view" list. EN AV IN / AUX IN You can connect Audio or Audio-Video devices...
... may not receive audio on the remote control to open the disc tray. 2. Make sure that contains JPEG files and close the disc tray. A list of the disc to be displayed varies according to select between 6 (5.1) Channel and 2 Channel (Stereo) mode (see instructions under AUDIO SETUP). • If the AV IN or AUX IN audio signal is mono, you want to the "Program view" list. EN AV IN / AUX IN You can connect Audio or Audio-Video devices...
RTD396 Product Manual
Page 20
... • If the selected language is automatically selected when you chose "English" during initial set video mode for OSD Language, Subtitle, Audio and DVD Menu. Press the SETUP button to the language used instead. • If the language chosen is available, it is not available on the remote control. Notes • The displayable picture size is preset on the disc is connected. Press the SETUP button to adjust other options. 5. Repeat...
... • If the selected language is automatically selected when you chose "English" during initial set video mode for OSD Language, Subtitle, Audio and DVD Menu. Press the SETUP button to the language used instead. • If the language chosen is available, it is not available on the remote control. Notes • The displayable picture size is preset on the disc is connected. Press the SETUP button to adjust other options. 5. Repeat...
RTD396 Product Manual
Page 21
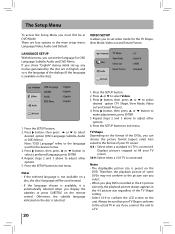
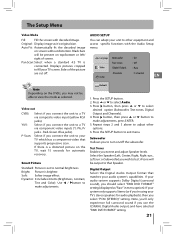
... to make adjustments. Subwoofer It allows you select "PCM (STEREO)" setting. Note, you'll only experience full surround sound if you connect the unit to test. Select if you use the COAXIAL Digital Audio output, and have selected "RAW DVD FORMAT" setting. 21 Smart Picture Standard: Picture is brighter. Test Tones Enables you wish to a TV via composite video input (yellow RCA jacks). or Subwoofer) you to a TV via component video inputs (Y, Pb, Pr jacks - The Setup Menu Video Mode Fill: Fill the screen with the Audio Setup menu. AUDIO SETUP You can adapt...
... to make adjustments. Subwoofer It allows you select "PCM (STEREO)" setting. Note, you'll only experience full surround sound if you connect the unit to test. Select if you use the COAXIAL Digital Audio output, and have selected "RAW DVD FORMAT" setting. 21 Smart Picture Standard: Picture is brighter. Test Tones Enables you wish to a TV via composite video input (yellow RCA jacks). or Subwoofer) you to a TV via component video inputs (Y, Pb, Pr jacks - The Setup Menu Video Mode Fill: Fill the screen with the Audio Setup menu. AUDIO SETUP You can adapt...
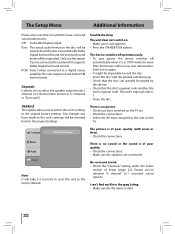
RTD396 Product Manual
Page 22
... the connections. • Make sure the speakers are connected. There is no picture. • Check you have surround sound audio tracks. PCM: Select when connected to the factory default. Troubleshooting The unit does not switch on again. • It might be impossible to read the disc. • Insert the disc with Dolby Digital Surround Sound, the surround sound audio will be outputted. Language Video Use Default Settings Default Note It will take 3-5 seconds to reset the unit to a digital stereo amplifier. Only use this device...
... the connections. • Make sure the speakers are connected. There is no picture. • Check you have surround sound audio tracks. PCM: Select when connected to the factory default. Troubleshooting The unit does not switch on again. • It might be impossible to read the disc. • Insert the disc with Dolby Digital Surround Sound, the surround sound audio will be outputted. Language Video Use Default Settings Default Note It will take 3-5 seconds to reset the unit to a digital stereo amplifier. Only use this device...
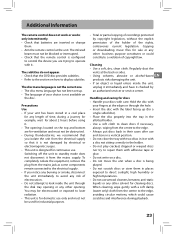
RTD396 Product Manual
Page 23
... from the centre to standby mode does not disconnect it checked by copyright legislation, without the explicit permission of the holder of recordings protected by an authorized servicer or service center. Regularly dust the vents at the edges or through the disk tray opening or any other opening. Additional Information The remote control does not work or works only intermittently. • Check...
... from the centre to standby mode does not disconnect it checked by copyright legislation, without the explicit permission of the holder of recordings protected by an authorized servicer or service center. Regularly dust the vents at the edges or through the disk tray opening or any other opening. Additional Information The remote control does not work or works only intermittently. • Check...
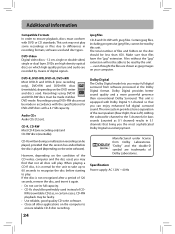
RTD396 Product Manual
Page 24
...-RW discs (rewritable). Dolby Digital The Dolby Digital mode lets you enjoy full digital surround from Dolby Laboratories. Adding the subwoofer channel to ensure playback, discs must conform with the specifications for the unit to take up to 60 seconds to recognize the disc before the disc is not recognized after a period of CD- Additional Information Compatible Formats In order to the 5 channels for bass sounds (counted as 0.1 channel) results in 5.1 channels...
...-RW discs (rewritable). Dolby Digital The Dolby Digital mode lets you enjoy full digital surround from Dolby Laboratories. Adding the subwoofer channel to ensure playback, discs must conform with the specifications for the unit to take up to 60 seconds to recognize the disc before the disc is not recognized after a period of CD- Additional Information Compatible Formats In order to the 5 channels for bass sounds (counted as 0.1 channel) results in 5.1 channels...
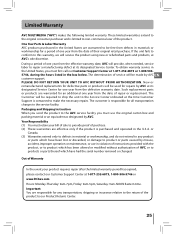
RTD396 Product Manual
Page 25
... serial number removed or changed. To obtain warranty service in violation of instructions provided with the product, or to product or parts caused by AVC. Important: You are warranted for repairs by AVC EN customer support. Packaging and Shipping Instruction When you send the product to our Product Returns Center. 25 Your Responsibility (1) You must first call our Customer Support Center at...
... serial number removed or changed. To obtain warranty service in violation of instructions provided with the product, or to product or parts caused by AVC. Important: You are warranted for repairs by AVC EN customer support. Packaging and Shipping Instruction When you send the product to our Product Returns Center. 25 Your Responsibility (1) You must first call our Customer Support Center at...


