
User Manual
Page 2
... expose this DVD player to radio communications. USE OF CONTROLS OR ADJUSTMENTS OR PERFORMANCE OF PROCEDURES OTHER THAN THOSE SPECIFIED HEREIN MAY RESULT IN HAZARDOUS RADIATION EXPOSURE. REFER SERVICING TO QUALIFIED PERSONNEL. If the Region number of the player. The use shielded cables and connectors for home and other limited pay-per-view uses only, unless otherwise authorized in a particular installation. NO USERSERVICEABLE PARTS ARE INSIDE...
... expose this DVD player to radio communications. USE OF CONTROLS OR ADJUSTMENTS OR PERFORMANCE OF PROCEDURES OTHER THAN THOSE SPECIFIED HEREIN MAY RESULT IN HAZARDOUS RADIATION EXPOSURE. REFER SERVICING TO QUALIFIED PERSONNEL. If the Region number of the player. The use shielded cables and connectors for home and other limited pay-per-view uses only, unless otherwise authorized in a particular installation. NO USERSERVICEABLE PARTS ARE INSIDE...

User Manual
Page 3
... Play 5 Prepare to Connect the DVD Player 5 Types of Jacks and Cables 6 Choosing a Connection 7 Connection Options: DVD Player + TV without A/V Input Jacks 8 DVD Player + TV with A/V Input Jacks 9 DVD Player + TV + Dolby Digital And/Or DTS-Ready Receiver 10 DVD Player + TV + VCR 11 DVD Player + TV + VCR + Satellite Receiver 12 Connect the AC Power Cord 14 Setting Up the Menu Language 14 How to Find Your TV's Video Input Channel 15 Tour of the Remote Control 16 Helpful Hints about the Remote 19 Playing DVDs 21 Loading and Playing a DVD 22 Using a DVD's Disc Menu 23 DVD Playback...
... Play 5 Prepare to Connect the DVD Player 5 Types of Jacks and Cables 6 Choosing a Connection 7 Connection Options: DVD Player + TV without A/V Input Jacks 8 DVD Player + TV with A/V Input Jacks 9 DVD Player + TV + Dolby Digital And/Or DTS-Ready Receiver 10 DVD Player + TV + VCR 11 DVD Player + TV + VCR + Satellite Receiver 12 Connect the AC Power Cord 14 Setting Up the Menu Language 14 How to Find Your TV's Video Input Channel 15 Tour of the Remote Control 16 Helpful Hints about the Remote 19 Playing DVDs 21 Loading and Playing a DVD 22 Using a DVD's Disc Menu 23 DVD Playback...

User Manual
Page 4
... 50 Selecting a Specific Track 50 Random Playback 50 Program Playback 51 Using the Repeat Feature 52 Playing Video CDs 53 Loading and Playing a Video CD 54 Video CD Playback Features 56 Exchange 56 Disc Skip 56 Skipping Tracks 57 Using the Shuttle 57 Selecting a Specific Track 57 Changing the Audio Channel Output 57 Random Playback 58 Program Playback 59 Features in the Player Information Display 60 Reference 61 Front Panel Controls 62 Programming the Remote 65 TV Codes 66 Troubleshooting 67 Limited Warranty 69...
... 50 Selecting a Specific Track 50 Random Playback 50 Program Playback 51 Using the Repeat Feature 52 Playing Video CDs 53 Loading and Playing a Video CD 54 Video CD Playback Features 56 Exchange 56 Disc Skip 56 Skipping Tracks 57 Using the Shuttle 57 Selecting a Specific Track 57 Changing the Audio Channel Output 57 Random Playback 58 Program Playback 59 Features in the Player Information Display 60 Reference 61 Front Panel Controls 62 Programming the Remote 65 TV Codes 66 Troubleshooting 67 Limited Warranty 69...

User Manual
Page 6
... is made to charge a battery not intended to malfunction. • Before you 're not going to use the remote for a month or more, be recharged. • Discard leaky batteries immediately. Replace the battery door. Open the battery door on the front panel display, turn the power off. Setup and Connections Unpack the Box Carefully unpack the items in the box: • DVD player • Remote control and batteries • Audio/Video cables • S-Video cable Install Batteries in motion...
... is made to charge a battery not intended to malfunction. • Before you 're not going to use the remote for a month or more, be recharged. • Discard leaky batteries immediately. Replace the battery door. Open the battery door on the front panel display, turn the power off. Setup and Connections Unpack the Box Carefully unpack the items in the box: • DVD player • Remote control and batteries • Audio/Video cables • S-Video cable Install Batteries in motion...
User Manual
Page 8
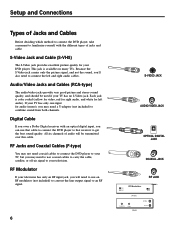
... only the picture signal, and not the sound, you will be used if your television has only an RF input jack, you 'll also need to use an RF modulator (not included) to convert the line output signal to connect the left audio). Digital Cable If you own a Dolby Digital receiver with the different types of audio will need a Y-adaptor (not included) to get the best sound quality. If your DVD player.
... only the picture signal, and not the sound, you will be used if your television has only an RF input jack, you 'll also need to use an RF modulator (not included) to convert the line output signal to connect the left audio). Digital Cable If you own a Dolby Digital receiver with the different types of audio will need a Y-adaptor (not included) to get the best sound quality. If your DVD player.

User Manual
Page 9
... connection. Refer to your TV, VCR, or Dolby Digital Receiver owner's manual for better quality picture and sound. (For the best quality picture, use them to attach the power cord, and set the on hooking up your television only has antenna (RF) inputs, you have connected all of the components, you 've connected the components, don't forget to get the best quality picture and sound. DVD Player + TV without A/V Input Jacks ...... 8 If your specific components. Setup and Connections Choosing a Connection...
... connection. Refer to your TV, VCR, or Dolby Digital Receiver owner's manual for better quality picture and sound. (For the best quality picture, use them to attach the power cord, and set the on hooking up your television only has antenna (RF) inputs, you have connected all of the components, you 've connected the components, don't forget to get the best quality picture and sound. DVD Player + TV without A/V Input Jacks ...... 8 If your specific components. Setup and Connections Choosing a Connection...

User Manual
Page 10
... particular components. Setup and Connections DVD Player + TV without A/V Input Jacks (Good Picture and Mono Sound Quality) TV (BACK PANEL) ANT IN RF MODULATOR (not included) VIDEO AUDIO (L) DVD PLAYER "Y" ADAPTER (not included) RF OUT ANT IN CABLE OR OFF-AIR SIGNAL OPTICAL COAXIAL DIGITAL AUDIO OUT R1 L1 V1 R2 L2 V2 Pr Y Pb ANALOG AUDIO OUT VIDEO OUT S-VIDEO OUT COMPONENT VIDEO OUT To Connect the DVD Player If you do not have a CH 3/4 switch...
... particular components. Setup and Connections DVD Player + TV without A/V Input Jacks (Good Picture and Mono Sound Quality) TV (BACK PANEL) ANT IN RF MODULATOR (not included) VIDEO AUDIO (L) DVD PLAYER "Y" ADAPTER (not included) RF OUT ANT IN CABLE OR OFF-AIR SIGNAL OPTICAL COAXIAL DIGITAL AUDIO OUT R1 L1 V1 R2 L2 V2 Pr Y Pb ANALOG AUDIO OUT VIDEO OUT S-VIDEO OUT COMPONENT VIDEO OUT To Connect the DVD Player If you do not have a CH 3/4 switch...

User Manual
Page 11
... television manual for specific details. Consult the owner's manuals of the DVD player. Setup and Connections DVD Player + TV with COMPONENT VIDEO jacks.These jacks replace the S-Video jacks and it is preferable to use them if you TV is so equipped.To hook up the COMPONENT VIDEO jacks, connect the cables to the same color-coded jacks. Note: • Your cable or off-air connection to the corresponding audio inputs on the TV. 2. Using A/V cables, connect the ANALOG AUDIO...
... television manual for specific details. Consult the owner's manuals of the DVD player. Setup and Connections DVD Player + TV with COMPONENT VIDEO jacks.These jacks replace the S-Video jacks and it is preferable to use them if you TV is so equipped.To hook up the COMPONENT VIDEO jacks, connect the cables to the same color-coded jacks. Note: • Your cable or off-air connection to the corresponding audio inputs on the TV. 2. Using A/V cables, connect the ANALOG AUDIO...
User Manual
Page 12
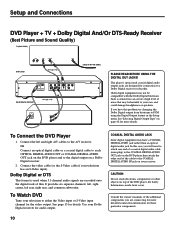
... format is used when 5.1-channel audio signals are designed for audio output. 10 COAXIAL DIGITAL AUDIO JACK Some digital equipment may be compatible with the Dolby Digital bitstream. Setup and Connections DVD Player + TV + Dolby Digital And/Or DTS-Ready Receiver (Best Picture and Sound Quality) TV (BACK PANEL) DVD PLAYER AUDIO L R VIDEO S-VIDEO OUT OR ANT IN CABLE OR OFF-AIR SIGNAL OPTICAL COAXIAL DIGITAL AUDIO OUT R1 L1 V1 R2 L2 V2 Pr Y Pb ANALOG AUDIO OUT VIDEO OUT S-VIDEO OUT COMPONENT VIDEO OUT OR DOLBY DIGITAL RECEIVER DIGITAL...
... format is used when 5.1-channel audio signals are designed for audio output. 10 COAXIAL DIGITAL AUDIO JACK Some digital equipment may be compatible with the Dolby Digital bitstream. Setup and Connections DVD Player + TV + Dolby Digital And/Or DTS-Ready Receiver (Best Picture and Sound Quality) TV (BACK PANEL) DVD PLAYER AUDIO L R VIDEO S-VIDEO OUT OR ANT IN CABLE OR OFF-AIR SIGNAL OPTICAL COAXIAL DIGITAL AUDIO OUT R1 L1 V1 R2 L2 V2 Pr Y Pb ANALOG AUDIO OUT VIDEO OUT S-VIDEO OUT COMPONENT VIDEO OUT OR DOLBY DIGITAL RECEIVER DIGITAL...

User Manual
Page 13
..., you should only connect your DVD player directly to your television manual for those particular components. 11 See page 15 or consult your TV, not to a VCR. Setup and Connections DVD Player + TV + VCR The following is one possible connection if you want to the TV. 2. Use audio/video cables to connect the player's left and right ANALOG AUDIO OUT jacks to include a VCR in a distorted picture from copy-protected DVD discs. CAUTION Do not...
..., you should only connect your DVD player directly to your television manual for those particular components. 11 See page 15 or consult your TV, not to a VCR. Setup and Connections DVD Player + TV + VCR The following is one possible connection if you want to the TV. 2. Use audio/video cables to connect the player's left and right ANALOG AUDIO OUT jacks to include a VCR in a distorted picture from copy-protected DVD discs. CAUTION Do not...

User Manual
Page 15
...: • Make sure VCR is turned off -air antenna or cable to either the Video input or S-Video input channel. See page 15 or consult your television to the antenna input on top of the VCR. Consult the owner's manuals of the satellite receiver. Use a coaxial cable to connect the antenna output on the satellite receiver to channel 3 or 4 depending on the satellite receiver. 2. Setup and Connections To Connect the DVD Player 1. To Connect the Satellite Receiver 1. CAUTION...
...: • Make sure VCR is turned off -air antenna or cable to either the Video input or S-Video input channel. See page 15 or consult your television to the antenna input on top of the VCR. Consult the owner's manuals of the satellite receiver. Use a coaxial cable to connect the antenna output on the satellite receiver to channel 3 or 4 depending on the satellite receiver. 2. Setup and Connections To Connect the DVD Player 1. To Connect the Satellite Receiver 1. CAUTION...

User Manual
Page 18
... components from a single remote control, you 're using the menu system of another component. To order the Universal Remote Control, see "Programming the Remote" on the DVD Player and to set the remote to do so (see page 71. However, for your DVD Player's menu you to select a menu item. Please be able to turn on next page) 16 DISC GO BACK INFO OK MENU 1 2 CLEAR 3 4 5 6 7 8 INPUT 0 9 ANTENNA REVERSE PLAY FORWARD MARKER STOP PAUSE SUBTITLE AUDIO ANGLE OPEN•CLOSE The component buttons...
... components from a single remote control, you 're using the menu system of another component. To order the Universal Remote Control, see "Programming the Remote" on the DVD Player and to set the remote to do so (see page 71. However, for your DVD Player's menu you to select a menu item. Please be able to turn on next page) 16 DISC GO BACK INFO OK MENU 1 2 CLEAR 3 4 5 6 7 8 INPUT 0 9 ANTENNA REVERSE PLAY FORWARD MARKER STOP PAUSE SUBTITLE AUDIO ANGLE OPEN•CLOSE The component buttons...

User Manual
Page 19
... MENU 1 2 CLEAR 3 4 5 6 7 8 INPUT 0 9 ANTENNA REVERSE PLAY FORWARD MARKER STOP PAUSE SUBTITLE AUDIO ANGLE OPEN•CLOSE Note: The remote packed with all antennas. When the remote is programmed to do so (see page 65). 17 ANGLE Press this to access various camera angles on -screen menus. Allows you to move to the beginning of televisions and A/V receiver/amplifiers, but you 're using Dolby Surround or Dolby Digital. The buttons on the remote. DISC Use...
... MENU 1 2 CLEAR 3 4 5 6 7 8 INPUT 0 9 ANTENNA REVERSE PLAY FORWARD MARKER STOP PAUSE SUBTITLE AUDIO ANGLE OPEN•CLOSE Note: The remote packed with all antennas. When the remote is programmed to do so (see page 65). 17 ANGLE Press this to access various camera angles on -screen menus. Allows you to move to the beginning of televisions and A/V receiver/amplifiers, but you 're using Dolby Surround or Dolby Digital. The buttons on the remote. DISC Use...

User Manual
Page 20
... MENU 1 2 CLEAR 3 4 5 6 7 8 INPUT 0 9 ANTENNA REVERSE PLAY FORWARD MARKER STOP PAUSE SUBTITLE AUDIO ANGLE OPEN•CLOSE 18 This may not work with subtitles). Also used for frame advance. STOP Stops disc play chapters, tracks, titles or discs randomly. DVD ON OFF TV AUX ZOOM RANDOM 3-D MUTE PLAY MODE CH + VOL VOL REPEAT GUIDE CH - MENU Press this button to go to an inaudible level. Number buttons (0-9) Use the number buttons to input information such as OK button) Press this button to the Video Input Channel. SELECT...
... MENU 1 2 CLEAR 3 4 5 6 7 8 INPUT 0 9 ANTENNA REVERSE PLAY FORWARD MARKER STOP PAUSE SUBTITLE AUDIO ANGLE OPEN•CLOSE 18 This may not work with subtitles). Also used for frame advance. STOP Stops disc play chapters, tracks, titles or discs randomly. DVD ON OFF TV AUX ZOOM RANDOM 3-D MUTE PLAY MODE CH + VOL VOL REPEAT GUIDE CH - MENU Press this button to go to an inaudible level. Number buttons (0-9) Use the number buttons to input information such as OK button) Press this button to the Video Input Channel. SELECT...

User Manual
Page 64
... 3-D Surround feature on and off . 2. Disc Select Buttons Press to the previous menu screen. 5. SKIP FWD Allows you to change discs while one disc continues to forward through the DVD or CD; REPEAT Press twice to activate the frame advance and reverse. 15. MENU Access the disc menu (if the disc is playing) or the player menu (if disc is currently playing. 8. Press and hold to play (and closes disc tray if open and close the disc tray. 26. JOG Use...
... 3-D Surround feature on and off . 2. Disc Select Buttons Press to the previous menu screen. 5. SKIP FWD Allows you to change discs while one disc continues to forward through the DVD or CD; REPEAT Press twice to activate the frame advance and reverse. 15. MENU Access the disc menu (if the disc is playing) or the player menu (if disc is currently playing. 8. Press and hold to play (and closes disc tray if open and close the disc tray. 26. JOG Use...

User Manual
Page 67
...; This remote may not be programmed. 2. DVD ON OFF TV AUX ZOOM RANDOM 3-D MUTE PLAY MODE CH + VOL VOL REPEAT GUIDE CH DISC GO BACK INFO OK MENU 1 2 CLEAR 3 4 5 6 7 8 INPUT 0 9 ANTENNA REVERSE PLAY FORWARD MARKER STOP PAUSE SUBTITLE AUDIO ANGLE OPEN•CLOSE This Is Important! Then press POWER or CH ^ (channel up the brand and code number(s) for Zenith in this section. 3. If you 'll need to enter the specific codes for your...
...; This remote may not be programmed. 2. DVD ON OFF TV AUX ZOOM RANDOM 3-D MUTE PLAY MODE CH + VOL VOL REPEAT GUIDE CH DISC GO BACK INFO OK MENU 1 2 CLEAR 3 4 5 6 7 8 INPUT 0 9 ANTENNA REVERSE PLAY FORWARD MARKER STOP PAUSE SUBTITLE AUDIO ANGLE OPEN•CLOSE This Is Important! Then press POWER or CH ^ (channel up the brand and code number(s) for Zenith in this section. 3. If you 'll need to enter the specific codes for your...

User Manual
Page 69
Turn power back on the TV's power. • Ensure that is out of range • Master volume may need replacing. • Operate the remote control closer to the DVD player. • Remove any obstacles between the remote and the DVD player or other component. • Remove batteries and hold down one or more buttons for the TV and/or receiver are correct. • No sound is heard during forward and reverse scan No sound or...
Turn power back on the TV's power. • Ensure that is out of range • Master volume may need replacing. • Operate the remote control closer to the DVD player. • Remove any obstacles between the remote and the DVD player or other component. • Remove batteries and hold down one or more buttons for the TV and/or receiver are correct. • No sound is heard during forward and reverse scan No sound or...

User Manual
Page 70
... be changed Picture is not displayed correct aspect ratio Forgot Rating Limit Password Cannot copy discs to video tape Solution If the subtitle and/or audio language does not exist on the disc, the initial settings will not be seen/heard. This player is set to the initial factory settings. If the regional codes don't match, the disc cannot be required to the Setup menu and select the language you power up. Reference Troubleshooting DVD Problem Subtitle and/or audio language is...
... be changed Picture is not displayed correct aspect ratio Forgot Rating Limit Password Cannot copy discs to video tape Solution If the subtitle and/or audio language does not exist on the disc, the initial settings will not be seen/heard. This player is set to the initial factory settings. If the regional codes don't match, the disc cannot be required to the Setup menu and select the language you power up. Reference Troubleshooting DVD Problem Subtitle and/or audio language is...
User Manual
Page 77
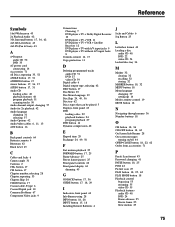
... player + TV + VCR + Satellite Receiver 12 DVD player + TV with A/V input jacks 9 DVD player + TV without A/V input Jacks 8 Controls, remote 16, 17 Copy protection 11 D Deleting programmed tracks audio CD 51 DVD 27 video CD 59 Digital cable 6 Digital output type, selecting 42 DISC button 17 Disc Menu 23 Disc Menu Language 39 Disc Skip 24, 49, 56 Disc tray 62 Discs, types that can be played 5 Displays, front panel 63 DVD loading a disc 22 playback features 24 program playback 27 DVD button 16 Dynamic compression 42 E Elapsed time 29 Exchange 24, 49, 56 F Fast motion playback 25 FORWARD button...
... player + TV + VCR + Satellite Receiver 12 DVD player + TV with A/V input jacks 9 DVD player + TV without A/V input Jacks 8 Controls, remote 16, 17 Copy protection 11 D Deleting programmed tracks audio CD 51 DVD 27 video CD 59 Digital cable 6 Digital output type, selecting 42 DISC button 17 Disc Menu 23 Disc Menu Language 39 Disc Skip 24, 49, 56 Disc tray 62 Discs, types that can be played 5 Displays, front panel 63 DVD loading a disc 22 playback features 24 program playback 27 DVD button 16 Dynamic compression 42 E Elapsed time 29 Exchange 24, 49, 56 F Fast motion playback 25 FORWARD button...

User Manual
Page 78
... 76 Setup and Connections 3 Setup menu 35 Shuttle 25 Skipping tracks audio CD 49 video CD 57 Slow motion playback 25 Still Mode 44 STOP button 18, 22, 62 SUBTITLE button 18, 30 Subtitle language changing 30 selecting 38 Surround sound, simulated 34 T Title repeating 33 Title Number selecting 28 Track selection, audio CD 50 selection, video CD 57 skipping, audio CD 49 skipping, video CD 57 Troubleshooting 67, 68 TV button 16 TV codes 66 V Video CD 53 Video Input Channel 15 VIDEO OUT...
... 76 Setup and Connections 3 Setup menu 35 Shuttle 25 Skipping tracks audio CD 49 video CD 57 Slow motion playback 25 Still Mode 44 STOP button 18, 22, 62 SUBTITLE button 18, 30 Subtitle language changing 30 selecting 38 Surround sound, simulated 34 T Title repeating 33 Title Number selecting 28 Track selection, audio CD 50 selection, video CD 57 skipping, audio CD 49 skipping, video CD 57 Troubleshooting 67, 68 TV button 16 TV codes 66 V Video CD 53 Video Input Channel 15 VIDEO OUT...


