
Brochure
Page 1
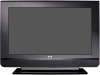
...™ Connections Provide High Definition Video and Audio to Connect to Provide Enhanced Color and Contrast So You Can Enjoy a Crisp Picture with your area. L46WD22 Product Size (H x W x D) with stand: 32.0 x 45.2 x 12.0 inches w/o stand: 29.5 x 45.2 x 4.8 inches 46" diagonal LCD Flat Panel HDTV Features and Benefits EN-V Picture Processing Technology...
...™ Connections Provide High Definition Video and Audio to Connect to Provide Enhanced Color and Contrast So You Can Enjoy a Crisp Picture with your area. L46WD22 Product Size (H x W x D) with stand: 32.0 x 45.2 x 12.0 inches w/o stand: 29.5 x 45.2 x 4.8 inches 46" diagonal LCD Flat Panel HDTV Features and Benefits EN-V Picture Processing Technology...
Brochure
Page 2
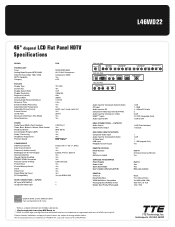
...GENERAL TV Finish Detachable Base VESA Wall Mount Compatible Packaging Size (HxWxD) inches Weight (lbs) (Product/Packaged) 1 L/R 1 - RCA and associated marks are registered U.S. R PB PR Y 1 COMPONENT INPUT (1080i/720p/480p/480i) L -- OUTPUTS Audio Output Digital ...-- RGB 1 - 3/5mm PC Audio 2 2 L/R 2 (1 DVI Compatible Only) 1 L/R for DVI 1 L/R (Fixed Variable) 1 Coaxial 1 1 L/R 1 1 - L46WD22 46" diagonal LCD Flat Panel HDTV Specifications BRAND TECHNOLOGY Tuner Analog Video Formats (NTSC/480i) Video Formats (480p, 720p, 1080i) HDTV Capability Category PICTURE Display...
...GENERAL TV Finish Detachable Base VESA Wall Mount Compatible Packaging Size (HxWxD) inches Weight (lbs) (Product/Packaged) 1 L/R 1 - RCA and associated marks are registered U.S. R PB PR Y 1 COMPONENT INPUT (1080i/720p/480p/480i) L -- OUTPUTS Audio Output Digital ...-- RGB 1 - 3/5mm PC Audio 2 2 L/R 2 (1 DVI Compatible Only) 1 L/R for DVI 1 L/R (Fixed Variable) 1 Coaxial 1 1 L/R 1 1 - L46WD22 46" diagonal LCD Flat Panel HDTV Specifications BRAND TECHNOLOGY Tuner Analog Video Formats (NTSC/480i) Video Formats (480p, 720p, 1080i) HDTV Capability Category PICTURE Display...

User Manual
Page 2
...of electric shock or personal injury. This symbol indicates that the cable ground shall be placed on a firm, flat www.rca.com/television. For disposal or recycling information, please contact your safety. Refer to obtain warranty parts and service and for this product, ..., 5736897. The apparatus shall not be blocked resulting in particular, specifies that this product contains mercury. For US customers: Your RCA Consumer Electronics product may be registered at , surface. Model No Serial No Purchase Date Dealer/Address/Phone Licensed by BBE Sound, Inc....
...of electric shock or personal injury. This symbol indicates that the cable ground shall be placed on a firm, flat www.rca.com/television. For disposal or recycling information, please contact your safety. Refer to obtain warranty parts and service and for this product, ..., 5736897. The apparatus shall not be blocked resulting in particular, specifies that this product contains mercury. For US customers: Your RCA Consumer Electronics product may be registered at , surface. Model No Serial No Purchase Date Dealer/Address/Phone Licensed by BBE Sound, Inc....

User Manual
Page 3
Do not use attachments/accessories specified by the manufacturer, or sold with the manufacturer's instructions. 8. Do not install near water. 6. A grounding type plug has two blades and a third grounding prong. Unplug this apparatus near any heat sources such as radiators, heat registers, stoves, or other . Refer all servicing to avoid injury from the apparatus. 11. Heed all instructions. 5. Do not defeat the safety purpose of the lead-in accordance with the apparatus. Use only with one wider than the other apparatus (including amplifiers) that ...
Do not use attachments/accessories specified by the manufacturer, or sold with the manufacturer's instructions. 8. Do not install near water. 6. A grounding type plug has two blades and a third grounding prong. Unplug this apparatus near any heat sources such as radiators, heat registers, stoves, or other . Refer all servicing to avoid injury from the apparatus. 11. Heed all instructions. 5. Do not defeat the safety purpose of the lead-in accordance with the apparatus. Use only with one wider than the other apparatus (including amplifiers) that ...

User Manual
Page 4
Table of Contents Important Safety Instructions i Chapter 1: Connections and Setup Things to Consider Before You Connect 5 Protect Against Power Surges 5 Protect Devices from Overheating 5 Position Cables Properly to Avoid Audio Interference 5 Use Indirect Light 5 Check Supplied Parts 5 Get the Picture 6 Getting Channels 6 Choose Your Connection 7 Video (Basic) Connection 8 Component Video (Advanced) Connection .......... 8 HDMI/DVI Connection 10 VGA Connection 12 Plug in the TV 13 Put Batteries in the Remote 13 Turn on the TV 13 How to Use the Remote Control to Complete the ...
Table of Contents Important Safety Instructions i Chapter 1: Connections and Setup Things to Consider Before You Connect 5 Protect Against Power Surges 5 Protect Devices from Overheating 5 Position Cables Properly to Avoid Audio Interference 5 Use Indirect Light 5 Check Supplied Parts 5 Get the Picture 6 Getting Channels 6 Choose Your Connection 7 Video (Basic) Connection 8 Component Video (Advanced) Connection .......... 8 HDMI/DVI Connection 10 VGA Connection 12 Plug in the TV 13 Put Batteries in the Remote 13 Turn on the TV 13 How to Use the Remote Control to Complete the ...
User Manual
Page 5
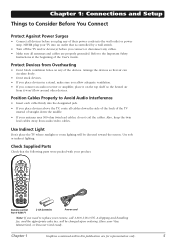
Use Indirect Light Don't place the TV where sunlight or room lighting will be directed toward the screen. Use soft or indirect lighting. Protect Devices from audio/video cables. Position Cables Properly to Avoid Audio Interference • Insert each cable firmly into the designated jack. • If you need to replace your remote, call 1-800-338-0376. Check Supplied Parts Check that the following parts were packed with your Visa, MasterCard, or Discover Card ready. Have your product. Refer to Consider Before You Connect Protect Against Power Surges • Connect all ...
Use Indirect Light Don't place the TV where sunlight or room lighting will be directed toward the screen. Use soft or indirect lighting. Protect Devices from audio/video cables. Position Cables Properly to Avoid Audio Interference • Insert each cable firmly into the designated jack. • If you need to replace your remote, call 1-800-338-0376. Check Supplied Parts Check that the following parts were packed with your Visa, MasterCard, or Discover Card ready. Have your product. Refer to Consider Before You Connect Protect Against Power Surges • Connect all ...

User Manual
Page 6
See the graphic to view digital channels. Coaxial cable or Outdoor or Indoor antenna Getting Channels What You Need • Antenna ("rabbit ears") or outdoor antenna with coaxial cable OR • Coaxial cable with cable service A. C. They may use to receive the local digital channels available to you. The back panel of your TV allows you to receive analog and/or digital channels by using a certain antenna. • When you are ready to watch channels, the channel banner displays the type of channel you to the left for more information. 6 Chapter 1 If not, go to page 15 for the...
See the graphic to view digital channels. Coaxial cable or Outdoor or Indoor antenna Getting Channels What You Need • Antenna ("rabbit ears") or outdoor antenna with coaxial cable OR • Coaxial cable with cable service A. C. They may use to receive the local digital channels available to you. The back panel of your TV allows you to receive analog and/or digital channels by using a certain antenna. • When you are ready to watch channels, the channel banner displays the type of channel you to the left for more information. 6 Chapter 1 If not, go to page 15 for the...

User Manual
Page 7
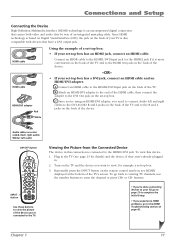
... connection is best for you. There are trademarks or registered trademarks of HDMI Licensing LLC. Jacks Used Cables Needed Go to connect your RCA product, please visit www.rca.com/customersupport. Video1 R AUDIO Audio1 R and L L Audio/Video page 8-9 AUDIO/VIDEO INPUT 1 (VID1) VIDEO COMPONENT INPUT 1 (CMP1) R Y Pb Pr AUDIO L Audio R and L Pr...
... connection is best for you. There are trademarks or registered trademarks of HDMI Licensing LLC. Jacks Used Cables Needed Go to connect your RCA product, please visit www.rca.com/customersupport. Video1 R AUDIO Audio1 R and L L Audio/Video page 8-9 AUDIO/VIDEO INPUT 1 (VID1) VIDEO COMPONENT INPUT 1 (CMP1) R Y Pb Pr AUDIO L Audio R and L Pr...

User Manual
Page 8
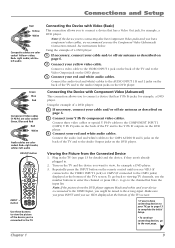
Go to page 6 for instructions. Go to page 6 for instructions. Go to the top of page 9 for specific instructions. 1 Don't forget: If necessary, connect antenna or cable to get a picture. COMPONENT INPUT 1 (CMP1) R AUDIO L Pr Pb Y 3 2 OUTPUT COMPONENT VIDEO Y Pb Pr L AUDIO R VIDEO L AUDIO R S-VIDEO INPUT VIDEO L AUDIO R S-VIDEO 8 Chapter 1 Go to the middle of page 9 for specific instructions. 1 Don't forget: If necessary, connect antenna or cable to get a picture. Connections and Setup Video (Basic) Connection This is an example of a connection ...
Go to page 6 for instructions. Go to page 6 for instructions. Go to the top of page 9 for specific instructions. 1 Don't forget: If necessary, connect antenna or cable to get a picture. COMPONENT INPUT 1 (CMP1) R AUDIO L Pr Pb Y 3 2 OUTPUT COMPONENT VIDEO Y Pb Pr L AUDIO R VIDEO L AUDIO R S-VIDEO INPUT VIDEO L AUDIO R S-VIDEO 8 Chapter 1 Go to the middle of page 9 for specific instructions. 1 Don't forget: If necessary, connect antenna or cable to get a picture. Connections and Setup Video (Basic) Connection This is an example of a connection ...
User Manual
Page 9
white= left audio ON•OFF button INPUT button ON•OFF TV PIP SAT•AUX DVD GO BACK VOL CH MENU MUTE INFO + CH CTRL ZOOMCLEAR PRESETS ZOOM+ GUIDE ?!+- Note: If the device you're connecting also has Component Video jacks and you have component video cables, we recommend you want to view, for example, a DVD player. Connect your cable and/or off -air antenna as described on the DVD player. 3. Viewing the Picture from the input list. Turn on the DVD player. Note: If the picture from the DVD player appears black and white and your device is connected to...
white= left audio ON•OFF button INPUT button ON•OFF TV PIP SAT•AUX DVD GO BACK VOL CH MENU MUTE INFO + CH CTRL ZOOMCLEAR PRESETS ZOOM+ GUIDE ?!+- Note: If the device you're connecting also has Component Video jacks and you have component video cables, we recommend you want to view, for example, a DVD player. Connect your cable and/or off -air antenna as described on the DVD player. 3. Viewing the Picture from the input list. Turn on the DVD player. Note: If the picture from the DVD player appears black and white and your device is connected to...

User Manual
Page 10
Go to get a picture. HDMI 1/DVI INPUT R DVI AUDIO INPUT L A C Device with HDMI Y Pb Pr Video Out R L Audio Out HDMI Out OR B DVI Out L R Audio Out Device with DVI 10 Chapter 1 Connections and Setup HDMI/DVI Connection This is an example of a connection using the HDMI/DVI jack. * *Don't forget: If necessary, connect antenna or cable to page 6 for instructions.
Go to get a picture. HDMI 1/DVI INPUT R DVI AUDIO INPUT L A C Device with HDMI Y Pb Pr Video Out R L Audio Out HDMI Out OR B DVI Out L R Audio Out Device with DVI 10 Chapter 1 Connections and Setup HDMI/DVI Connection This is an example of a connection using the HDMI/DVI jack. * *Don't forget: If necessary, connect antenna or cable to page 6 for instructions.
User Manual
Page 11
A. Audio cables are color coded- Repeatedly press the INPUT button on the remote control until you experience HDMI problems, go to your set -top box. 3. buttons. • If you're done connecting devices to the HDMI Troubleshooting section on the back of the device. -OR- • If your TV is also compatible with devices that carries both video and audio data by way of a set-top box: • If your TV, go back to viewing TV channels, use the number buttons to the HDMI1/DVI Input jack on the TV and the device you want to connect Audio left audio ON•OFF button INPUT...
A. Audio cables are color coded- Repeatedly press the INPUT button on the remote control until you experience HDMI problems, go to your set -top box. 3. buttons. • If you're done connecting devices to the HDMI Troubleshooting section on the back of the device. -OR- • If your TV is also compatible with devices that carries both video and audio data by way of a set-top box: • If your TV, go back to viewing TV channels, use the number buttons to the HDMI1/DVI Input jack on the TV and the device you want to connect Audio left audio ON•OFF button INPUT...
User Manual
Page 12
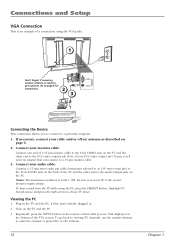
Be sure to set your PC's video output isn't 15-pin, you'll need an adapter that can connect to a personal computer. 1. Viewing the PC 1. Turn on the remote control until you to connect to a 15-pin monitor cable. 3. Repeatedly press the INPUT button on the TV and the PC. 3. Note, if your PC to the VGA AUDIO jack on the PC. Connect your cable and/or off-air antenna as 1/8" stereo mini pin) to the correct monitor output setting. To go back to viewing TV channels, use the number buttons to choose TV tuner. If necessary, connect your audio cable. Connect one end of a 15-...
Be sure to set your PC's video output isn't 15-pin, you'll need an adapter that can connect to a personal computer. 1. Viewing the PC 1. Turn on the remote control until you to connect to a 15-pin monitor cable. 3. Repeatedly press the INPUT button on the TV and the PC. 3. Note, if your PC to the VGA AUDIO jack on the PC. Connect your cable and/or off-air antenna as 1/8" stereo mini pin) to the correct monitor output setting. To go back to viewing TV channels, use the number buttons to choose TV tuner. If necessary, connect your audio cable. Connect one end of a 15-...
User Manual
Page 13
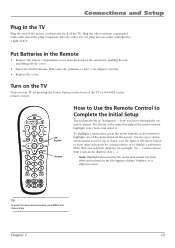
Connections and Setup Plug in the Remote • Remove the battery compartment cover from other menu items on the front of the remote by pushing the tab and lifting off the cover. • Insert two fresh batteries. To highlight a menu item, press the arrow buttons on the remote control. Note: Highlighted means that the menu item stands out from the back of the TV or ON•OFF on the remote to highlight one selection displays, for a menu choice or to view other end into an outlet controlled by pressing the Power button on the list (appears darker, brighter, or a ...
Connections and Setup Plug in the Remote • Remove the battery compartment cover from other menu items on the front of the remote by pushing the tab and lifting off the cover. • Insert two fresh batteries. To highlight a menu item, press the arrow buttons on the remote control. Note: Highlighted means that the menu item stands out from the back of the TV or ON•OFF on the remote to highlight one selection displays, for a menu choice or to view other end into an outlet controlled by pressing the Power button on the list (appears darker, brighter, or a ...
User Manual
Page 14
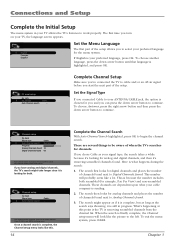
To choose another language, press the down arrow button until that language is still in progress. If you 've connected the TV to cancel Any channels already found . 3. These channels are several things to be stored. To exit the menu system, press CLEAR. Complete Channel Setup Make sure you chose Cable as the search says Running, it 's removing scrambled channels found. Running... 10 05 Auto Channel search in progress. Press CLEAR to cable and/or an off-air signal before you connected Cable to continue. Press OK to the left. There are dependent upon what ...
To choose another language, press the down arrow button until that language is still in progress. If you 've connected the TV to cancel Any channels already found . 3. These channels are several things to be stored. To exit the menu system, press CLEAR. Complete Channel Setup Make sure you chose Cable as the search says Running, it 's removing scrambled channels found. Running... 10 05 Auto Channel search in progress. Press CLEAR to cable and/or an off-air signal before you connected Cable to continue. Press OK to the left. There are dependent upon what ...

User Manual
Page 15
Press the ZOOM+/- It depends on -screen, press the ZOOM+/- Go to page 32 for a D at the bottom of these channels in a 16/9 format. To tune to a digital channel with a sub-channel, such as 10-1 as shown in the graphic to view the different formats available. This is sent by the broadcaster. Some bars can have connected to see if you 're watching an analog channel. Changing Channels • Digital channels can 't be time consuming, so you 're used to see if you 're watching an analog channel. Go to page 32 for more explanation of screen formats. • ...
Press the ZOOM+/- It depends on -screen, press the ZOOM+/- Go to page 32 for a D at the bottom of these channels in a 16/9 format. To tune to a digital channel with a sub-channel, such as 10-1 as shown in the graphic to view the different formats available. This is sent by the broadcaster. Some bars can have connected to see if you 're watching an analog channel. Changing Channels • Digital channels can 't be time consuming, so you 're used to see if you 're watching an analog channel. Go to page 32 for more explanation of screen formats. • ...

User Manual
Page 16
Connections and Setup FIXED/VARIABLE AUDIO OUTPUT AUDIO/VIDEO INPUT 1 (VID1) COMPONENT INPUT 2 (CMP2) COMPONENT INPUT 1 (CMP1) R AUDIO L VIDEO R AUDIO L Pr Pb Y R AUDIO L Pr Pb Y R AUDIO L VIDEO OUTPUT DIGITAL AUDIO OUTPUT (Coaxial) 16 ANTENNA/CABLE INPUT HDMI 2 INPUT HDMI 1/DVI INPUT R DVI AUDIO INPUT L VIDEO AUDIO VGA INPUT Explanation of Jacks (in the Advanced Sound menu. AUDIO/VIDEO INPUT 1 (VID1) Lets you connect a device that has component video jacks, such as a VCR or DVD player. • L AUDIO Provides left and right audio cables to a compatible audio receiver. The left ...
Connections and Setup FIXED/VARIABLE AUDIO OUTPUT AUDIO/VIDEO INPUT 1 (VID1) COMPONENT INPUT 2 (CMP2) COMPONENT INPUT 1 (CMP1) R AUDIO L VIDEO R AUDIO L Pr Pb Y R AUDIO L Pr Pb Y R AUDIO L VIDEO OUTPUT DIGITAL AUDIO OUTPUT (Coaxial) 16 ANTENNA/CABLE INPUT HDMI 2 INPUT HDMI 1/DVI INPUT R DVI AUDIO INPUT L VIDEO AUDIO VGA INPUT Explanation of Jacks (in the Advanced Sound menu. AUDIO/VIDEO INPUT 1 (VID1) Lets you connect a device that has component video jacks, such as a VCR or DVD player. • L AUDIO Provides left and right audio cables to a compatible audio receiver. The left ...
User Manual
Page 17
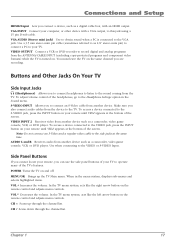
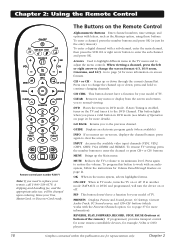
You must leave the TV on the same channel you to connect an S-Video cable from another device such as a camcorder, video game console, VCR, or DVD player. To adjust volume control of the headphones, go to the Headphone Settings option in the menu system, displays sub-menus and selects highlighted items. VOL Increases the volume. To access a device connected to the VIDEO jack, press the INPUT button on . In the TV menu system, acts like the left arrow button on the remote control and adjusts menu controls. CH Scans down through the channel list. Buttons and Other Jacks On Your ...
You must leave the TV on the same channel you to connect an S-Video cable from another device such as a camcorder, video game console, VCR, or DVD player. To adjust volume control of the headphones, go to the Headphone Settings option in the menu system, displays sub-menus and selects highlighted items. VOL Increases the volume. To access a device connected to the VIDEO jack, press the INPUT button on . In the TV menu system, acts like the left arrow button on the remote control and adjusts menu controls. CH Scans down through the channel list. Buttons and Other Jacks On Your ...
User Manual
Page 18
The Buttons on screen formats. To enter a digital channel with letters, such as the Message option, using these buttons. This button lights when you to normal viewing. INPUT Accesses the available video input channels (VID1, VID2, CMP1, CMP2, VGA, HDMI1 and HDMI2). Press again to enter the channel or press CH+ or CH- Chapter 2 CH + or CH - Scans up or down ; Press once to work with the Favorite Channels option. CLEAR Removes any menu or display from the screen and returns you press a valid button in DVD mode (see Modes of the remote) If programmed, provides ...
The Buttons on screen formats. To enter a digital channel with letters, such as the Message option, using these buttons. This button lights when you to normal viewing. INPUT Accesses the available video input channels (VID1, VID2, CMP1, CMP2, VGA, HDMI1 and HDMI2). Press again to enter the channel or press CH+ or CH- Chapter 2 CH + or CH - Scans up or down ; Press once to work with the Favorite Channels option. CLEAR Removes any menu or display from the screen and returns you press a valid button in DVD mode (see Modes of the remote) If programmed, provides ...
User Manual
Page 19
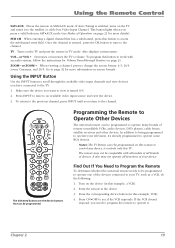
... if the VCR responds. Once the channel is turned ON. 2. To program this remote to the channel. In addition to being programmed to operate some RCA devices. The remote may not operate all brands of your television, it controls only this button to be compatible with an audio system, follow the...
... if the VCR responds. Once the channel is turned ON. 2. To program this remote to the channel. In addition to being programmed to operate some RCA devices. The remote may not operate all brands of your television, it controls only this button to be compatible with an audio system, follow the...