User Guide & Warranty
Page 4
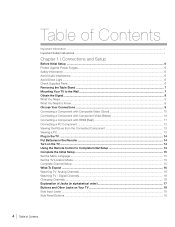
...Protect Against Power Surges ...6 Safety Information ...6 Avoid Audio Interference ...6 Avoid Direct Light ...6 Check Supplied Parts ...6 Removing the Table Stand ...7 Mounting Your TV to the Wall ...7 Obtain the Signal ...8 What You Need ...8 What You Need to Know ...8 Choose Your Connections ...9 Connecting a Component with Composite...with HDMI (Best 11 Connecting a PC Component ...12 Viewing the Picture from the Connected Component 13 Viewing a PC...13 Plug in the TV ...14 Put Batteries in the Remote ...14 Turn on the TV ...14 Using the Remote Control to Complete Initial Setup 14 Complete ...
...Protect Against Power Surges ...6 Safety Information ...6 Avoid Audio Interference ...6 Avoid Direct Light ...6 Check Supplied Parts ...6 Removing the Table Stand ...7 Mounting Your TV to the Wall ...7 Obtain the Signal ...8 What You Need ...8 What You Need to Know ...8 Choose Your Connections ...9 Connecting a Component with Composite...with HDMI (Best 11 Connecting a PC Component ...12 Viewing the Picture from the Connected Component 13 Viewing a PC...13 Plug in the TV ...14 Put Batteries in the Remote ...14 Turn on the TV ...14 Using the Remote Control to Complete Initial Setup 14 Complete ...
User Guide & Warranty
Page 5
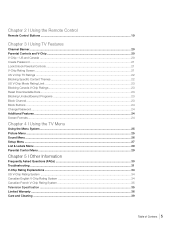
...23 Block Channel ...23 Block Buttons ...24 Change Password ...24 Additional Features ...24 Screen Formats ...24 Chapter 4 I Using the TV Menu Using the Menu System ...25 Picture Menu ...25 Sound Menu ...26 Setup Menu ...27 List & Labels Menu ...29 Parental Control Menu ...29 Chapter 5 I Using... TV Features Channel Banner ...20 Parental Controls and V-Chip ...20 V-Chip - Chapter 2 I Using the Remote Control Remote Control Buttons ...19 Chapter 3...
...23 Block Channel ...23 Block Buttons ...24 Change Password ...24 Additional Features ...24 Screen Formats ...24 Chapter 4 I Using the TV Menu Using the Menu System ...25 Picture Menu ...25 Sound Menu ...26 Setup Menu ...27 List & Labels Menu ...29 Parental Control Menu ...29 Chapter 5 I Using... TV Features Channel Banner ...20 Parental Controls and V-Chip ...20 V-Chip - Chapter 2 I Using the Remote Control Remote Control Buttons ...19 Chapter 3...
User Guide & Warranty
Page 10
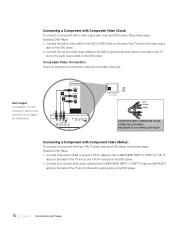
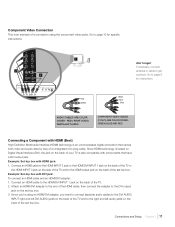
...Don't forget: If necessary, connect antenna or cable to page 8 for instructions. Go to get a picture. Connect your red and white audio cables to the COMPONENT INPUT 2 (CMPT 2) right and left audio jacks on the ...output jacks on the DVD player. 2. Composite Video Connection This is an example of the TV and to the video output jack on the DVD player. 10 Chapter 1 Connections and Setup...or special Y Pb Pr cables to the COMPONENT INPUT 2 (CMPT 2) Y Pb Pr jacks on the back of the TV and to the audio output jacks on the DVD player. 2. Connect the red and white audio cables to the (VID...
...Don't forget: If necessary, connect antenna or cable to page 8 for instructions. Go to get a picture. Connect your red and white audio cables to the COMPONENT INPUT 2 (CMPT 2) right and left audio jacks on the ...output jacks on the DVD player. 2. Composite Video Connection This is an example of the TV and to the video output jack on the DVD player. 10 Chapter 1 Connections and Setup...or special Y Pb Pr cables to the COMPONENT INPUT 2 (CMPT 2) Y Pb Pr jacks on the back of the TV and to the audio output jacks on the DVD player. 2. Connect the red and white audio cables to the (VID...
User Guide & Warranty
Page 11
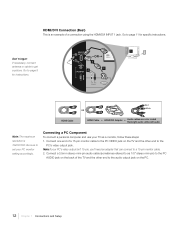
.... Since HDMI technology is based on Digital Visual Interface (DVI), the jack on the back of your TV is an uncompressed digital connection that have a DVI output jack. Example: Set-top box with DVI jack...connect separate audio cables to the DVI AUDIO INPUT right and left audio jacks on the back of the TV. 2. Component Video Connection This is an example of the HDMI cable; CMPT2 CMPT1 Don't forget: ...If necessary, connect antenna or cable to page 10 for instructions. Go to get a picture. Go to the DVI output jack on the back of the set -top box. Connect an HDMI cable...
.... Since HDMI technology is based on Digital Visual Interface (DVI), the jack on the back of your TV is an uncompressed digital connection that have a DVI output jack. Example: Set-top box with DVI jack...connect separate audio cables to the DVI AUDIO INPUT right and left audio jacks on the back of the TV. 2. Component Video Connection This is an example of the HDMI cable; CMPT2 CMPT1 Don't forget: ...If necessary, connect antenna or cable to page 10 for instructions. Go to get a picture. Go to the DVI output jack on the back of the set -top box. Connect an HDMI cable...
User Guide & Warranty
Page 12
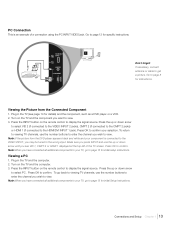
... output isn't 15-pin, you'll need an adapter that can connect to a 15-pin monitor cable. 2. Go to get a picture. Connecting a PC Component To connect a personal computer and use your TV as 1/8" stereo mini-pin) to the PC AUDIO jack on the back of a 15-pin monitor cable to the PC...'s video output jack. Connect one end of the TV and the other end to the audio output jack on the TV and the other end to the PC VIDEO jack on the PC. 12 Chapter 1 Connections and Setup Connect a 3.5mm...
... output isn't 15-pin, you'll need an adapter that can connect to a 15-pin monitor cable. 2. Go to get a picture. Connecting a PC Component To connect a personal computer and use your TV as 1/8" stereo mini-pin) to the PC AUDIO jack on the back of a 15-pin monitor cable to the PC...'s video output jack. Connect one end of the TV and the other end to the audio output jack on the TV and the other end to the PC VIDEO jack on the PC. 12 Chapter 1 Connections and Setup Connect a 3.5mm...
User Guide & Warranty
Page 13
Turn on the remote control to confirm. Note: If the picture from the Connected Component 1. Viewing a PC 1. To go to page 15 for initial Setup Instructions. Press the INPUT button on the TV and the component you wish to view. Press OK to display the signal source. Note: When you have...sure you press INPUT and use the number buttons to enter the channel you want to view. 3. Turn on the remote control to get a picture. VIDEO Viewing the Picture from the DVD player appears black and white and your selection. Press OK to confirm your component is an example of the...
Turn on the remote control to confirm. Note: If the picture from the Connected Component 1. Viewing a PC 1. To go to page 15 for initial Setup Instructions. Press the INPUT button on the TV and the component you wish to view. Press OK to display the signal source. Note: When you have...sure you press INPUT and use the number buttons to enter the channel you want to view. 3. Turn on the remote control to get a picture. VIDEO Viewing the Picture from the DVD player appears black and white and your selection. Press OK to confirm your component is an example of the...
User Guide & Warranty
Page 15
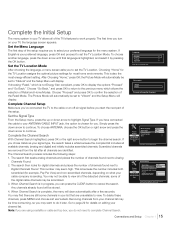
... The first step of the setup requires you to display the options "Proceed" and "Go Back." Choosing "Home" for the TV Location assigns the optimal picture settings for digital channels and places the number of the setup. Choose "Go Back," and press OK to return to the previous... arrow to Digital Channels Found. When Channel Search is not Energy Star compliant, press OK to select your preferred language for digital channels. Picture Sound Setup List & Labels Parental Control Exit Menu Language Signal Type Channel Search Closed Caption Time English Cable Start Press OK or > to...
... The first step of the setup requires you to display the options "Proceed" and "Go Back." Choosing "Home" for the TV Location assigns the optimal picture settings for digital channels and places the number of the setup. Choose "Go Back," and press OK to return to the previous... arrow to Digital Channels Found. When Channel Search is not Energy Star compliant, press OK to select your preferred language for digital channels. Picture Sound Setup List & Labels Parental Control Exit Menu Language Signal Type Channel Search Closed Caption Time English Cable Start Press OK or > to...

User Guide & Warranty
Page 17
...when using a DVI component, remember to select S-VID. When using the HDMI 1 jack for the best picture quality. The right audio connector is usually red. PC VIDEO INPUT Connect your TV is connected to confirm. Connections and Setup Chapter 1 17 The left audio connection when using CMPT 1/CMPT...HDMI INPUT 2 Lets you connect a component, such as a DVD player. • CMPT 1/CMPT 2 Y Pb Pr (Component Video) Provides good picture quality because the video is usually white. The left audio connector is separated into three signals. then press the up or down arrow to connect...
...when using a DVI component, remember to select S-VID. When using the HDMI 1 jack for the best picture quality. The right audio connector is usually red. PC VIDEO INPUT Connect your TV is connected to confirm. Connections and Setup Chapter 1 17 The left audio connection when using CMPT 1/CMPT...HDMI INPUT 2 Lets you connect a component, such as a DVD player. • CMPT 1/CMPT 2 Y Pb Pr (Component Video) Provides good picture quality because the video is usually white. The left audio connector is separated into three signals. then press the up or down arrow to connect...

User Guide & Warranty
Page 21
... the following graphic details where items are UNLOCKED. The Main Menu appears. 2. Select Create Password; TV Rating Status D L Picture Sound Setup List & Labels Parental Control Exit TV-MA TV-14 TV-PG TV-G TV-Y7 TV-Y View View View View View View S V FV Press OK to view/block programs with the ...the left limit is displayed: "Parental Controls are located within the TV Ratings option with this menu. 5. Press OK key to continue." • Press OK or the right arrow button to view the picture. Picture Sound Setup List & Labels Parental Control Exit Lock Parental Control ...
... the following graphic details where items are UNLOCKED. The Main Menu appears. 2. Select Create Password; TV Rating Status D L Picture Sound Setup List & Labels Parental Control Exit TV-MA TV-14 TV-PG TV-G TV-Y7 TV-Y View View View View View View S V FV Press OK to view/block programs with the ...the left limit is displayed: "Parental Controls are located within the TV Ratings option with this menu. 5. Press OK key to continue." • Press OK or the right arrow button to view the picture. Picture Sound Setup List & Labels Parental Control Exit Lock Parental Control ...
User Guide & Warranty
Page 22
TV Rating Status D L Picture Sound Setup List & Labels Parental Control Exit TV-MA TV-14 TV-PG TV-G TV-Y7 TV-Y View View View View View View S V FV Press OK to view/block programs with this rating that content theme for rating limits to ... rating corresponding with the lowest rating you unlock the language corresponding with TV-14. If parental controls have previously been locked, you must enter your password. 2. TV Rating Status D L Picture Sound Setup List & Labels Parental Control Exit TV-MA TV-14 TV-PG TV-G TV-Y7 TV-Y View View View View View View S V FV Press OK to...
TV Rating Status D L Picture Sound Setup List & Labels Parental Control Exit TV-MA TV-14 TV-PG TV-G TV-Y7 TV-Y View View View View View View S V FV Press OK to view/block programs with this rating that content theme for rating limits to ... rating corresponding with the lowest rating you unlock the language corresponding with TV-14. If parental controls have previously been locked, you must enter your password. 2. TV Rating Status D L Picture Sound Setup List & Labels Parental Control Exit TV-MA TV-14 TV-PG TV-G TV-Y7 TV-Y View View View View View View S V FV Press OK to...
User Guide & Warranty
Page 23
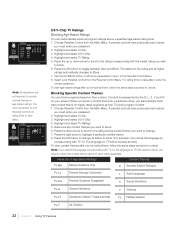
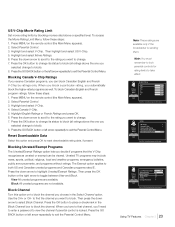
...you automatically block the higher-rated programs as unrated or exempt can block Canadian English and French V-Chip by ratings only. Unrated TV programs may include news, sports, political, religious, local and weather programs, emergency bulletins, public announcements, and programs without ratings.... Menu. Press the GO BACK button or left arrow repeatedly to exit the Parental Control Menu. Block All unrated programs are available. Picture Sound Setup List & Labels Parental Control Exit Lock Parental Control Select Channel Block Channel Button Block V-Chip Change Password -- -- -- ...
...you automatically block the higher-rated programs as unrated or exempt can block Canadian English and French V-Chip by ratings only. Unrated TV programs may include news, sports, political, religious, local and weather programs, emergency bulletins, public announcements, and programs without ratings.... Menu. Press the GO BACK button or left arrow repeatedly to exit the Parental Control Menu. Block All unrated programs are available. Picture Sound Setup List & Labels Parental Control Exit Lock Parental Control Select Channel Block Channel Button Block V-Chip Change Password -- -- -- ...
User Guide & Warranty
Page 24
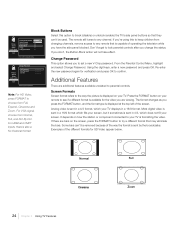
... will not take effect. Most digital video is sent in a 16/9 format which fills your TV. If there are additional features available unrelated to the way the picture is displayed at the top left of the screen. Screen Formats Screen format refers to parental controls.... Please input your TV is also a No Overscan format. Normal Full Cinerama Zoom 24 Chapter 3 Using TV Features Picture Sound Setup List & Labels Parental Control Exit Lock Parental Control Select Channel Block Channel Button ...
... will not take effect. Most digital video is sent in a 16/9 format which fills your TV. If there are additional features available unrelated to the way the picture is displayed at the top left of the screen. Screen Formats Screen format refers to parental controls.... Please input your TV is also a No Overscan format. Normal Full Cinerama Zoom 24 Chapter 3 Using TV Features Picture Sound Setup List & Labels Parental Control Exit Lock Parental Control Select Channel Block Channel Button ...
User Guide & Warranty
Page 25
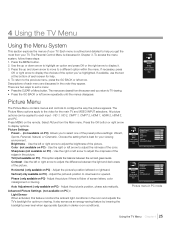
... or right arrow to adjust the richness of the preset picture settings: Vibrant, Sports, Personal, Natural, or Cinematic. Advanced Picture Settings (not available on PC) - Picture menu in darker room conditions). 4 Using the TV Menu Using the Menu System This section explores the menus ...light and dark areas of the picture. Adjust the picture's position, phase automatically. Each menu is best for optimum viewing. All picture options can be applied to help . 4. Select Picture from your TV. Tint (not available on PC) - Adjust the picture's position leftward or rightward. ...
... or right arrow to adjust the richness of the preset picture settings: Vibrant, Sports, Personal, Natural, or Cinematic. Advanced Picture Settings (not available on PC) - Picture menu in darker room conditions). 4 Using the TV Menu Using the Menu System This section explores the menus ...light and dark areas of the picture. Adjust the picture's position, phase automatically. Each menu is best for optimum viewing. All picture options can be applied to help . 4. Select Picture from your TV. Tint (not available on PC) - Adjust the picture's position leftward or rightward. ...
User Guide & Warranty
Page 26
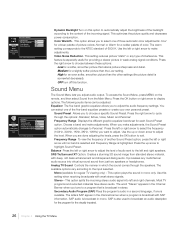
...Personal. This option plays the sound in mono. SAP is highlighted. or Warm for the visually impaired. 26 Chapter 4 Using the TV Menu This setting reduces picture "static" or any multichannel audio source into left or right arrow to select the frequency (100Hz, 300Hz, 1KHz, 3KHz, 10KHz)... Press the OK button or right arrow to adjust the level. When you want to adjust. Picture Sound Setup List & Labels Parental Control Exit Equalizer Balance 0 TruSurroundXT Off Analog TV sound Mono Default Audio language English Current Audio language Not Available Press > or OK to open ...
...Personal. This option plays the sound in mono. SAP is highlighted. or Warm for the visually impaired. 26 Chapter 4 Using the TV Menu This setting reduces picture "static" or any multichannel audio source into left or right arrow to select the frequency (100Hz, 300Hz, 1KHz, 3KHz, 10KHz)... Press the OK button or right arrow to adjust the level. When you want to adjust. Picture Sound Setup List & Labels Parental Control Exit Equalizer Balance 0 TruSurroundXT Off Analog TV sound Mono Default Audio language English Current Audio language Not Available Press > or OK to open ...
User Guide & Warranty
Page 27
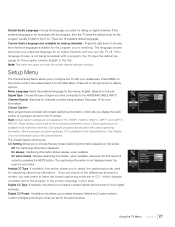
... this allows you to choose the way closed captioning information. Channel Search Searches for the menus: English, Espanol or Francais. Picture Sound Setup List & Labels Parental Control Exit Menu Language Signal Type Channel Search Closed Caption Time English Cable Start Press > or...received. On always Captioning information shown always, when available. When a program is closed captioning mode set for dialog on the TV screen. Note: Closed caption settings are unsure of the program in the primary language in the connected component's menu. Default Audio...
... this allows you to choose the way closed captioning information. Channel Search Searches for the menus: English, Espanol or Francais. Picture Sound Setup List & Labels Parental Control Exit Menu Language Signal Type Channel Search Closed Caption Time English Cable Start Press > or...received. On always Captioning information shown always, when available. When a program is closed captioning mode set for dialog on the TV screen. Note: Closed caption settings are unsure of the program in the primary language in the connected component's menu. Default Audio...

User Guide & Warranty
Page 28
... keys and AM/PM with OK key. TIME Enter Time If you want to set the time manually, use the digit keys to set the TV to turn off after a given amount of the space behind the digital closed caption text: Solid, Transparent, Translucent or Flashing. Daylight Saving Choose OFF ...to select AM or PM. Digital CC Background Opacity Allows you to set the appearance of time. 28 Chapter 4 Using the TV Menu Digital CC Style Picture Sound Setup List & Labels Parental Control Exit Digital CC Size Digital CC Font Digital CC Opacity Digital CC Color Digital CC Background Opacity...
... keys and AM/PM with OK key. TIME Enter Time If you want to set the time manually, use the digit keys to set the TV to turn off after a given amount of the space behind the digital closed caption text: Solid, Transparent, Translucent or Flashing. Daylight Saving Choose OFF ...to select AM or PM. Digital CC Background Opacity Allows you to set the appearance of time. 28 Chapter 4 Using the TV Menu Digital CC Style Picture Sound Setup List & Labels Parental Control Exit Digital CC Size Digital CC Font Digital CC Opacity Digital CC Color Digital CC Background Opacity...
User Guide & Warranty
Page 29
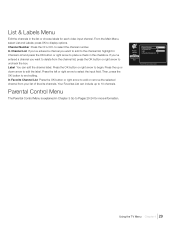
... input channel. Then, press the OK button to display options. Parental Control Menu The Parental Control Menu is explained in Chapter 3 Go to 10 channels. Picture Sound Setup List & Labels Parental Control Exit Channel Number A2 In Channel List Label In Favorite Channel List Press CH+/CH- Using the... TV Menu Chapter 4 29 From the Main Menu, select List and Labels; If you've entered a channel you want to delete from your list of favorite ...
... input channel. Then, press the OK button to display options. Parental Control Menu The Parental Control Menu is explained in Chapter 3 Go to 10 channels. Picture Sound Setup List & Labels Parental Control Exit Channel Number A2 In Channel List Label In Favorite Channel List Press CH+/CH- Using the... TV Menu Chapter 4 29 From the Main Menu, select List and Labels; If you've entered a channel you want to delete from your list of favorite ...
User Guide & Warranty
Page 31
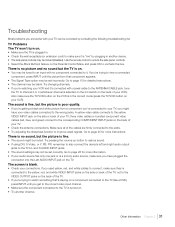
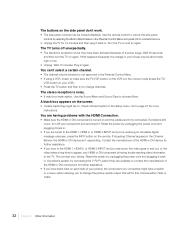
... be locked (disabled). Go to channel 3 or 4 (whichever channel is in the correct mode (press the TV/VCR button on . • You may be set correctly. The screen is on your VCR). There is no picture and no component connected to it is fine. • The sound might have plugged the connection...'re connected to the yellow, red, and white VIDEO INPUT jacks on the side or back of the TV, not to the TV is poor quality. • If you're getting a black and white picture from that 's playing on . • Try another device. • The side panel controls may be blank. Use the...
... be locked (disabled). Go to channel 3 or 4 (whichever channel is in the correct mode (press the TV/VCR button on . • You may be set correctly. The screen is on your VCR). There is no picture and no component connected to it is fine. • The sound might have plugged the connection...'re connected to the yellow, red, and white VIDEO INPUT jacks on the side or back of the TV, not to the TV is poor quality. • If you're getting a black and white picture from that 's playing on . • Try another device. • The side panel controls may be blank. Use the...
User Guide & Warranty
Page 32
... the video takes a long time to appear, your VCR). • Press the TV button and then try again. Check Closed Caption in your house may be abnormally high or low. • Unplug. Re-connect your picture, the component you connected might be a weak station. The buttons on the remote.... You can't select a certain channel. • The channel may be blocked or not approved in the Parental Control Menu. • If using a VCR, check to make sure the TV/VCR button on...
... the video takes a long time to appear, your VCR). • Press the TV button and then try again. Check Closed Caption in your house may be abnormally high or low. • Unplug. Re-connect your picture, the component you connected might be a weak station. The buttons on the remote.... You can't select a certain channel. • The channel may be blocked or not approved in the Parental Control Menu. • If using a VCR, check to make sure the TV/VCR button on...

Spec Sheet
Page 1
...: 45.9" | WITH STAND W-44.4" x H-30.9" x D-12.6" | WITHOUT STAND W-44.4" x H-28.5" x D-3.7" FEATURES AND BENEFITS For the ultimate in High Definition viewing, RCA introduces the new Full 1080p L46FHD37R. The RCA L46FHD37R is an incredible value that is perfectly balanced for crisp, lifelike details, SRS TruSurround XT® which detects ambient room light to operate with stunning picture...
...: 45.9" | WITH STAND W-44.4" x H-30.9" x D-12.6" | WITHOUT STAND W-44.4" x H-28.5" x D-3.7" FEATURES AND BENEFITS For the ultimate in High Definition viewing, RCA introduces the new Full 1080p L46FHD37R. The RCA L46FHD37R is an incredible value that is perfectly balanced for crisp, lifelike details, SRS TruSurround XT® which detects ambient room light to operate with stunning picture...


