User Guide & Warranty
Page 7
... Connect: TV + Component with DVI or HDMI 18 How to Connect: TV + CableCARD 19 Setting Up Digital Cable Television Service 19 Audio Connections ...20 How to Connect: TV + Router via the HDTV's ETHERNET Jack 22 Plug in the TV ...23 Put Batteries in -Picture) Operation 46 5 List 38 How V-Chip Works for the USA and Canada 39 USA V-Chip TV Ratings ...39 Canada V-Chip ...43 Auto Tuning Feature ...45 PIP (Picture-in the Remote ...23 Turn on the TV ...23 Use the Remote Control...
... Connect: TV + Component with DVI or HDMI 18 How to Connect: TV + CableCARD 19 Setting Up Digital Cable Television Service 19 Audio Connections ...20 How to Connect: TV + Router via the HDTV's ETHERNET Jack 22 Plug in the TV ...23 Put Batteries in -Picture) Operation 46 5 List 38 How V-Chip Works for the USA and Canada 39 USA V-Chip TV Ratings ...39 Canada V-Chip ...43 Auto Tuning Feature ...45 PIP (Picture-in the Remote ...23 Turn on the TV ...23 Use the Remote Control...
User Guide & Warranty
Page 8
... ...55 Green Stretch ...55 Edge Enhancement ...55 Contrast Expand ...56 Advanced Settings ...56 Audio Menu ...57 Equalizer Presets ...57 Audio Processor ...57 Sound Logic ...58 Audio Mode ...58 SAP (Second Audio Program 58 Balance ...58 Audio Connections ...59 Recordings Menu ...60 Connections Menu ...60 Signal Strength ...60 Channel Search ...61 Software Upgrade ...61 Signal Source ...61 Video Input Setup ...61 Auto Tuning ...62 DTVLink Setup ...62 Special Features ...62 Ethernet Setup ...63 Preferences Menu ...64 Closed Captioning ...64 Screen Format ...66 Time Menu ...66 Color Scheme...
... ...55 Green Stretch ...55 Edge Enhancement ...55 Contrast Expand ...56 Advanced Settings ...56 Audio Menu ...57 Equalizer Presets ...57 Audio Processor ...57 Sound Logic ...58 Audio Mode ...58 SAP (Second Audio Program 58 Balance ...58 Audio Connections ...59 Recordings Menu ...60 Connections Menu ...60 Signal Strength ...60 Channel Search ...61 Software Upgrade ...61 Signal Source ...61 Video Input Setup ...61 Auto Tuning ...62 DTVLink Setup ...62 Special Features ...62 Ethernet Setup ...63 Preferences Menu ...64 Closed Captioning ...64 Screen Format ...66 Time Menu ...66 Color Scheme...
User Guide & Warranty
Page 16
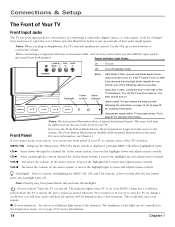
... off (standby mode) HEADPHONE Blinks Light blinks 5 times, pauses, and blinks again 5 times: Lamp is off . Power Indicator Light Status AUDIO IN L/MONO R VIDEO S-VIDEO IN IN On TV is on . Lamp power supply within TV may be different from both speakers. CH Scans up to operate many of the TV's features. Go to open . Use the VOL up the Main menu. Locate the door on . If you can be displayed after 5 minutes and then the light blinks steadily...
... off (standby mode) HEADPHONE Blinks Light blinks 5 times, pauses, and blinks again 5 times: Lamp is off . Power Indicator Light Status AUDIO IN L/MONO R VIDEO S-VIDEO IN IN On TV is on . Lamp power supply within TV may be different from both speakers. CH Scans up to operate many of the TV's features. Go to open . Use the VOL up the Main menu. Locate the door on . If you can be displayed after 5 minutes and then the light blinks steadily...
User Guide & Warranty
Page 17
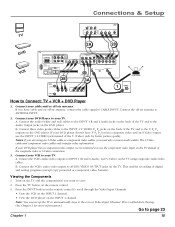
...composite video or S-Video connection. 3. Press the INPUT button on the remote control to scroll through the Video Input Channels. • View the VCR on the INPUT 1 channel. • View the DVD player on the DVD player. VOL + CH MENU CH TV R AUDIO L IN R L OUT VIDEO VIDEO DVD PR PB Y S-VIDEO L/ L/ L/ 2A 2B DVD VCR TV CENTER SPEAKER INPUT EXTERNAL AMP MAX POWER RATING! (60 WATTS into 8 OHMS) FIXED/VARIABLE AUDIO OUTPUTS CENTER R REAR L REAR MATRIX SURROUND OUTPUTS AUDIO/VIDEO OUTPUT POWER (AC 120V~60Hz) SUBWOOFER R L WIRED IR R L V DIGITAL AUDIO ETHERNET OUTPUT...
...composite video or S-Video connection. 3. Press the INPUT button on the remote control to scroll through the Video Input Channels. • View the VCR on the INPUT 1 channel. • View the DVD player on the DVD player. VOL + CH MENU CH TV R AUDIO L IN R L OUT VIDEO VIDEO DVD PR PB Y S-VIDEO L/ L/ L/ 2A 2B DVD VCR TV CENTER SPEAKER INPUT EXTERNAL AMP MAX POWER RATING! (60 WATTS into 8 OHMS) FIXED/VARIABLE AUDIO OUTPUTS CENTER R REAR L REAR MATRIX SURROUND OUTPUTS AUDIO/VIDEO OUTPUT POWER (AC 120V~60Hz) SUBWOOFER R L WIRED IR R L V DIGITAL AUDIO ETHERNET OUTPUT...
User Guide & Warranty
Page 18
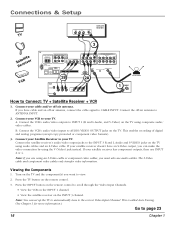
...V S-VIDEO INPUT 1 R L PR PB Y/VIDEO INPUT 2 CABLE INPUT ANTENNA INPUT For Factory Use Only 2B HDMI/DVI INPUT Use menu for DVI audio. 2A OFF-AIR ANTENNA VCR ANTENNA IN R AUDIO L IN ANTENNA OUT VIDEO R AUDIO L OUT O VIDEO 1 CABLE How to INPUT 1 (R and L-Audio, and V-Video) on the TV and the component(s) you can set up the TV to automatically tune to scroll through the Video Input Channels. • View the VCR on the INPUT 1 channel. • View the satellite receiver on the TV. Connect your TV. Connect the VCR's audio/video outputs to Connect: TV + Satellite...
...V S-VIDEO INPUT 1 R L PR PB Y/VIDEO INPUT 2 CABLE INPUT ANTENNA INPUT For Factory Use Only 2B HDMI/DVI INPUT Use menu for DVI audio. 2A OFF-AIR ANTENNA VCR ANTENNA IN R AUDIO L IN ANTENNA OUT VIDEO R AUDIO L OUT O VIDEO 1 CABLE How to INPUT 1 (R and L-Audio, and V-Video) on the TV and the component(s) you can set up the TV to automatically tune to scroll through the Video Input Channels. • View the VCR on the INPUT 1 channel. • View the satellite receiver on the TV. Connect your TV. Connect the VCR's audio/video outputs to Connect: TV + Satellite...
User Guide & Warranty
Page 21
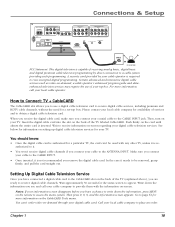
...connect your cable to receive digital cable channels. In the case it is inserted. You can 't be removed, grasp firmly, and pull the card straight out. Insert the digital cable card into 8 OHMS) FIXED/VARIABLE AUDIO OUTPUTS CENTER R REAR L REAR MATRIX SURROUND OUTPUTS POWER (AC 120V~60Hz) SUBWOOFER R L WIRED IR R AUDIO/VIDEO OUTPUT L V ETHERNET DIGITAL AUDIO OUTPUT CableCARD™ COMPOSITE INPUTS INPUT 3 R L V S-VIDEO COMPONENT/COMPOSITE INPUTS Use menu for your digital cable card. See below for information on setting up digital cable television services...
...connect your cable to receive digital cable channels. In the case it is inserted. You can 't be removed, grasp firmly, and pull the card straight out. Insert the digital cable card into 8 OHMS) FIXED/VARIABLE AUDIO OUTPUTS CENTER R REAR L REAR MATRIX SURROUND OUTPUTS POWER (AC 120V~60Hz) SUBWOOFER R L WIRED IR R AUDIO/VIDEO OUTPUT L V ETHERNET DIGITAL AUDIO OUTPUT CableCARD™ COMPOSITE INPUTS INPUT 3 R L V S-VIDEO COMPONENT/COMPOSITE INPUTS Use menu for your digital cable card. See below for information on setting up digital cable television services...
User Guide & Warranty
Page 24
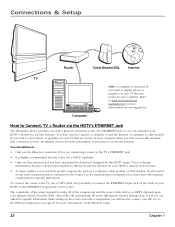
... (then you don't need to set up the router and other Internet components for specific instructions. You don't need to contact your ISP. You'll need cable modem/ DSL or Internet access). Use the manuals that accompany your HDTV to the ETHERNET Output Jack on the router. To connect the router to the TV, use a CAT5 cable (not provided) to connect the ETHERNET Input Jack on the back...
... (then you don't need to set up the router and other Internet components for specific instructions. You don't need to contact your ISP. You'll need cable modem/ DSL or Internet access). Use the manuals that accompany your HDTV to the ETHERNET Output Jack on the router. To connect the router to the TV, use a CAT5 cable (not provided) to connect the ETHERNET Input Jack on the back...
User Guide & Warranty
Page 29
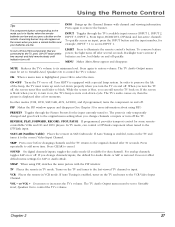
... TV back on the screen when you press a remote button and your batteries are low. Backlight won't activate if batteries are low, but blinks on , then the picture is equipped with channel and viewing information. Your HDTV is displayed after 30 seconds. Turns on or off. The TV Audio Output menu must be set to Variable Level, Speakers On to control the TV's volume. To conserve battery power, the light turns off . If Auto...
... TV back on the screen when you press a remote button and your batteries are low. Backlight won't activate if batteries are low, but blinks on , then the picture is equipped with channel and viewing information. Your HDTV is displayed after 30 seconds. Turns on or off. The TV Audio Output menu must be set to Variable Level, Speakers On to control the TV's volume. To conserve battery power, the light turns off . If Auto...
User Guide & Warranty
Page 48
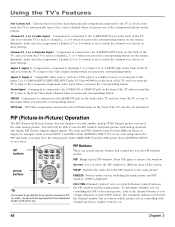
... the front Video Input Channel when you press the corresponding button. PIP doesn't support digital signals. CTRL FREEZE CC PRESETS FAV CC LIGHT FORMAT CLEAR C INFO i MENU M SOUND SKIP There are controlling the PIP or the main picture, look at the channel banner as a DVD player or satellite receiver, is from ANTENNA INPUT, or vice-versa. FREEZE Freezes entire screen, including the main picture and PIP window, if PIP is connected to the CABLE INPUT jack on...
... the front Video Input Channel when you press the corresponding button. PIP doesn't support digital signals. CTRL FREEZE CC PRESETS FAV CC LIGHT FORMAT CLEAR C INFO i MENU M SOUND SKIP There are controlling the PIP or the main picture, look at the channel banner as a DVD player or satellite receiver, is from ANTENNA INPUT, or vice-versa. FREEZE Freezes entire screen, including the main picture and PIP window, if PIP is connected to the CABLE INPUT jack on...
User Guide & Warranty
Page 51
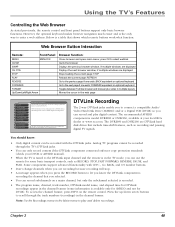
... 2 Channel Search 3 Software Upgrade 4 Signal Source 5 Video Input Setup 6 Auto Tuning 7 DTVLink Setup 8 Special Features 9 Ethernet Setup Main Menu Connections The DTVLink Setup menu has screens for a DTVLink device. •Recording Device: Select a default digital recording device. DTVLink Recording The 2-way DTVLink jacks enable you can record subchannels on optional keyboard Toggles between Full-Size browser and browser plus video in multiple layouts Moves the cursor in the TV mode...
... 2 Channel Search 3 Software Upgrade 4 Signal Source 5 Video Input Setup 6 Auto Tuning 7 DTVLink Setup 8 Special Features 9 Ethernet Setup Main Menu Connections The DTVLink Setup menu has screens for a DTVLink device. •Recording Device: Select a default digital recording device. DTVLink Recording The 2-way DTVLink jacks enable you can record subchannels on optional keyboard Toggles between Full-Size browser and browser plus video in multiple layouts Moves the cursor in the TV mode...
User Guide & Warranty
Page 54
... menu system. Menu Path 0 Go Back 1 Signal Strength 2 Channel Search 3 Software Upgrade 4 Signal Source 5 Video Input Setup 6 Auto Tuning 7 DTVLink Setup 8 Special Features 9 Ethernet Setup Main Menu Connections Select which input or channel should be automatically tuned when a button listed below is pressed on the remote is pressed on the remote. VCR Front Input VCR2 (AUX default) Front Input AUDIO (Audio Receiver/Amp) Front Input RCA SAT2 Front Input DVD Front Input SAT-CABLE (Satellite or Cable Box) Front Input Press OK to select the channel...
... menu system. Menu Path 0 Go Back 1 Signal Strength 2 Channel Search 3 Software Upgrade 4 Signal Source 5 Video Input Setup 6 Auto Tuning 7 DTVLink Setup 8 Special Features 9 Ethernet Setup Main Menu Connections Select which input or channel should be automatically tuned when a button listed below is pressed on the remote is pressed on the remote. VCR Front Input VCR2 (AUX default) Front Input AUDIO (Audio Receiver/Amp) Front Input RCA SAT2 Front Input DVD Front Input SAT-CABLE (Satellite or Cable Box) Front Input Press OK to select the channel...
User Guide & Warranty
Page 58
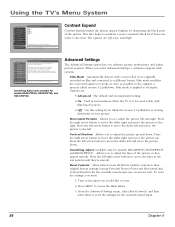
... video sources that let you to the menu. Press to return to adjust the lines of the picture. The options are : • Advanced The default and recommended setting. • On Used in circumstances when the TV is applied to all Picture Quality controls to reset the settings for models HD44LPW165, HD50LPW165, and HD61LPW165. Reset Controls Menu button resets all inputs. From the Advanced Settings menu, select Reset Controls, and then select Reset to their original factory settings...
... video sources that let you to the menu. Press to return to adjust the lines of the picture. The options are : • Advanced The default and recommended setting. • On Used in circumstances when the TV is applied to all Picture Quality controls to reset the settings for models HD44LPW165, HD50LPW165, and HD61LPW165. Reset Controls Menu button resets all inputs. From the Advanced Settings menu, select Reset Controls, and then select Reset to their original factory settings...
User Guide & Warranty
Page 59
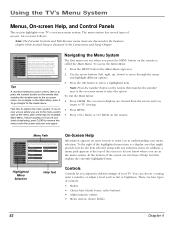
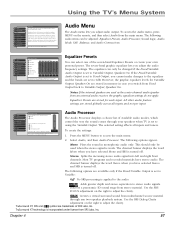
... external audio receiver, the graphic equalizer settings do not apply. The equalizer can select one of available audio modes, which control the way the sound comes through any two-speaker playback system. This should only be changed if the Fixed/Variable Audio Output is turned off . Use the SRS Dialog Clarity adjustment on the right to adjust the clarity. Using the TV's Menu System 0 Go Back 1 Picture Quality 2 Audio 3 Recordings 4 Parental Controls 5 Connections 6 Preferences 7 Assisted Setup...
... external audio receiver, the graphic equalizer settings do not apply. The equalizer can select one of available audio modes, which control the way the sound comes through any two-speaker playback system. This should only be changed if the Fixed/Variable Audio Output is turned off . Use the SRS Dialog Clarity adjustment on the right to adjust the clarity. Using the TV's Menu System 0 Go Back 1 Picture Quality 2 Audio 3 Recordings 4 Parental Controls 5 Connections 6 Preferences 7 Assisted Setup...
User Guide & Warranty
Page 61
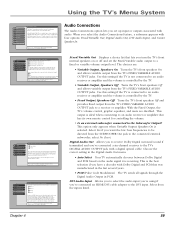
... the TV's audio inputs and select that audio input for volume control. Choosing PCM will send a Dolby Digital signal (when available) out of the DIGITAL AUDIO OUTPUT on or off and set up subwoofer. •Digital Audio Out: Choose either Auto Select or PCM output. •DVI Audio Input: Choose a TV audio input for controlling the volume. • Is an external subwoofer connected to a fixed or variable volume output level. However, if you connect a DVI output to the TV's HDMI input, you turn the TV's front internal speakers on...
... the TV's audio inputs and select that audio input for volume control. Choosing PCM will send a Dolby Digital signal (when available) out of the DIGITAL AUDIO OUTPUT on or off and set up subwoofer. •Digital Audio Out: Choose either Auto Select or PCM output. •DVI Audio Input: Choose a TV audio input for controlling the volume. • Is an external subwoofer connected to a fixed or variable volume output level. However, if you connect a DVI output to the TV's HDMI input, you turn the TV's front internal speakers on...
User Guide & Warranty
Page 62
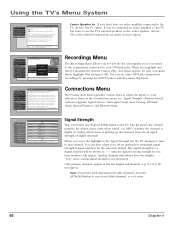
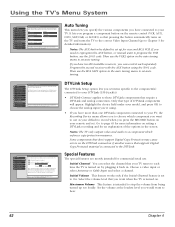
... connected to the TV, choose The TV option. To do not appear. To play a program listed, highlight Play and press OK. This screen changes inputs. •Video Input Setup: Choose component or composite video. •Auto Tuning: Create one button access to the Internal Speaker Input on the TV. The signal strength for a digital channel will be used as the center speaker, choose The center channel output from an audio receiver. Digital subchannels, e.g. 8-1, 8-2, do so, connect an external audio amplifier's center channel output...
... connected to the TV, choose The TV option. To do not appear. To play a program listed, highlight Play and press OK. This screen changes inputs. •Video Input Setup: Choose component or composite video. •Auto Tuning: Create one button access to the Internal Speaker Input on the TV. The signal strength for a digital channel will be used as the center speaker, choose The center channel output from an audio receiver. Digital subchannels, e.g. 8-1, 8-2, do so, connect an external audio amplifier's center channel output...
User Guide & Warranty
Page 64
... volume from the turning on the remote. 0 Go Back 1 Signal Strength 2 Channel Search 3 Software Upgrade 4 Signal Source 5 Video Input Setup 6 Auto Tuning 7 DTVLink Setup 8 Special Features 9 Ethernet Setup Main Menu Connections The DTVLink Setup menu has screens for setting up DTVLink devices to work with the AUX button using . • If you have two RCA satellite receivers, you would want to Cable Input Channel 999 Sub-channel 999 Note: An Initial Channel setting of the options in . Program the second receiver with the TV...
... volume from the turning on the remote. 0 Go Back 1 Signal Strength 2 Channel Search 3 Software Upgrade 4 Signal Source 5 Video Input Setup 6 Auto Tuning 7 DTVLink Setup 8 Special Features 9 Ethernet Setup Main Menu Connections The DTVLink Setup menu has screens for setting up DTVLink devices to work with the AUX button using . • If you have two RCA satellite receivers, you would want to Cable Input Channel 999 Sub-channel 999 Note: An Initial Channel setting of the options in . Program the second receiver with the TV...
User Guide & Warranty
Page 68
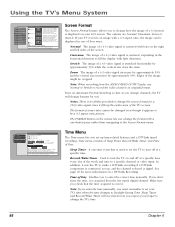
... Wake-up timer. Time menu consists of Sleep Timer, Record/Wake Timer, and Time of some video cannot be changed even though it is acquired from the AUDIO/VIDEO OUTPUT jacks, use as you expect if you must remember to be cropped. Use Automatic Format Switching Screen format determines the format and size of the image might be a 4:3 aspect-ratio picture. Edges of the picture on the display screen. Time Menu The Time menu lets you...
... Wake-up timer. Time menu consists of Sleep Timer, Record/Wake Timer, and Time of some video cannot be changed even though it is acquired from the AUDIO/VIDEO OUTPUT jacks, use as you expect if you must remember to be cropped. Use Automatic Format Switching Screen format determines the format and size of the image might be a 4:3 aspect-ratio picture. Edges of the picture on the display screen. Time Menu The Time menu lets you...
User Guide & Warranty
Page 72
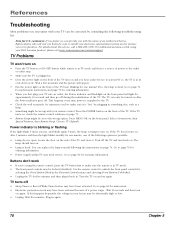
...; Power supply within TV may have been activated because of power to page 74 for replacement instructions and page 79 for five minutes and then plug it is plugged in TV mode. • The front panel controls may have been activated. TV turns off • Sleep Timer or Record/Wake Timer feature may need service. TV Problems TV won't turn on • Press the TV button or ON/OFF button while remote is in TV mode...
...; Power supply within TV may have been activated because of power to page 74 for replacement instructions and page 79 for five minutes and then plug it is plugged in TV mode. • The front panel controls may have been activated. TV turns off • Sleep Timer or Record/Wake Timer feature may need service. TV Problems TV won't turn on • Press the TV button or ON/OFF button while remote is in TV mode...
User Guide & Warranty
Page 86
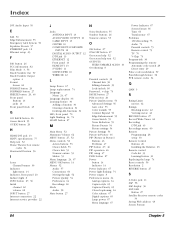
... BACK button 26 Green Stretch 55 GUIDE button 26 H HDMI/DVI jack 13 HDTV specifications 77 Help text 52 Home Theatre box remote codes 34 Horizontal Position 56 I Icons Channel banner 36 Indicator light status 14 Indicator, front panel 23 Indirect light 8 INFO button 27, 36 Initial channel 62 volume 62 INPUT button 27 Internet connection 22 Internet service provider 22 J N Jacks ANTENNA INPUT 13 AUDIO/VIDEO OUTPUT 10 CABLE INPUT 13 CENTER 10 COMPONENT/COMPOSITE INPUTS 12 DIGITAL AUDIO OUTPUT 12 DTVLink...
... BACK button 26 Green Stretch 55 GUIDE button 26 H HDMI/DVI jack 13 HDTV specifications 77 Help text 52 Home Theatre box remote codes 34 Horizontal Position 56 I Icons Channel banner 36 Indicator light status 14 Indicator, front panel 23 Indirect light 8 INFO button 27, 36 Initial channel 62 volume 62 INPUT button 27 Internet connection 22 Internet service provider 22 J N Jacks ANTENNA INPUT 13 AUDIO/VIDEO OUTPUT 10 CABLE INPUT 13 CENTER 10 COMPONENT/COMPOSITE INPUTS 12 DIGITAL AUDIO OUTPUT 12 DTVLink...
Spec Sheet
Page 2
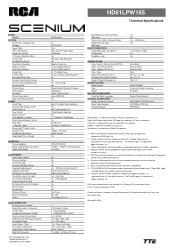
... Digital Cable/Satellite Connections Digital Cable Ready CONVENIENCE Auto Channel Search Channel Labeling Commercial Skip Interactive Set-up w/ Menus Integrated Web Browser²° Lighted Control Panel Multilingual On-Screen Display One-Button Launch for Inputs One-Touch DVR Record Parental Control (V-Chip) Pic Memory Presets for consumer intervention. 11 - Menu Switchable 1 Set - Back Product Size (WxHxD) inches Packaging Size (WxHxD) inches Weight: Product/Packaged, lbs REMOTE CONTROL Model Number Type Backlit INCLUDED ACCESSORIES Instruction Book Languages OPTIONAL ACCESSORIES Stand...
... Digital Cable/Satellite Connections Digital Cable Ready CONVENIENCE Auto Channel Search Channel Labeling Commercial Skip Interactive Set-up w/ Menus Integrated Web Browser²° Lighted Control Panel Multilingual On-Screen Display One-Button Launch for Inputs One-Touch DVR Record Parental Control (V-Chip) Pic Memory Presets for consumer intervention. 11 - Menu Switchable 1 Set - Back Product Size (WxHxD) inches Packaging Size (WxHxD) inches Weight: Product/Packaged, lbs REMOTE CONTROL Model Number Type Backlit INCLUDED ACCESSORIES Instruction Book Languages OPTIONAL ACCESSORIES Stand...


