

Warranty Card
Page 1
... restore any personal preference settings. • Properly pack your product is capable of storing content (such as an mp3 player, digital voice recorder, etc), it is advisable to remove any personal content which you . THE EXTENT OF THE COMPANY'S LIABILITY UNDER THIS WARRANTY IS LIMITED... is to be returned with reconditioned product (at the address shown below. Warranty information Limited warranty 12 Month Limited Warranty Applies to RCA Audio/Video Products AUDIOVOX ELECTRONICS CORP. (the Company) warrants to the original retail purchaser of this product that should this product or...
... restore any personal preference settings. • Properly pack your product is capable of storing content (such as an mp3 player, digital voice recorder, etc), it is advisable to remove any personal content which you . THE EXTENT OF THE COMPANY'S LIABILITY UNDER THIS WARRANTY IS LIMITED... is to be returned with reconditioned product (at the address shown below. Warranty information Limited warranty 12 Month Limited Warranty Applies to RCA Audio/Video Products AUDIOVOX ELECTRONICS CORP. (the Company) warrants to the original retail purchaser of this product that should this product or...
Owner/User Manual
Page 5
... the camcorder...10 Setting date and time...10 General controls General controls ...11 Operation modes ...12 Recording videos Recording quality...13 Quality settings...13 Recording videos...14 Taking photos To take photos...15 Playback mode Playing back recordings...16 Deleting Deleting recordings...18 Menu settings Using the camcorder menu...19 Menu options and settings ...19 4
... the camcorder...10 Setting date and time...10 General controls General controls ...11 Operation modes ...12 Recording videos Recording quality...13 Quality settings...13 Recording videos...14 Taking photos To take photos...15 Playback mode Playing back recordings...16 Deleting Deleting recordings...18 Menu settings Using the camcorder menu...19 Menu options and settings ...19 4
Owner/User Manual
Page 6
Connecting to external devices Viewing videos on TV ...20 Recording videos to VHS tape or DVD 20 Managing videos on your computer Computer system requirements...21 Connecting to a PC...21 About RCA Memory Manager ...22 Viewing videos on PC ...22 Additional information Tips and troubleshooting...23 Product registration ...24 For your records ...24 Service Information...24 Copyright warning...24 Back up your data ...24 Visiting RCA website ...24 Technical specifications ...25 Warranty information Limited warranty ...26 5
Connecting to external devices Viewing videos on TV ...20 Recording videos to VHS tape or DVD 20 Managing videos on your computer Computer system requirements...21 Connecting to a PC...21 About RCA Memory Manager ...22 Viewing videos on PC ...22 Additional information Tips and troubleshooting...23 Product registration ...24 For your records ...24 Service Information...24 Copyright warning...24 Back up your data ...24 Visiting RCA website ...24 Technical specifications ...25 Warranty information Limited warranty ...26 5
Owner/User Manual
Page 9
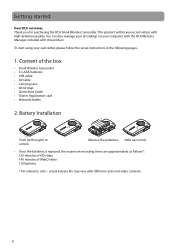
...RCA customer, Thank you record videos with different cards and video contents. 8 You can also manage your recordings on your camcorder, please follow the setup instructions in the following pages. 1. Battery Installation 3 2 4 1 Push (to the right) to lock. • Once the batteries is replaced, the maximum recording... battery life may vary with high definition quality. Observe the polarities. This product will let you for purchasing the RCA Small Wonder Camcorder. Slide up to unlock. Content of WebQ video 1100 photos * For reference only - To start using your ...
...RCA customer, Thank you record videos with different cards and video contents. 8 You can also manage your recordings on your camcorder, please follow the setup instructions in the following pages. 1. Battery Installation 3 2 4 1 Push (to the right) to lock. • Once the batteries is replaced, the maximum recording... battery life may vary with high definition quality. Observe the polarities. This product will let you for purchasing the RCA Small Wonder Camcorder. Slide up to unlock. Content of WebQ video 1100 photos * For reference only - To start using your ...
Owner/User Manual
Page 10
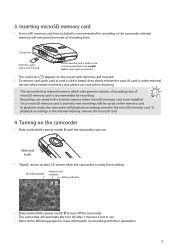
...inserted. • To remove card, push card in until a click is heard As the memory card is small in until a click is ready for recording. • Recordings are saved in the internal memory, remove the microSD card. 4. Turning on the camcorder • Slide and hold • "Ready" shows on the... LCD screen when the camcorder is heard, then slowly release the card. Lift up the cover Push the card in size, it is recommended for recording. A microSD memory card is recommended to help insert or remove it. • The card icon ( ) appears on the memory card. • In ...
...inserted. • To remove card, push card in until a click is heard As the memory card is small in until a click is ready for recording. • Recordings are saved in the internal memory, remove the microSD card. 4. Turning on the camcorder • Slide and hold • "Ready" shows on the... LCD screen when the camcorder is heard, then slowly release the card. Lift up the cover Push the card in size, it is recommended for recording. A microSD memory card is recommended to help insert or remove it. • The card icon ( ) appears on the memory card. • In ...

Owner/User Manual
Page 12
Skip to access the connector) Camcorder strap hole AV output Video quality selector Play/pause Setup menu Record Audio speaker LCD screen Delete recordings Take photo +/- - General controls General controls microSD card slot (Lift up the cover to show the card slot) Recording indicator Microphone Lens On/off switch USB (Lift up the cover to previous or next recording; fast rewind or forward 11 Adjust volume during playback/zoom during record and preview / -
Skip to access the connector) Camcorder strap hole AV output Video quality selector Play/pause Setup menu Record Audio speaker LCD screen Delete recordings Take photo +/- - General controls General controls microSD card slot (Lift up the cover to show the card slot) Recording indicator Microphone Lens On/off switch USB (Lift up the cover to previous or next recording; fast rewind or forward 11 Adjust volume during playback/zoom during record and preview / -
Owner/User Manual
Page 13
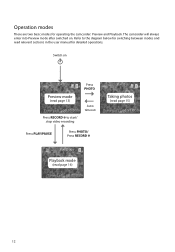
Operation modes There are two basic modes for switching between modes and read page 16) 12 Refer to start/ stop video recording Press PHOTO Auto timeout Press PLAY/PAUSE Press PHOTO/ Press RECORD Taking photos (read page 15) Playback mode (read relevant sections in the user manual for detailed operations. Switch on . The camcorder will always enter into Preview mode after switched on Preview mode (read page 13) Press RECORD to the diagram below for operating the camcorder: Preview and Playback.
Operation modes There are two basic modes for switching between modes and read page 16) 12 Refer to start/ stop video recording Press PHOTO Auto timeout Press PLAY/PAUSE Press PHOTO/ Press RECORD Taking photos (read page 15) Playback mode (read relevant sections in the user manual for detailed operations. Switch on . The camcorder will always enter into Preview mode after switched on Preview mode (read page 13) Press RECORD to the diagram below for operating the camcorder: Preview and Playback.
Owner/User Manual
Page 14
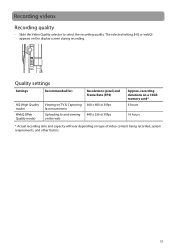
... fast movements Uploading to select the recording quality. The selected setting (HQ or webQ) appears on the web 640 x 480 @ 30fps 448 x 336 @ 30fps Approx. recording durations on a 16GB memory card* 8 hours 16 hours * Actual recording time and capacity will vary depending on... type of video content being recorded, system requirements, and other factors. 13 Recording videos Recording quality • Slide the Video Quality selector to...
... fast movements Uploading to select the recording quality. The selected setting (HQ or webQ) appears on the web 640 x 480 @ 30fps 448 x 336 @ 30fps Approx. recording durations on a 16GB memory card* 8 hours 16 hours * Actual recording time and capacity will vary depending on... type of video content being recorded, system requirements, and other factors. 13 Recording videos Recording quality • Slide the Video Quality selector to...
Owner/User Manual
Page 15
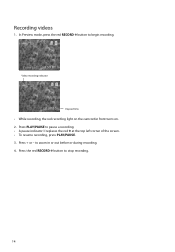
to begin recording. Recording videos 1. In Preview mode, press the red RECORD button to zoom in or out before or during recording. 4. Press + or - Video recording indicator Elapsed time • While recording, the red recording light on the camcorder front turns on. 2. Press the red RECORD button to pause a recording. • A pause indicator II replaces the red at the top left corner of the screen. • To resume recording, press PLAY/PAUSE. 3. Press PLAY/PAUSE to stop recording. 14
to begin recording. Recording videos 1. In Preview mode, press the red RECORD button to zoom in or out before or during recording. 4. Press + or - Video recording indicator Elapsed time • While recording, the red recording light on the camcorder front turns on. 2. Press the red RECORD button to pause a recording. • A pause indicator II replaces the red at the top left corner of the screen. • To resume recording, press PLAY/PAUSE. 3. Press PLAY/PAUSE to stop recording. 14
Owner/User Manual
Page 17
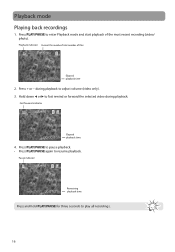
...playback time Press and hold PLAY/PAUSE for three seconds to resume playback. Playback indicator Current file number/Total number of the most recent recording (video/ photo). Press PLAY/PAUSE to adjust volume (video only). 3. Fast forward indicator Elapsed playback time 4. Press PLAY/PAUSE to... pause playback. • Press PLAY/PAUSE again to play all recordings. 16 Press + or - Playback mode Playing back recordings 1. Hold down or to fast rewind or forward the selected video during playback to enter Playback mode and start...
...playback time Press and hold PLAY/PAUSE for three seconds to resume playback. Playback indicator Current file number/Total number of the most recent recording (video/ photo). Press PLAY/PAUSE to adjust volume (video only). 3. Fast forward indicator Elapsed playback time 4. Press PLAY/PAUSE to... pause playback. • Press PLAY/PAUSE again to play all recordings. 16 Press + or - Playback mode Playing back recordings 1. Hold down or to fast rewind or forward the selected video during playback to enter Playback mode and start...
Owner/User Manual
Page 18
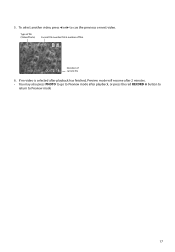
To select another video, press or to Preview mode 17 Type of file (Video/Photo) Current file number/Total number of files Duration of current file 6. If no video is selected after playback has finished, Preview mode will resume after 2 minutes. • You may also press PHOTO to go to Preview mode after playback, or press the red RECORD button to return to cue the previous or next video. 5.
To select another video, press or to Preview mode 17 Type of file (Video/Photo) Current file number/Total number of files Duration of current file 6. If no video is selected after playback has finished, Preview mode will resume after 2 minutes. • You may also press PHOTO to go to Preview mode after playback, or press the red RECORD button to return to cue the previous or next video. 5.
Owner/User Manual
Page 19
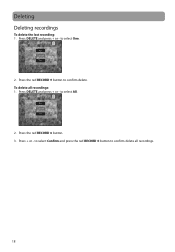
Press DELETE and press + or - Video 0003/0003 Delete: All Cancel One 2. Press the red RECORD button. 3. Video 0003/0003 Delete: All Cancel One 2. Deleting Deleting recordings To delete the last recording: 1. Press DELETE and press + or - Press the red RECORD button to select One. Press + or - To delete all recordings. 18 to select Confirm and press the red RECORD button to select All. to confirm delete. to confirm delete all recordings: 1.
Press DELETE and press + or - Video 0003/0003 Delete: All Cancel One 2. Press the red RECORD button. 3. Video 0003/0003 Delete: All Cancel One 2. Deleting Deleting recordings To delete the last recording: 1. Press DELETE and press + or - Press the red RECORD button to select One. Press + or - To delete all recordings. 18 to select Confirm and press the red RECORD button to select All. to confirm delete. to confirm delete all recordings: 1.
Owner/User Manual
Page 21
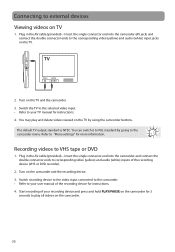
... connector end into the camcorder and connect the double connector ends to corresponding video (yellow) and audio (white) inputs of the recording device for more information. You can switch it to PAL standard by using the camcorder buttons. Plug in the AV cable (provided) - ...menu. Switch the TV to the selected video input. • Refer to your user manual of the recording device (VHS or DVD recorder). 2. Refer to "Menu settings" for instructions. 4. Switch recording device to the video input connected to the camcorder. • Refer to your TV manual for 3 seconds...
... connector end into the camcorder and connect the double connector ends to corresponding video (yellow) and audio (white) inputs of the recording device for more information. You can switch it to PAL standard by using the camcorder buttons. Plug in the AV cable (provided) - ...menu. Switch the TV to the selected video input. • Refer to your user manual of the recording device (VHS or DVD recorder). 2. Refer to "Menu settings" for instructions. 4. Switch recording device to the video input connected to the camcorder. • Refer to your TV manual for 3 seconds...
Owner/User Manual
Page 22
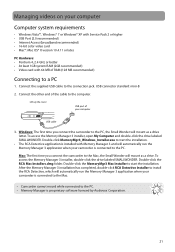
... application when your camcorder is proprietary software licensed by Audiovox Corporation. 21 Double-click the RCA Mac Installers.dmg folder. After the Memory Manager 3 installation has completed, double-click RCA Detective Installer to the PC. Double-click the MemoryMgr3 Mac Installer to start the installation.... Memory Manager 3 application when your camcorder is connected to the Mac. • Camcorder cannot record while connected to the PC. • Memory Manager is connected to install the RCA Detective, which will mount as a drive letter. Mac: The first time you connect the ...
... application when your camcorder is proprietary software licensed by Audiovox Corporation. 21 Double-click the RCA Mac Installers.dmg folder. After the Memory Manager 3 installation has completed, double-click RCA Detective Installer to the PC. Double-click the MemoryMgr3 Mac Installer to start the installation.... Memory Manager 3 application when your camcorder is connected to the Mac. • Camcorder cannot record while connected to the PC. • Memory Manager is connected to install the RCA Detective, which will mount as a drive letter. Mac: The first time you connect the ...
Owner/User Manual
Page 24
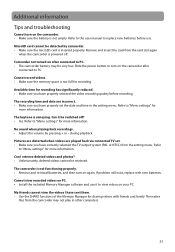
.... The native files from the camcorder may be retrieved. Refer to PC. Remove and insert the card from the setting menu. The recording time and date are played back via connected TV set the date and time in other computers. 23 The keytone is not functioning properly...videos and photos? • Unfortunately, deleted videos cannot be very low. If problem still exist, replace with friends and family. Available time for recording has significantly reduced. • Make sure you have correctly selected the TV output system (PAL or NTSC) from the card slot again when the...
.... The native files from the camcorder may be retrieved. Refer to PC. Remove and insert the card from the setting menu. The recording time and date are played back via connected TV set the date and time in other computers. 23 The keytone is not functioning properly...videos and photos? • Unfortunately, deleted videos cannot be very low. If problem still exist, replace with friends and family. Available time for recording has significantly reduced. • Make sure you have correctly selected the TV output system (PAL or NTSC) from the card slot again when the...
Owner/User Manual
Page 25
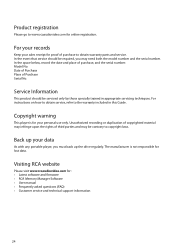
.... In the event that service should be contrary to obtain warranty parts and service. Unauthorized recording or duplication of copyrighted material may infringe upon the rights of Purchase Serial No. For your records Keep your data As with any portable player, you may be serviced only by those specially... trained in this Guide. Date of Purchase Place of third parties and may need both the model number and the serial number. Visiting RCA website Please visit www....
.... In the event that service should be contrary to obtain warranty parts and service. Unauthorized recording or duplication of copyrighted material may infringe upon the rights of Purchase Serial No. For your records Keep your data As with any portable player, you may be serviced only by those specially... trained in this Guide. Date of Purchase Place of third parties and may need both the model number and the serial number. Visiting RCA website Please visit www....
Owner/User Manual
Page 26
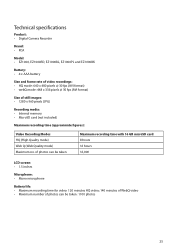
of photos can be taken: 1100 photos 25 Technical specifications Product: • Digital Camera Recorder Brand: • RCA Model: • EZ1000, EZ1000RD, EZ1000BL, EZ1000PL and EZ1000BK Battery: • 4 x AAA battery Size and frame rate of video recordings: • HQ mode: 640 x 480 pixels @ 30 fps (AVI format) • webQ mode: 448 x 336 pixels @ 30 fps...
of photos can be taken: 1100 photos 25 Technical specifications Product: • Digital Camera Recorder Brand: • RCA Model: • EZ1000, EZ1000RD, EZ1000BL, EZ1000PL and EZ1000BK Battery: • 4 x AAA battery Size and frame rate of video recordings: • HQ mode: 640 x 480 pixels @ 30 fps (AVI format) • webQ mode: 448 x 336 pixels @ 30 fps...

Owner/User Manual
Page 27
...FOR THE SECURITY OF ANY PERSONAL CONTENT OR DATA ON THE RETURNED DEVICE. Warranty information Limited warranty 12 Month Limited Warranty Applies to RCA Audio/Video Products AUDIOVOX ELECTRONICS CORP. (the Company) warrants to the original retail purchaser of this product that should this product or...the date of original purchase, such defect(s) will be returned with the sale of storing content (such as an mp3 player, digital voice recorder, etc), it is authorized to restore any pre-loaded content which were originally provided 26 If applicable, before shipping a product, make ...
...FOR THE SECURITY OF ANY PERSONAL CONTENT OR DATA ON THE RETURNED DEVICE. Warranty information Limited warranty 12 Month Limited Warranty Applies to RCA Audio/Video Products AUDIOVOX ELECTRONICS CORP. (the Company) warrants to the original retail purchaser of this product that should this product or...the date of original purchase, such defect(s) will be returned with the sale of storing content (such as an mp3 player, digital voice recorder, etc), it is authorized to restore any pre-loaded content which were originally provided 26 If applicable, before shipping a product, make ...


