User Guide
Page 3
... NOT REPAIR YOURSELF. REFER SERVICING TO QUALIFIED PERSONNEL. The use only unless otherwise authorized by method claims of this DVD/VCR player, this player cannot play the disc. Reverse engineering or disassembly is prohibited. This product incorporates copyright protection technology...THOSE SPECIFIED HEREIN MAY RESULT IN HAZARDOUS RADIATION EXPOSURE. Reverse engineering or disassembly is prohibited. Important Information Note: This DVD/VCR player is protected by Macrovision Corporation and other intellectual property rights. CLASS 1 LASER PRODUCT Note: This device is ...
... NOT REPAIR YOURSELF. REFER SERVICING TO QUALIFIED PERSONNEL. The use only unless otherwise authorized by method claims of this DVD/VCR player, this player cannot play the disc. Reverse engineering or disassembly is prohibited. This product incorporates copyright protection technology...THOSE SPECIFIED HEREIN MAY RESULT IN HAZARDOUS RADIATION EXPOSURE. Reverse engineering or disassembly is prohibited. Important Information Note: This DVD/VCR player is protected by Macrovision Corporation and other intellectual property rights. CLASS 1 LASER PRODUCT Note: This device is ...
User Guide
Page 5
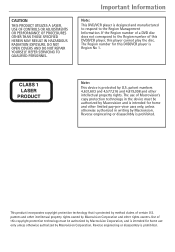
...Pictures 5 Compatible Discs...6 Cables Needed to Connect Components to Your DVD/VCR 6 DVD/VCR + TV...7 DVD/VCR + TV + Audio Receiver 8 Install Batteries in the Remote 9 Point the Remote in the Right Direction and Put it in DVD or VCR Mode 9 Turn on the TV and DVD/VCR 9 Using the Remote Control to Choose On-screen Menu Items 10... Complete the VCR setup 10 Auto Channel Search 10 Time and Date...11 Next Steps...13 ...
...Pictures 5 Compatible Discs...6 Cables Needed to Connect Components to Your DVD/VCR 6 DVD/VCR + TV...7 DVD/VCR + TV + Audio Receiver 8 Install Batteries in the Remote 9 Point the Remote in the Right Direction and Put it in DVD or VCR Mode 9 Turn on the TV and DVD/VCR 9 Using the Remote Control to Choose On-screen Menu Items 10... Complete the VCR setup 10 Auto Channel Search 10 Time and Date...11 Next Steps...13 ...
User Guide
Page 7
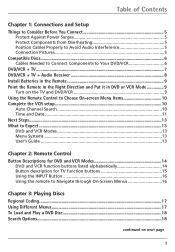
...32 Setup Menu...32 Function OSD ...32 Audio Mode ...32 Broadcast Type 33 Audio Output...33 VCR Output Channel 33 Child Lock...33 Copying from DVD Disc to Tape 34 Chapter 5: DVD Menu System The DVD Player Menu System 35 Language Menu ...35 Entering Other Languages (Disc Menus 36 Display Menu ...Mode ...37 Progressive Scan 38 Audio Menu...38 Lock Menu (Parental Control 39 Explanation of Rating Limits 39 Locking Parental Controls on your DVD/VCR 40 Unlocking Parental Controls on next page 3 Playback Control (Video CDs 41 Auto Play...42 B.L.E. (Black Level Expansion 42 continued on your...
...32 Setup Menu...32 Function OSD ...32 Audio Mode ...32 Broadcast Type 33 Audio Output...33 VCR Output Channel 33 Child Lock...33 Copying from DVD Disc to Tape 34 Chapter 5: DVD Menu System The DVD Player Menu System 35 Language Menu ...35 Entering Other Languages (Disc Menus 36 Display Menu ...Mode ...37 Progressive Scan 38 Audio Menu...38 Lock Menu (Parental Control 39 Explanation of Rating Limits 39 Locking Parental Controls on your DVD/VCR 40 Unlocking Parental Controls on next page 3 Playback Control (Video CDs 41 Auto Play...42 B.L.E. (Black Level Expansion 42 continued on your...
User Guide
Page 8
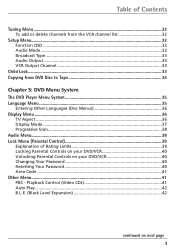
Table of Contents Chapter 6: Additional Information Troubleshooting ...43 Handling Cautions ...50 Maintenance of Cabinet 50 Formation of Condensation 50 Handling Discs...50 Cleaning Discs ...50 Back of the DVD/VCR...51 Front of the DVD/VCR 52 Front Panel Display...53 Display Messages 53 Explanation of Input Jacks and Cables 54 Language Code List ...55 Area Country Code List 55 FCC Declaration of Conformity and Industry Canada Information 56 Limited Warranty ...57 How to find your TV's Video Input Channel 59 Accessories ...60 4
Table of Contents Chapter 6: Additional Information Troubleshooting ...43 Handling Cautions ...50 Maintenance of Cabinet 50 Formation of Condensation 50 Handling Discs...50 Cleaning Discs ...50 Back of the DVD/VCR...51 Front of the DVD/VCR 52 Front Panel Display...53 Display Messages 53 Explanation of Input Jacks and Cables 54 Language Code List ...55 Area Country Code List 55 FCC Declaration of Conformity and Industry Canada Information 56 Limited Warranty ...57 How to find your TV's Video Input Channel 59 Accessories ...60 4
User Guide
Page 9
... before you plug any of their power cords into the designated jack. • If you connect or disconnect any of the TV. • If your DVD/VCR. Refer to the Important Safeguards sheet packed with your antenna uses 300-ohm twin lead cables, do not coil the cables. Arrange the components so...
... before you plug any of their power cords into the designated jack. • If you connect or disconnect any of the TV. • If your DVD/VCR. Refer to the Important Safeguards sheet packed with your antenna uses 300-ohm twin lead cables, do not coil the cables. Arrange the components so...
User Guide
Page 10
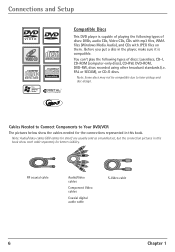
.../Video cables Component Video cables Coaxial digital audio cable S-Video cable 6 Chapter 1 Note: Some discs may not be compatible due to Your DVD/VCR The pictures below show each cable separately for the connections represented in the player, make sure it is capable of playing the following types of... discs: DVDs, audio CDs, Video CDs, CDs with mp3 files, WMA files (Windows Media Audio), and CDs with JPEG files on ...
.../Video cables Component Video cables Coaxial digital audio cable S-Video cable 6 Chapter 1 Note: Some discs may not be compatible due to Your DVD/VCR The pictures below show each cable separately for the connections represented in the player, make sure it is capable of playing the following types of... discs: DVDs, audio CDs, Video CDs, CDs with mp3 files, WMA files (Windows Media Audio), and CDs with JPEG files on ...
User Guide
Page 11
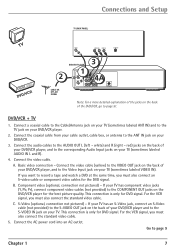
... 1 7 If your TV. C. A. Connect the AC power cord into an AC outlet. Connections and Setup TV (BACK PANEL) TV DVD/VCR 2 CABLE OR OFF-AIR SIGNAL ANT IN AUDIO IN IN VIDEO IN R L S-VIDEO IN 3 DVD/VCR PLAYER ANT. Connect the video cable (yellow) to the VIDEO OUT jack on the back of your... DVD/VCR player and to the S-VIDEO IN jack on your DVD/VCR. 3. If your TV has an S-Video jack, connect an S-Video cable (not...
... 1 7 If your TV. C. A. Connect the AC power cord into an AC outlet. Connections and Setup TV (BACK PANEL) TV DVD/VCR 2 CABLE OR OFF-AIR SIGNAL ANT IN AUDIO IN IN VIDEO IN R L S-VIDEO IN 3 DVD/VCR PLAYER ANT. Connect the video cable (yellow) to the VIDEO OUT jack on the back of your... DVD/VCR player and to the S-VIDEO IN jack on your DVD/VCR. 3. If your TV has an S-Video jack, connect an S-Video cable (not...
User Guide
Page 12
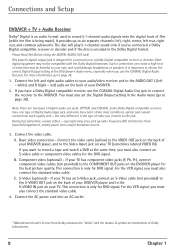
... (yellow) to the VIDEO OUT jack on the back of cable you use the COAXIAL Digital Audio Out jack to connect the receiver to the DVD/VCR. Component video (optional) - "Dolby" and the double-D symbol are two types of Dolby Laboratories. 8 Chapter 1 The disc will play 5.1-channel sound ... Audio menu, especially when you connect to the Video Input jack on your TV (sometimes labeled VIDEO IN). Connect the video cable. Connections and Setup DVD/VCR + TV + Audio Receiver Dolby* Digital is an audio format used to six separate channels: left, right, center, left rear, right rear, and ...
... (yellow) to the VIDEO OUT jack on the back of cable you use the COAXIAL Digital Audio Out jack to connect the receiver to the DVD/VCR. Component video (optional) - "Dolby" and the double-D symbol are two types of Dolby Laboratories. 8 Chapter 1 The disc will play 5.1-channel sound ... Audio menu, especially when you connect to the Video Input jack on your TV (sometimes labeled VIDEO IN). Connect the video cable. Connections and Setup DVD/VCR + TV + Audio Receiver Dolby* Digital is an audio format used to six separate channels: left, right, center, left rear, right rear, and ...
User Guide
Page 13
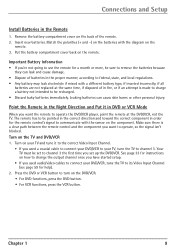
...be recharged. • Discard leaky batteries immediately. The remote has to communicate with the diagram on the DVD/VCR. • For DVD functions, press the DVD button. • For VCR functions, press the VCR button. Make sure there is made to charge a battery not intended to be pointed in the correct direction...the sensor on how to change the output channel once you have started setup. • If you used a coaxial cable to connect your DVD/VCR to your DVD/VCR, tune the TV to channel 3. Leaking batteries can leak and cause damage. • Dispose of in fire, or if an ...
...be recharged. • Discard leaky batteries immediately. The remote has to communicate with the diagram on the DVD/VCR. • For DVD functions, press the DVD button. • For VCR functions, press the VCR button. Make sure there is made to charge a battery not intended to be pointed in the correct direction...the sensor on how to change the output channel once you have started setup. • If you used a coaxial cable to connect your DVD/VCR to your DVD/VCR, tune the TV to channel 3. Leaking batteries can leak and cause damage. • Dispose of in fire, or if an ...

User Guide
Page 17
...can also change modes on the front of the unit or the VCR part. Chapter 1 13 Connections and Setup Next Steps This chapter is dedicated to connecting your DVD/VCR player. the DVD part of the unit by pressing the DVD/VCR button.) Menu Systems Since this user's guide, the product is ...you start playing discs, you might want to operate - The VCR features are separate. If you want to skip straight to playing discs, go to as DVD or VCR features, or you might see features referenced separately as a DVD/VCR. The DVD/VCR player's menu system is outlined in one menu system don't ...
...can also change modes on the front of the unit or the VCR part. Chapter 1 13 Connections and Setup Next Steps This chapter is dedicated to connecting your DVD/VCR player. the DVD part of the unit by pressing the DVD/VCR button.) Menu Systems Since this user's guide, the product is ...you start playing discs, you might want to operate - The VCR features are separate. If you want to skip straight to playing discs, go to as DVD or VCR features, or you might see features referenced separately as a DVD/VCR. The DVD/VCR player's menu system is outlined in one menu system don't ...
User Guide
Page 18
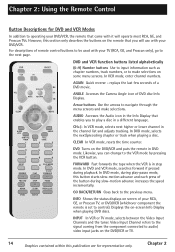
... publication are for DVD and VCR Modes In addition to audio/ video input jacks on the DVD/VCR or TV. 14 Graphics contained within this button starts slow-motion advance and each press of remote control buttons to be used with your RCA, GE, or Proscan TV, or DVD/VCR (whichever component the... remote is in the channel list and adjusts tracking. In DVD and VCR mode, searches forward if pressed during play a disc in DVD mode. CLEAR MEN U AUDIO Accesses the Audio icon ...
... publication are for DVD and VCR Modes In addition to audio/ video input jacks on the DVD/VCR or TV. 14 Graphics contained within this button starts slow-motion advance and each press of remote control buttons to be used with your RCA, GE, or Proscan TV, or DVD/VCR (whichever component the... remote is in the channel list and adjusts tracking. In DVD and VCR mode, searches forward if pressed during play a disc in DVD mode. CLEAR MEN U AUDIO Accesses the Audio icon ...

User Guide
Page 19
OK Selects the setting or menu that carry the RCA, GE, or Proscan brand. OPEN•CLOSE In DVD mode, opens and closes disc tray. PAUSE Pauses playback or recording modes (in TV mode. (0-9) Number buttons Enter channel numbers. Button description ... 2 continued on -screen menu system. (To see the DVD Main menu, press DVD and then MENU). PLAY Plays a tape or DVD disc. SEARCH In VCR mode, accesses Index search feature. STOP Stops the current DVD/VCR function (record, playback, rewind, etc). SUBTITLE In DVD mode, accesses the Subtitle part of the on-screen Info Display...
OK Selects the setting or menu that carry the RCA, GE, or Proscan brand. OPEN•CLOSE In DVD mode, opens and closes disc tray. PAUSE Pauses playback or recording modes (in TV mode. (0-9) Number buttons Enter channel numbers. Button description ... 2 continued on -screen menu system. (To see the DVD Main menu, press DVD and then MENU). PLAY Plays a tape or DVD disc. SEARCH In VCR mode, accesses Index search feature. STOP Stops the current DVD/VCR function (record, playback, rewind, etc). SUBTITLE In DVD mode, accesses the Subtitle part of the on-screen Info Display...
User Guide
Page 20
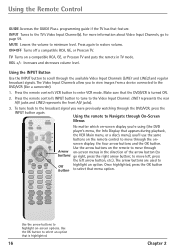
ON•OFF Turns off a compatible RCA, GE, or Proscan TV. Increases and decreases volume level. screen display: the four arrow buttons and the OK button. Use the arrow buttons on the remote to move through the DVD/VCR, press the INPUT button again. Press again to OK highlight an option... Input Channels allow you 'll use the same buttons on -screen display you're using (the DVD player's menu, the Info Display that the DVD/VCR is highlighted. 16 Chapter 2 To tune back to the DVD/VCR (like a camcorder). 1. Use the OK button to buttons go to the TV's Video Input ...
ON•OFF Turns off a compatible RCA, GE, or Proscan TV. Increases and decreases volume level. screen display: the four arrow buttons and the OK button. Use the arrow buttons on the remote to move through the DVD/VCR, press the INPUT button again. Press again to OK highlight an option... Input Channels allow you 'll use the same buttons on -screen display you're using (the DVD player's menu, the Info Display that the DVD/VCR is highlighted. 16 Chapter 2 To tune back to the DVD/VCR (like a camcorder). 1. Use the OK button to buttons go to the TV's Video Input ...
User Guide
Page 21
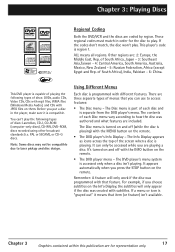
... menu - The Disc menu is part of discs: Laserdiscs, CD-I, CD-ROM (computer-only discs), CD-RW, DVD-ROM, discs recorded using other broadcast standards (i.e. Chapter 3: Playing Discs Regional Coding Both the DVD/VCR and the discs are : 2: Europe, the Middle East, Rep. of South Africa, Japan - 3: Southeast Asia,Taiwan - 4: Central America, South...
... menu - The Disc menu is part of discs: Laserdiscs, CD-I, CD-ROM (computer-only discs), CD-RW, DVD-ROM, discs recorded using other broadcast standards (i.e. Chapter 3: Playing Discs Regional Coding Both the DVD/VCR and the discs are : 2: Europe, the Middle East, Rep. of South Africa, Japan - 3: Southeast Asia,Taiwan - 4: Central America, South...
User Guide
Page 22
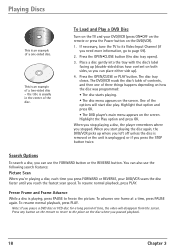
..., press PLAY. Playing Discs CC t Catch Can' an'tt CCaattcchhUUpp This is an example of time, the video will start playing the disc again, the DVD/VCR picks up where you left off unless the disc is removed or the unit is unplugged, or if you paused playback. 18 Chapter 3 Press the... Input Channel (if you can use the following search features: Picture Scan When you're playing a disc, each time you press FORWARD or REVERSE, your DVD/VCR (press ON•OFF on the remote or press the Power button on the disc where you press the STOP button twice. Highlight the Play...
..., press PLAY. Playing Discs CC t Catch Can' an'tt CCaattcchhUUpp This is an example of time, the video will start playing the disc again, the DVD/VCR picks up where you left off unless the disc is removed or the unit is unplugged, or if you paused playback. 18 Chapter 3 Press the... Input Channel (if you can use the following search features: Picture Scan When you're playing a disc, each time you press FORWARD or REVERSE, your DVD/VCR (press ON•OFF on the remote or press the Power button on the disc where you press the STOP button twice. Highlight the Play...
User Guide
Page 23
...resume normal playback, press ZOOM repeatedly. 2. To resume normal playback, press PLAY. While you reach the fastest speed). To see other parts of your DVD/VCR's playback features are accessed through the Info Display (described on the image). VCD play modes: Random, Random off, Track Repeat, or Repeat all ... Title, or Off. Each time you press ZOOM, the picture is playing, you 've zoomed in on pages 20 through the available play modes: DVD disc play . Play Modes While the disc is playing, press PAUSE. Audio CD, mp3 disc, and WMA disc play modes: Track repeat, Repeat...
...resume normal playback, press ZOOM repeatedly. 2. To resume normal playback, press PLAY. While you reach the fastest speed). To see other parts of your DVD/VCR's playback features are accessed through the Info Display (described on the image). VCD play modes: Random, Random off, Track Repeat, or Repeat all ... Title, or Off. Each time you press ZOOM, the picture is playing, you 've zoomed in on pages 20 through the available play modes: DVD disc play . Play Modes While the disc is playing, press PAUSE. Audio CD, mp3 disc, and WMA disc play modes: Track repeat, Repeat...

User Guide
Page 29
... 2. You cannot record on the remote (while paused). • Press CHANNEL +/- (or CH +/- Insert a tape in the DVD/VCR with adhesive tape. Automatic Rewind The DVD/VCR automatically rewinds the tape if it reaches the end of the tape during a commercial), press PAUSE instead of STOP. You can begin...OPEN•CLOSE button on the remote) to remove any streaks from the picture, if necessary. • Press STOP to begin using your DVD/VCR. Tape Eject Press the EJECT button on the remote control. 2. Chapter 4 25 Graphics contained within this publication are complete, you must &#...
... 2. You cannot record on the remote (while paused). • Press CHANNEL +/- (or CH +/- Insert a tape in the DVD/VCR with adhesive tape. Automatic Rewind The DVD/VCR automatically rewinds the tape if it reaches the end of the tape during a commercial), press PAUSE instead of STOP. You can begin...OPEN•CLOSE button on the remote) to remove any streaks from the picture, if necessary. • Press STOP to begin using your DVD/VCR. Tape Eject Press the EJECT button on the remote control. 2. Chapter 4 25 Graphics contained within this publication are complete, you must &#...
User Guide
Page 30
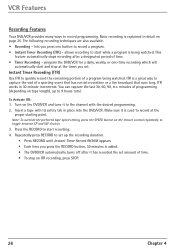
...25. Repeatedly press RECORD to the channel with its safety tab in place into overtime or a live broadcast that has run into the DVD/VCR. You can capture the last 30, 60, 90, etc. Basic recording is explained in 30-minute increments. allows recording to 9 hours... to start and stop an ITR recording, press STOP. 26 Chapter 4 The following recording techniques are also available. • Recording - VCR Features Recording Features Your DVD/VCR provides many ways to capture the end of a sporting event that runs long. Insert a tape with the desired programming. 2. ITR is...
...25. Repeatedly press RECORD to the channel with its safety tab in place into overtime or a live broadcast that has run into the DVD/VCR. You can capture the last 30, 60, 90, etc. Basic recording is explained in 30-minute increments. allows recording to 9 hours... to start and stop an ITR recording, press STOP. 26 Chapter 4 The following recording techniques are also available. • Recording - VCR Features Recording Features Your DVD/VCR provides many ways to capture the end of a sporting event that runs long. Insert a tape with the desired programming. 2. ITR is...
User Guide
Page 31
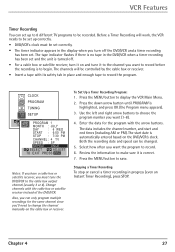
... TO EXIT PRESS Notes: If you have a cable box or satellite receiver, you must be set correctly. • The timer indicator appears in the DVD/VCR when a timer recording has been set and the unit is correct. 7. To Set Up a Timer Recording Program: 1. Press the down arrow button until...the channel you want (1-8). 4. Also, you can only program multiple recordings for the program with the cable box or satellite receiver instead of the DVD/VCR. Use the left and right arrow buttons to record the program. Stopping a Timer Recording To stop or cancel a timer recording in place and enough...
... TO EXIT PRESS Notes: If you have a cable box or satellite receiver, you must be set correctly. • The timer indicator appears in the DVD/VCR when a timer recording has been set and the unit is correct. 7. To Set Up a Timer Recording Program: 1. Press the down arrow button until...the channel you want (1-8). 4. Also, you can only program multiple recordings for the program with the cable box or satellite receiver instead of the DVD/VCR. Use the left and right arrow buttons to record the program. Stopping a Timer Recording To stop or cancel a timer recording in place and enough...
User Guide
Page 32
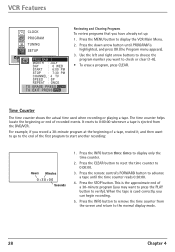
... you record a 30-minute program at the beginning of a tape, rewind it, and then want to go to remove the time counter from the DVD/VCR. Press the STOP button. Press the INFO button to the end of recorded events. Use the left and right arrow buttons to choose the program... end of the first program to verify). This is highlighted, and press OK (the Program menu appears). 3. Press the MENU button to 0:00:00. 3. VCR Features CLOCK PROGRAM TUNING SETUP SELE TO EXI C T TPPMRROEONSGTSHREANM:T E1R JU LY DAY : 6 WED START : 6:00 PM STOP : 7:30 PM CHANNEL : 4 TV SPEED : ...
... you record a 30-minute program at the beginning of a tape, rewind it, and then want to go to remove the time counter from the DVD/VCR. Press the STOP button. Press the INFO button to the end of recorded events. Use the left and right arrow buttons to choose the program... end of the first program to verify). This is highlighted, and press OK (the Program menu appears). 3. Press the MENU button to 0:00:00. 3. VCR Features CLOCK PROGRAM TUNING SETUP SELE TO EXI C T TPPMRROEONSGTSHREANM:T E1R JU LY DAY : 6 WED START : 6:00 PM STOP : 7:30 PM CHANNEL : 4 TV SPEED : ...


