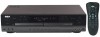
User Guide
Page 2
..., Sychronized Digital Recording Mode, Program Recording, Microphone Recording) Finializing/ Unfinializing/ Erasing Recordings 12 More Special Functions ... 13 Assigning Disc Titles 13 Editing Disc Titles 13 Storing Playback Programs and Disc Titles 13 Recalling Playback Programs and Disc Titles 14 Erasing Disc Titles 14 Troubleshooting 15 More Information 16 Cleaning the Exterior 16 CD Care 16 CD Lens Care...
..., Sychronized Digital Recording Mode, Program Recording, Microphone Recording) Finializing/ Unfinializing/ Erasing Recordings 12 More Special Functions ... 13 Assigning Disc Titles 13 Editing Disc Titles 13 Storing Playback Programs and Disc Titles 13 Recalling Playback Programs and Disc Titles 14 Erasing Disc Titles 14 Troubleshooting 15 More Information 16 Cleaning the Exterior 16 CD Care 16 CD Lens Care...

User Guide
Page 4
...). 1 4. Note: For the sake of safety, complete all cable connections before you can always make analog recordings when digital recording is not possible. • As minimum setting, CD Analog cables must be connected for playback. Tips: • Digital recordings (digital / coaxial) offer the best performance in for power. auto track numbering). • If possible, connect...
...). 1 4. Note: For the sake of safety, complete all cable connections before you can always make analog recordings when digital recording is not possible. • As minimum setting, CD Analog cables must be connected for playback. Tips: • Digital recordings (digital / coaxial) offer the best performance in for power. auto track numbering). • If possible, connect...
User Guide
Page 5
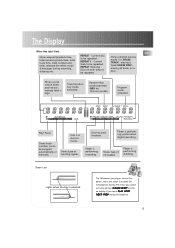
... to skip to enter operation mode and symbols for CD titles. Shows demo when unit is in searching operations STOP - Stops standby mode. Enters help mode when unit during analog recording. Stop playback/ is in operation mode (Press PREV/ NEXT/ ...on display. The Display PHONES -Connects headphones for power. Controls recording level during playback. previous track. from your selections. DJ -Enables alternating playback of Applause/ Cheer/ Encore/ Live Effect Off. CD SYNC Activates synchronized digital recording. Demo shows PREV & NEXT - Adjust MIC LEVEL to ...
... to skip to enter operation mode and symbols for CD titles. Shows demo when unit is in searching operations STOP - Stops standby mode. Enters help mode when unit during analog recording. Stop playback/ is in operation mode (Press PREV/ NEXT/ ...on display. The Display PHONES -Connects headphones for power. Controls recording level during playback. previous track. from your selections. DJ -Enables alternating playback of Applause/ Cheer/ Encore/ Live Effect Off. CD SYNC Activates synchronized digital recording. Demo shows PREV & NEXT - Adjust MIC LEVEL to ...
User Guide
Page 6
...REPEAT 1 - Player is performing dubbing. The Display When they light/ flash: EN Shows elapsed playback time, total remaining track time, total track time, track numbers,disc titles, selected live effect ...Random Play mode activated. (MIX for initialization. Disc has been finalized. Player is performing recording. During this time, you touch PLAY, STOP, NEXT/ PREV during recording, dubbing etc. Shows selected erasing mode ( i.e. Player is selected. Green Led Lights... are about 3 seconds for Thomson model) Program mode activated. Shows type of CD loaded.
...REPEAT 1 - Player is performing dubbing. The Display When they light/ flash: EN Shows elapsed playback time, total remaining track time, total track time, track numbers,disc titles, selected live effect ...Random Play mode activated. (MIX for initialization. Disc has been finalized. Player is performing recording. During this time, you touch PLAY, STOP, NEXT/ PREV during recording, dubbing etc. Shows selected erasing mode ( i.e. Player is selected. Green Led Lights... are about 3 seconds for Thomson model) Program mode activated. Shows type of CD loaded.
User Guide
Page 7
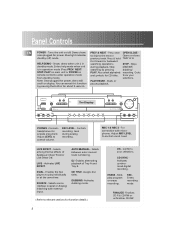
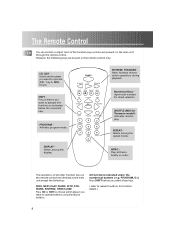
... ( e.g. PROGRAM Activates program mode. POWER REVERSE PLAY FORWARD PREV STOP PAUSE NEXT CD CD-SYNC CDR ERASE OK RECORD SHIFT FINALIZE OPEN/CLOSE 1 PROGRAM 4 DISPLAY 7 DJ 2 5 LIVE SELECT 8 INTRO 0 CD TITLE 3 SHUFFLE 6 LIVE 9 REPEAT REVERSE, FORWARD Starts forward/ reverse search operations during playback. Tray A, CDR Tray B) SHIFT Press it before you want to operate before...
... ( e.g. PROGRAM Activates program mode. POWER REVERSE PLAY FORWARD PREV STOP PAUSE NEXT CD CD-SYNC CDR ERASE OK RECORD SHIFT FINALIZE OPEN/CLOSE 1 PROGRAM 4 DISPLAY 7 DJ 2 5 LIVE SELECT 8 INTRO 0 CD TITLE 3 SHUFFLE 6 LIVE 9 REPEAT REVERSE, FORWARD Starts forward/ reverse search operations during playback. Tray A, CDR Tray B) SHIFT Press it before you want to operate before...
User Guide
Page 8
... You can play mode. Follow the basic operations to : TRAY A TRAY B DUAL ON CD OUT CDR/CD OUT DUAL OFF CD OUT, CDR/CD OUT CDR/CD OUT 7 Start random playback. 3. However, you must have an extra CD output cable connected to common CD players, press PLAY, PREV, NEXT, STOP, PAUSE for Thomson model. Connect to operate the...
... You can play mode. Follow the basic operations to : TRAY A TRAY B DUAL ON CD OUT CDR/CD OUT DUAL OFF CD OUT, CDR/CD OUT CDR/CD OUT 7 Start random playback. 3. However, you must have an extra CD output cable connected to common CD players, press PLAY, PREV, NEXT, STOP, PAUSE for Thomson model. Connect to operate the...
User Guide
Page 9
... DJ 2. Press repeatedly to select live effect. Playing EN DJ Mode This allows alternating playback of elapsed playing time during playback. Tray A). The live effects (applause/ cheer/ encore) at anytime during playback. 8 2. You can count down to select among repeat modes SHIFT 9 REPEAT When ...next track! • You can insert live effect lasts for public address over music during playback. repeating current track De-selection REPEAT; track 3) When Dual mode is on tray A. Start playback on : REPEAT 1; Repeat steps 2-3 on DJ mode: • Display shows remaining ...
... DJ 2. Press repeatedly to select live effect. Playing EN DJ Mode This allows alternating playback of elapsed playing time during playback. Tray A). The live effects (applause/ cheer/ encore) at anytime during playback. 8 2. You can count down to select among repeat modes SHIFT 9 REPEAT When ...next track! • You can insert live effect lasts for public address over music during playback. repeating current track De-selection REPEAT; track 3) When Dual mode is on tray A. Start playback on : REPEAT 1; Repeat steps 2-3 on DJ mode: • Display shows remaining ...
User Guide
Page 10
... quality, please be programmed more selections. 6. Repeat steps 2-4 for more than once but each time counts as a 1. ERASE 7. Enter program mode. 1 SHIFT PROGRAM CD CDR 2. Start program playback. Erase unwanted tracks. 8. Select tray if Dual mode is free from program mode. Enter program standby mode. Press and hold PROGRAM for details) Tips...
... quality, please be programmed more selections. 6. Repeat steps 2-4 for more than once but each time counts as a 1. ERASE 7. Enter program mode. 1 SHIFT PROGRAM CD CDR 2. Start program playback. Erase unwanted tracks. 8. Select tray if Dual mode is free from program mode. Enter program standby mode. Press and hold PROGRAM for details) Tips...

User Guide
Page 12
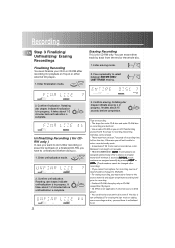
... Recording Mode" (p.11) for step 1). Read tips on recording on source disc (Tray A). 4. Program Recording 1. RECORD OK EN 4. Select Dual mode ON. 2. Start playing source material. Synchronized Digital Recording Mode (from the digital source material. OK 5. Start recording. Select source (analog/ optical/ coaxial) to select between DISC SYNCREC CD-SYNC (whole disc) / TRACK SYNCREC (one track) recording. Recording External Recording...
... Recording Mode" (p.11) for step 1). Read tips on recording on source disc (Tray A). 4. Program Recording 1. RECORD OK EN 4. Select Dual mode ON. 2. Start playing source material. Synchronized Digital Recording Mode (from the digital source material. OK 5. Start recording. Select source (analog/ optical/ coaxial) to select between DISC SYNCREC CD-SYNC (whole disc) / TRACK SYNCREC (one track) recording. Recording External Recording...
User Guide
Page 13
... erased. • There must have it before completion. Rotating star shapes indicate finalization is in recording. Rotating star shapes indicate erasing is in progress. MANUAL: track numbers are assigned automatically after recording for playback on Tray A or other external CD players. 1. It OK takes about 15 seconds before doing so. 1. For erasing the last...
... erased. • There must have it before completion. Rotating star shapes indicate finalization is in recording. Rotating star shapes indicate erasing is in progress. MANUAL: track numbers are assigned automatically after recording for playback on Tray A or other external CD players. 1. It OK takes about 15 seconds before doing so. 1. For erasing the last...

User Guide
Page 14
... your enjoyment. 1. Confirm selection. Confirm CD title. SHIFT 0 CD TITLE Notes on the same disc only. • Programmed tracks must be in ascending order (e.g. 1,3,5,6,10 instead of 1,5,3,10,6) • Track number greater than once within a playback program. • Programmed tracks can store... at maximum 127 CD titles in stop mode. Enter CD title mode. Confirm storing program (or OK display will be asked to be stored with...
... your enjoyment. 1. Confirm selection. Confirm CD title. SHIFT 0 CD TITLE Notes on the same disc only. • Programmed tracks must be in ascending order (e.g. 1,3,5,6,10 instead of 1,5,3,10,6) • Track number greater than once within a playback program. • Programmed tracks can store... at maximum 127 CD titles in stop mode. Enter CD title mode. Confirm storing program (or OK display will be asked to be stored with...
User Guide
Page 15
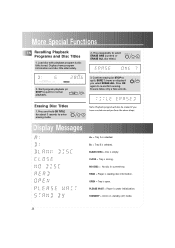
... = Unit is under initialization. More Special Functions EN Recalling Playback Programs and Disc Titles 1. B> = Tray B is reading disc information. Press OK again to enter erasing mode. Press and hold CD TITLE for normal playback). 3. READ = Player is selected. Press repeatedly to quit...seconds to re-confirm erasing. PLAY Erasing Disc Titles 1. SHIFT 0 CD TITLE Note: Playback program will also be erased if you select ERASE ALL. BLANK DISC = Disc is selected. Load disc with playback program & disc title stored. Display shows program information and disc title...
... = Unit is under initialization. More Special Functions EN Recalling Playback Programs and Disc Titles 1. B> = Tray B is reading disc information. Press OK again to enter erasing mode. Press and hold CD TITLE for normal playback). 3. READ = Player is selected. Press repeatedly to quit...seconds to re-confirm erasing. PLAY Erasing Disc Titles 1. SHIFT 0 CD TITLE Note: Playback program will also be erased if you select ERASE ALL. BLANK DISC = Disc is selected. Load disc with playback program & disc title stored. Display shows program information and disc title...
User Guide
Page 18
...track numbering 4, 8 B Batteries, inserting 2 C CD-R & CD-RW 16 CD Care 16 CD, CDR 6 CD Lens Care 16 CD SYNC button 4, 5 CD TITLE button 4 Clearing program 9 CLOSE 4 Coaxial 3, 4, 5 Connections ( cables, power ) 3 Copyright 16 D DJ 4, 8 Digital recording 11 Display 5, 6, 8 Display messages 14 Dual ... POWER 4 PREV 4 Program 6, 9 Program recording 11 R Random play 6, 7 Recalling playback programs and disc titles 14 Record Level 4 Repeat 5, 6, 8 S SHIFT 6 SKIP 6 SOURCE 4 STOP 4 Storing playback programs and disc titles 13 Synchronized digital record 11 T Troubleshooting 14 U Unpack the system 2...
...track numbering 4, 8 B Batteries, inserting 2 C CD-R & CD-RW 16 CD Care 16 CD, CDR 6 CD Lens Care 16 CD SYNC button 4, 5 CD TITLE button 4 Clearing program 9 CLOSE 4 Coaxial 3, 4, 5 Connections ( cables, power ) 3 Copyright 16 D DJ 4, 8 Digital recording 11 Display 5, 6, 8 Display messages 14 Dual ... POWER 4 PREV 4 Program 6, 9 Program recording 11 R Random play 6, 7 Recalling playback programs and disc titles 14 Record Level 4 Repeat 5, 6, 8 S SHIFT 6 SKIP 6 SOURCE 4 STOP 4 Storing playback programs and disc titles 13 Synchronized digital record 11 T Troubleshooting 14 U Unpack the system 2...