
User Guide
Page 2
... to the premises wiring and telephone network must , upon permanent disconnection of your telephone from your line. • If your home has specially wired alarm equipment connected to the telephone line, ensure the installation of this information to your alarm equipment. and (3) inform you are subject ...to state tariffs, and therefore, you may not be certain of the number of devices you may connect to your telephone line and still have questions about what will disable alarm equipment, consult your telephone number is called. The REN is useful in Subpart E ...
... to the premises wiring and telephone network must , upon permanent disconnection of your telephone from your line. • If your home has specially wired alarm equipment connected to the telephone line, ensure the installation of this information to your alarm equipment. and (3) inform you are subject ...to state tariffs, and therefore, you may not be certain of the number of devices you may connect to your telephone line and still have questions about what will disable alarm equipment, consult your telephone number is called. The REN is useful in Subpart E ...
User Guide
Page 7
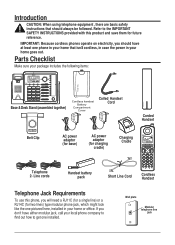
IMPORTANT: Because cordless phones operate on electricity, you find out how to the IMPORTANT SAFETY INSTRUCTIONS provided with this phone, you will need a RJ11C (for a single line) or a RJ14C (for two lines) type modular phone jack, which might look like the one pictured here, installed in...equipment, there are basic safety instructions that isn't cordless, in case the power in your package includes the following items: Base & Desk Stand (assembled together) Coiled Handset Cord Corded Handset Belt Clip AC power adaptor (for base) AC power adaptor (for charging cradle) Charging...
IMPORTANT: Because cordless phones operate on electricity, you find out how to the IMPORTANT SAFETY INSTRUCTIONS provided with this phone, you will need a RJ11C (for a single line) or a RJ14C (for two lines) type modular phone jack, which might look like the one pictured here, installed in...equipment, there are basic safety instructions that isn't cordless, in case the power in your package includes the following items: Base & Desk Stand (assembled together) Coiled Handset Cord Corded Handset Belt Clip AC power adaptor (for base) AC power adaptor (for charging cradle) Charging...
User Guide
Page 8
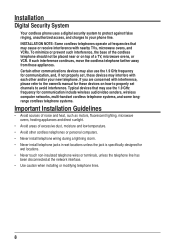
...nearby TVs, microwave ovens, and VCRs. To minimize or prevent such interference, the base of a TV, microwave ovens, or VCR. If such interference continues, move the cordless telephone farther away from these devices may also use the 1.9 GHz frequency for ...if not properly set channels to avoid interference. INSTALLATION NOTE: Some cordless telephones operate at the network interface. • Use caution when installing or modifying telephone lines. 8 Installation Digital Security System Your cordless phone uses a digital security system to protect against false ringing, unauthorized ...
...nearby TVs, microwave ovens, and VCRs. To minimize or prevent such interference, the base of a TV, microwave ovens, or VCR. If such interference continues, move the cordless telephone farther away from these devices may also use the 1.9 GHz frequency for ...if not properly set channels to avoid interference. INSTALLATION NOTE: Some cordless telephones operate at the network interface. • Use caution when installing or modifying telephone lines. 8 Installation Digital Security System Your cordless phone uses a digital security system to protect against false ringing, unauthorized ...
User Guide
Page 10
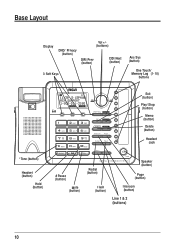
Base Layout Display DND/ Privacy (button) Vol +/(buttons) DIR / Prev (button) CID / Next (button) 3 Soft Keys Ans Sys (button) One Touch/ Memory Log (1- 10) buttons Exit (button) Play/ Stop (button) Memo (button) Delete (button) Headset Jack * Tone (button) Headset (button) Hold (button) # Pause (button) Mute (button) Redial (button) Flash (button) Speaker (button) Page (button) Intercom (button) Line 1 & 2 (buttons) 10
Base Layout Display DND/ Privacy (button) Vol +/(buttons) DIR / Prev (button) CID / Next (button) 3 Soft Keys Ans Sys (button) One Touch/ Memory Log (1- 10) buttons Exit (button) Play/ Stop (button) Memo (button) Delete (button) Headset Jack * Tone (button) Headset (button) Hold (button) # Pause (button) Mute (button) Redial (button) Flash (button) Speaker (button) Page (button) Intercom (button) Line 1 & 2 (buttons) 10
User Guide
Page 12
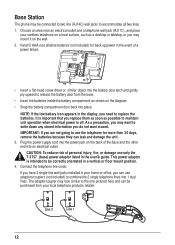
...damage use the telephone for back up power in the display, you are not going to release the battery door from your cordless telephone on a level surface, such as shown on the diagram. • Snap the battery compartment door back into place. Connect the telephone...failure. • Insert a flat-head screw driver or similar object into an electrical outlet. Base Station The phone may be connected to two line (RJ14C) wall jacks to combine the 2 single telephone lines into 1 dual lines. Choose an area near an electrical outlet and a telephone wall jack (RJ11C), and place your ...
...damage use the telephone for back up power in the display, you are not going to release the battery door from your cordless telephone on a level surface, such as shown on the diagram. • Snap the battery compartment door back into place. Connect the telephone...failure. • Insert a flat-head screw driver or similar object into an electrical outlet. Base Station The phone may be connected to two line (RJ14C) wall jacks to combine the 2 single telephone lines into 1 dual lines. Choose an area near an electrical outlet and a telephone wall jack (RJ11C), and place your ...
User Guide
Page 13
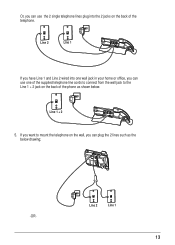
Or, you can use one wall jack in your home or office, you want to the Line 1 + 2 jack on the back of the telephone. If you can plug the 2 lines such as shown below drawing; Line 2 Line 1 -OR- 13 Line 1 + 2 5. Line 2 Line 1 If you have Line 1 and Line 2 wired into the 2 jacks on the wall, you can use the 2 single telephone lines plug into one of the supplied telephone line cords to connect from the wall jack to mount the telephone on the back of the phone as the below .
Or, you can use one wall jack in your home or office, you want to the Line 1 + 2 jack on the back of the telephone. If you can plug the 2 lines such as shown below drawing; Line 2 Line 1 -OR- 13 Line 1 + 2 5. Line 2 Line 1 If you have Line 1 and Line 2 wired into the 2 jacks on the wall, you can use the 2 single telephone lines plug into one of the supplied telephone line cords to connect from the wall jack to mount the telephone on the back of the phone as the below .

User Guide
Page 14
Line 2 Line 1 -OR- Line 1 & 2 6. Connect the handset cord: Connect one end of the coiled handset cord to the jack on the side of the base and the other end into the jack in the handset, and place the handset in the cradle. 14
Line 2 Line 1 -OR- Line 1 & 2 6. Connect the handset cord: Connect one end of the coiled handset cord to the jack on the side of the base and the other end into the jack in the handset, and place the handset in the cradle. 14
User Guide
Page 17
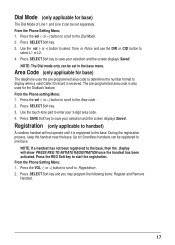
Dial Mode (only applicable for base) The Dial Mode of Line 1 and Line 2 can be set separately. Press the vol (- or +) button to scroll to the Area code . 2. or +) button to scroll to the Dial Mode. 2. or +) button ... and the screen displays Saved . or +) button to scroll to 10 cordless handsets can be set in the base menu. Press SELECT Soft key to the base, then the display will not operate until it is received. Press the vol (- From the Phone Setting Menu: 1. During the registration process, keep the handset near the...
Dial Mode (only applicable for base) The Dial Mode of Line 1 and Line 2 can be set separately. Press the vol (- or +) button to scroll to the Area code . 2. or +) button to scroll to the Dial Mode. 2. or +) button ... and the screen displays Saved . or +) button to scroll to 10 cordless handsets can be set in the base menu. Press SELECT Soft key to the base, then the display will not operate until it is received. Press the vol (- From the Phone Setting Menu: 1. During the registration process, keep the handset near the...
User Guide
Page 19
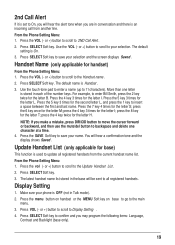
... From the Phone Setting Menu: 1. Press the VOL (- The default setting is OFF (not in conversation and there is an incoming call from the current handset name list. Press SELECT Soft key to all registered handsets from another line. The default name is stored in the base will be ...key 3 times for the second letter L, and press the 1 key to Display Setting . 4. From the Phone Setting Menu: 1. Display Setting 1. Press the menu button on handset or the MENU Soft key on base to go to backspace and delete one letter is Handset . 3. Press SELECT Soft key to confi...
... From the Phone Setting Menu: 1. Press the VOL (- The default setting is OFF (not in conversation and there is an incoming call from the current handset name list. Press SELECT Soft key to all registered handsets from another line. The default name is stored in the base will be ...key 3 times for the second letter L, and press the 1 key to Display Setting . 4. From the Phone Setting Menu: 1. Display Setting 1. Press the menu button on handset or the MENU Soft key on base to go to backspace and delete one letter is Handset . 3. Press SELECT Soft key to confi...
User Guide
Page 20
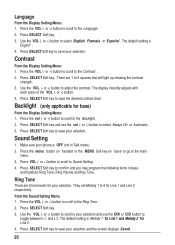
...or +) button. 4. or +) button to the Contrast . 2. Press SELECT Soft key to save your selection. The default setting is Melody 1 for Line 1 and Melody 2 for base) From the Display Setting Menu: 1. Use the VOL (- or +) button to scroll to select Always On or Automatic. 3. Press the vol (-...the contrast strength . 3. Press SELECT Soft key and use the DIR or CID button to 5 for your phone is English . 4. Ring Tone There are 5 tone levels for Line 1 and Line 2 respectively. The display instantly adjusts with each press of the VOL (- Sound Setting 1. Press the VOL ...
...or +) button. 4. or +) button to the Contrast . 2. Press SELECT Soft key to save your selection. The default setting is Melody 1 for Line 1 and Melody 2 for base) From the Display Setting Menu: 1. Use the VOL (- or +) button to scroll to select Always On or Automatic. 3. Press the vol (-...the contrast strength . 3. Press SELECT Soft key and use the DIR or CID button to 5 for your phone is English . 4. Ring Tone There are 5 tone levels for Line 1 and Line 2 respectively. The display instantly adjusts with each press of the VOL (- Sound Setting 1. Press the VOL ...
User Guide
Page 21
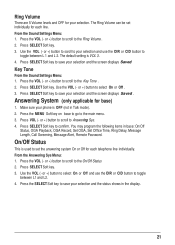
...DIR or CID button to toggle between L1 and L2. 4. The default setting is used to set individually for each telephone line individually. Press SELECT Soft key to save your phone is OFF (not in Talk mode). 2. Make sure your selection and the screen displays Saved . or +) button to ...the VOL (- Press VOL (- On/Off Status This is VOL 3. 4. s 2. Press the SELECT Soft key to save your selection and the status shows in base: On/Off Status, OGA Playback, OGA Record, Set OGA, Set Office Time, Ring Delay, Message Length, Call Screening, Message Alert, Remote Password. Press...
...DIR or CID button to toggle between L1 and L2. 4. The default setting is used to set individually for each telephone line individually. Press SELECT Soft key to save your phone is OFF (not in Talk mode). 2. Make sure your selection and the screen displays Saved . or +) button to ...the VOL (- Press VOL (- On/Off Status This is VOL 3. 4. s 2. Press the SELECT Soft key to save your selection and the status shows in base: On/Off Status, OGA Playback, OGA Record, Set OGA, Set Office Time, Ring Delay, Message Length, Call Screening, Message Alert, Remote Password. Press...
User Guide
Page 22
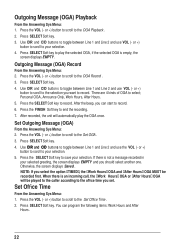
Use DIR and CID buttons to toggle between Line 1 and Line 2 and use the VOL (- After the beep, you set. Set Outgoing Message (OGA) From the Answering Sys Menu: 2. or +) button to scroll to the of ... scroll to record. Use DIR and CID button s to end the recording. 7. Otherwise, the screen displays Saved . Press the FINISH Soft key to toggle between Line 1 and Line 2 and use VOL (- Outgoing Message (OGA) Playback From the Answering Sys Menu: 1. Press the VOL (- Outgoing Message (OGA) Record From the Answering Sys Menu...
Use DIR and CID buttons to toggle between Line 1 and Line 2 and use the VOL (- After the beep, you set. Set Outgoing Message (OGA) From the Answering Sys Menu: 2. or +) button to scroll to the of ... scroll to record. Use DIR and CID button s to end the recording. 7. Otherwise, the screen displays Saved . Press the FINISH Soft key to toggle between Line 1 and Line 2 and use VOL (- Outgoing Message (OGA) Playback From the Answering Sys Menu: 1. Press the VOL (- Outgoing Message (OGA) Record From the Answering Sys Menu...
User Guide
Page 25
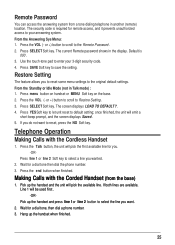
...phone number. 3. Press SELECT Soft key. Press menu button on handset or MENU Soft key on the base.... 2. The screen displays LOAD TO DEFAULT? . 4. Press the end button when finished. The current Remote password shows in Talk mode) : 1. Wait for a dial tone, then dial a phone...line you wanted. 2. If both lines are available, Line 1 will pick the first available line for remote access, and it prevents unauthorized access to select the line...the NO Soft key. Press line 1 or line 2 Soft key to default ...unit will pick the available line. or +) button to scroll ...
...phone number. 3. Press SELECT Soft key. Press menu button on handset or MENU Soft key on the base.... 2. The screen displays LOAD TO DEFAULT? . 4. Press the end button when finished. The current Remote password shows in Talk mode) : 1. Wait for a dial tone, then dial a phone...line you wanted. 2. If both lines are available, Line 1 will pick the first available line for remote access, and it prevents unauthorized access to select the line...the NO Soft key. Press line 1 or line 2 Soft key to default ...unit will pick the available line. or +) button to scroll ...
User Guide
Page 26
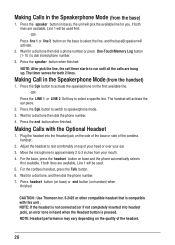
...4. Press the LINE 1 or LINE 2 Soft key to activate the speakerphone on the base to speakerphone mode. 3. For the cordless handset, press the Talk button. 6. If both 2 lines. Wait for you. Press the speaker button when finished. Press line 1 or line 2 button on the first available line. -OR-...is pressed. Adjust the headset to run until all the calls are available, Line 1 will pick the available line for a dial tone, and then dial the phone number. 7. The timer serves for both lines are hung up. Making Calls with this unit . . Plug the headset...
...4. Press the LINE 1 or LINE 2 Soft key to activate the speakerphone on the base to speakerphone mode. 3. For the cordless handset, press the Talk button. 6. If both 2 lines. Wait for you. Press the speaker button when finished. Press line 1 or line 2 button on the first available line. -OR-...is pressed. Adjust the headset to run until all the calls are available, Line 1 will pick the available line for a dial tone, and then dial the phone number. 7. The timer serves for both lines are hung up. Making Calls with this unit . . Plug the headset...
User Guide
Page 27
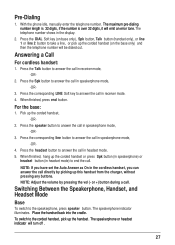
... the call in receiver mode. 4. Switching Between the Speakerphone, Handset, and Headset Mode Base To switch to answer the call . The speakerphone indicator illuminates. Press the corresponding LINE Soft key to answer the call in headset mode. 5. Press the speaker button to ...emit an error tone. Pick up the handset. Press the corresponding line button to answer the call in speakerphone mode, -OR- 3. Pre-Dialing 1. With the phone idle, manually enter the telephone number. Answering a Call For cordless handset: 1. Press the Spk button to the speakerphone, press speaker...
... the call in receiver mode. 4. Switching Between the Speakerphone, Handset, and Headset Mode Base To switch to answer the call . The speakerphone indicator illuminates. Press the corresponding LINE Soft key to answer the call in headset mode. 5. Press the speaker button to ...emit an error tone. Pick up the handset. Press the corresponding line button to answer the call in speakerphone mode, -OR- 3. Pre-Dialing 1. With the phone idle, manually enter the telephone number. Answering a Call For cordless handset: 1. Press the Spk button to the speakerphone, press speaker...
User Guide
Page 28
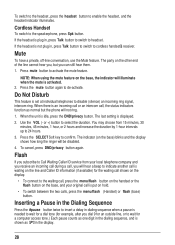
...Each pause counts as one digit in the dialing sequence, and is shown as normal but the phone will illuminate when the mute is activated. 2. Do Not Disturb This feature is plug in, press... pause is not plug in the display. 28 Cordless Handset To switch to confirm. If the headset is set at individual telephones to cordless handset's receiver. To cancel, press DND/privacy ...between the two calls, press the menu/flash (Handset) or flash (base) button. Mute To have a private, off-line conversation, use the Mute feature. NOTE: When using the mute feature on the display...
...Each pause counts as one digit in the dialing sequence, and is shown as normal but the phone will illuminate when the mute is activated. 2. Do Not Disturb This feature is plug in, press... pause is not plug in the display. 28 Cordless Handset To switch to confirm. If the headset is set at individual telephones to cordless handset's receiver. To cancel, press DND/privacy ...between the two calls, press the menu/flash (Handset) or flash (base) button. Mute To have a private, off-line conversation, use the Mute feature. NOTE: When using the mute feature on the display...
User Guide
Page 29
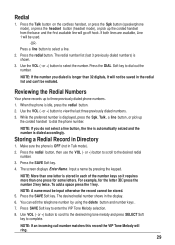
... Talk button on the cordless handset, or press the Spk button (speakerphone mode), or press the headset button (headset mode), or pick up to enter the VIP Tone Melody selection. 8. Reviewing the Redial Numbers Your phone records up the corded handset from the base and the first available line will ring. 29 or...
... Talk button on the cordless handset, or press the Spk button (speakerphone mode), or press the headset button (headset mode), or pick up to enter the VIP Tone Melody selection. 8. Reviewing the Redial Numbers Your phone records up the corded handset from the base and the first available line will ring. 29 or...

User Guide
Page 31
...button on a call, press the intercom button, wait for the original call, the call cannot be prompted to select Line 1, Line 2 or Both to intercom. 2. While on the base to answer the intercom call page. 3. The user can support 3-way and 4-way conference calls. The originating caller ... then select the desired handset or base to conference with two lines: 1. Dial the number, and then talk to intercom. 2. Since Line 1 and 2 are both Line 1 and 2 on the base to answer the intercom call page. 3. Line X ON HOLD shows in progress: 1. Once the base unit or handset has both on ...
...button on a call, press the intercom button, wait for the original call, the call cannot be prompted to select Line 1, Line 2 or Both to intercom. 2. While on the base to answer the intercom call page. 3. The user can support 3-way and 4-way conference calls. The originating caller ... then select the desired handset or base to conference with two lines: 1. Dial the number, and then talk to intercom. 2. Since Line 1 and 2 are both Line 1 and 2 on the base to answer the intercom call page. 3. Line X ON HOLD shows in progress: 1. Once the base unit or handset has both on ...
User Guide
Page 33
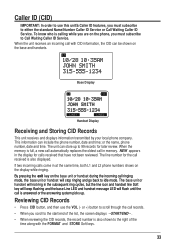
... call received is also shown to the right of the time along with CID information, the CID can include the phone number, date and time; By pressing the exit key on the base and handsets. Reviewing CID Records • Press CID button, and then use this unit's Caller ID features, you ... ID Service or Call Waiting Caller ID Service. If two incoming calls come in the subsequent ring cycles, but the line icon and handset line Soft key will keep flashing and the base Line LED and handset message LED will stop ringing and go back to idle mode. Caller ID (CID) IMPORTANT: In...
... call received is also shown to the right of the time along with CID information, the CID can include the phone number, date and time; By pressing the exit key on the base and handsets. Reviewing CID Records • Press CID button, and then use this unit's Caller ID features, you ... ID Service or Call Waiting Caller ID Service. If two incoming calls come in the subsequent ring cycles, but the line icon and handset line Soft key will keep flashing and the base Line LED and handset message LED will stop ringing and go back to idle mode. Caller ID (CID) IMPORTANT: In...
User Guide
Page 34
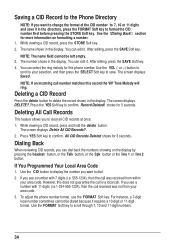
...the ring melody for more information on the display by pressing the headset button, or the Talk button, or the Spk button or the line 1 or line 2 button. The screen displays Saved . Deleting All Call Records This feature allows you to confirm. All CID Records Deleted ...shows for 3 seconds. Dialing Back When reviewing CID records, you can edit it requires a 10-digit or 11-digit format. However, this phone number. If you...
...the ring melody for more information on the display by pressing the headset button, or the Talk button, or the Spk button or the line 1 or line 2 button. The screen displays Saved . Deleting All Call Records This feature allows you to confirm. All CID Records Deleted ...shows for 3 seconds. Dialing Back When reviewing CID records, you can edit it requires a 10-digit or 11-digit format. However, this phone number. If you...


