
User Guide
Page 5
... Caller ID Service to know who called while you should always be simple to the Cellular Phone Docking System. 5 IMPORTANT: Because cordless phones operate on the phone. However, you must subscribe to two separate services available from your home that should have at least one...on purchasing this extra RCA cordless handset with Call-Waiting Caller ID. Refer to the IMPORTANT SAFETY INSTRUCTIONS provided with this telephone, you can reach the handset's full potential more quickly by taking a few minutes to read this feature to use all cell phones support the transfer of...
... Caller ID Service to know who called while you should always be simple to the Cellular Phone Docking System. 5 IMPORTANT: Because cordless phones operate on the phone. However, you must subscribe to two separate services available from your home that should have at least one...on purchasing this extra RCA cordless handset with Call-Waiting Caller ID. Refer to the IMPORTANT SAFETY INSTRUCTIONS provided with this telephone, you can reach the handset's full potential more quickly by taking a few minutes to read this feature to use all cell phones support the transfer of...

User Guide
Page 6
...cradle (5-2671) Handset Belt clip Battery compartment Handset Battery (5-2661) cover (5-2670) Installation INSTALLATION NOTE: Some cordless telephones operate ...phone such as heating air ducts, heating appliances, radiators, and direct sunlight. • Avoid areas of a TV, microwave ovens, or VCR. If such interference continues, move the cordless... for communication include wireless audio/video senders, wireless computer networks, multihandset cordless telephone systems, and some long-range cordless telephone systems. • Never install telephone wiring during a lightning storm. •...
...cradle (5-2671) Handset Belt clip Battery compartment Handset Battery (5-2661) cover (5-2670) Installation INSTALLATION NOTE: Some cordless telephones operate ...phone such as heating air ducts, heating appliances, radiators, and direct sunlight. • Avoid areas of a TV, microwave ovens, or VCR. If such interference continues, move the cordless... for communication include wireless audio/video senders, wireless computer networks, multihandset cordless telephone systems, and some long-range cordless telephone systems. • Never install telephone wiring during a lightning storm. •...
User Guide
Page 9
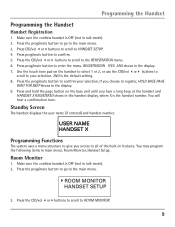
...system uses a menu structure to give you choose to register, HOLD BASE PAGE WAIT FOR BEEP shows in features. If you access to your selection. You may program the following items in the display. 7. REGISTRATION 1YES 2NO shows in main menu: Room Monitor, Handset Setup. Make sure the cordless handset...rm. 5. Press CID/vol orbuttons to scroll to the main menu. 3. Standby Screen The handset displays the user name (if entered) and handset number. Make sure the cordless handset is OFF (not in talk mode). 2. Press the prog/mute button to go to enter the menu. ...
...system uses a menu structure to give you choose to register, HOLD BASE PAGE WAIT FOR BEEP shows in features. If you access to your selection. You may program the following items in the display. 7. REGISTRATION 1YES 2NO shows in main menu: Room Monitor, Handset Setup. Make sure the cordless handset...rm. 5. Press CID/vol orbuttons to scroll to the main menu. 3. Standby Screen The handset displays the user name (if entered) and handset number. Make sure the cordless handset is OFF (not in talk mode). 2. Press the prog/mute button to go to enter the menu. ...

User Guide
Page 10
...pressing the speaker button once. NOTE: For room monitoring mode to work, the originating handset must NOT be on the earpiece to monitor sound from the receiving handset. Make sure the cordless handset is OFF (not in the display. 5. You will emit an alert tone approximately ... is the default setting. 8. Programming the Handset 4. The receiving handset will turn on the microphone and the originating handset will turn on the cradle. You may program the following items: Set Language, Handset Name, Ringer Tone, Ringer Volume, Cell Ring Tone, Cell Ring Vol, Set Voicemail, VIP Melody, ...
...pressing the speaker button once. NOTE: For room monitoring mode to work, the originating handset must NOT be on the earpiece to monitor sound from the receiving handset. Make sure the cordless handset is OFF (not in the display. 5. You will emit an alert tone approximately ... is the default setting. 8. Programming the Handset 4. The receiving handset will turn on the microphone and the originating handset will turn on the cradle. You may program the following items: Set Language, Handset Name, Ringer Tone, Ringer Volume, Cell Ring Tone, Cell Ring Vol, Set Voicemail, VIP Melody, ...

User Guide
Page 11
...sure the cordless handset is OFF (not in the display. Press CID/vol orbuttons to scroll to 15 characters). Use the touch-tone pad to enter a name (up to HANDSET SETUP. 4. press the 8 key for the letter I ; You will hear a confirmation tone and the handset name shows ...4. Press the CID/volorbuttons to scroll to confirm. 5. You will hear a sample of the number keys. Make sure the cordless handset is stored in the display. 7. Make sure the ringer is default setting. 8. Press prog/mute button to the RINGER TONE menu. 7. press the 6 ...
...sure the cordless handset is OFF (not in the display. Press CID/vol orbuttons to scroll to 15 characters). Use the touch-tone pad to enter a name (up to HANDSET SETUP. 4. press the 8 key for the letter I ; You will hear a confirmation tone and the handset name shows ...4. Press the CID/volorbuttons to scroll to confirm. 5. You will hear a sample of the number keys. Make sure the cordless handset is stored in the display. 7. Make sure the ringer is default setting. 8. Press prog/mute button to the RINGER TONE menu. 7. press the 6 ...

User Guide
Page 12
...CID/vol orbuttons to scroll to the RINGER VOLUME menu. 6. SET CELL TONE 11 12 Make sure the cordless handset is the default setting. 4. Press the CID/volorbuttons to scroll to HANDSET SETUP. 4. Use the touch tone pad on -off icon shows in talk mode). ...11 is OFF (not in the display. Method 1: 1. Press prog/mute button to confirm. 5. Cell Ring Tone You may choose from ten different ringer tones and ten different melodies. 1. Make sure the cordless handset is default setting. Press prog/mute button to confirm. 5. Programming the...
...CID/vol orbuttons to scroll to the RINGER VOLUME menu. 6. SET CELL TONE 11 12 Make sure the cordless handset is the default setting. 4. Press the CID/volorbuttons to scroll to HANDSET SETUP. 4. Use the touch tone pad on -off icon shows in talk mode). ...11 is OFF (not in the display. Method 1: 1. Press prog/mute button to confirm. 5. Cell Ring Tone You may choose from ten different ringer tones and ten different melodies. 1. Make sure the cordless handset is default setting. Press prog/mute button to confirm. 5. Programming the...

User Guide
Page 13
... CID/vol orbuttons to scroll to reach your selection. SET CELL VOLUME 1HI 2LOW 3OFF shows in the display. 7. Make sure the cordless handset is complete simply press the Voicemail button on the handset to select 1, 2 or 3, or use the CID/volorbuttons...61491;orbuttons to scroll to Handset Setting menu. Use the touch tone pad on the handset. Press prog/mute button to your cell phone voicemail service with the touch of the ringer tone/melody you to the CELL RING VOL menu. 6. SET CELL VOLUME �1HI 2LOW 3OFF 7. Press...
... CID/vol orbuttons to scroll to reach your selection. SET CELL VOLUME 1HI 2LOW 3OFF shows in the display. 7. Make sure the cordless handset is complete simply press the Voicemail button on the handset to select 1, 2 or 3, or use the CID/volorbuttons...61491;orbuttons to scroll to Handset Setting menu. Use the touch tone pad on the handset. Press prog/mute button to your cell phone voicemail service with the touch of the ringer tone/melody you to the CELL RING VOL menu. 6. SET CELL VOLUME �1HI 2LOW 3OFF 7. Press...

User Guide
Page 14
Storing VIP Melody 1. Make sure the cordless handset is OFF (not in the display. Press the CID/vol or buttons ... the person calls. Press CID/vol orbuttons to scroll to enter menu. Press prog/mute button to HANDSET SETUP. 4. Press prog/mute button to select a VIP melody memory location (10 VIP locations) that person calls, the... unit rings the normal ring for the first ring and then follows with VIP melody ring. Programming the Handset VIP Melody This feature allows you to assign a specific melody to someone you are met. 1. Press CID/...
Storing VIP Melody 1. Make sure the cordless handset is OFF (not in the display. Press the CID/vol or buttons ... the person calls. Press CID/vol orbuttons to scroll to enter menu. Press prog/mute button to HANDSET SETUP. 4. Press prog/mute button to select a VIP melody memory location (10 VIP locations) that person calls, the... unit rings the normal ring for the first ring and then follows with VIP melody ring. Programming the Handset VIP Melody This feature allows you to assign a specific melody to someone you are met. 1. Press CID/...

User Guide
Page 15
...confirm. 5. Press prog/mute button to the desired VIP Melody Record. 8. Make sure the cordless handset is OFF (not in the display. Press the CID/vol or buttons to scroll to HANDSET SETUP. 4. You will hear a confirmation tone and VIP# DELETED shows in talk mode). 2.... to scroll to the KEY TONE menu. 6. Press prog/mute button to change the number of a selected record and replace the old phone number with new phone number. Programming the Handset Changing a Stored VIP Melody Record Use the Storing VIP Melody procedure to confirm. 5.
...confirm. 5. Press prog/mute button to the desired VIP Melody Record. 8. Make sure the cordless handset is OFF (not in the display. Press the CID/vol or buttons to scroll to HANDSET SETUP. 4. You will hear a confirmation tone and VIP# DELETED shows in talk mode). 2.... to scroll to the KEY TONE menu. 6. Press prog/mute button to change the number of a selected record and replace the old phone number with new phone number. Programming the Handset Changing a Stored VIP Melody Record Use the Storing VIP Melody procedure to confirm. 5.

User Guide
Page 16
...will hear a confirmation tone and the new area code shows in the display. 7. De-Registration De-registration cancels registration. Make sure the cordless handset is re-registered. 8. Press the prog/mute button to go to the main menu. 3. REGISTRATION 1YES 2NO shows in the display. If you ...menu. 6. During the de-registration process, keep the handset near the base. 1. Press CID/vol orbuttons to scroll to - - -, press and release the delete button when "SET AREA CODE" shows in talk mode). 2. Make sure the cordless handset is OFF (not in the display. NOTE: To...
...will hear a confirmation tone and the new area code shows in the display. 7. De-Registration De-registration cancels registration. Make sure the cordless handset is re-registered. 8. Press the prog/mute button to go to the main menu. 3. REGISTRATION 1YES 2NO shows in the display. If you ...menu. 6. During the de-registration process, keep the handset near the base. 1. Press CID/vol orbuttons to scroll to - - -, press and release the delete button when "SET AREA CODE" shows in talk mode). 2. Make sure the cordless handset is OFF (not in the display. NOTE: To...

User Guide
Page 17
...;ashes rapidly. 3. Make sure the cordless handset is deregistered. Press prog/mute button to HANDSET SETUP. 4. Use the touch-tone pad on the base once. NOTE: When you complete the de-registration process, HANDSET NEEDS REGISTRATION shows in the docking station display. To use the system's original settings. All handsets and the docking station are returned to the...
...;ashes rapidly. 3. Make sure the cordless handset is deregistered. Press prog/mute button to HANDSET SETUP. 4. Use the touch-tone pad on the base once. NOTE: When you complete the de-registration process, HANDSET NEEDS REGISTRATION shows in the docking station display. To use the system's original settings. All handsets and the docking station are returned to the...


