
PLVWR7300 Manual 1
Page 2
ACCESSORIES 5. TROUBLE SHOOTING 3.1 NO POWER 3.2 NO FUNCTION OF REMOTE CONTROL 3.3 NO DISPLAY OR NOT CLEAR 4. INSTALLATION GUIDE 2. SPECIFICATIONS TABLE OF CONTENT 1. FUNCTION KEYS 2.1 FUNCTIONS OF FRONT PANEL 2.2 FUNCTIONS OF REMOTE CONTROL 3.
ACCESSORIES 5. TROUBLE SHOOTING 3.1 NO POWER 3.2 NO FUNCTION OF REMOTE CONTROL 3.3 NO DISPLAY OR NOT CLEAR 4. INSTALLATION GUIDE 2. SPECIFICATIONS TABLE OF CONTENT 1. FUNCTION KEYS 2.1 FUNCTIONS OF FRONT PANEL 2.2 FUNCTIONS OF REMOTE CONTROL 3.
PLVWR7300 Manual 1
Page 3
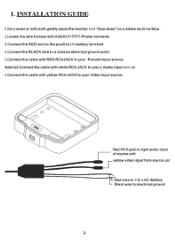
1. INSTALLATION GUIDE I .On a towel or soft cloth,gently place the monitor unit "face down" on a stable work surface. ?.Locate the wire honess with AUDIO/VIDEO /Power connects 3.Connect the RED wire to electrical ground 2 Black wire to the positive (+) battery terminal. t.Connect the BLACK wire to a chassis electrical ground point. 5.Connect the cable with yellow RCAJACK to +12 v DC Battery - vtaterial.Connect the cable with white RCA JACK to your L Audio Input sovrce 3.Connect the cable with RED RCAJACK to your Video Input source. .Nroor n ei Red RCA jack to...
1. INSTALLATION GUIDE I .On a towel or soft cloth,gently place the monitor unit "face down" on a stable work surface. ?.Locate the wire honess with AUDIO/VIDEO /Power connects 3.Connect the RED wire to electrical ground 2 Black wire to the positive (+) battery terminal. t.Connect the BLACK wire to a chassis electrical ground point. 5.Connect the cable with yellow RCAJACK to +12 v DC Battery - vtaterial.Connect the cable with white RCA JACK to your L Audio Input sovrce 3.Connect the cable with RED RCAJACK to your Video Input source. .Nroor n ei Red RCA jack to...

PLVWR7300 Manual 1
Page 4
2. FUNCTION KEYS 2.1 FUNCTIONS OF FRONT PANEL A.door light switch __ n . . 1 1 .1 arphone JACK C.menu E.power on/off Pannel A.Turn on the door light C.Activate the menu E.LCD On/Off B.Positive adjustment D.Negative adjustmen F.Earphone jack 3
2. FUNCTION KEYS 2.1 FUNCTIONS OF FRONT PANEL A.door light switch __ n . . 1 1 .1 arphone JACK C.menu E.power on/off Pannel A.Turn on the door light C.Activate the menu E.LCD On/Off B.Positive adjustment D.Negative adjustmen F.Earphone jack 3
PLVWR7300 Manual 1
Page 5
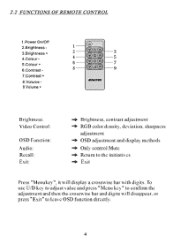
Return to leave OSD function directly. 4 Only control Mute -0. 2.2 FUNCTIONS OF REMOTE CONTROL 1.Power On/Off 2.Brightness 3.Brightness + 4.Colour 5.Colour + 6.Contrast 7.Contrast + 8.Volume 9.Volume + 1 2 35? 3 4 (t) 5 6 7 8 9 Brightness: Video Control: OSD Function: Audio: Recall: Exit: -+ Brightness, contrast adjustment RGB color density, deviation. sharpness adjustment OSD adjustment and display methods -0. To use U/D kcy to adjust value and press " Menu key" to confirm the adjustment and then the crosswise bar and digits will disappear, or press "Exit" to the ...
Return to leave OSD function directly. 4 Only control Mute -0. 2.2 FUNCTIONS OF REMOTE CONTROL 1.Power On/Off 2.Brightness 3.Brightness + 4.Colour 5.Colour + 6.Contrast 7.Contrast + 8.Volume 9.Volume + 1 2 35? 3 4 (t) 5 6 7 8 9 Brightness: Video Control: OSD Function: Audio: Recall: Exit: -+ Brightness, contrast adjustment RGB color density, deviation. sharpness adjustment OSD adjustment and display methods -0. To use U/D kcy to adjust value and press " Menu key" to confirm the adjustment and then the crosswise bar and digits will disappear, or press "Exit" to the ...

PLVWR7300 Manual 1
Page 6
Make sure the power cable has been pluged in proper position. 4. Make sure the plug has 12V-14V, may use another electrical appliance to test it . 3. Check the video signal wires if they are in between. 3. Make sure the batteries are connected properly. 2. ACCESSORIES • INSTALLATION BRACKET • SCREW PACK • USER MANUAL • REMOTE CONTROL 5 Make sure the remote control is within 7 meters. 3.3 NO DISPLAY OR NOT CLEAR 1. TROUBLE SHOOTING 3.1 NOPOWER 1. Make sure...
Make sure the power cable has been pluged in proper position. 4. Make sure the plug has 12V-14V, may use another electrical appliance to test it . 3. Check the video signal wires if they are in between. 3. Make sure the batteries are connected properly. 2. ACCESSORIES • INSTALLATION BRACKET • SCREW PACK • USER MANUAL • REMOTE CONTROL 5 Make sure the remote control is within 7 meters. 3.3 NO DISPLAY OR NOT CLEAR 1. TROUBLE SHOOTING 3.1 NOPOWER 1. Make sure...


