

User Manual
Page 3
... 15 Reset Factory Settings 15 Rear View Camera 15 Alternate Audio Source 15 Control Panel 16 Unit keys 16 Radio Operation 19 Listening to the radio 19 Storing and Listening to a memory station 19 Automatic Memory Storing & Program Scanning 20 RDS function 20 Media Operation 22 Basic Operation 23 Selecting Play Mode 23 On-Screen Display Function 24 Digital Video Special Function........25 Multi-Subtitle Language function.......25 Multi-audio language Function.......... 25 Title menu function 25 BT Operation 26 AUX Operation 29 AV Operation 30 USB Operation...
... 15 Reset Factory Settings 15 Rear View Camera 15 Alternate Audio Source 15 Control Panel 16 Unit keys 16 Radio Operation 19 Listening to the radio 19 Storing and Listening to a memory station 19 Automatic Memory Storing & Program Scanning 20 RDS function 20 Media Operation 22 Basic Operation 23 Selecting Play Mode 23 On-Screen Display Function 24 Digital Video Special Function........25 Multi-Subtitle Language function.......25 Multi-audio language Function.......... 25 Title menu function 25 BT Operation 26 AUX Operation 29 AV Operation 30 USB Operation...

User Manual
Page 10
If the cable has not been correctly connected, the message "PARKING BRAKE" appears on the monitor. -8- Electric Connection WIRING CONNECTION RADIO ANTENNA JACK AV IN REAR RCA AUDIO OUTPUT RED REAR RCA AUDIO OUTPUT WHITE White Yellow Red Yellow ISO CONNECTOR FRONT RCA AUDIO OUT SOCKET FRONT RCA AUDIO OUT SOCKET VIDEO OUTPUT SOCKET VIDEO OUTPUT SOCKET Note: the ground connection cable (parking brake B-) must be connected in order for pictures to be played back to the monitor.
If the cable has not been correctly connected, the message "PARKING BRAKE" appears on the monitor. -8- Electric Connection WIRING CONNECTION RADIO ANTENNA JACK AV IN REAR RCA AUDIO OUTPUT RED REAR RCA AUDIO OUTPUT WHITE White Yellow Red Yellow ISO CONNECTOR FRONT RCA AUDIO OUT SOCKET FRONT RCA AUDIO OUT SOCKET VIDEO OUTPUT SOCKET VIDEO OUTPUT SOCKET Note: the ground connection cable (parking brake B-) must be connected in order for pictures to be played back to the monitor.

User Manual
Page 11
... disc. 4 SETUP Press this button to open the SETUP menu. In Digital Video Disc Playback mode, pressing this button will SUBTITLE allow you press STOP twice, playback will improve sound quality). In Disc Playback mode, pressing this as an option. DISTANT In Radio mode, press this button to change the subtitle language on discs which have 6 LOCAL/ this button opens the AUDIO setup menu for making changes to the way the soundtrack is weak, sometimes (AUDIO) switching...
... disc. 4 SETUP Press this button to open the SETUP menu. In Digital Video Disc Playback mode, pressing this button will SUBTITLE allow you press STOP twice, playback will improve sound quality). In Disc Playback mode, pressing this as an option. DISTANT In Radio mode, press this button to change the subtitle language on discs which have 6 LOCAL/ this button opens the AUDIO setup menu for making changes to the way the soundtrack is weak, sometimes (AUDIO) switching...

User Manual
Page 12
... SubWoofer Digital Video disc. BAND 14 (OSD) In Radio mode, press this button repeatedly to turn the 15 /MOD unit OFF. Press this button will scan for enhanced listening. When playing a Digital Video, pressing this button to turn off the audio. Remote Control Ref # Button 8 GOTO Function Press it button to its prior volume level. Press again to restore the 17 MUTE sound to begin playback at a moment in making playback selections. When playing...
... SubWoofer Digital Video disc. BAND 14 (OSD) In Radio mode, press this button repeatedly to turn the 15 /MOD unit OFF. Press this button will scan for enhanced listening. When playing a Digital Video, pressing this button to turn off the audio. Remote Control Ref # Button 8 GOTO Function Press it button to its prior volume level. Press again to restore the 17 MUTE sound to begin playback at a moment in making playback selections. When playing...

User Manual
Page 13
... indicated by the arrow (See 1 )And then Remove the battery holder as the direction indicated by the arrow (See 2 ). 2.Replace the battery Set a new battery property with a plastic . Using the Remote Control Face the remote control towards the player front face IR mark (remote control signal receiver). In BT menu, it to reverse rapidly Use to input numerical values during programming, with the GOTO 0-9 button, or to directly select a track to the...
... indicated by the arrow (See 1 )And then Remove the battery holder as the direction indicated by the arrow (See 2 ). 2.Replace the battery Set a new battery property with a plastic . Using the Remote Control Face the remote control towards the player front face IR mark (remote control signal receiver). In BT menu, it to reverse rapidly Use to input numerical values during programming, with the GOTO 0-9 button, or to directly select a track to the...

User Manual
Page 14
... switch the unit off the display and the unit still work, tap anywhere of the display to the previous playback . General setup interface2 ANIMATION In RADIO mode, you turn on the display again. 4. GENERAL CLOCK AUDIO VIDEO Setup interface 1 Disc setup as follow : Touch the " " section on the setting menu, touch the " / " ranges to select the adjustment item, Touch the " " icon to return to turn the unit on , tap to " 10S " for inserting or ejecting disc. 3. Basic Operation...
... switch the unit off the display and the unit still work, tap anywhere of the display to the previous playback . General setup interface2 ANIMATION In RADIO mode, you turn on the display again. 4. GENERAL CLOCK AUDIO VIDEO Setup interface 1 Disc setup as follow : Touch the " " section on the setting menu, touch the " / " ranges to select the adjustment item, Touch the " " icon to return to turn the unit on , tap to " 10S " for inserting or ejecting disc. 3. Basic Operation...

User Manual
Page 15
... appropriate TV aspect (4:3 or 16:9) according to select BT function on or off . WALLPAPER Touch to adjust the time and time format. CLOCK SETUP Touch the CLOCK to select wallpaper . Basic Operation FORMAT This player is capable of the display image which causes a small delay and some flickering of playing discs recorded in either PAL or NTSC formats. Make the selection based on it checks to a PAL TV or...
... appropriate TV aspect (4:3 or 16:9) according to select BT function on or off . WALLPAPER Touch to adjust the time and time format. CLOCK SETUP Touch the CLOCK to select wallpaper . Basic Operation FORMAT This player is capable of the display image which causes a small delay and some flickering of playing discs recorded in either PAL or NTSC formats. Make the selection based on it checks to a PAL TV or...

User Manual
Page 16
... COLOR Touch to 32 Adjust the contrast of the bright and dark portion. SUBWOOFER: touch to select OSD language. BRIGHTNESS: 0 to audio quality adjustment. Adjust sound balance between front and rear speakers . -14- Tap auto icon the backlight change automatically. Basic Operation AUDIO SETUP Touch the audio to turn to 32 Adjust if the picture is selected for "NTSC/PAL " . LOUDNESS: touch to select loudness effect as follow: LANGUAGE USER -> JAZZ -> CLASSIC -> POP -> ROCK Touch to adjust subwoofer volume...
... COLOR Touch to 32 Adjust the contrast of the bright and dark portion. SUBWOOFER: touch to select OSD language. BRIGHTNESS: 0 to audio quality adjustment. Adjust sound balance between front and rear speakers . -14- Tap auto icon the backlight change automatically. Basic Operation AUDIO SETUP Touch the audio to turn to 32 Adjust if the picture is selected for "NTSC/PAL " . LOUDNESS: touch to select loudness effect as follow: LANGUAGE USER -> JAZZ -> CLASSIC -> POP -> ROCK Touch to adjust subwoofer volume...

User Manual
Page 17
... monitor can not display the image.) AUX IN AUX IN Headphones port -15- Rear View Camera When connecting the rear view camera the mirror image of the unit when all memory data will deleted, please re-adjust . Error symbol on the external device itself to connect analogue replay devices. All the function buttons do not operate. ALTERNATE AUDIO SOURCE On the front panel of other replay equipment such as show to be activated with stereo jack plug the AUX IN socket . 2). Use this...
... monitor can not display the image.) AUX IN AUX IN Headphones port -15- Rear View Camera When connecting the rear view camera the mirror image of the unit when all memory data will deleted, please re-adjust . Error symbol on the external device itself to connect analogue replay devices. All the function buttons do not operate. ALTERNATE AUDIO SOURCE On the front panel of other replay equipment such as show to be activated with stereo jack plug the AUX IN socket . 2). Use this...

User Manual
Page 19
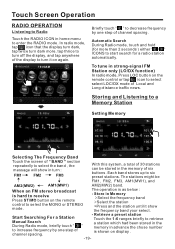
... the mute function. Press it button to turn on the unit. B) In Radio Mode Touch repeatedly to six preset stations. long press it to switch of the loudspeakers for a your desired station beginning from the current frequency; Briefly pressing |>| button can also be cancelled by rotating the VOL multifunction button. The word MUTE flashes in the memory. This function can manually search down or up to preset station. With this button...
... the mute function. Press it button to turn on the unit. B) In Radio Mode Touch repeatedly to six preset stations. long press it to switch of the loudspeakers for a your desired station beginning from the current frequency; Briefly pressing |>| button can also be cancelled by rotating the VOL multifunction button. The word MUTE flashes in the memory. This function can manually search down or up to preset station. With this button...
User Manual
Page 21
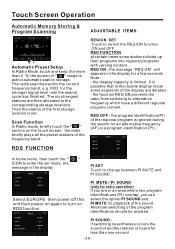
... in strong-signal FM Station only (LO/DX function) In radio mode, Press LOC button on the remote control to turn off the display, and tap anywhere of 30 stations can be FM1, FM2, FM3, AM1(MW1), and AM2(MW2) AM1(MW1) AM2(MW2) band. When an FM stereo broadcast is hard to receive Press ST/MO button on the remote control or tap icon to six preset stations.
... in strong-signal FM Station only (LO/DX function) In radio mode, Press LOC button on the remote control to turn off the display, and tap anywhere of 30 stations can be FM1, FM2, FM3, AM1(MW1), and AM2(MW2) AM1(MW1) AM2(MW2) band. When an FM stereo broadcast is hard to receive Press ST/MO button on the remote control or tap icon to six preset stations.
User Manual
Page 22
... first storage location is limited . PI MUTE / PI SOUND (only for radio operation) If you are deleted . - Alternate switching of the frequency band . Then the station of the sound. Scan Function In Radio mode, briefly touch the " " section on RDS function. RADIO PI SET Touch to switch the REGION function ON and OFF. Touch Screen Operation Automatic Memory Storing & Program Scanning 10:00 AM Automatic Preset Setup In Radio Mode, touch and keep (for the stronger signal level until...
... first storage location is limited . PI MUTE / PI SOUND (only for radio operation) If you are deleted . - Alternate switching of the frequency band . Then the station of the sound. Scan Function In Radio mode, briefly touch the " " section on RDS function. RADIO PI SET Touch to switch the REGION function ON and OFF. Touch Screen Operation Automatic Memory Storing & Program Scanning 10:00 AM Automatic Preset Setup In Radio Mode, touch and keep (for the stronger signal level until...
User Manual
Page 23
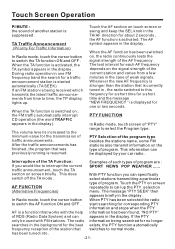
... section on , the radio continuously tests the signal strength of the AF frequency . During radio operation in the background for a traffic announcement station is suppressed . Touch the PTY on screen AF FUNCTION repeatedly to switch the TA function ON and OFF . TA Traffic Announcement (Priority For Traffic Information) In Radio mode, touch the cursor button to call up . Touch Screen Operation PI MUTE : the sound of another station is started automatically...
... section on , the radio continuously tests the signal strength of the AF frequency . During radio operation in the background for a traffic announcement station is suppressed . Touch the PTY on screen AF FUNCTION repeatedly to switch the TA function ON and OFF . TA Traffic Announcement (Priority For Traffic Information) In Radio mode, touch the cursor button to call up . Touch Screen Operation PI MUTE : the sound of another station is started automatically...
User Manual
Page 24
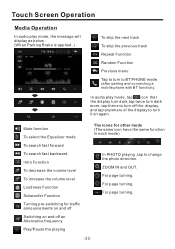
... decrease the volume level To increase the volume level Loudness Function Subwoofer Function In PHOTO playing ,tap to change the photo direction. ZOOM IN and OUT. For page turning. Touch Screen Operation Media Operation In audio play mode, tap icon that the display turn dark,tap twice turn dark more, tap thrice to turn off the display, and tap anywhere of the display to turn to BT PHONE mode. (after pairing and connecting a mobile phone with BT...
... decrease the volume level To increase the volume level Loudness Function Subwoofer Function In PHOTO playing ,tap to change the photo direction. ZOOM IN and OUT. For page turning. Touch Screen Operation Media Operation In audio play mode, tap icon that the display turn dark,tap twice turn dark more, tap thrice to turn off the display, and tap anywhere of the display to turn to BT PHONE mode. (after pairing and connecting a mobile phone with BT...

User Manual
Page 27
... on touch screen (or press the LANG on the remote .The title menu is pressed or touch, number of the audio soundtrack language changes on the remote control while the disc is possible to confirm . Touch Screen Operation the screen will be display at screen left top corner. Title Menu Function Digital Video Special Function 1. It can switch between monaural and stereo sound. Select preferred title by the cursor button and confirmed by touching the numberic buttons , then touch...
... on touch screen (or press the LANG on the remote .The title menu is pressed or touch, number of the audio soundtrack language changes on the remote control while the disc is possible to confirm . Touch Screen Operation the screen will be display at screen left top corner. Title Menu Function Digital Video Special Function 1. It can switch between monaural and stereo sound. Select preferred title by the cursor button and confirmed by touching the numberic buttons , then touch...
User Manual
Page 28
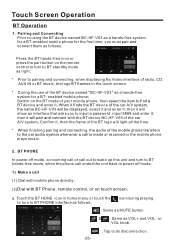
... playing : Same as MUTE button. & : Same as a hands-free system for the first time, you must pair and connect them as follows: Press the BT hands-free icon or press the pair button on the remote control to turn to BT hands-free mode, when the phone call is made or received or the mobile phone plays music. 2. BT PHONE In power off mode. 1) Make a call (1) Dial with mobile phone directly; (2)Dial with the BT device...
... playing : Same as MUTE button. & : Same as a hands-free system for the first time, you must pair and connect them as follows: Press the BT hands-free icon or press the pair button on the remote control to turn to BT hands-free mode, when the phone call is made or received or the mobile phone plays music. 2. BT PHONE In power off mode. 1) Make a call (1) Dial with mobile phone directly; (2)Dial with the BT device...
User Manual
Page 31
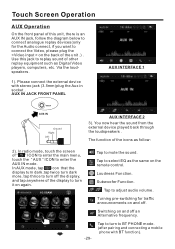
... remote control. You now hear the sound from the external device played back through the loudspeakers . In AUX mode, tap icon that the display turn dark,tap twice turn off an Alternative frequency. -29- Subwoofer Function. Tap to adjust audio volume. Loudness Function. Turning pre-switching for the Audio connect, if you want to connect the Video, please plug the on again. 10:00AM Tap to mute the sound. AUX IN JACK FRONT PANEL AUX INTERFACE 1 AUX IN AUX IN Ground...
... remote control. You now hear the sound from the external device played back through the loudspeakers . In AUX mode, tap icon that the display turn dark,tap twice turn off an Alternative frequency. -29- Subwoofer Function. Tap to adjust audio volume. Loudness Function. Turning pre-switching for the Audio connect, if you want to connect the Video, please plug the on again. 10:00AM Tap to mute the sound. AUX IN JACK FRONT PANEL AUX INTERFACE 1 AUX IN AUX IN Ground...
User Manual
Page 32
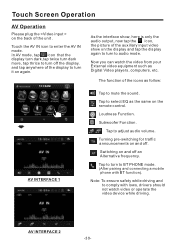
... show, here is only the audio output, now tap the icon, the picture of the auxiliary input video show on the display and tap the display again to turn off an Alternative frequency. AV INTERFACE 2 -30- Touch Screen Operation AV Operation Please plug the on the back of the icons as follow: Tap to mute the sound. Tap to adjust audio volume. Turning pre-switching for traffic announcements on and off...
... show, here is only the audio output, now tap the icon, the picture of the auxiliary input video show on the display and tap the display again to turn off an Alternative frequency. AV INTERFACE 2 -30- Touch Screen Operation AV Operation Please plug the on the back of the icons as follow: Tap to mute the sound. Tap to adjust audio volume. Turning pre-switching for traffic announcements on and off...
User Manual
Page 33
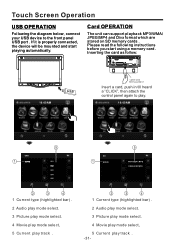
... USB port . Touch Screen Operation USB OPERATION Following the diagram below, connect your USB device to play. 10:00AM USB 1 SONG 5 001 002 003 004 005 SD 1 MOVE 5 MOV03247.MPG CIMG3080.MOV 2 3 4 1 Current type (highlighted bar) . 2 Audio play mode select. 3 Picture play mode select. 4 Movie play mode select, 5 Current play track . 2 3 4 1 Current type (highlighted bar) . 2 Audio play mode select. 3 Picture play mode select. 4 Movie play mode select, 5 Current play track . -31- If it is properly connected, the device will be mounted and start using a memory...
... USB port . Touch Screen Operation USB OPERATION Following the diagram below, connect your USB device to play. 10:00AM USB 1 SONG 5 001 002 003 004 005 SD 1 MOVE 5 MOV03247.MPG CIMG3080.MOV 2 3 4 1 Current type (highlighted bar) . 2 Audio play mode select. 3 Picture play mode select. 4 Movie play mode select, 5 Current play track . 2 3 4 1 Current type (highlighted bar) . 2 Audio play mode select. 3 Picture play mode select. 4 Movie play mode select, 5 Current play track . -31- If it is properly connected, the device will be mounted and start using a memory...
User Manual
Page 36
... the car Cool off or until the ambient is too high temperature return to normal Video/image appears black-white The color system is set incorrectly Please switch to correct color system from menu No video/image appears The unit is not connected to the parking brake detection switch The parking brake is not properly fixed do not work connected The signals are not recorded Change the disc Record JPEG in a compliant format files using a compliant application The built-in reverse...
... the car Cool off or until the ambient is too high temperature return to normal Video/image appears black-white The color system is set incorrectly Please switch to correct color system from menu No video/image appears The unit is not connected to the parking brake detection switch The parking brake is not properly fixed do not work connected The signals are not recorded Change the disc Record JPEG in a compliant format files using a compliant application The built-in reverse...

