User Manual
Page 3
... TFT display calibration 15 Reset Factory Settings 15 Rear View Camera 15 Alternate Audio Source 15 Control Panel 16 Unit keys 16 Radio Operation 19 Listening to the radio 19 Storing and Listening to a memory station 19 Automatic Memory Storing & Program Scanning 20 RDS function 20 Media Operation 22 Basic Operation 23 Selecting Play Mode 23 On-Screen Display Function 24 Digital Video Special Function........25 Multi-Subtitle Language function.......25 Multi-audio language Function.......... 25 Title menu function 25 AUX Operation 26 AV Operation 27 USB Operation...
... TFT display calibration 15 Reset Factory Settings 15 Rear View Camera 15 Alternate Audio Source 15 Control Panel 16 Unit keys 16 Radio Operation 19 Listening to the radio 19 Storing and Listening to a memory station 19 Automatic Memory Storing & Program Scanning 20 RDS function 20 Media Operation 22 Basic Operation 23 Selecting Play Mode 23 On-Screen Display Function 24 Digital Video Special Function........25 Multi-Subtitle Language function.......25 Multi-audio language Function.......... 25 Title menu function 25 AUX Operation 26 AV Operation 27 USB Operation...

User Manual
Page 4
... . -Do not use solvents such as this may result in locations where; - This warning appears only when the parking brake wire is connected to clean the screen . it handy for future reference . Before operating the unit, read the following precautions before installing and operating the unit . it may result in a traffic accident. DO NOT operate any receiver in a traffic accident. - IF THE DRIVER watches the monitor while driving...
... . -Do not use solvents such as this may result in locations where; - This warning appears only when the parking brake wire is connected to clean the screen . it handy for future reference . Before operating the unit, read the following precautions before installing and operating the unit . it may result in a traffic accident. DO NOT operate any receiver in a traffic accident. - IF THE DRIVER watches the monitor while driving...

User Manual
Page 10
Electric Connection WIRING CONNECTION RADIO ANTENNA JACK AV IN REAR RCA AUDIO OUTPUT RED REAR RCA AUDIO OUTPUT WHITE FRONT RCA AUDIO OUT SOCKET FRONT RCA AUDIO OUT SOCKET VIDEO OUTPUT SOCKET VIDEO OUTPUT SOCKET White Yellow Red Yellow ISO CONNECTOR Note: the ground connection cable (parking brake B-) must be connected in order for pictures to be played back to the monitor. If the cable has not been correctly connected, the message "PARKING BRAKE" appears on the monitor. -8-
Electric Connection WIRING CONNECTION RADIO ANTENNA JACK AV IN REAR RCA AUDIO OUTPUT RED REAR RCA AUDIO OUTPUT WHITE FRONT RCA AUDIO OUT SOCKET FRONT RCA AUDIO OUT SOCKET VIDEO OUTPUT SOCKET VIDEO OUTPUT SOCKET White Yellow Red Yellow ISO CONNECTOR Note: the ground connection cable (parking brake B-) must be connected in order for pictures to be played back to the monitor. If the cable has not been correctly connected, the message "PARKING BRAKE" appears on the monitor. -8-

User Manual
Page 11
... unit OFF. Press it briefly to select a desired work source. 6 Menu Press this button to switch SWF FREQ ( ) between 80HZ, 120HZ and 160HZ. 7 In Disc Playback mode, press for fast forward playback. Switch the Repeat mode of a SubWoofer Digital Video disc. Press this button to change the subtitle language on discs which have 8 LOCAL/ this button to its prior volume level. Remote Control 1 2 3 4 5 6 7 8 10 11 12 13 14 15 16 POWER MUTE PLAY...
... unit OFF. Press it briefly to select a desired work source. 6 Menu Press this button to switch SWF FREQ ( ) between 80HZ, 120HZ and 160HZ. 7 In Disc Playback mode, press for fast forward playback. Switch the Repeat mode of a SubWoofer Digital Video disc. Press this button to change the subtitle language on discs which have 8 LOCAL/ this button to its prior volume level. Remote Control 1 2 3 4 5 6 7 8 10 11 12 13 14 15 16 POWER MUTE PLAY...
User Manual
Page 12
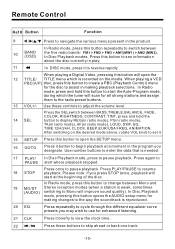
.... Remote Control Ref # Button Function 9 / / / Press to begin playback at the beginning of the disc. When playing a VCD PBC(A/P) disc, press this button to create a PBC (Playback Control) menu for enhanced listening. 21 CLK Press it to reverse rapidly When playing a Digital Video, pressing this button opens the AUDIO setup menu for making changes to the way the soundtrack is needed. 17 PLAY/ In Disc Playback mode, press to resume playback. Use number buttons to enter the data...
.... Remote Control Ref # Button Function 9 / / / Press to begin playback at the beginning of the disc. When playing a VCD PBC(A/P) disc, press this button to create a PBC (Playback Control) menu for enhanced listening. 21 CLK Press it to reverse rapidly When playing a Digital Video, pressing this button opens the AUDIO setup menu for making changes to the way the soundtrack is needed. 17 PLAY/ In Disc Playback mode, press to resume playback. Use number buttons to enter the data...

User Manual
Page 13
... each band Use to input numerical values during programming, with the GOTO 0-9 button, or to directly select a track to play . 25 0/TA In Radio mode, (when the RDS engaged,), 0 serves as TA function, 9/AF 9 serves as the AF function . 26 +10 This button is used with the other number buttons for use please remove this plastic so that the remote control is used to confirm selections and settings within...
... each band Use to input numerical values during programming, with the GOTO 0-9 button, or to directly select a track to play . 25 0/TA In Radio mode, (when the RDS engaged,), 0 serves as TA function, 9/AF 9 serves as the AF function . 26 +10 This button is used with the other number buttons for use please remove this plastic so that the remote control is used to confirm selections and settings within...

User Manual
Page 14
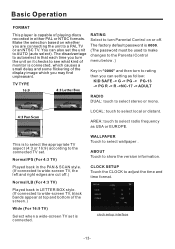
... inserting or ejecting disc. 3. General setup interface2 ANIMATION In RADIO mode, you turn the unit on the display again. 4. Note: Please set the playing time of the animation to turn off . ABOUT ... Disc setup as follow : DISC FORMAT TV TYPE NTSC 4:3PS RATING ADULT Setup interface 1 -12- When the unit is power on the setting menu, touch the " / " ranges to select the adjustment item, Touch the " " icon to return to turn on . GENERAL CLOCK AUDIO VIDEO Setup interface 2 ADJUSTABLE ITEMS...
... inserting or ejecting disc. 3. General setup interface2 ANIMATION In RADIO mode, you turn the unit on the display again. 4. Note: Please set the playing time of the animation to turn off . ABOUT ... Disc setup as follow : DISC FORMAT TV TYPE NTSC 4:3PS RATING ADULT Setup interface 1 -12- When the unit is power on the setting menu, touch the " / " ranges to select the adjustment item, Touch the " " icon to return to turn on . GENERAL CLOCK AUDIO VIDEO Setup interface 2 ADJUSTABLE ITEMS...
User Manual
Page 15
... AUTO (auto select). You can setting as USA or EUROPE. This is that each time you turn the unit on whether you can also set . HOUR MINUTE FORMAT CLOCK 12 36 12HR AM PM clock setup interface -13- The factory default password is capable of the display image which causes a small delay and some flickering of playing discs recorded in either PAL or NTSC formats. AREA: touch to select radio...
... AUTO (auto select). You can setting as USA or EUROPE. This is that each time you turn the unit on whether you can also set . HOUR MINUTE FORMAT CLOCK 12 36 12HR AM PM clock setup interface -13- The factory default password is capable of the display image which causes a small delay and some flickering of playing discs recorded in either PAL or NTSC formats. AREA: touch to select radio...

User Manual
Page 16
... COLOR: 0 to adjust subwoofer volume and frequency. Adjust sound balance between front and rear speakers . -14- Tap auto icon the backlight change automatically. BRIGHTNESS: 0 to +7 Adjust bass level . BASS: -7 to 32 Adjust if the picture is selected for all buttons. LOUDNESS: touch to select loudness effect as follow: LANGUAGE USER -> JAZZ -> CLASSIC -> POP -> ROCK Touch to select the backlight for "NTSC/PAL " . USER audio setup interface1 AUDIO LOUDNESS FADER/BLANCE OFF ... EQ: touch to select audio mode...
... COLOR: 0 to adjust subwoofer volume and frequency. Adjust sound balance between front and rear speakers . -14- Tap auto icon the backlight change automatically. BRIGHTNESS: 0 to +7 Adjust bass level . BASS: -7 to 32 Adjust if the picture is selected for all buttons. LOUDNESS: touch to select loudness effect as follow: LANGUAGE USER -> JAZZ -> CLASSIC -> POP -> ROCK Touch to select the backlight for "NTSC/PAL " . USER audio setup interface1 AUDIO LOUDNESS FADER/BLANCE OFF ... EQ: touch to select audio mode...
User Manual
Page 17
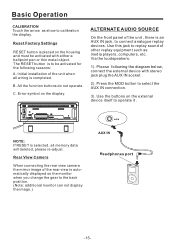
... the function buttons do not operate. Error symbol on the external device itself to select the AUX IN connection. 3). ALTERNATE AUDIO SOURCE On the front panel of the rear view is automatically displayed on the housing and must be activated for the following the diagram below, connect the external device with either a ballpoint pen or thin metal object. Rear View Camera When connecting the rear view camera the mirror image of the unit , there is completed. The RESET button...
... the function buttons do not operate. Error symbol on the external device itself to select the AUX IN connection. 3). ALTERNATE AUDIO SOURCE On the front panel of the rear view is automatically displayed on the housing and must be activated for the following the diagram below, connect the external device with either a ballpoint pen or thin metal object. Rear View Camera When connecting the rear view camera the mirror image of the unit , there is completed. The RESET button...

User Manual
Page 19
Control Panel 3. Briefly pressing |>| button can manually search down or up to preset station. In media mode, pressing |>| button can fast backwards or forwards at the following multiple of the RADIO, DISC, USB, CARD, AUX and AV; The word MUTE flashes in advance the chose number is used to increase or decrease the volume. 4. /MODE BUTTON In power off mode, press it button to turn off the unit. 5/6. >>| and || button can automatically search down...
Control Panel 3. Briefly pressing |>| button can manually search down or up to preset station. In media mode, pressing |>| button can fast backwards or forwards at the following multiple of the RADIO, DISC, USB, CARD, AUX and AV; The word MUTE flashes in advance the chose number is used to increase or decrease the volume. 4. /MODE BUTTON In power off mode, press it button to turn off the unit. 5/6. >>| and || button can automatically search down...
User Manual
Page 21
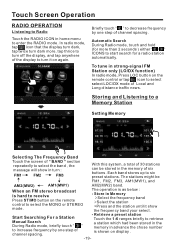
When an FM stereo broadcast is hard to receive Press ST/MO button on display . -19- To tune in strong-signal FM Station only (LO/DX function) In radio mode, Press LOC button on again. 10:00AM Briefly touch " " to decrease frequency by one step of channel spacing. - The stations might be stored in advance the chose number is as below : - Retrieve a preset station Touch the 1-6 ranges briefly...
When an FM stereo broadcast is hard to receive Press ST/MO button on display . -19- To tune in strong-signal FM Station only (LO/DX function) In radio mode, Press LOC button on again. 10:00AM Briefly touch " " to decrease frequency by one step of channel spacing. - The stations might be stored in advance the chose number is as below : - Retrieve a preset station Touch the 1-6 ranges briefly...
User Manual
Page 22
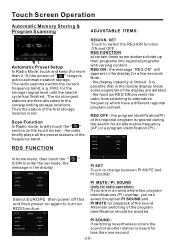
... switch the REGION function ON and OFF. PI MUTE / PI SOUND (only for radio operation) If you can select the option PI SOUND and PI MUTE for playback of the sound. ST/MONO LOCAL REGION RDS REGIONAL STEREO DX EUROPE ON PI SOUND : If switching nevertheless occurs the sound of " " range to the corresponding storage locations . Touch Screen Operation Automatic Memory Storing & Program Scanning 10:00 AM Automatic Preset Setup In Radio Mode, touch...
... switch the REGION function ON and OFF. PI MUTE / PI SOUND (only for radio operation) If you can select the option PI SOUND and PI MUTE for playback of the sound. ST/MONO LOCAL REGION RDS REGIONAL STEREO DX EUROPE ON PI SOUND : If switching nevertheless occurs the sound of " " range to the corresponding storage locations . Touch Screen Operation Automatic Memory Storing & Program Scanning 10:00 AM Automatic Preset Setup In Radio Mode, touch...

User Manual
Page 23
... for a traffic announcement station is switched on the type of program. When the TA function is started automatically (TA SEEK) . This does With PTY function you would like to call up . This information can appears in the display). When the AF function has been switched on screen briefly . Touch Screen Operation PI MUTE : the sound of the AF frequency . In Radio mode, touch the cursor button When PTY has...
... for a traffic announcement station is switched on the type of program. When the TA function is started automatically (TA SEEK) . This does With PTY function you would like to call up . This information can appears in the display). When the AF function has been switched on screen briefly . Touch Screen Operation PI MUTE : the sound of the AF frequency . In Radio mode, touch the cursor button When PTY has...

User Manual
Page 24
... Intro Function To decrease the volume level To increase the volume level Loudness Function In PHOTO playing ,tap to change the photo direction. Mute function The icons for traffic announcements on and off Switching on and off the display, and tap anywhere of the display to turn off an Alternative frequency Play/Pause the playing -22- Touch Screen Operation Media Operation In audio play mode, the message will display as below : (When Parking Brake is...
... Intro Function To decrease the volume level To increase the volume level Loudness Function In PHOTO playing ,tap to change the photo direction. Mute function The icons for traffic announcements on and off Switching on and off the display, and tap anywhere of the display to turn off an Alternative frequency Play/Pause the playing -22- Touch Screen Operation Media Operation In audio play mode, the message will display as below : (When Parking Brake is...

User Manual
Page 27
... button is pressed or touch, number of the touch screen or Press AUDIO on the remote) . Touch the icon on touch screen(or press the SUBT on the remote . Select preferred title by the cursor button and confirmed by touching the numberic buttons , then touch the OK button to start playback. - Title Menu Function Digital Video Special Function 1. ck are recorded, " INVALID KEY " will display the following message : - It can switch between monaural and stereo sound...
... button is pressed or touch, number of the touch screen or Press AUDIO on the remote) . Touch the icon on touch screen(or press the SUBT on the remote . Select preferred title by the cursor button and confirmed by touching the numberic buttons , then touch the OK button to start playback. - Title Menu Function Digital Video Special Function 1. ck are recorded, " INVALID KEY " will display the following message : - It can switch between monaural and stereo sound...

User Manual
Page 28
... the diagram below to connect analogue replay devices(only for traffic announcements on and off an Alternative frequency. -26- In radio mode, touch the screen of " " ICON to enter the main menu, touch the " AUX " ICON to adjust audio volume. AUX IN JACK FRONT PANEL AUX INTERFACE 1 AUX IN AUX IN Ground Right Left AUX INTERFACE 2 3). Turning pre-switching for the Audio connect, if you want to connect the Video, please plug the on the remote control. Loudness Function. Switching...
... the diagram below to connect analogue replay devices(only for traffic announcements on and off an Alternative frequency. -26- In radio mode, touch the screen of " " ICON to enter the main menu, touch the " AUX " ICON to adjust audio volume. AUX IN JACK FRONT PANEL AUX INTERFACE 1 AUX IN AUX IN Ground Right Left AUX INTERFACE 2 3). Turning pre-switching for the Audio connect, if you want to connect the Video, please plug the on the remote control. Loudness Function. Switching...

User Manual
Page 29
...: Tap to mute the sound. Touch Screen Operation AV Operation Please plug the on the back of the auxiliary input video show on the display and tap the display again to turn to audio mode. Touch the AV IN icon to adjust audio volume. Subwoofer Function. Switching on and off the display, and tap anywhere of the display to turn it on and off. In AV mode, tap icon that the display turn dark,tap twice turn dark more...
...: Tap to mute the sound. Touch Screen Operation AV Operation Please plug the on the back of the auxiliary input video show on the display and tap the display again to turn to audio mode. Touch the AV IN icon to adjust audio volume. Subwoofer Function. Switching on and off the display, and tap anywhere of the display to turn it on and off. In AV mode, tap icon that the display turn dark,tap twice turn dark more...
User Manual
Page 30
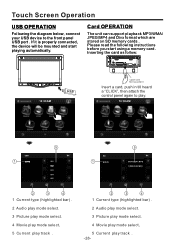
... panel USB port . Card OPERATION The unit can support playback MP3/WMA/ JPEG/MP4 and Divx format which are stored on SD memory cards . Please read the following instructions before you start playing automatically. Touch Screen Operation USB OPERATION Following the diagram below, connect your USB device to play. 10:00AM USB 1 SONG 5 001 002 003 004 005 SD 1 MOVE 5 MOV03247.MPG CIMG3080.MOV 2 3 4 1 Current type (highlighted bar) . 2 Audio play mode select. 3 Picture play mode select. 4 Movie play mode...
... panel USB port . Card OPERATION The unit can support playback MP3/WMA/ JPEG/MP4 and Divx format which are stored on SD memory cards . Please read the following instructions before you start playing automatically. Touch Screen Operation USB OPERATION Following the diagram below, connect your USB device to play. 10:00AM USB 1 SONG 5 001 002 003 004 005 SD 1 MOVE 5 MOV03247.MPG CIMG3080.MOV 2 3 4 1 Current type (highlighted bar) . 2 Audio play mode select. 3 Picture play mode select. 4 Movie play mode...
User Manual
Page 33
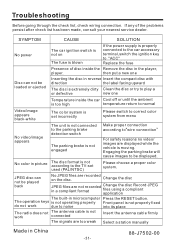
... loaded or ejected Inserting the disc in the player, player. Change the disc JPEG files are too weak Select a station manually Made in microcomputer Press the RESET button. The operation keys is not operating properly Front panel is not properly fixed do not work due to normal Video/image appears black-white The color system is not Insert the antenna cable firmly work connected The signals are not recorded Change the disc Record JPEG in a compliant format files using a compliant application...
... loaded or ejected Inserting the disc in the player, player. Change the disc JPEG files are too weak Select a station manually Made in microcomputer Press the RESET button. The operation keys is not operating properly Front panel is not properly fixed do not work due to normal Video/image appears black-white The color system is not Insert the antenna cable firmly work connected The signals are not recorded Change the disc Record JPEG in a compliant format files using a compliant application...

