Instruction Manual
Page 1
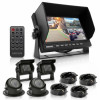
Vehicle DVR Camera & Monitor Video Recording Kit Rear View / Backup Camera Systems with 7" -inch Display Monitor (with Quad View, 4-Cam Video Support)
Vehicle DVR Camera & Monitor Video Recording Kit Rear View / Backup Camera Systems with 7" -inch Display Monitor (with Quad View, 4-Cam Video Support)
Instruction Manual
Page 2
... Rating: IP-69 ● Camera Dimensions (W x H x D): 3.2'' x 3.2'' x 2.2'' inches ● Weight: 0.72 lbs. built-in speaker and with one single image or quad split images; www.PyleUSA.com 2 TECHNICAL SPECS: ● LCD Screen: 7'' -inch 16:9 Image ● Micro SD Card Support: Up to 32 GB *Not Included ● OSD Control: Color, Brightness, Contrast, Volume, Language ● Power Cord Length: 4-Pin Cable 49.2' ft. ● Brightness: 350-400cd/m2 ● Aspect...
... Rating: IP-69 ● Camera Dimensions (W x H x D): 3.2'' x 3.2'' x 2.2'' inches ● Weight: 0.72 lbs. built-in speaker and with one single image or quad split images; www.PyleUSA.com 2 TECHNICAL SPECS: ● LCD Screen: 7'' -inch 16:9 Image ● Micro SD Card Support: Up to 32 GB *Not Included ● OSD Control: Color, Brightness, Contrast, Volume, Language ● Power Cord Length: 4-Pin Cable 49.2' ft. ● Brightness: 350-400cd/m2 ● Aspect...
Instruction Manual
Page 3
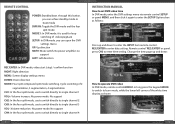
...: The direct channel CH2 mode in split mode/It is menu plus in split mode. The next page in DVR video playback state, used to switch playback/video mode. 9. CH 2: Direct channel CH 2 mode in universal car security and monitor. BUTTON FUNCTION 1. POWER: Compound key long press indicates that the monitor is used to playback/video mode. With no radiation, low comsumption, beautiful and vivid image, small size etc features...
...: The direct channel CH2 mode in split mode/It is menu plus in split mode. The next page in DVR video playback state, used to switch playback/video mode. 9. CH 2: Direct channel CH 2 mode in universal car security and monitor. BUTTON FUNCTION 1. POWER: Compound key long press indicates that the monitor is used to playback/video mode. With no radiation, low comsumption, beautiful and vivid image, small size etc features...
Instruction Manual
Page 4
... this button. you can open the DVR settings menu UP: Up direction MUTE: Mute switch. No power mode. Change the time page up and down : How to operate DVR video In DVR mode, remote control MODE1 or long press the keypad MODE to switch to enter time setting. press CH3 to burn mode, while the lower left corner of the white time display as follows: Press up and down to enter date setting. no support LEFT...
... this button. you can open the DVR settings menu UP: Up direction MUTE: Mute switch. No power mode. Change the time page up and down : How to operate DVR video In DVR mode, remote control MODE1 or long press the keypad MODE to switch to enter time setting. press CH3 to burn mode, while the lower left corner of the white time display as follows: Press up and down to enter date setting. no support LEFT...

Instruction Manual
Page 5
... 8 OK, play, pause icon and time displays, and then remote control REC / ENTER or panel press CH3 to select di erent video le. The image began to burn, the upper left corner of the red dot will ash as shown: CONNECTION How to view DVR burn videos In the DVR mode, remote control MODE1 or press the panel MODE to switch to view the recording mode, the upper...
... 8 OK, play, pause icon and time displays, and then remote control REC / ENTER or panel press CH3 to select di erent video le. The image began to burn, the upper left corner of the red dot will ash as shown: CONNECTION How to view DVR burn videos In the DVR mode, remote control MODE1 or press the panel MODE to switch to view the recording mode, the upper...
Instruction Manual
Page 6
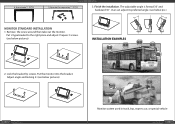
Remove the screw around then take out the monitor. Put the monitor into the bracket. The adjustable angle is forwad 30° and backward 30°. Prepare 3 screws. (see below pic.) MONITOR STANDARD INSTALLATION 1. Lock the bracket by screws. User can adjust its preferred angle. (see below pictures) 9 www.PyleUSA.com Monitor system used in truck, bus, express car, or special vehicle www.PyleUSA.com 10 Put U type bracket to the right place and adjust. Finish the installation. Adjust angle and locking it. (see below pictures) INSTALLATION EXAMPLES 2. 3.
Remove the screw around then take out the monitor. Put the monitor into the bracket. The adjustable angle is forwad 30° and backward 30°. Prepare 3 screws. (see below pic.) MONITOR STANDARD INSTALLATION 1. Lock the bracket by screws. User can adjust its preferred angle. (see below pictures) 9 www.PyleUSA.com Monitor system used in truck, bus, express car, or special vehicle www.PyleUSA.com 10 Put U type bracket to the right place and adjust. Finish the installation. Adjust angle and locking it. (see below pictures) INSTALLATION EXAMPLES 2. 3.


