Instruction Manual
Page 2
Content (manual Error! Bookmark not defined. Caution: Please install the product in cold weather, there appears dark screen during starting up. product function ...3 Product Application Error! Connection ...6 Remote control function 7 Operating instructions 8 Main interface instructions...8 Menu operation...8 Playback interface ...11 Accessories ...12 Product maintenance Error! Non-professionals don't dismantle the product without permission. Please consult after power on. Notice Error! Notice For your safety, don't watch video or operate monitor when driving....
Content (manual Error! Bookmark not defined. Caution: Please install the product in cold weather, there appears dark screen during starting up. product function ...3 Product Application Error! Connection ...6 Remote control function 7 Operating instructions 8 Main interface instructions...8 Menu operation...8 Playback interface ...11 Accessories ...12 Product maintenance Error! Non-professionals don't dismantle the product without permission. Please consult after power on. Notice Error! Notice For your safety, don't watch video or operate monitor when driving....
Instruction Manual
Page 3
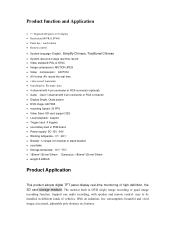
... be installed in DVR single image recording or quad image recording function. Quad picture DVR image: 640*480 recording Speed: 30 FPS Video Save: SD card support 32G Local playback : support Trigger input :4 triggers one audio recording, with 4 pin connector or RCA connector Display Single. Product function and Application 7'' Digital LCD panel ,16:9 display Resolution:800*R.G.B*480 Panel key : touch button Remote control...
... be installed in DVR single image recording or quad image recording function. Quad picture DVR image: 640*480 recording Speed: 30 FPS Video Save: SD card support 32G Local playback : support Trigger input :4 triggers one audio recording, with 4 pin connector or RCA connector Display Single. Product function and Application 7'' Digital LCD panel ,16:9 display Resolution:800*R.G.B*480 Panel key : touch button Remote control...
Instruction Manual
Page 4
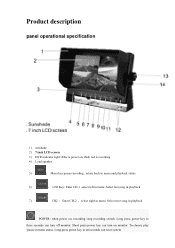
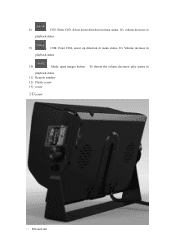
... menu status. Short press power key can turn off monitor. Long press power key to ten seconds can turn on monitor. Product description panel operational specification 1) sunshade 2) 7 inch LCD screen 3) DVR indicator light: Blue is recording 4) Loud speaker 5) : Menu key:pasue recording . Long press power key to three seconds can reset system To choose play /pause in menu. Select next song in playback : POWER: when power on , flash red is power...
... menu status. Short press power key can turn off monitor. Long press power key to ten seconds can turn on monitor. Product description panel operational specification 1) sunshade 2) 7 inch LCD screen 3) DVR indicator light: Blue is recording 4) Loud speaker 5) : Menu key:pasue recording . Long press power key to three seconds can reset system To choose play /pause in menu. Select next song in playback : POWER: when power on , flash red is power...
Instruction Manual
Page 5
It's volume decrease in playback status 9) : CH4: Enter CH4, select up direction in menu status. 8) : CH3: Enter CH3, Select down direction in menu status. It's Volume increase in playback status 10) : Mode: quad images button playback status 11) Remote window 12) Plastic screw 13) screw 14)screw To choose the volume decrease/ play /pause in SD card slot
It's volume decrease in playback status 9) : CH4: Enter CH4, select up direction in menu status. 8) : CH3: Enter CH3, Select down direction in menu status. It's Volume increase in playback status 10) : Mode: quad images button playback status 11) Remote window 12) Plastic screw 13) screw 14)screw To choose the volume decrease/ play /pause in SD card slot
Instruction Manual
Page 6
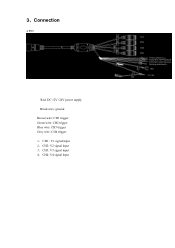
3、Connection 4 PIN Red: DC 12V /24V power supply Black wire: ground Brown wire: CH1 trigger Green wire: CH2 trigger Blue wire: CH3 trigger Grey wire: CH4 trigger 1、 CH1 : V1 signal input 2、 CH2: V2 signal input 3、 CH3: V3 signal input 4、 CH4: V4 signal input
3、Connection 4 PIN Red: DC 12V /24V power supply Black wire: ground Brown wire: CH1 trigger Green wire: CH2 trigger Blue wire: CH3 trigger Grey wire: CH4 trigger 1、 CH1 : V1 signal input 2、 CH2: V2 signal input 3、 CH3: V3 signal input 4、 CH4: V4 signal input
Instruction Manual
Page 7
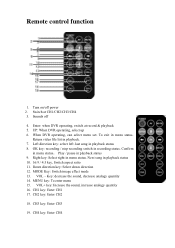
... left .last song in playback status 10. 16:9 / 4:3 key, Switch aspect ratio 11. Confirm in menu status。 Play / pause in menu status. MODE Key: Switch image effect mode 13. VOL+ key: Increase the sound, increase analogy quantity 16. CH3 key: Enter CH3 19. Sounds off power 2. When DVR operating, can select menu set. Down direction key: Select down direction 12. UP: When DVR...
... left .last song in playback status 10. 16:9 / 4:3 key, Switch aspect ratio 11. Confirm in menu status。 Play / pause in menu status. MODE Key: Switch image effect mode 13. VOL+ key: Increase the sound, increase analogy quantity 16. CH3 key: Enter CH3 19. Sounds off power 2. When DVR operating, can select menu set. Down direction key: Select down direction 12. UP: When DVR...
Instruction Manual
Page 8
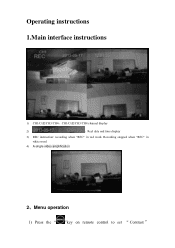
Recording stopped when "REC" in red word. Operating instructions 1.Main interface instructions 1) CH1/CH2/CH3/CH4:CH1/CH2/CH3/CH4 channel display 2) :Real data and time display 3) REC instruction: recording when "REC" in white word 4) A single video amplification 2、Menu operation 1) Press the " "key on remote control to set " Contrast "
Recording stopped when "REC" in red word. Operating instructions 1.Main interface instructions 1) CH1/CH2/CH3/CH4:CH1/CH2/CH3/CH4 channel display 2) :Real data and time display 3) REC instruction: recording when "REC" in white word 4) A single video amplification 2、Menu operation 1) Press the " "key on remote control to set " Contrast "
Instruction Manual
Page 9
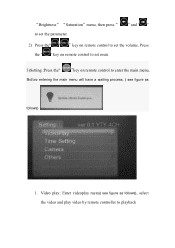
Press the " " key on remote control to set mute 3)Setting :Press the" "key on remote control to set the parameter " and " " 2) Press th"e " "key on remote control to enter the main menu, Before entering the main menu will have a waiting process, ( see figure as follows) 1. "Brightness" "Saturation"menu, then press" to set the volume. Video play: Enter videoplay menu( see figure as follows), select the video and play video by remote controller to playback
Press the " " key on remote control to set mute 3)Setting :Press the" "key on remote control to set the parameter " and " " 2) Press th"e " "key on remote control to enter the main menu, Before entering the main menu will have a waiting process, ( see figure as follows) 1. "Brightness" "Saturation"menu, then press" to set the volume. Video play: Enter videoplay menu( see figure as follows), select the video and play video by remote controller to playback
Instruction Manual
Page 10
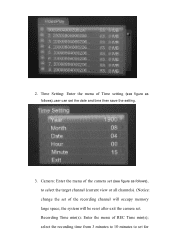
the system will occupy memory large space; select the recording time from 3 minutes to 10 minutes to select the target channel (current view or all channels). (Notice: change the set the date and time then save the setting. 3. Time Setting: Enter the menu of Time setting (see figure as follows).user can set of REC Time min(s); Recording Time min(s): Enter the menu of the recording channel will be reset after exit the camera set for Camera: Enter the menu of the camera set (see figure as follows), to set . 2.
the system will occupy memory large space; select the recording time from 3 minutes to 10 minutes to select the target channel (current view or all channels). (Notice: change the set the date and time then save the setting. 3. Time Setting: Enter the menu of Time setting (see figure as follows).user can set of REC Time min(s); Recording Time min(s): Enter the menu of the recording channel will be reset after exit the camera set for Camera: Enter the menu of the camera set (see figure as follows), to set . 2.
Instruction Manual
Page 11
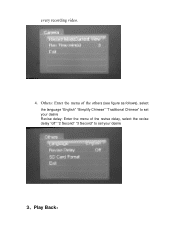
Others: Enter the menu of the others (see figure as follows), select the language "English" "Simplify Chinese" "Traditional Chinese" to set your desire Revise delay: Enter the menu of the revise delay, select the revise delay "off" "2 Second" "3 Second" to set your desire 3、Play Back: every recording video. 4.
Others: Enter the menu of the others (see figure as follows), select the language "English" "Simplify Chinese" "Traditional Chinese" to set your desire Revise delay: Enter the menu of the revise delay, select the revise delay "off" "2 Second" "3 Second" to set your desire 3、Play Back: every recording video. 4.
Instruction Manual
Page 12
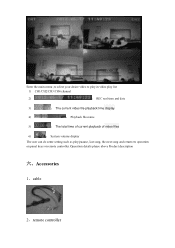
Operation details please above Product description 六、Accessories 1、cable 2、remote controller Enter the main menu ,to select your desire video to play in video play list 1) CH1/CH2/CH3/CH4 channel 2) : REC real time and date 3) : The current video file playback time display 4) : Playback file name 5) : The total time of current playback of video files 6) : System volume display The user can do some setting such as play/puause, last song, the next song and return etc operation on panel keys or remote controller.
Operation details please above Product description 六、Accessories 1、cable 2、remote controller Enter the main menu ,to select your desire video to play in video play list 1) CH1/CH2/CH3/CH4 channel 2) : REC real time and date 3) : The current video file playback time display 4) : Playback file name 5) : The total time of current playback of video files 6) : System volume display The user can do some setting such as play/puause, last song, the next song and return etc operation on panel keys or remote controller.


