PL1101HRBK Manual 1
Page 1
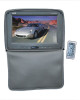
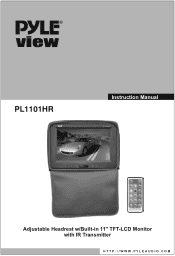
PL1101HR Instruction Manual PL1101HRGR Adjustable Headrest w/Built-in 11" TFT-LCD Monitor with IR Transmitter HTTP://WWW.PYLEAUDIO.COM
PL1101HR Instruction Manual PL1101HRGR Adjustable Headrest w/Built-in 11" TFT-LCD Monitor with IR Transmitter HTTP://WWW.PYLEAUDIO.COM

PL1101HRBK Manual 1
Page 2
...connect the electric power wires, you should not be dissembled Service must be away from moisture and shock. Because the LCD screen is composed of precision components and should make clear about the positive and negative electrode ( the red one is positive and the black is high voltage cluster in this machine, if you wrongly connected the fuse...Read this manual before using this device in normal operation and be installed firmly to prevent falling of device that will be damp-proof. 3. This product is the main component It should connect on the Main line of storage battery as ...
...connect the electric power wires, you should not be dissembled Service must be away from moisture and shock. Because the LCD screen is composed of precision components and should make clear about the positive and negative electrode ( the red one is positive and the black is high voltage cluster in this machine, if you wrongly connected the fuse...Read this manual before using this device in normal operation and be installed firmly to prevent falling of device that will be damp-proof. 3. This product is the main component It should connect on the Main line of storage battery as ...

PL1101HRBK Manual 1
Page 3
...-INSTALLED MONITOR OWNER'S MANUAL Congratulations on or in the ACC position so the monitors turn off when the key is in the off position. Installation Instructions 1. Run the cable down the seat and out to run down when the engine is not running. b. Insert the posts into position. Connect the wires as a DVD player). 5. Black: Connect to the video output from the seat. 2. Connect the video input connector to a good chassis ground...
...-INSTALLED MONITOR OWNER'S MANUAL Congratulations on or in the ACC position so the monitors turn off when the key is in the off position. Installation Instructions 1. Run the cable down the seat and out to run down when the engine is not running. b. Insert the posts into position. Connect the wires as a DVD player). 5. Black: Connect to the video output from the seat. 2. Connect the video input connector to a good chassis ground...
PL1101HRBK Manual 1
Page 4
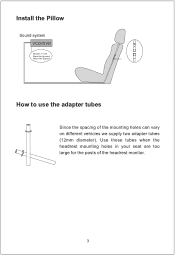
Install the Pillow Sound system VCD/DVD Red line (+12V) Black line (ground) Yellow line (signal) How to use the adapter tubes 3
Install the Pillow Sound system VCD/DVD Red line (+12V) Black line (ground) Yellow line (signal) How to use the adapter tubes 3

PL1101HRBK Manual 1
Page 5
Positive adjustment 3. Power ON/OFF 4 Activation of menu indicator 5. Remote sensor window 4. Monitor Controls and Features PL1101HRGR 12 3 45 6 1. V1/V2 switch 6. Negative adjustment 2.
Positive adjustment 3. Power ON/OFF 4 Activation of menu indicator 5. Remote sensor window 4. Monitor Controls and Features PL1101HRGR 12 3 45 6 1. V1/V2 switch 6. Negative adjustment 2.

PL1101HRBK Manual 1
Page 6
Insert a new battery and push the drawer back fully into the remote. Battery Release button Installation Diagram 5 (Yellow) Video 1 input (Yellow) Video 2 input (Red) Audio right input (White) Audio left input (Black) Grounding (Red) Battery +12V To open this drawer (as shown below) and slide the drawer out. Remote Contorl Changing the battery in the remote control The remote battery is held in a small " drawer" on the edge of this drawer, press and hold the small button on one edge of the remote.
Insert a new battery and push the drawer back fully into the remote. Battery Release button Installation Diagram 5 (Yellow) Video 1 input (Yellow) Video 2 input (Red) Audio right input (White) Audio left input (Black) Grounding (Red) Battery +12V To open this drawer (as shown below) and slide the drawer out. Remote Contorl Changing the battery in the remote control The remote battery is held in a small " drawer" on the edge of this drawer, press and hold the small button on one edge of the remote.

PL1101HRBK Manual 1
Page 7
Operating Temperature: -20°C to fit any seat - High resolution: 1024xRGBx600 - 2 set wired AV inputs - Specification - Adjustable mounting poles to 50°C - Color system: PAL/NTSC - Available in dual channel IR transmitter Channel A: 2.3Mhz (left), 2.8Mhz (right) Channel B: 3.2Mhz (left), 3.8Mhz (right) - Environmental humidity: Contrast ratio: 300:1 - Brightness rating: 350 cd/m2 - Built in BLACK, GRAY, TAN - Poles adjustable from 12.5cm to 70°C - Storage temperature: -10°C to 20cm - 11" wide (16:9) TFT LCD monitor -
Operating Temperature: -20°C to fit any seat - High resolution: 1024xRGBx600 - 2 set wired AV inputs - Specification - Adjustable mounting poles to 50°C - Color system: PAL/NTSC - Available in dual channel IR transmitter Channel A: 2.3Mhz (left), 2.8Mhz (right) Channel B: 3.2Mhz (left), 3.8Mhz (right) - Environmental humidity: Contrast ratio: 300:1 - Brightness rating: 350 cd/m2 - Built in BLACK, GRAY, TAN - Poles adjustable from 12.5cm to 70°C - Storage temperature: -10°C to 20cm - 11" wide (16:9) TFT LCD monitor -

PL1101HRBK Manual 1
Page 8
WARNING: Hazard do not operate this manual carefully and follow the instructions. To enjoy the features of this device and to ensure years of trouble-free operation, please read this unit unless vehicle is parked in safe and legal area. 7 Accessories 7" TFT LCD Pillow Monitor 1 Wireless Remote Control 1 Assembling Stick 2 AV Input Line 1 Power Wire 1 User's Manual 1 Thank you for purchasing the headrest TFT LCD color monitor.
WARNING: Hazard do not operate this manual carefully and follow the instructions. To enjoy the features of this device and to ensure years of trouble-free operation, please read this unit unless vehicle is parked in safe and legal area. 7 Accessories 7" TFT LCD Pillow Monitor 1 Wireless Remote Control 1 Assembling Stick 2 AV Input Line 1 Power Wire 1 User's Manual 1 Thank you for purchasing the headrest TFT LCD color monitor.

